

web.xml SpringBoot가 SpringMVC를 실행하기 위해 실행 가능한 Jar를 패키지하는 방법은 무엇입니까?

webapps 디렉터리에 배포하여 시작
본 글에서 사용한 Spring 버전은 Spring6, SpringBoot 버전은 3, JDK는 17이다. 이전과 조금 다를 수는 있지만 전체적인 과정은 크게 다르지 않습니다.
배포된 애플리케이션이 tomcat webapps 디렉터리에서 시작되는 경우 web.conf를 구성해야 하며 context-param 태그를 사용하여 초기화 매개변수를 설정할 수 있습니다. 이러한 매개변수는 웹 애플리케이션 전체에서 사용 가능하며 ServletContext 객체의 getInitParameter() 메소드를 통해 얻을 수 있습니다.
ContextLoaderListener
ContextLoaderListener는 ServletContextListener 인터페이스를 구현합니다. 이 인터페이스는 웹 애플리케이션이 시작될 때 애플리케이션이 컨텍스트 환경을 초기화하기 위해 남겨둔 인터페이스입니다.
ServletContextListener에는 두 가지 기본 메서드가 있습니다.
<context-param>
    <param-name>contextConfigLocation</param-name>
    <param-value>/WEB-INF/spring/application-context.xml</param-value>
</context-param>
<listener>
    <listener-class>org.springframework.web.context.ContextLoaderListener</listener-class>
</listener>ContextLoaderListener도 ContextLoader 클래스를 상속하며 모든 컨텍스트 작업은 이 클래스에서 수행됩니다.
ContextLoaderListener는 contextInitialized 메소드를 구현한 다음 상위 클래스 ContextLoader의 initWebApplicationContext 메소드를 호출하여 ServletContext를 전달합니다.
// 在所有的servlet和filter初始化之前被调用
default public void contextInitialized(ServletContextEvent sce) {
}
// 在所有的servlet和filter销毁之后被调用
default public void contextDestroyed(ServletContextEvent sce) {
}Spring 컨텍스트를 초기화합니다.
InitWebApplicationContext 메소드 키 코드
@Override
public void contextInitialized(ServletContextEvent event) {
   initWebApplicationContext(event.getServletContext());
}Create ApplicationContext
createWebApplicationContext 메소드에서 먼저determineContextClass 메소드를 호출하여 사용할 ApplicationContext를 결정한 후 인스턴스화한다.
determineContextClass 이 메소드는 주로 사용할 ApplicationContext를 결정하며, 사용자가 정의한 경우에는 web.xml에서 먼저 로드됩니다.
...
if (this.context == null) {
    // 创建ApplicationContext
    this.context = createWebApplicationContext(servletContext);
}
...
// 刷新ApplicationContext
configureAndRefreshWebApplicationContext(cwac, servletContext);
...
// 将当前ApplicationContext添加到ServletContext的属性中,后面有用再说
// String ROOT_WEB_APPLICATION_CONTEXT_ATTRIBUTE = WebApplicationContext.class.getName() + ".ROOT";
servletContext.setAttribute(WebApplicationContext.ROOT_WEB_APPLICATION_CONTEXT_ATTRIBUTE, this.context);
...web.xml의 구성은 다음과 같습니다.
String contextClassName = servletContext.getInitParameter(CONTEXT_CLASS_PARAM);
구성이 없으면 Spring의 기본 XmlWebApplicationContext 클래스가 사용됩니다.
이 클래스는 ContextLoader와 동일한 경로 패키지 아래의 ContextLoader.properties 파일에 정의되어 있습니다.
<context-param>
    <param-name>contextClass</param-name>
    <param-value>com.xxx.XxxContext</param-value>
</context-param>ApplicationContext 구성 및 새로 고침
configureAndRefreshWebApplicationContext 키 코드
org.springframework.web.context.WebApplicationContext=org.springframework.web.context.support.XmlWebApplicationContext
이 시점에서 Tomcat은 Spring 환경을 시작했으며 후속 작업은 Spring 초기화 프로세스이므로 여기에서는 설명하지 않습니다.
Initialize DispatcherServlet
protected void configureAndRefreshWebApplicationContext(ConfigurableWebApplicationContext wac,ServletContext sc) {
    // ...
    // 获取web.xml中配置的contextConfigLocation参数
    String configLocationParam = sc.getInitParameter(CONFIG_LOCATION_PARAM);
    if (configLocationParam != null) {
        wac.setConfigLocation(configLocationParam);
    }
    // ...
    // 刷新上下文
    wac.refresh();
}여기서 contextConfigLocation은 DispatcherServlet의 상위 클래스인 FrameworkServlet에 속하며 주로 SpringMVC 관련 구성을 로드하는 데 사용됩니다. 예제는 다음과 같습니다.
<servlet>
    <servlet-name>dispatcher</servlet-name>
    <servlet-class>org.springframework.web.servlet.DispatcherServlet</servlet-class>
    <init-param>
       <param-name>contextConfigLocation</param-name>
       <param-value>/WEB-INF/spring/dispatcher-servlet.xml</param-value>
    </init-param>
    <load-on-startup>1</load-on-startup>
</servlet>
<servlet-mapping>
    <servlet-name>dispatcher</servlet-name>
    <url-pattern>/</url-pattern>
</servlet-mapping>DispatcherServlet 클래스 다이어그램
을 참조하세요. DispatcherServlet은 Servlet 인터페이스를 구현합니다. Servlet 인터페이스에는 init 메소드가 있으며 초기화 중에 SpringMVC 구성이 로드됩니다. 키 코드는 HttpServletBean.init() 및 FrameworkServlet.initServletBean() 메서드에 있습니다. 메인 부모의 기능 -자식 컨테이너는 프레임워크 경계와 구현 Bean 재사용을 구분하는 것입니다.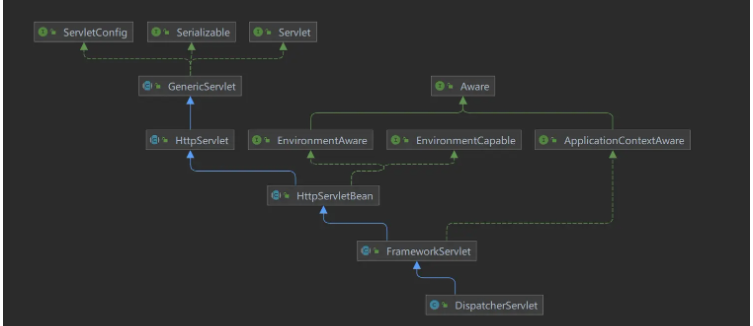 J2EE 3계층 아키텍처에서는 일반적으로 서비스 계층에서 Spring 프레임워크를 사용하는 반면, 웹 계층에는 Spring MVC, Struts 등과 같은 다양한 선택 사항이 있습니다. 웹 계층이 서비스 계층의 Bean을 사용할 수 있도록 하려면 서비스 계층 컨테이너를 웹 계층 컨테이너의 상위 컨테이너로 사용해야 프레임워크 통합이 달성될 수 있습니다.
상위-하위 컨테이너의 역할은 하위 컨테이너(Servlet WebApplicationContext)에서 Bean을 가져오려고 할 때 빈이 없으면 상위 컨테이너(Root WebApplicationContext)에 위임하여 찾는 것입니다. 그것. 각 하위 컨테이너에서 동일한 Bean의 반복 정의가 방지되므로 코드 재사용성과 유지 관리성이 향상됩니다.
요청 받기
요청은 먼저 doService에 들어간 다음 doDispatch를 호출하여 처리합니다.
doDispatch key code
<beans xmlns="http://www.springframework.org/schema/beans"
    xmlns:context="http://www.springframework.org/schema/context"
    xmlns:mvc="http://www.springframework.org/schema/mvc"
    xmlns:xsi="http://www.w3.org/2001/XMLSchema-instance"
    xsi:schemaLocation="
        http://www.springframework.org/schema/beans
        http://www.springframework.org/schema/beans/spring-beans-4.3.xsd
        http://www.springframework.org/schema/context
        http://www.springframework.org/schema/context/spring-context-4.3.xsd
        http://www.springframework.org/schema/mvc
        http://www.springframework.org/schema/mvc/spring-mvc-4.3.xsd">
    <!-- 扫描控制器和其他组件 -->
    <context:component-scan base-package="com.example.controller" />
    <!-- 配置视图解析器 -->
    <bean class="org.springframework.web.servlet.view.InternalResourceViewResolver">
        <property name="prefix" value="/WEB-INF/views/" />
        <property name="suffix" value=".jsp" />
    </bean>
    <!-- 启用Spring MVC注解支持 -->
    <mvc:annotation-driven />
</beans>HandlerMapping은 요청과 핸들러 객체 간의 매핑입니다. 요청을 기반으로 해당 핸들러를 찾을 수 있습니다. 핸들러 객체는 @Controller 주석이 달린 클래스, Controller 인터페이스를 구현하는 클래스, HttpRequestHandler 인터페이스를 구현하는 클래스 등 모든 유형이 될 수 있습니다.
- HandlerExecutionChain은 핸들러 객체와 HandlerInterceptor 세트를 래핑하는 핸들러 실행 체인입니다. HandlerInterceptor는 핸들러 실행 전후에 권한 확인, 로깅 등 몇 가지 추가 작업을 수행할 수 있는 인터셉터입니다.
- HandlerAdapter는 다양한 유형의 핸들러 개체를 처리하고, 해당 메서드를 호출하고, ModelAndView 개체를 반환할 수 있는 어댑터입니다. HandlerAdapter는 핸들러 객체의 유형에 따라 매개변수 바인딩, 반환 값 처리 및 기타 작업을 수행할 수 있습니다.
을 사용하여 인터셉터 클래스를 정의하고, HandlerInterceptor 인터페이스를 구현하거나 HandlerInterceptorAdapter 클래스를 상속하고, preHandle, postHandle 및 afterCompletion 세 가지 메서드를 재정의합니다.
在preHandle方法中,可以获取请求和响应对象,进行预处理,比如检查请求头中的token,或者判断请求的url是否有权限访问等。如果返回true,则继续执行后续的拦截器或者处理器;如果返回false,则中断请求,不再执行后续的拦截器或者处理器。
在postHandle方法中,可以获取请求和响应对象,以及处理器返回的ModelAndView对象,进行后处理,比如修改模型数据或者视图信息等。只有在preHandle方法返回true并且处理器成功执行后,该方法才会被调用。
在afterCompletion方法中,可以获取请求和响应对象,以及处理器抛出的异常对象(如果有的话),进行清理资源或者异常处理等。只有当preHandle方法返回true时,无论处理器是否成功执行,该方法才会被调用。
在SpringMVC配置文件中,需注册拦截器类并指定拦截的URL模式。可以注册多个拦截器,并指定顺序。拦截器会按照顺序执行preHandle方法,然后按照逆序执行postHandle和afterCompletion方法。
HandlerInterceptor和Filter的区别
HandlerInterceptor利用Java反射机制实现,而Filter则通过函数回调方式实现。HandlerInterceptor可以利用Spring的AOP技术,实现更灵活的拦截逻辑,而Filter只能在请求前后进行简单的处理。
HandlerInterceptor不依赖于Servlet容器,而Filter依赖于Servlet容器。HandlerInterceptor是SpringMVC框架提供的,可以在任何情况下使用,而Filter是Servlet规范的一部分,只能在Web应用中使用。
HandlerInterceptor的执行由SpringMVC框架控制,而Filter的执行由Servlet容器控制。HandlerInterceptor可以通过IoC容器来管理,可以注入其他的Bean,而Filter则需要在web.xml中配置,或者使用@WebFilter注解,并且需要@ServletComponentScan扫描。
HandlerInterceptor只能拦截DispatcherServlet处理的请求,而Filter可以拦截任何请求。HandlerInterceptor只能对Controller方法进行拦截,而Filter可以对静态资源、JSP页面等进行拦截。
HandlerInterceptor有三个方法:preHandle,postHandle和afterCompletion,分别在请求处理前后和视图渲染前后执行,而Filter只有一个方法:doFilter,在请求处理前后执行。
处理controller返回结果
对于被controller方法,使用的适配器是RequestMappingHandlerAdapter,在handlerAdapter.handle方法执行时,会去执行对应的controller方法,处理controller方法返回的结果。
invocableMethod.invokeAndHandle(webRequest, mavContainer);
ServletInvocableHandlerMethod.invokeAndHandle
// 执行controller方法
Object returnValue = invokeForRequest(webRequest, mavContainer, providedArgs);
...
// 处理返回数据,会判断是不是有@ResponseBody注解,如果有,会使用RequestResponseBodyMethodProcessor来处理返回值
// 然后会解析请求头等等,判断应该返回什么类型的数据,然后使用对应的HttpMessageConverter写入输出流
this.returnValueHandlers.handleReturnValue(
returnValue, getReturnValueType(returnValue), mavContainer, webRequest);SpringBoot Jar启动
SpringBoot使用嵌入式Servlet容器启动应用,有Tomcat,Jetty,Undertow。
选择Servlet容器
SpringBoot默认使用Tomcat,可以在配置文件中看出。
<dependency>
    <groupId>org.springframework.boot</groupId>
    <artifactId>spring-boot-starter-web</artifactId>
</dependency>web模块自动引入了tomcat
<dependency>
  <groupId>org.springframework.boot</groupId>
  <artifactId>spring-boot-starter-tomcat</artifactId>
</dependency>
如果不使用Tomcat可以排除,引入其他服务器。
<dependency>
  <groupId>org.springframework.boot</groupId>
  <artifactId>spring-boot-starter-web</artifactId>
  <!-- 剔除Tomcat -->
  <exclusions>
    <exclusion>
      <artifactId>spring-boot-starter-tomcat</artifactId>
      <groupId>org.springframework.boot</groupId>
    </exclusion>
  </exclusions>
</dependency>
<!-- 使用jetty -->
<dependency>
  <groupId>org.springframework.boot</groupId>
  <artifactId>spring-boot-starter-jetty</artifactId>
</dependency>如果没有排除Tomcat,直接引入其他服务器,比如下面。
<dependency>
  <groupId>org.springframework.boot</groupId>
  <artifactId>spring-boot-starter-web</artifactId>
  <!-- 没有排除Tomcat -->
</dependency>
<!-- 引入jetty -->
<dependency>
  <groupId>org.springframework.boot</groupId>
  <artifactId>spring-boot-starter-jetty</artifactId>
</dependency>
如果项目中同时引入了Tomcat和其他服务器的依赖,那么SpringBoot会按照以下顺序来选择启动的服务器。
Tomcat > Jetty > Undertow
也就是说,如果有Tomcat,就优先使用Tomcat,如果没有Tomcat,就看有没有Jetty,如果有Jetty,就使用Jetty,以此类推。这个顺序是在SpringBoot的ServletWebServerFactoryConfiguration类中定义的。
// 只展示必要代码
class ServletWebServerFactoryConfiguration {
   // 当Servlet、Tomcat、UpgradeProtocol类在类路径存在时
   // 并且ServletWebServerFactory类存在,则会创建tomcatServletWebServerFactory bean。
   @ConditionalOnClass({ Servlet.class, Tomcat.class, UpgradeProtocol.class })
   @ConditionalOnMissingBean(value = ServletWebServerFactory.class, search = SearchStrategy.CURRENT)
   static class EmbeddedTomcat {
      @Bean
      TomcatServletWebServerFactory tomcatServletWebServerFactory(
         ... 代码省略
      }
   }
   // 当Servlet、Server、WebAppContext类在类路径存在时
   // 并且ServletWebServerFactory类型的Bean不存在时,则会创建JettyServletWebServerFactory bean。
   // ServletWebServerFactory是TomcatServletWebServerFactory、JettyServletWebServerFactory、
   // UndertowServletWebServerFactory的父类
   // 所以如果Tomcat被引入,上面的tomcatServletWebServerFactory就会被创建,这里的条件就不满足,不会被创建。
   @ConditionalOnClass({ Servlet.class, Server.class, Loader.class, WebAppContext.class })
   @ConditionalOnMissingBean(value = ServletWebServerFactory.class, search = SearchStrategy.CURRENT)
   static class EmbeddedJetty {
      @Bean
      JettyServletWebServerFactory JettyServletWebServerFactory(
         ... 代码省略
      }
   }
   // 分析同上
   @ConditionalOnClass({ Servlet.class, Undertow.class, SslClientAuthMode.class })
   @ConditionalOnMissingBean(value = ServletWebServerFactory.class, search = SearchStrategy.CURRENT)
   static class EmbeddedUndertow {
      @Bean
      UndertowServletWebServerFactory undertowServletWebServerFactory(
        ... 代码省略
      }
}下面继续以Tomcat为例
Tomcat配置、启动
Tomcat是在Spring容器启动的时候启动的
SpringApplication.run方法
首先创建一个ConfigurableApplicationContext对象,并调用其refresh()方法,这个对象一般是AnnotationConfigServletWebServerApplicationContext。
context = createApplicationContext();
-> refreshContext(context);
-> refresh(context);
-> applicationContext.refresh();
refresh()方法会调用其父类ServletWebServerApplicationContext的refresh()方法,在父类的refresh()中再次调用父类AbstractApplicationContext的refresh()方法,主要在onRefresh阶段,会进行服务器的配置。
... refresh()代码简略
// 这里会初始化Tomcat配置
onRefresh();
// 这里会启动Tomcat
finishRefresh();
...
回到ServletWebServerApplicationContext类的onRefresh()方法,会调用createWebServer()方法,创建web服务器。
protected void onRefresh() {
   super.onRefresh();
   try {
      // 创建服务器
      createWebServer();
   }
   catch (Throwable ex) {
      throw new ApplicationContextException("Unable to start web server", ex);
   }
}private void createWebServer() {
... 代码简略
// 获取工厂类,这里获取的就是在配置类中生效的那一个,这里为TomcatServletWebServerFactory
ServletWebServerFactory factory = getWebServerFactory();
createWebServer.tag("factory", factory.getClass().toString());
// 获取服务器
this.webServer = factory.getWebServer(getSelfInitializer());
}TomcatServletWebServerFactory.getWebServer
public WebServer getWebServer(ServletContextInitializer... initializers) {
   if (this.disableMBeanRegistry) {
      Registry.disableRegistry();
   }
   Tomcat tomcat = new Tomcat();
   File baseDir = (this.baseDirectory != null) ? this.baseDirectory : createTempDir("tomcat");
   tomcat.setBaseDir(baseDir.getAbsolutePath());
   for (LifecycleListener listener : this.serverLifecycleListeners) {
      tomcat.getServer().addLifecycleListener(listener);
   }
   // 设置Connector,对应与Tomcat Server.xml 中的<Connector></Connector>
   Connector connector = new Connector(this.protocol);
   connector.setThrowOnFailure(true);
   // 对应于Server.xml 中
   // <Service name="Catalina">
   //   <Connector port="8080" protocol="HTTP/1.1"
   //     connectionTimeout="20000"
   //     redirectPort="8443" relaxedQueryChars="[|]"/>
   // </Service>
   tomcat.getService().addConnector(connector);
   customizeConnector(connector);
   tomcat.setConnector(connector);
   tomcat.getHost().setAutoDeploy(false);
   configureEngine(tomcat.getEngine());
   for (Connector additionalConnector : this.additionalTomcatConnectors) {
      tomcat.getService().addConnector(additionalConnector);
   }
   // 准备好Context组件
   prepareContext(tomcat.getHost(), initializers);
   return getTomcatWebServer(tomcat);
}// 创建Tomcat服务器
protected TomcatWebServer getTomcatWebServer(Tomcat tomcat) {
return new TomcatWebServer(tomcat, getPort() >= 0, getShutdown());
}至此,Tomcat配置已经初始化完成,准备启动。
在finishRefresh()方法中,会启动Tomcat
getLifecycleProcessor().onRefresh();
> DefaultLifecycleProcessor.startBeans(true);
> LifecycleGroup::start
> doStart(this.lifecycleBeans, member.name, this.autoStartupOnly);
> bean.start();
> WebServerStartStopLifecycle.start
> TomcatWebServer.start();
private void startBeans(boolean autoStartupOnly) {
   Map<String, Lifecycle> lifecycleBeans = getLifecycleBeans();
   Map<Integer, LifecycleGroup> phases = new TreeMap<>();
   lifecycleBeans.forEach((beanName, bean) -> {
      if (!autoStartupOnly || (bean instanceof SmartLifecycle smartLifecycle && smartLifecycle.isAutoStartup())) {
         int phase = getPhase(bean);
         phases.computeIfAbsent(
               phase,
               p -> new LifecycleGroup(phase, this.timeoutPerShutdownPhase, lifecycleBeans, autoStartupOnly)
         ).add(beanName, bean);
      }
   });
   if (!phases.isEmpty()) {
      phases.values().forEach(LifecycleGroup::start);
   }
}public void start() {
this.webServer.start();
this.running = true;
this.applicationContext
.publishEvent(new ServletWebServerInitializedEvent(this.webServer, this.applicationContext));
}DispatchServlet配置
ServletContextInitializer
在prepareContext方法中,有一个方法configureContext
configureContext(context, initializersToUse);
configureContext方法,在这里面创建了一个TomcatStarter对象,这个类实现了ServletContainerInitializer接口,所以在容器启动过程中会被调用。
TomcatStarter starter = new TomcatStarter(initializers);
context.addServletContainerInitializer(starter, NO_CLASSES);
initializers是Spring自己定义的初始化接口ServletContextInitializer,传入TomcatStarter之后,在onStartup方法中循环调用onStartup方法。
public void onStartup(Set<Class<?>> classes, ServletContext servletContext) throws ServletException {
   try {
      for (ServletContextInitializer initializer : this.initializers) {
         initializer.onStartup(servletContext);
      }
   }
   ...
}需要注意的是,这里的initializers有些传过来的时候是一个函数式接口,在上面的factory.getWebServer(getSelfInitializer());这里传进来的,就是一个函数式接口
private org.springframework.boot.web.servlet.ServletContextInitializer getSelfInitializer() {
   return this::selfInitialize;
}实际调用在下面这个方法
private void selfInitialize(ServletContext servletContext) throws ServletException {
   prepareWebApplicationContext(servletContext);
   registerApplicationScope(servletContext);
   WebApplicationContextUtils.registerEnvironmentBeans(getBeanFactory(), servletContext);
   for (ServletContextInitializer beans : getServletContextInitializerBeans()) {
      beans.onStartup(servletContext);
   }
}在此处绕过所有ServletContextInitializer,随后执行它们的onStartup方法。
其中有一个DispatcherServletRegistrationBean,这个类实现了ServletContextInitializer接口,主要是用来添加DispatchServlet。
DispatcherServletAutoConfiguration配置类中有DispatcherServlet,DispatcherServletRegistrationBean两个Bean。
protected static class DispatcherServletRegistrationConfiguration {
   @Bean(name = DEFAULT_DISPATCHER_SERVLET_REGISTRATION_BEAN_NAME)
   @ConditionalOnBean(value = DispatcherServlet.class, name = DEFAULT_DISPATCHER_SERVLET_BEAN_NAME)
   public DispatcherServletRegistrationBean dispatcherServletRegistration(DispatcherServlet dispatcherServlet,
         WebMvcProperties webMvcProperties, ObjectProvider<MultipartConfigElement> multipartConfig) {
      // 创建DispatcherServletRegistrationBean,并把dispatcherServlet传进去
      DispatcherServletRegistrationBean registration = new DispatcherServletRegistrationBean(dispatcherServlet,
            webMvcProperties.getServlet().getPath());
      registration.setName(DEFAULT_DISPATCHER_SERVLET_BEAN_NAME);
      registration.setLoadOnStartup(webMvcProperties.getServlet().getLoadOnStartup());
      multipartConfig.ifAvailable(registration::setMultipartConfig);
      return registration;
   }
}
protected static class DispatcherServletConfiguration {
    @Bean(name = DEFAULT_DISPATCHER_SERVLET_BEAN_NAME)
    public DispatcherServlet dispatcherServlet(WebMvcProperties webMvcProperties) {
        // 创建DispatcherServlet
        DispatcherServlet dispatcherServlet = new DispatcherServlet();
        dispatcherServlet.setDispatchOptionsRequest(webMvcProperties.isDispatchOptionsRequest());
        dispatcherServlet.setDispatchTraceRequest(webMvcProperties.isDispatchTraceRequest());
        dispatcherServlet.setThrowExceptionIfNoHandlerFound(webMvcProperties.isThrowExceptionIfNoHandlerFound());
        dispatcherServlet.setPublishEvents(webMvcProperties.isPublishRequestHandledEvents());
        dispatcherServlet.setEnableLoggingRequestDetails(webMvcProperties.isLogRequestDetails());
        return dispatcherServlet;
    }
}ServletContextInitializer.onStartup方法由子类RegistrationBean实现
public final void onStartup(ServletContext servletContext) throws ServletException {
    String description = getDescription();
    if (!isEnabled()) {
        logger.info(StringUtils.capitalize(description) + " was not registered (disabled)");
        return;
    }
    // register是一个抽象方法,由子类DynamicRegistrationBean实现
    register(description, servletContext);
}
protected abstract void register(String description, ServletContext servletContext);DynamicRegistrationBean.register
protected final void register(String description, ServletContext servletContext) {
   // addRegistration是一个抽象方法,由子类ServletRegistrationBean实现
   D registration = addRegistration(description, servletContext);
   if (registration == null) {
      logger.info(StringUtils.capitalize(description) + " was not registered (possibly already registered?)");
      return;
   }
   // Servlet被添加到Context后,这里对Servlet进行配置,如拦截路径
   configure(registration);
}
protected abstract D addRegistration(String description, ServletContext servletContext);ServletRegistrationBean.addRegistration,作用类似下面
<servlet>
    <servlet-name>dispatcher</servlet-name>
    <servlet-class>org.springframework.web.servlet.DispatcherServlet</servlet-class>
</servlet>protected ServletRegistration.Dynamic addRegistration(String description, ServletContext servletContext) {
String name = getServletName();
// 添加Servlet到Context中,这里的servlet就是DispatchServlet。
return servletContext.addServlet(name, this.servlet);
}ServletRegistrationBean.configure,作用类似下面
<servlet-mapping>
    <servlet-name>dispatcher</servlet-name>
    <url-pattern>/</url-pattern>
</servlet-mapping>protected void configure(ServletRegistration.Dynamic registration) {
super.configure(registration);
String[] urlMapping = StringUtils.toStringArray(this.urlMappings);
if (urlMapping.length == 0 && this.alwaysMapUrl) {
// DEFAULT_MAPPINGS默是“/”
urlMapping = DEFAULT_MAPPINGS;
}
if (!ObjectUtils.isEmpty(urlMapping)) {
// 设置mapping
registration.addMapping(urlMapping);
}
registration.setLoadOnStartup(this.loadOnStartup);
if (this.multipartConfig != null) {
registration.setMultipartConfig(this.multipartConfig);
}
}至此,DispatchServlet已配置好,后续流程和web.xml配置调用流程基本相同。
FrameworkServlet.initWebApplicationContext()
protected WebApplicationContext initWebApplicationContext() {
    // 此处获取根容器,就是Spring初始化的XmlWebApplicationContext,
    // 在上面把它添加到了ServletContext的属性中,标记根容器,这里把它获取出来
    // String ROOT_WEB_APPLICATION_CONTEXT_ATTRIBUTE = WebApplicationContext.class.getName() + ".ROOT";
    // servletContext.getAttribute(WebApplicationContext.ROOT_WEB_APPLICATION_CONTEXT_ATTRIBUTE);
    // ===========上面为使用web.xml时的分析,下面为SpringBoot嵌入式Tomcat分析============
    // 同样是获取根容器,不过一般为AnnotationConfigServletWebServerApplicationContext
   WebApplicationContext rootContext =
         WebApplicationContextUtils.getWebApplicationContext(getServletContext());
   WebApplicationContext wac = null;
   // 此时webApplicationContext还是null,因为DispatchServlet是被tomcat创建的,需要无参构造器
   // 构造器中没有设置webApplicationContext的代码,所以此时webApplicationContext还是null
   // ===========上面为使用web.xml时的分析,下面为SpringBoot嵌入式Tomcat分析============
   // 注意:在SpringBoot使用嵌入式Tomcat时,这个webApplicationContext不为null,因为FrameworkServlet还
   // 实现了ApplicationContextAware接口,所以当SpringBoot的上下文准备好之后,会回调setApplicationContext方法
   // 注入ApplicationContext,后面在细说
   if (this.webApplicationContext != null) {
      // A context instance was injected at construction time -> use it
      wac = this.webApplicationContext;
      if (wac instanceof ConfigurableWebApplicationContext cwac && !cwac.isActive()) {
         // The context has not yet been refreshed -> provide services such as
         // setting the parent context, setting the application context id, etc
         if (cwac.getParent() == null) {
            // The context instance was injected without an explicit parent -> set
            // the root application context (if any; may be null) as the parent
            cwac.setParent(rootContext);
         }
         configureAndRefreshWebApplicationContext(cwac);
      }
   }
   if (wac == null) {
      // No context instance was injected at construction time -> see if one
      // has been registered in the servlet context. If one exists, it is assumed
      // that the parent context (if any) has already been set and that the
      // user has performed any initialization such as setting the context id
      // 此处主要是获取web.xml配置的WebApplicationContext
      // 可以通过设置参数contextAttribute来设置加载SpringMVC的ApplicationContext
      // 比如下面这样。除非项目中有多个WebApplicationContext,需要使用其他WebApplicationContext才会用到
      // 一般都是null
      // <context-param>
      //    <param-name>contextAttribute</param-name>
      //    <param-value>myWebApplicationContext</param-value>
      // </context-param>
      // ===========上面为使用web.xml时的分析,下面为SpringBoot嵌入式Tomcat分析
      // 因为wac此时不为null,这里不会进入
      wac = findWebApplicationContext();
   }
   if (wac == null) {
      // 现在进入到创建SpringMVC的ApplicationContext流程
      // 也就是加载contextConfigLocation定义的xml文件
      // ===========上面为使用web.xml时的分析,下面为SpringBoot嵌入式Tomcat分析
      // 因为wac此时不为null,这里不会进入,所以没有SpringMVC的容器,也就是没有父子容器之分,SpringBoot项目中只有一个容器
      // No context instance is defined for this servlet -> create a local one
      wac = createWebApplicationContext(rootContext);
   }
   if (!this.refreshEventReceived) {
      // Either the context is not a ConfigurableApplicationContext with refresh
      // support or the context injected at construction time had already been
      // refreshed -> trigger initial onRefresh manually here.
      synchronized (this.onRefreshMonitor) {
         // 初始化策略对象
         // 比如:HandlerMapping,HandlerAdapter,ViewResolver等等
         onRefresh(wac);
      }
   }
   if (this.publishContext) {
      // Publish the context as a servlet context attribute.
      String attrName = getServletContextAttributeName();
      getServletContext().setAttribute(attrName, wac);
   }
   return wac;
}위 내용은 web.xml SpringBoot가 SpringMVC를 실행하기 위해 실행 가능한 Jar를 패키지하는 방법은 무엇입니까?의 상세 내용입니다. 자세한 내용은 PHP 중국어 웹사이트의 기타 관련 기사를 참조하세요!

핫 AI 도구

Undresser.AI Undress
사실적인 누드 사진을 만들기 위한 AI 기반 앱

AI Clothes Remover
사진에서 옷을 제거하는 온라인 AI 도구입니다.

Undress AI Tool
무료로 이미지를 벗다

Clothoff.io
AI 옷 제거제

Video Face Swap
완전히 무료인 AI 얼굴 교환 도구를 사용하여 모든 비디오의 얼굴을 쉽게 바꾸세요!

인기 기사
뜨거운 도구

메모장++7.3.1
사용하기 쉬운 무료 코드 편집기

SublimeText3 중국어 버전
중국어 버전, 사용하기 매우 쉽습니다.

스튜디오 13.0.1 보내기
강력한 PHP 통합 개발 환경

드림위버 CS6
시각적 웹 개발 도구

SublimeText3 Mac 버전
신 수준의 코드 편집 소프트웨어(SublimeText3)
뜨거운 주제
 7629
7629
 15
1389
52
89
11
70
19
31
141
15
1389
52
89
11
70
19
31
141

 Linux에서 jar 파일을 실행하는 방법
Feb 20, 2024 am 10:40 AM
Linux에서 jar 파일을 실행하는 방법
Feb 20, 2024 am 10:40 AM
JAR 파일 실행을 위한 전제조건 Linux 시스템에서 JAR 파일을 실행하려면 JVM(Java Virtual Machine), 코어 클래스 라이브러리 등 Java 애플리케이션을 실행하는 데 필요한 기본 구성 요소인 JRE(Java Runtime Environment)가 설치되어 있어야 합니다. Ubuntu, Debian, Fedora, openSUSE 등과 같은 많은 주류 Linux 배포판은 사용자 설치를 용이하게 하기 위해 JRE 패키지의 소프트웨어 라이브러리를 제공합니다. 다음 문서에서는 널리 사용되는 배포판에 JRE를 설치하는 단계를 자세히 설명합니다. JRE를 설정한 후 개인 기본 설정에 따라 명령줄 터미널 또는 그래픽 사용자 인터페이스를 사용하여 JAR 파일을 시작하도록 선택할 수 있습니다. 선택은 Linux 셸에 대한 친숙도와 개인 선호도에 따라 달라질 수 있습니다.
 Springboot가 Jasypt를 통합하여 구성 파일 암호화를 구현하는 방법
Jun 01, 2023 am 08:55 AM
Springboot가 Jasypt를 통합하여 구성 파일 암호화를 구현하는 방법
Jun 01, 2023 am 08:55 AM
Jasypt 소개 Jasypt는 개발자가 최소한의 노력으로 프로젝트에 기본 암호화 기능을 추가할 수 있게 해주며 암호화 작동 방식에 대한 깊은 이해가 필요하지 않은 단방향 및 양방향 암호화에 대한 높은 보안을 제공합니다. 표준 기반 암호화 기술. 비밀번호, 텍스트, 숫자, 바이너리 암호화... Spring 기반 애플리케이션, 개방형 API와의 통합에 적합하며 모든 JCE 공급자와 함께 사용할 수 있습니다... 다음 종속성을 추가합니다: com.github.ulisesbocchiojasypt-spring-boot-starter2. Jasypt의 이점은 코드가 유출되더라도 데이터 소스를 보장할 수 있어 시스템 보안을 보호합니다.
 SpringBoot가 Redisson을 통합하여 지연 대기열을 구현하는 방법
May 30, 2023 pm 02:40 PM
SpringBoot가 Redisson을 통합하여 지연 대기열을 구현하는 방법
May 30, 2023 pm 02:40 PM
사용 시나리오 1. 주문이 성공적으로 이루어졌으나 30분 이내에 결제가 이루어지지 않았습니다. 결제 시간이 초과되어 주문이 자동으로 취소되었습니다. 2. 주문이 서명되었으며 서명 후 7일 동안 평가가 수행되지 않았습니다. 주문 시간이 초과되어 평가되지 않으면 시스템은 기본적으로 긍정적 평가로 설정됩니다. 3. 판매자가 5분 동안 주문을 받지 않으면 주문이 취소됩니다. 문자 메시지 알림이 전송됩니다... 지연이 길고 실시간 성능이 낮은 시나리오의 경우 작업 예약을 사용하여 정기적인 폴링 처리를 수행할 수 있습니다. 예: xxl-job 오늘은 다음을 선택하겠습니다.
 Redis를 사용하여 SpringBoot에서 분산 잠금을 구현하는 방법
Jun 03, 2023 am 08:16 AM
Redis를 사용하여 SpringBoot에서 분산 잠금을 구현하는 방법
Jun 03, 2023 am 08:16 AM
1. Redis는 분산 잠금 원칙과 분산 잠금이 필요한 이유를 구현합니다. 분산 잠금에 대해 이야기하기 전에 분산 잠금이 필요한 이유를 설명해야 합니다. 분산 잠금의 반대는 독립형 잠금입니다. 다중 스레드 프로그램을 작성할 때 공유 변수를 동시에 작동하여 발생하는 데이터 문제를 방지하기 위해 일반적으로 잠금을 사용하여 공유 변수를 상호 제외합니다. 공유 변수의 사용 범위는 동일한 프로세스에 있습니다. 동시에 공유 리소스를 운영해야 하는 여러 프로세스가 있는 경우 어떻게 상호 배타적일 수 있습니까? 오늘날의 비즈니스 애플리케이션은 일반적으로 마이크로서비스 아키텍처입니다. 이는 하나의 애플리케이션이 여러 프로세스를 배포한다는 의미이기도 합니다. 여러 프로세스가 MySQL에서 동일한 레코드 행을 수정해야 하는 경우 잘못된 작업으로 인해 발생하는 더티 데이터를 방지하려면 배포가 필요합니다. 현재 소개할 스타일은 잠겨 있습니다. 포인트를 얻고 싶다
 springboot가 파일을 jar 패키지로 읽은 후 파일에 액세스할 수 없는 문제를 해결하는 방법
Jun 03, 2023 pm 04:38 PM
springboot가 파일을 jar 패키지로 읽은 후 파일에 액세스할 수 없는 문제를 해결하는 방법
Jun 03, 2023 pm 04:38 PM
Springboot가 파일을 읽지만 jar 패키지로 패키징한 후 최신 개발에 액세스할 수 없습니다. springboot가 파일을 jar 패키지로 패키징한 후 파일을 읽을 수 없는 상황이 발생합니다. 그 이유는 패키징 후 파일의 가상 경로 때문입니다. 유효하지 않으며 읽기를 통해서만 액세스할 수 있습니다. 파일은 리소스 publicvoidtest(){Listnames=newArrayList();InputStreamReaderread=null;try{ClassPathResourceresource=newClassPathResource("name.txt");Input 아래에 있습니다.
 여러 테이블을 추가하기 위해 SQL 문을 사용하지 않고 Springboot+Mybatis-plus를 구현하는 방법
Jun 02, 2023 am 11:07 AM
여러 테이블을 추가하기 위해 SQL 문을 사용하지 않고 Springboot+Mybatis-plus를 구현하는 방법
Jun 02, 2023 am 11:07 AM
Springboot+Mybatis-plus가 다중 테이블 추가 작업을 수행하기 위해 SQL 문을 사용하지 않을 때 내가 직면한 문제는 테스트 환경에서 생각을 시뮬레이션하여 분해됩니다. 매개 변수가 있는 BrandDTO 개체를 생성하여 배경으로 매개 변수 전달을 시뮬레이션합니다. Mybatis-plus에서 다중 테이블 작업을 수행하는 것은 매우 어렵다는 것을 Mybatis-plus-join과 같은 도구를 사용하지 않으면 해당 Mapper.xml 파일을 구성하고 냄새나고 긴 ResultMap만 구성하면 됩니다. 해당 SQL 문을 작성합니다. 이 방법은 번거로워 보이지만 매우 유연하며 다음을 수행할 수 있습니다.
 SpringBoot와 SpringMVC의 비교 및 차이점 분석
Dec 29, 2023 am 11:02 AM
SpringBoot와 SpringMVC의 비교 및 차이점 분석
Dec 29, 2023 am 11:02 AM
SpringBoot와 SpringMVC는 모두 Java 개발에서 일반적으로 사용되는 프레임워크이지만 둘 사이에는 몇 가지 분명한 차이점이 있습니다. 이 기사에서는 이 두 프레임워크의 기능과 용도를 살펴보고 차이점을 비교할 것입니다. 먼저 SpringBoot에 대해 알아봅시다. SpringBoot는 Spring 프레임워크를 기반으로 하는 애플리케이션의 생성 및 배포를 단순화하기 위해 Pivotal 팀에서 개발되었습니다. 독립 실행형 실행 파일을 구축하는 빠르고 가벼운 방법을 제공합니다.
 SpringBoot가 Redis를 사용자 정의하여 캐시 직렬화를 구현하는 방법
Jun 03, 2023 am 11:32 AM
SpringBoot가 Redis를 사용자 정의하여 캐시 직렬화를 구현하는 방법
Jun 03, 2023 am 11:32 AM
1. RedisAPI 기본 직렬화 메커니즘인 RedisTemplate1.1을 사용자 정의합니다. API 기반 Redis 캐시 구현은 데이터 캐싱 작업에 RedisTemplate 템플릿을 사용합니다. 여기서 RedisTemplate 클래스를 열고 클래스의 소스 코드 정보를 봅니다. 키 선언, 값의 다양한 직렬화 방법, 초기 값은 비어 있음 @NullableprivateRedisSe
