

axios를 캡슐화하고 vue3 및 ts와 함께 mock.js를 사용하는 방법은 무엇입니까?

머리말
Axios와 Ajax를 구별하는 데 주의해야 합니다.
Ajax는 기술에 대한 일반적인 용어입니다. 기술 콘텐츠에는 HTML 또는 XHTML, CSS, JavaScript, DOM, XML, XSLT 및 가장 중요한 XMLHttpRequest는 브라우저와 서버 간의 비동기 데이터 전송(HTTP 요청)을 사용하여 로컬 새로 고침을 달성하기 위해 로컬 요청을 수행합니다.
Axios는 약속 기반 HTTP 라이브러리이며 타사입니다. library
주요 기술 스택: vue3, ts, axios, mock.js, elementPlus
1. Axios 종속성 설치 및 처리
1. 비동기식 네트워크 요청 사용은 로딩, 메시지 및 기타와 확실히 분리될 수 없습니다. 오늘은 elementPlus와 함께 사용합니다.
// 安装axios
npm install axios --save

// 安装 elementPlus
npm install element-plus --save
2. Global axios 패키지
src 디렉토리 아래에 새로운 request.ts를 생성합니다. TS를 사용하기 때문에 데이터 형식을 미리 정의해야 합니다. :src 디렉터리를 사용하여 api/index.ts요청 데이터 반환 정의 형식을 미리 확인해야 합니다
3. 실제로- Axios 기본 구성 정보 정의
- 요청 인터셉터: 모든 요청이 먼저 도착하는 경우 여기에서 요청 헤더 정보를 맞춤 설정할 수 있습니다(예: 토큰, 다국어 등 )
- 응답 인터셉터: 데이터가 처음 도착하는 장소를 반환합니다. 여기서 예외 정보를 처리할 수 있습니다(예: 코드 401은 로그인으로 리디렉션되고, 코드 500은 오류 메시지를 표시합니다)
import axios, { AxiosInstance, AxiosError, AxiosRequestConfig, AxiosResponse } from "axios"; import { ElMessage, ElLoading, ElMessageBox } from "element-plus"; // response interface { code, msg, success } // 不含 data interface Result { code: number, success: boolean, msg: string } // request interface,包含 data interface ResultData<T = any> extends Result { data?: T } enum RequestEnums { TIMEOUT = 10000, // 请求超时 request timeout FAIL = 500, // 服务器异常 server error LOGINTIMEOUT = 401, // 登录超时 login timeout SUCCESS = 200, // 请求成功 request successfully } // axios 基础配置 const config = { // 默认地址,可以使用 process Node内置的,项目根目录下新建 .env.development baseURL: process.env.VUE_APP_BASE_API as string, timeout: RequestEnums.TIMEOUT as number, // 请求超时时间 withCredentials: true, // 跨越的时候允许携带凭证 } class Request { service: AxiosInstance; constructor(config: AxiosRequestConfig) { // 实例化 serice this.service = axios.create(config); /** * 请求拦截器 * request -> { 请求拦截器 } -> server */ this.service.interceptors.request.use( (config: AxiosRequestConfig) => { const token = localStorage.getItem('token') ?? ''; return { ...config, headers: { 'customToken': "customBearer " + token } } }, (error: AxiosError) => { // 请求报错 Promise.reject(error) } ); /** * 响应拦截器 * response -> { 响应拦截器 } -> client */ this.service.interceptors.response.use( (response: AxiosResponse) => { const { data, config } = response; if (data.code === RequestEnums.LOGINTIMEOUT) { // 表示登录过期,需要重定向至登录页面 ElMessageBox.alert("Session expired", "System info", { confirmButtonText: 'Relogin', type: 'warning' }).then(() => { // 或者调用 logout 方法去处理 localStorage.setItem('token', ''); location.href = '/' }) } if (data.code && data.code !== RequestEnums.SUCCESS) { ElMessage.error(data); return Promise.reject(data); } return data }, (error: AxiosError) => { const { response } = error; if (response) { this.handleCode(response.status); } if (!window.navigator.onLine) { ElMessage.error("网络连接失败,请检查网络"); // 可以重定向至404页面 } } ) } public handleCode = (code: number): void => { switch (code) { case 401: ElMessage.error("登陆失败,请重新登录"); break; case 500: ElMessage.error("请求异常,请联系管理员"); break; default: ElMessage.error('请求失败'); break; } } // 通用方法封装 get<T>(url: string, params?: object): Promise<ResultData<T>> { return this.service.get(url, { params }); } post<T>(url: string, params?: object): Promise<ResultData<T>> { return this.service.post(url, params); } put<T>(url: string, params?: object): Promise<ResultData<T>> { return this.service.put(url, params); } delete<T>(url: string, params?: object): Promise<ResultData<T>> { return this.service.delete(url, { params }); } } export default new Request(config)로그인 후 복사
요청의 매개변수 유형을 정의합니다.
여기서 사용합니다. 실제 개발을 위한 TS의 네임스페이스 많은 API가 동일한 이름과 다른 의미를 가질 수 있으므로 네임스페이스를 사용하여- 응답의 특정 매개변수 유형을 정의합니다
Vue 파일에서 호출import request from "@/utils/request"; namespace User { // login export interface LoginForm { userName: string, password: string } } export namespace System { export interface Info { path: string, routeName: string } export interface ResponseItem { code: number, items: Array<Sidebar>, success: boolean } export interface Sidebar { id: number, hashId: string | number, title: string, routeName: string, children: Array<SidebarItem>, } export interface SidebarItem { id: number, parentId: number, hashId: string | number, title: string, } } export const info = (params: System.Info) => { // response if (!params || !params.path) throw new Error('Params and params in path can not empty!') // 这里因为是全局的一个info,根据路由地址去请求侧边栏,所需不用把地址写死 return request.post<System.Sidebar>(params.path, { routeName: params.routeName }) }로그인 후 복사
<script lang="ts" setup name="Sidebar">
import { ref, reactive, onBeforeMount } from "vue"
import { info } from "@/api"
import { useRoute } from "vue-router"
const route = useRoute();
let loading = ref<boolean>(false);
let sidebar = ref<any>({});
const _fetch = async (): Promise<void> => {
const routeName = route.name as string;
const path = '/' + routeName.replace(routeName[0], routeName[0].toLocaleLowerCase()) + 'Info'
try {
loading.value = true;
const res = await info({ path, routeName });
if (!res || !res.data) return;
sidebar.value = res.data;
} finally {
loading.value = false
}
}
onBeforeMount(() => {
_fetch();
})
</script>을 정의합니다. 2. mock.js의 종속성 설치 및 처리
1. ts에서 사용할 경우 shims-vue.d.ts 파일에 종속성
# 安装
npm install mockjs --save
을 설치해야 합니다. 그렇지 않으면 오류가 발생하는 문제가 발생합니다
/* eslint-disable */
declare module '*.vue' {
import type { DefineComponent } from 'vue'
const component: DefineComponent<{}, {}, any>
export default component
}
declare module 'mockjs';2. new mock
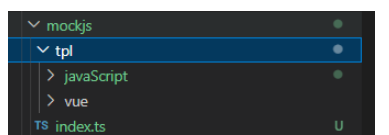 index.ts(mockjs 전역 구성 파일에 속함), mockjs/javaScript/index.ts(특정 데이터 파일), 이 두 가지에 주의해야 하며 다른 것에는 주의할 필요가 없습니다
1. 새로운 mockjs/javaScript/index.ts(특정 데이터 파일)을 생성하세요
여기 데이터는 주로 사이드바 데이터이기 때문에 모두 고정되어 있으므로 데이터 생성에 mockjs 규칙을 사용하지 않습니다
import { GlobalSidebar, Sidebar } from "../../sidebar";
namespace InfoSidebar {
export type InfoSidebarParams = {
body: string,
type: string,
url: string
}
}
const dataSource: Array<GlobalSidebar> = [
{
mainTitle: 'JavaScript基础问题梳理',
mainSidebar: [
{
id: 0,
hashId: 'This',
title: 'this指向',
routeName: 'JsBasic',
children: [
{
id: 1,
parentId: 0,
hashId: 'GlobalFunction',
title: '全局函数'
},
{
id: 2,
parentId: 0,
hashId: 'ObjectMethod',
title: '对象方法'
},
{
id: 3,
parentId: 0,
hashId: 'Constructor',
title: '构造函数'
},
{
id: 4,
parentId: 0,
hashId: 'SetTimeout',
title: '定时器、回调函数'
},
{
id: 5,
parentId: 0,
hashId: 'EventFunction',
title: '事件函数'
},
{
id: 6,
parentId: 0,
hashId: 'ArrowFunction',
title: '箭头函数'
},
{
id: 7,
parentId: 0,
hashId: 'CallApplyBind',
title: 'call、apply、bind'
},
]
},
{
id: 2,
hashId: 'DeepClone',
title: '深拷贝和浅拷贝',
routeName: 'JsBasic',
children: []
}
]
},
];
export default {
name: 'jsBasicInfo',
jsBasicInfo(params: InfoSidebar.InfoSidebarParams) {
const param = JSON.parse(params.body)
if (!param) throw new Error("Params can not empty!");
const data = dataSource.find((t: GlobalSidebar) => {
return t.mainSidebar.filter((x: Sidebar) => {
return x.routeName === param.routeName
})
})
return {
data,
success: true,
code: 200
}
}
}
/**
 * @param { number } id Unique value
 * @param { string } hashId href Unique value
 * @param { string } title show current title
 * @param { string } routeName page find data
 */

interface GlobalSidebar {
    mainTitle: string,
    mainSidebar: Array<Sidebar>
}

interface Sidebar {
    id: number,
    hashId: string | number,
    title: string,
    routeName: string,
    children: Array<SidebarItem>,
}

interface SidebarItem {
    id: number,
    parentId: number,
    hashId: string | number,
    title: string,
}

export {
    GlobalSidebar,
    Sidebar,
    SidebarItem
}2. 새로운 mockjs/index.ts 생성
import Mock from "mockjs";
import jsBasicInfo from "./tpl/javaScript/index";
const requestMethod = 'post';
const BASE_URL = process.env.VUE_APP_BASE_API;
const mocks = [jsBasicInfo];

for (let i of mocks) {
    Mock.mock(BASE_URL + '/' + i.name, requestMethod, i.jsBasicInfo);
}

export default Mock3. Main.ts는
import { createApp } from 'vue'
import App from './App.vue'

if(process.env.NODE_ENV == 'development'){
    require('./mockjs/index')
}

const app = createApp(App);
app.mount('#app');3을 소개합니다. 사실은 방금 axios
<script lang="ts" setup name="Sidebar">
import { ref, reactive, onBeforeMount } from "vue"
import { info } from "@/api"
import { useRoute } from "vue-router"
const route = useRoute();
let loading = ref<boolean>(false);
let sidebar = ref<any>({});
const _fetch = async (): Promise<void> => {
const routeName = route.name as string;
const path = '/' + routeName.replace(routeName[0], routeName[0].toLocaleLowerCase()) + 'Info'
try {
loading.value = true;
const res = await info({ path, routeName });
if (!res || !res.data) return;
sidebar.value = res.data;
} finally {
loading.value = false
}
}
onBeforeMount(() => {
_fetch();
})
</script>위 내용은 axios를 캡슐화하고 vue3 및 ts와 함께 mock.js를 사용하는 방법은 무엇입니까?의 상세 내용입니다. 자세한 내용은 PHP 중국어 웹사이트의 기타 관련 기사를 참조하세요!

핫 AI 도구

Undresser.AI Undress
사실적인 누드 사진을 만들기 위한 AI 기반 앱

AI Clothes Remover
사진에서 옷을 제거하는 온라인 AI 도구입니다.

Undress AI Tool
무료로 이미지를 벗다

Clothoff.io
AI 옷 제거제

AI Hentai Generator
AI Hentai를 무료로 생성하십시오.

인기 기사
뜨거운 도구

메모장++7.3.1
사용하기 쉬운 무료 코드 편집기

SublimeText3 중국어 버전
중국어 버전, 사용하기 매우 쉽습니다.

스튜디오 13.0.1 보내기
강력한 PHP 통합 개발 환경

드림위버 CS6
시각적 웹 개발 도구

SublimeText3 Mac 버전
신 수준의 코드 편집 소프트웨어(SublimeText3)
뜨거운 주제
 7454
7454
 15
1374
52
77
11
40
19
14
9
15
1374
52
77
11
40
19
14
9

 Vue 애플리케이션에서 axios를 사용할 때 'Uncaught (in promise) Error: Request failed with status code 500'이 발생하면 어떻게 해야 합니까?
Jun 24, 2023 pm 05:33 PM
Vue 애플리케이션에서 axios를 사용할 때 'Uncaught (in promise) Error: Request failed with status code 500'이 발생하면 어떻게 해야 합니까?
Jun 24, 2023 pm 05:33 PM
Vue 애플리케이션에서 axios를 사용하는 것은 매우 일반적입니다. axios는 브라우저와 Node.js에서 사용할 수 있는 Promise 기반 HTTP 클라이언트입니다. 개발 과정에서 "Uncaught(inpromise)Error: Requestfailedwithstatuscode500"이라는 오류 메시지가 나타나는 경우가 있는데, 개발자 입장에서는 이 오류 메시지를 이해하고 해결하기 어려울 수 있습니다. 이 기사에서는 이에 대해 알아볼 것입니다.
 Vue 애플리케이션에서 axios를 사용할 때 'TypeError: Failed to fetch'가 발생하면 어떻게 해야 합니까?
Jun 24, 2023 pm 11:03 PM
Vue 애플리케이션에서 axios를 사용할 때 'TypeError: Failed to fetch'가 발생하면 어떻게 해야 합니까?
Jun 24, 2023 pm 11:03 PM
최근 Vue 애플리케이션을 개발하는 동안 "TypeError: Failedtofetch" 오류 메시지라는 일반적인 문제에 직면했습니다. 이 문제는 axios를 사용하여 HTTP 요청을 할 때 백엔드 서버가 요청에 올바르게 응답하지 않을 때 발생합니다. 이 오류 메시지는 일반적으로 네트워크 이유나 서버가 응답하지 않아 요청이 서버에 도달할 수 없음을 나타냅니다. 이 오류 메시지가 나타나면 어떻게 해야 합니까? 해결 방법은 다음과 같습니다. 네트워크 연결을 확인하세요.
 Vue에서 데이터 요청 선택: Axios 또는 Fetch?
Jul 17, 2023 pm 06:30 PM
Vue에서 데이터 요청 선택: Axios 또는 Fetch?
Jul 17, 2023 pm 06:30 PM
Vue에서 데이터 요청 선택: AxiosorFetch? Vue 개발에서 데이터 요청을 처리하는 것은 매우 일반적인 작업입니다. 데이터 요청에 사용할 도구를 선택하는 것은 고려해야 할 질문입니다. Vue에서 가장 일반적인 두 가지 도구는 Axios와 Fetch입니다. 이 기사에서는 두 도구의 장단점을 비교하고 선택하는 데 도움이 되는 몇 가지 샘플 코드를 제공합니다. Axios는 브라우저와 Node.js에서 작동하는 Promise 기반 HTTP 클라이언트입니다.
 Vue 애플리케이션에서 axios를 사용할 때 '오류: 네트워크 오류' 문제를 해결하는 방법은 무엇입니까?
Jun 25, 2023 am 08:27 AM
Vue 애플리케이션에서 axios를 사용할 때 '오류: 네트워크 오류' 문제를 해결하는 방법은 무엇입니까?
Jun 25, 2023 am 08:27 AM
Vue 애플리케이션에서 axios를 사용할 때 "오류: NetworkError" 문제를 해결하는 방법은 무엇입니까? Vue 애플리케이션 개발에서 우리는 API 요청을 하거나 데이터를 얻기 위해 axios를 사용하는 경우가 많습니다. 그러나 때때로 axios 요청에서 "Error: NetworkError"가 발생하는 경우가 있습니다. 우선, "Error:NetworkError"가 무엇을 의미하는지 이해해야 합니다. 이는 일반적으로 네트워크 연결을 의미합니다.
 Vue와 Axios를 효율적으로 활용하여 프런트엔드 데이터 일괄 처리 구현
Jul 17, 2023 pm 10:43 PM
Vue와 Axios를 효율적으로 활용하여 프런트엔드 데이터 일괄 처리 구현
Jul 17, 2023 pm 10:43 PM
Vue와 Axios를 효율적으로 활용하여 프런트엔드 데이터의 일괄 처리를 구현합니다. 프런트엔드 개발에서는 데이터 처리가 일반적인 작업입니다. 많은 양의 데이터를 처리해야 할 때 효과적인 방법이 없으면 데이터 처리가 매우 번거롭고 비효율적이 됩니다. Vue는 뛰어난 프런트엔드 프레임워크이고 Axios는 널리 사용되는 네트워크 요청 라이브러리로 함께 작동하여 프런트엔드 데이터의 일괄 처리를 구현할 수 있습니다. 이 글에서는 데이터 일괄 처리를 위해 Vue와 Axios를 효율적으로 사용하는 방법을 자세히 소개하고 관련 코드 예제를 제공합니다.
 Vue 애플리케이션에서 axios를 사용할 때 '오류: xxxms의 시간 초과 초과'가 발생하면 어떻게 해야 합니까?
Jun 24, 2023 pm 03:27 PM
Vue 애플리케이션에서 axios를 사용할 때 '오류: xxxms의 시간 초과 초과'가 발생하면 어떻게 해야 합니까?
Jun 24, 2023 pm 03:27 PM
Vue 애플리케이션에서 axios를 사용할 때 "Error: timeoutofxxxmsexceeded"가 발생하면 어떻게 해야 합니까? 인터넷의 급속한 발전과 함께 프론트엔드 기술은 지속적으로 업데이트되고 반복되고 있으며, 뛰어난 프론트엔드 프레임워크로서 Vue는 최근 몇 년간 모든 사람들의 환영을 받아왔습니다. Vue 애플리케이션에서는 네트워크 요청을 위해 axios를 사용해야 하는 경우가 많지만 가끔 "Error: timeoutofxxxmsexceeded" 오류가 발생합니다.
 Vue3에서 아바타를 선택하고 자르는 방법
May 29, 2023 am 10:22 AM
Vue3에서 아바타를 선택하고 자르는 방법
May 29, 2023 am 10:22 AM
최종 효과는 VueCropper 컴포넌트 Yarnaddvue-cropper@next를 설치하는 것입니다. 위의 설치 값은 Vue2이거나 다른 방법을 사용하여 참조하려는 경우 공식 npm 주소: 공식 튜토리얼을 방문하세요. 컴포넌트에서 참조하고 사용하는 것도 매우 간단합니다. 여기서는 해당 컴포넌트와 해당 스타일 파일을 소개하기만 하면 됩니다. 여기서는 import{userInfoByRequest}from'../js/api만 소개하면 됩니다. 내 구성 요소 파일에서 import{VueCropper}from'vue-cropper&
 Vue(axios, element-ui)에서 파일 업로드 구현에 대한 전체 가이드
Jun 09, 2023 pm 04:12 PM
Vue(axios, element-ui)에서 파일 업로드 구현에 대한 전체 가이드
Jun 09, 2023 pm 04:12 PM
Vue(axios, element-ui)에서 파일 업로드 구현에 대한 전체 가이드 최신 웹 애플리케이션에서 파일 업로드는 기본 기능이 되었습니다. 아바타, 사진, 문서 또는 비디오를 업로드하든 사용자 컴퓨터에서 서버로 파일을 업로드할 수 있는 안정적인 방법이 필요합니다. 이 기사에서는 Vue, axios 및 element-ui를 사용하여 파일 업로드를 구현하는 방법에 대한 자세한 가이드를 제공합니다. Axiosaxios는 무도회 기반입니다.
