Nginx와 Tomcat이 동적 및 정적 분리와 로드 밸런싱을 달성하는 방법
1. nginx 소개:
nginx는 안정성이 높은 고성능 http 및 역방향 프록시 서버이며 핫 배포 및 손쉬운 모듈 확장을 지원합니다. 액세스가 최고조에 이르거나 누군가가 악의적으로 느린 연결을 시작하면 서버의 물리적 메모리가 고갈되고 자주 교환되어 응답이 손실될 수 있으며, nginx는 단계적 리소스만 다시 시작할 수 있습니다. 정적 파일을 처리하는 할당 기술과 캐시 없는 역방향 프록시 가속은 로드 밸런싱과 내결함성을 달성하며 이러한 높은 동시성 액세스 상황에서 높은 동시성 처리를 견딜 수 있습니다.
II. nginx 설치 및 구성
1단계: nginx 설치 패키지 다운로드
2단계: Linux에 nginx 설치
#tar zxvf nginx-1.7.8.tar.gz //解压

#cd nginx-1.7.8

#./configure --with-http_stub_status_module --with-http_ssl_module//启动server状态页和https模块
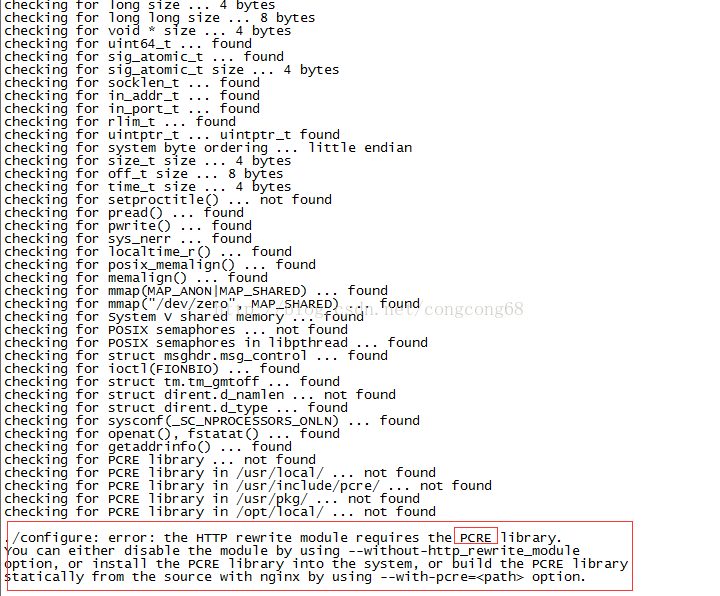
는 그림과 같이 pcre 라이브러리 누락 오류를 보고합니다.

지금은 , 먼저 세 번째 단계를 실행하여 pcre를 설치한 다음 3에서 실행하면 됩니다.
4.make && make install //컴파일 및 설치
5. 설치 구성이 올바른지 테스트합니다. nginx가 /usr에 설치되어 있습니다. /local/nginx
#/usr/local/nginx/sbin/nginx -t, 그림과 같이:

3단계: linux
#tar zxvf pcre-8.10.tar.gz //解压

cd pcre-8.10

./configure

make && make install//编译并安装
에 pcre를 설치합니다. nginx + tomcat은 동적 및 정적 분리를 실현합니다
동적 및 정적 분리는 nginx가 클라이언트가 요청한 정적 페이지(html 페이지)나 그림을 처리하고, tomcat이 클라이언트가 요청한 동적 페이지(jsp 페이지)를 처리한다는 의미입니다. nginx가 처리하는 정적 페이지의 효율성은 tomcat보다 높습니다.
1단계: nginx 파일을 구성해야 합니다
#vi /usr/local/nginx/conf/nginx.conf
 #user nobody;
worker_processes 1;
error_log logs/error.log;
pid    logs/nginx.pid;

events {
  use epoll;
  worker_connections 1024;
}


http {
  include    mime.types;
  default_type application/octet-stream;
  log_format main '$remote_addr - $remote_user [$time_local] "$request" '
           '$status $body_bytes_sent "$http_referer" '
           '"$http_user_agent" "$http_x_forwarded_for"';

  access_log logs/access.log main;
  sendfile    on;
keepalive_timeout 65;
gzip on;
gzip_min_length 1k;
gzip_buffers   4 16k;
gzip_http_version 1.0;
gzip_comp_level 2;
gzip_types text/plain application/x-javascript text/css application/xml;
gzip_vary on;
  server {
    listen    80 default;
    server_name localhost;
    <span style="color:#ff0000;"> location ~ .*\.(html|htm|gif|jpg|jpeg|bmp|png|ico|txt|js|css)$ //由nginx处理静态页面</span>
       {
         root  /usr/tomcat/apache-tomcat-8081/webapps/root;
          expires   30d; //缓存到客户端30天
        }
    error_page 404       /404.html;

    #redirect server error pages to the static page /50x.html

    error_page  500 502 503 504 /50x.html;
    location = /50x.html {
      root  html;
    }
     <span style="color:#ff0000;"> location ~ \.(jsp|do)$ {//所有jsp的动态请求都交给tomcat处理 </span>
      <span style="color:#ff0000;"> proxy_pass http://192.168.74.129:8081; //来自jsp或者do的后缀的请求交给tomcat处理</span>
      proxy_redirect off;
      proxy_set_header host $host;  //后端的web服务器可以通过x-forwarded-for获取用户真实ip
      proxy_set_header x-real-ip $remote_addr;
      proxy_set_header x-forwarded-for $proxy_add_x_forwarded_for;
      client_max_body_size 10m;  //允许客户端请求的最大单文件字节数
      client_body_buffer_size 128k; //缓冲区代理缓冲用户端请求的最大字节数
       proxy_connect_timeout 90;  //nginx跟后端服务器连接超时时间
       proxy_read_timeout 90;   //连接成功后,后端服务器响应时间
       proxy_buffer_size 4k;   //设置代理服务器(nginx)保存用户头信息的缓冲区大小
       proxy_buffers 6 32k;    //proxy_buffers缓冲区,网页平均在32k以下的话,这样设置
      proxy_busy_buffers_size 64k;//高负荷下缓冲大小(proxy_buffers*2)
      proxy_temp_file_write_size 64k; //设定缓存文件夹大小,大于这个值,将从upstream服务器传
    }

  }

}2단계: tomcat 아래 webapps/root 아래에 새 index.html 정적 페이지를 만듭니다. 그림에 표시된 대로:

3단계: nginx 서비스 시작
#sbin/nginx 그림에 표시된 대로:

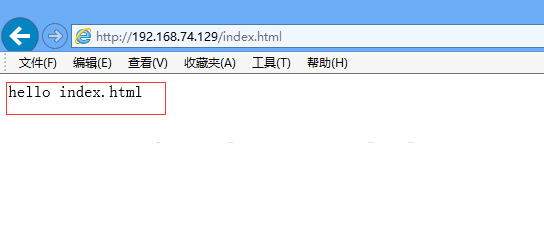
4단계: 페이지 액세스는 다음과 같이 일반 콘텐츠를 표시할 수 있습니다. 표시된 그림:

5단계: 높은 동시성에서 정적 페이지를 처리할 때 nginx 및 tomcat의 성능을 테스트하시겠습니까?
Linux ab 웹 사이트 스트레스 테스트 명령을 사용하여 성능 테스트
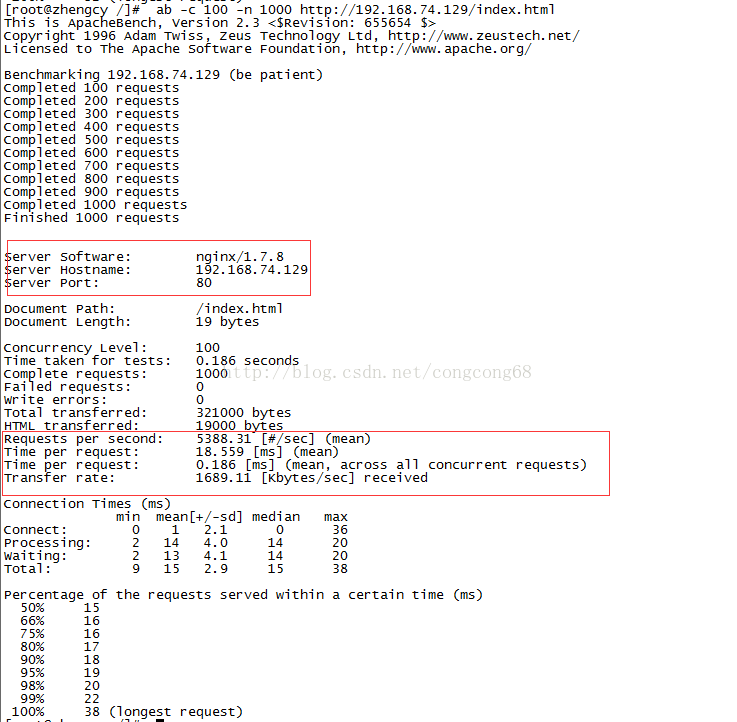
1. 정적 페이지 처리에서 nginx의 성능을 테스트합니다.
ab -c 100 -n 1000
이는 동시에 100개의 요청을 처리하고 그림과 같이 1000번 index.html 파일을 만듭니다.

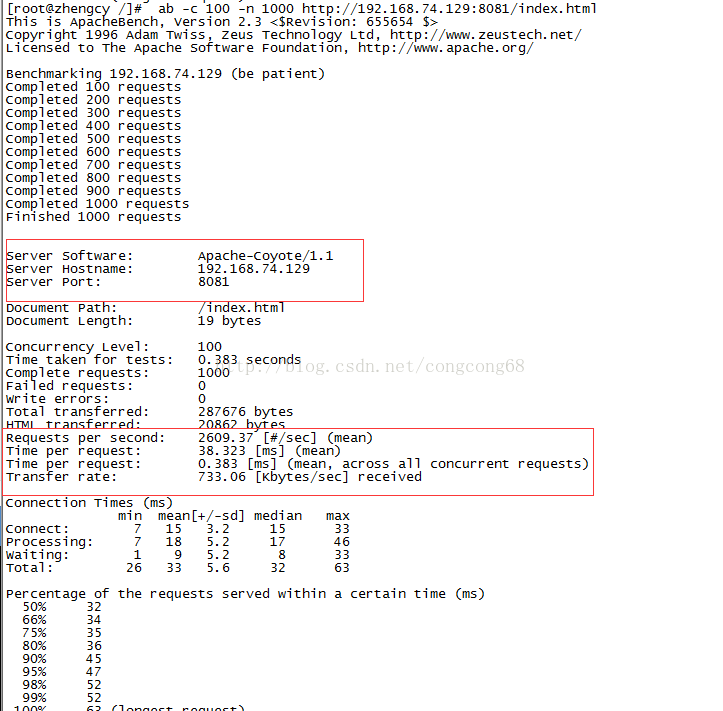
2. 정적 페이지 처리에서 Tomcat의 성능을 테스트합니다.
ab -c 100 -n 1000
이는 동시에 100개의 요청을 처리한다는 의미입니다. 그림과 같이 index.html 파일을 1000번 실행합니다.

동일한 정적 파일 처리의 경우 nginx 처리의 정적 성능이 tomcat보다 좋습니다. nginx는 초당 5388번 요청할 수 있지만 tomcat은 2609번만 요청할 수 있습니다.
요약: nginx 구성 파일에서는 처리를 위해 nginx에 정적 구성을 할당하고 tomcat에 대한 동적 요청을 할당하여 성능을 향상시킵니다.
넷. nginx + tomcat 로드 밸런싱 및 내결함성
높은 동시성 조건에서 서버 성능을 향상하고 단일 서버의 동시성 부담을 줄이기 위해 클러스터 배포를 채택하고 있으며, 이는 단일 서버가 중단되는 것을 방지하는 문제도 해결할 수 있습니다. 이 경우 내결함성 문제를 처리하기 위해 서비스에 액세스할 수 없습니다.
첫 번째 단계: 여기에 이틀 동안 192.168.74.129:8081 및 192.168.74.129:8082
Tomcat 서버를 배포했습니다. 두 번째 단계: nginx는 프록시 서버 역할을 하며 클라이언트가 요청할 때 로드 밸런싱이 사용됩니다. 클라이언트 요청이 매일 서버에 균등하게 분배되어 서버에 대한 부담을 줄일 수 있습니다. nginx 아래에 nginx.conf 파일을 구성합니다.
#vi /usr/local/nginx/conf/nginx.conf
 #user nobody;
worker_processes 1;
error_log logs/error.log;
pid    logs/nginx.pid;

events {
  use epoll;
  worker_connections 1024;
}


http {
  include    mime.types;
  default_type application/octet-stream;
  log_format main '$remote_addr - $remote_user [$time_local] "$request" '
           '$status $body_bytes_sent "$http_referer" '
           '"$http_user_agent" "$http_x_forwarded_for"';

  access_log logs/access.log main;
  sendfile    on;
keepalive_timeout 65;
gzip on;
gzip_min_length 1k;
gzip_buffers   4 16k;
gzip_http_version 1.0;
gzip_comp_level 2;
gzip_types text/plain application/x-javascript text/css application/xml;
gzip_vary on;
<span style="color:#ff0000;">upstream localhost_server {
    ip_hash;
    server 192.168.74.129:8081;
    server 192.168.74.129:8082;
  }</span>

  server {
    listen    80 default;
    server_name localhost;
    <span style="color:#ff0000;"> location ~ .*\.(html|htm|gif|jpg|jpeg|bmp|png|ico|txt|js|css)$ //由nginx处理静态页面</span>
       {
         root  /usr/tomcat/apache-tomcat-8081/webapps/root;
          expires   30d; //缓存到客户端30天
        }
    error_page 404       /404.html;

    #redirect server error pages to the static page /50x.html

    error_page  500 502 503 504 /50x.html;
    location = /50x.html {
      root  html;
    }
     <span style="color:#ff0000;">location ~ \.(jsp|do)$ {//所有jsp的动态请求都交给tomcat处理 </span>
      <span style="color:#ff0000;">proxy_pass http://localhost_server; //来自jsp或者do的后缀的请求交给tomcat处理</span>
      proxy_redirect off;
      proxy_set_header host $host;  //后端的web服务器可以通过x-forwarded-for获取用户真实ip
      proxy_set_header x-real-ip $remote_addr;
      proxy_set_header x-forwarded-for $proxy_add_x_forwarded_for;
      client_max_body_size 10m;  //允许客户端请求的最大单文件字节数
      client_body_buffer_size 128k; //缓冲区代理缓冲用户端请求的最大字节数
       proxy_connect_timeout 90;  //nginx跟后端服务器连接超时时间
       proxy_read_timeout 90;   //连接成功后,后端服务器响应时间
       proxy_buffer_size 4k;   //设置代理服务器(nginx)保存用户头信息的缓冲区大小
       proxy_buffers 6 32k;    //proxy_buffers缓冲区,网页平均在32k以下的话,这样设置
      proxy_busy_buffers_size 64k;//高负荷下缓冲大小(proxy_buffers*2)
      proxy_temp_file_write_size 64k; //设定缓存文件夹大小,大于这个值,将从upstream服务器传
    }

  }

}지침:
1 업스트림의 서버는 서버의 IP(도메인 이름) 및 포트를 참조하며 따라갈 수도 있습니다. 매개변수별
1 )weight: 서버의 전달 가중치를 설정합니다. 기본값은 1입니다.
2) max_fails: failure_timeout과 함께 사용됩니다. 이는 failure_timeout 기간 내에 서버 전달 실패 횟수가 max_fails에 설정된 값을 초과하면 서버를 사용할 수 없음을 의미합니다. max_fails의 기본값은 다음과 같습니다. 1
3)fail_timeout: 서버를 사용할 수 없는 것으로 간주되기 전까지 이 기간 내에 전달이 실패한 횟수를 나타냅니다.
4)down: 이 서버를 사용할 수 없음을 나타냅니다.
5) 백업: 이 서버에 대한 ip_hash 설정이 유효하지 않음을 나타냅니다. 백업이 아닌 모든 서버가 실패한 후에만 요청이 서버로 전달됩니다.
2. ip_hash 설정은 클러스터의 서버에 있습니다. 동일한 클라이언트 요청이 여러 서버로 전달되면 각 서버가 동일한 정보를 캐시할 수 있으며, 이로 인해 사용되는 ip_hash 설정도 동일하게 발생합니다. 클라이언트가 두 번째로 동일한 정보를 요청하면 처음 요청한 서버로 전달됩니다. 그러나 ip_hash는 가중치와 함께 사용할 수 없습니다.
위 내용은 Nginx와 Tomcat이 동적 및 정적 분리와 로드 밸런싱을 달성하는 방법의 상세 내용입니다. 자세한 내용은 PHP 중국어 웹사이트의 기타 관련 기사를 참조하세요!

핫 AI 도구

Undresser.AI Undress
사실적인 누드 사진을 만들기 위한 AI 기반 앱

AI Clothes Remover
사진에서 옷을 제거하는 온라인 AI 도구입니다.

Undress AI Tool
무료로 이미지를 벗다

Clothoff.io
AI 옷 제거제

AI Hentai Generator
AI Hentai를 무료로 생성하십시오.

인기 기사

뜨거운 도구

메모장++7.3.1
사용하기 쉬운 무료 코드 편집기

SublimeText3 중국어 버전
중국어 버전, 사용하기 매우 쉽습니다.

스튜디오 13.0.1 보내기
강력한 PHP 통합 개발 환경

드림위버 CS6
시각적 웹 개발 도구

SublimeText3 Mac 버전
신 수준의 코드 편집 소프트웨어(SublimeText3)

뜨거운 주제
 7563
7563
 15
15
 1384
1384
 52
52
 84
84
 11
11
 60
60
 19
19
 28
28
 99
99
 nginx가 시작되었는지 확인하는 방법
Apr 14, 2025 pm 01:03 PM
nginx가 시작되었는지 확인하는 방법 : 1. 명령 줄을 사용하십시오 : SystemCTL 상태 nginx (linux/unix), netstat -ano | Findstr 80 (Windows); 2. 포트 80이 열려 있는지 확인하십시오. 3. 시스템 로그에서 nginx 시작 메시지를 확인하십시오. 4. Nagios, Zabbix 및 Icinga와 같은 타사 도구를 사용하십시오.
 Nginx에서 클라우드 서버 도메인 이름을 구성하는 방법
Apr 14, 2025 pm 12:18 PM
클라우드 서버에서 nginx 도메인 이름을 구성하는 방법 : 클라우드 서버의 공개 IP 주소를 가리키는 레코드를 만듭니다. Nginx 구성 파일에 가상 호스트 블록을 추가하여 청취 포트, 도메인 이름 및 웹 사이트 루트 디렉토리를 지정합니다. Nginx를 다시 시작하여 변경 사항을 적용하십시오. 도메인 이름 테스트 구성에 액세스하십시오. 기타 참고 : HTTPS를 활성화하려면 SSL 인증서를 설치하고 방화벽에서 포트 80 트래픽을 허용하고 DNS 해상도가 적용되기를 기다립니다.
 nginx 서버를 시작하는 방법
Apr 14, 2025 pm 12:27 PM
Nginx 서버를 시작하려면 다른 운영 체제에 따라 다른 단계가 필요합니다. Linux/Unix System : Nginx 패키지 설치 (예 : APT-Get 또는 Yum 사용). SystemCTL을 사용하여 nginx 서비스를 시작하십시오 (예 : Sudo SystemCtl start nginx). Windows 시스템 : Windows 바이너리 파일을 다운로드하여 설치합니다. nginx.exe 실행 파일을 사용하여 nginx를 시작하십시오 (예 : nginx.exe -c conf \ nginx.conf). 어떤 운영 체제를 사용하든 서버 IP에 액세스 할 수 있습니다.
 Linux에서 Nginx를 시작하는 방법
Apr 14, 2025 pm 12:51 PM
Linux에서 Nginx를 시작하는 단계 : Nginx가 설치되어 있는지 확인하십시오. systemctl start nginx를 사용하여 nginx 서비스를 시작하십시오. SystemCTL을 사용하여 NGINX를 사용하여 시스템 시작시 NGINX의 자동 시작을 활성화하십시오. SystemCTL 상태 nginx를 사용하여 시작이 성공했는지 확인하십시오. 기본 환영 페이지를 보려면 웹 브라우저의 http : // localhost를 방문하십시오.
 nginx가 시작되었는지 확인하는 방법은 무엇입니까?
Apr 14, 2025 pm 12:48 PM
Linux에서는 다음 명령을 사용하여 nginx가 시작되었는지 확인하십시오. SystemCTL 상태 Nginx 판사 명령 출력에 따라 : "active : running"이 표시되면 Nginx가 시작됩니다. "Active : 비활성 (죽음)"이 표시되면 Nginx가 중지됩니다.
 Windows에서 nginx를 구성하는 방법
Apr 14, 2025 pm 12:57 PM
Windows에서 Nginx를 구성하는 방법은 무엇입니까? nginx를 설치하고 가상 호스트 구성을 만듭니다. 기본 구성 파일을 수정하고 가상 호스트 구성을 포함하십시오. 시작 또는 새로 고침 Nginx. 구성을 테스트하고 웹 사이트를보십시오. SSL을 선택적으로 활성화하고 SSL 인증서를 구성하십시오. 포트 80 및 443 트래픽을 허용하도록 방화벽을 선택적으로 설정하십시오.
 Nginx403을 해결하는 방법
Apr 14, 2025 am 10:33 AM
Nginx 403 금지 된 오류를 수정하는 방법은 무엇입니까? 파일 또는 디렉토리 권한을 확인합니다. 2. 확인 파일을 확인하십시오. 3. nginx 구성 파일 확인; 4. nginx를 다시 시작하십시오. 다른 가능한 원인으로는 방화벽 규칙, Selinux 설정 또는 응용 프로그램 문제가 있습니다.
 nginx 버전을 확인하는 방법
Apr 14, 2025 am 11:57 AM
nginx 버전을 쿼리 할 수있는 메소드는 다음과 같습니다. nginx -v 명령을 사용하십시오. nginx.conf 파일에서 버전 지시문을 봅니다. nginx 오류 페이지를 열고 페이지 제목을 봅니다.


