nginx 구성
  location ~ ^/2589(/.*)
  {
    autoindex on; //开启
    autoindex_localtime on;//开启显示功能
}auto_index 명령
구문: autoindex on | off;
구성 섹션: autoindex off;
구성 섹션: http, server, location
nginx 디렉터리 인덱싱 기능을 활성화/전용합니다.
구문: autoindex_exact_size on | off;
구성 섹션: autoindex_exact_size on;
구성 섹션: http, 서버, 위치
파일 크기를 바이트, mb, gb 등으로 추가로 표시할지 설정합니다. 기본값은 open
syntax: autoindex_localtime on | off;
구성 섹션: autoindex_localtime off;
구성 섹션: http, 서버, 위치
디렉토리 또는 파일의 시간을 표시할지 지정합니다. 기본값은 표시하지 않는 것입니다.
nginx+fancy는 아름다운 인덱스 디렉터리를 구현합니다.
nginx 인덱스 디렉터리는 매우 간단하고 보기에도 좋지 않은 자체 기능을 가지고 있습니다. 다음으로 아름다운 인덱스 목록을 만드는 방법을 살펴보겠습니다.
설치 환경
시스템: centos 6.3nginx: 1.4.2
fancy: http://wiki.nginx.org/ngxfancyindex
fancy를 다운로드하여 설치하세요
nginx의 내장 인덱스 효과(이전 기사에 게시된 그림)를 다음과 같이 비교해 보세요
# wget http://gitorious.org/ngx-fancyindex/ngx-fancyindex/archive-tarball/master
# tar -xzvf master
# wget http://nginx.org/download/nginx-1.4.2.tar.gz
# tar -xzvf nginx-1.4.2.tar.gz
# cd nginx-1.4.2
# ./configure --prefix=/usr/local/nginx-1.4.2 --add-module=../ngx-fancyindex-ngx-fancyindex
# make
# make install
fancy 인덱스 구성
server {
listen  80;
 server_name test.jb51.net;
 access_log /data/logs/nginx/test.jb51.net.access.log main;
index index.html index.php index.html;
 root /data/site/test.jb51.net;
location / {
}
 location ~ ^/2589(/.*)
 {
 fancyindex on;
 fancyindex_exact_size off;
 fancyindex_localtime on;
 fancyindex_footer "myfooter.shtml";
 }
 }
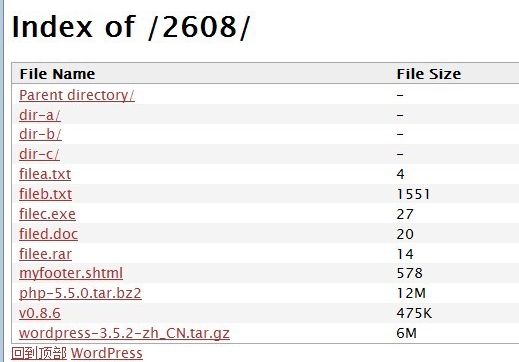
아래와 같이 nginx에 멋을 더한 효과를 보세요.

함께 제공되는 것보다 얼마나 좋아 보이는지 말하기는 어렵습니다... 어쨌든, 그냥 ... 더 좋아보이네요~
매개변수 설명:
fancyindex on: 팬시 인덱스 켜기
fancyindex_exact_size off: 정확한 크기를 사용하지 않고 반올림 사용, 켜면 단위가 2m로 표시됩니다. bytes
fancyindex_localtime on: 현지 시간 사용
fancyindex_footer "myfooter.shtml": 현재 경로의 myfooter.shtml 내용을 하단으로 사용합니다. 파일이 없으면 하단에 404가 나타납니다. shtml은 다음과 같습니다.
<!-- footer start --> <div id="footer"> <a id="gotop" href="#" onclick="mgjs.gotop();return false;">回到顶部</a> <a id="powered" href="http://wordpress.org/">wordpress</a> <div id="copyright"> 版权所有 © 2006-2015 本站 </div> <div id="themeinfo"> <a href="//www.jb51.net/about/">关于我们</a> | <a href="//www.jb51.net/sitemap.html">网站导航</a> | <a href="//www.jb51.net/sitemap.xml">网站地图</a> |<a rel="nofollow" href="http://www.miibeian.gov.cn/">苏icp备14036222号</a> </div> </div> <!-- footer end --> fancy指令使用:
구문:
*fancyindex* [*on* | *off*]
구성 블록: http, 서버, 위치
설명: 디렉터리 인덱스 기능 켜기/끄기
fancyindex_css_href
구문:
*fancyindex_css_href uri*
구성 블록: http, 서버, 위치
설명: 외부 CSS 경로, 이 CSS는 기존 CSS 스타일을 대체합니다. CSS를 알면 인덱스 목록을 더 아름답게 만들 수 있습니다. ttlsa에는 웹 디자이너가 없으므로 함께 제공되는 디자이너만 사용하면 됩니다^^
fancyindex_exact_size
Syntax:
*fancyindex_exact_size* [*on* | *off*]
구성 블록: http, server, location
설명: 파일 크기를 표시하는 방법을 정의합니다. 기본값은 on입니다. on: 파일 크기의 정확한 값을 사용합니다. 단위는 바이트입니다. off: 단위는 kb, mb입니다. , gb, 소수점이 포함된 경우 반올림됩니다. 예를 들어 1.9mb는 2mb로 표시됩니다.
fancyindex_footer
구문:
*fancyindex_footer path*
구성 블록: http, 서버, 위치
설명: 인덱스 페이지 하단에 삽입할 파일을 지정하세요. 효과는 이 글의 첫 번째 그림을 참조하세요.
fancyindex_header
구문:
*fancyindex_header path*
구성 블록: http, 서버, 위치
설명: 인덱스 페이지 헤더에 삽입할 파일을 지정합니다. 사용법은 fancyindex_footer
fancyindex_ignore
구문:
*fancyindex_ignore string1 [string2 [... stringn]]*
구성 블록: http, 서버, 위치
설명: 어떤 파일/디렉토리가 숨겨져 있습니까? nginx가 정규식을 지원하는 경우 정규식을 사용하여 필터링할 수 있습니다.
예를 들어, 파일을 숨기고 싶습니다. 또는 dir 및 filea.txt 파일로 시작하는 디렉터리의 경우 구성은 다음과 같습니다:
fancyindex_ignore "dir*" "filea.txt"
구문:
*fancyindex_localtime* [*on* | *off*]
구성 블록: http, 서버, 위치
위 내용은 Nginx 서버에서 인덱스 디렉터리를 구성하고 사용하는 방법의 상세 내용입니다. 자세한 내용은 PHP 중국어 웹사이트의 기타 관련 기사를 참조하세요!