SpringBoot2에 Mybatis 프레임워크를 통합하는 방법
1. Mybatis 프레임워크
1. mybatis 소개
MyBatis는 맞춤형 SQL, 저장 프로시저 및 고급 매핑을 지원하는 뛰어난 지속성 계층 프레임워크입니다. MyBatis는 거의 모든 JDBC 코드와 매개변수 수동 설정 및 결과 세트 검색을 방지합니다. MyBatis는 간단한 XML 또는 주석을 사용하여 기본 유형, 인터페이스 및 Java POJO(Plain Old Java Objects, Plain Old Java Object)를 구성하고 데이터베이스의 레코드에 매핑할 수 있습니다.
2. Mybatis 기능
1)sql语句与代码分离,存放于xml配置文件中,方便管理
2)用逻辑标签控制动态SQL的拼接,灵活方便
3)查询的结果集与java对象自动映射
4)编写原生态SQL,接近JDBC
5)简单的持久化框架,框架不臃肿简单易学
3. 적용 가능한 시나리오
MyBatis는 SQL 자체에 중점을 두고 있으며 충분히 유연한 DAO 레이어 솔루션입니다.
MyBatis는 높은 성능 요구 사항이 있거나 변화하는 요구 사항이 있는 프로젝트에 적합한 선택이 될 것입니다.
2. SpringBoot2와의 통합
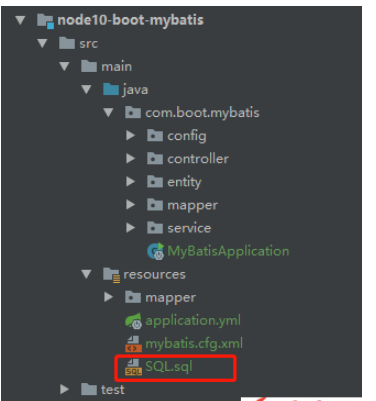
1. 프로젝트 구조 다이어그램

이 연결 풀은 druid 연결 풀을 사용합니다.
2. 핵심 종속성
<!-- mybatis依赖 -->
<dependency>
    <groupid>org.mybatis.spring.boot</groupid>
    <artifactid>mybatis-spring-boot-starter</artifactid>
    <version>1.3.2</version>
</dependency>
<!-- mybatis的分页插件 -->
<dependency>
    <groupid>com.github.pagehelper</groupid>
    <artifactid>pagehelper</artifactid>
    <version>4.1.6</version>
</dependency>
3. 핵심 구성
mybatis:
  # mybatis配置文件所在路径
  config-location: classpath:mybatis.cfg.xml
  type-aliases-package: com.boot.mybatis.entity
  # mapper映射文件
  mapper-locations: classpath:mapper/*.xml
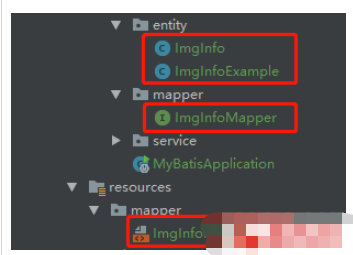
4. 리버스 엔지니어링으로 생성된 파일

코드는 여기에 게시되지 않습니다.
5. 기본 테스트 인터페이스 작성
// 增加
int insert(ImgInfo record);
// 组合查询
List<img info alt="SpringBoot2에 Mybatis 프레임워크를 통합하는 방법" > selectByExample(ImgInfoExample example);
// 修改
int updateByPrimaryKeySelective(ImgInfo record);
// 删除
int deleteByPrimaryKey(Integer imgId);</imginfo>
7. 컨트롤 레이어 테스트 클래스
@Service
public class ImgInfoServiceImpl implements ImgInfoService {
    @Resource
    private ImgInfoMapper imgInfoMapper ;
    @Override
    public int insert(ImgInfo record) {
        return imgInfoMapper.insert(record);
    }
    @Override
    public List<img info alt="SpringBoot2에 Mybatis 프레임워크를 통합하는 방법" > selectByExample(ImgInfoExample example) {
        return imgInfoMapper.selectByExample(example);
    }
    @Override
    public int updateByPrimaryKeySelective(ImgInfo record) {
        return imgInfoMapper.updateByPrimaryKeySelective(record);
    }
    @Override
    public int deleteByPrimaryKey(Integer imgId) {
        return imgInfoMapper.deleteByPrimaryKey(imgId);
    }
}</imginfo>3. 페이징 플러그인 통합
1. @RestController
public class ImgInfoController {
@Resource
private ImgInfoService imgInfoService ;
// 增加
@RequestMapping("/insert")
public int insert(){
ImgInfo record = new ImgInfo() ;
record.setUploadUserId("A123");
record.setImgTitle("博文图片");
record.setSystemType(1) ;
record.setImgType(2);
record.setImgUrl("https://avatars0.githubusercontent.com/u/50793885?s=460&v=4");
record.setLinkUrl("https://avatars0.githubusercontent.com/u/50793885?s=460&v=4");
record.setShowState(1);
record.setCreateDate(new Date());
record.setUpdateDate(record.getCreateDate());
record.setRemark("知了");
record.setbEnable("1");
return imgInfoService.insert(record) ;
}
// 组合查询
@RequestMapping("/selectByExample")
public List<img info alt="SpringBoot2에 Mybatis 프레임워크를 통합하는 방법" > selectByExample(){
ImgInfoExample example = new ImgInfoExample() ;
example.createCriteria().andRemarkEqualTo("知了") ;
return imgInfoService.selectByExample(example);
}
// 修改
@RequestMapping("/updateByPrimaryKeySelective")
public int updateByPrimaryKeySelective(){
ImgInfo record = new ImgInfo() ;
record.setImgId(11);
record.setRemark("知了一笑");
return imgInfoService.updateByPrimaryKeySelective(record);
}
// 删除
@RequestMapping("/deleteByPrimaryKey")
public int deleteByPrimaryKey() {
Integer imgId = 11 ;
return imgInfoService.deleteByPrimaryKey(imgId);
}
}</imginfo>로그인 후 복사
2. 페이징 구현 코드@RestController
public class ImgInfoController {
@Resource
private ImgInfoService imgInfoService ;
// 增加
@RequestMapping("/insert")
public int insert(){
ImgInfo record = new ImgInfo() ;
record.setUploadUserId("A123");
record.setImgTitle("博文图片");
record.setSystemType(1) ;
record.setImgType(2);
record.setImgUrl("https://avatars0.githubusercontent.com/u/50793885?s=460&v=4");
record.setLinkUrl("https://avatars0.githubusercontent.com/u/50793885?s=460&v=4");
record.setShowState(1);
record.setCreateDate(new Date());
record.setUpdateDate(record.getCreateDate());
record.setRemark("知了");
record.setbEnable("1");
return imgInfoService.insert(record) ;
}
// 组合查询
@RequestMapping("/selectByExample")
public List<img info alt="SpringBoot2에 Mybatis 프레임워크를 통합하는 방법" > selectByExample(){
ImgInfoExample example = new ImgInfoExample() ;
example.createCriteria().andRemarkEqualTo("知了") ;
return imgInfoService.selectByExample(example);
}
// 修改
@RequestMapping("/updateByPrimaryKeySelective")
public int updateByPrimaryKeySelective(){
ImgInfo record = new ImgInfo() ;
record.setImgId(11);
record.setRemark("知了一笑");
return imgInfoService.updateByPrimaryKeySelective(record);
}
// 删除
@RequestMapping("/deleteByPrimaryKey")
public int deleteByPrimaryKey() {
Integer imgId = 11 ;
return imgInfoService.deleteByPrimaryKey(imgId);
}
}</imginfo>http://localhost:8010/insert
http://localhost:8010/selectByExample
http://localhost:8010/updateByPrimaryKeySelective
http://localhost:8010/deleteByPrimaryKey
로그인 후 복사
3. 테스트 인터페이스http://localhost:8010/insert http://localhost:8010/selectByExample http://localhost:8010/updateByPrimaryKeySelective http://localhost:8010/deleteByPrimaryKey
<?xml  version="1.0" encoding="UTF-8" ?>
nbsp;configuration
        PUBLIC "-//mybatis.org//DTD Config 3.0//EN"
        "http://mybatis.org/dtd/mybatis-3-config.dtd">
<configuration>
    <plugins>
        <!--mybatis分页插件-->
        <plugin>
            <property></property>
        </plugin>
    </plugins>
</configuration>
로그인 후 복사
<?xml version="1.0" encoding="UTF-8" ?> nbsp;configuration PUBLIC "-//mybatis.org//DTD Config 3.0//EN" "http://mybatis.org/dtd/mybatis-3-config.dtd"> <configuration> <plugins> <!--mybatis分页插件--> <plugin> <property></property> </plugin> </plugins> </configuration>
위 내용은 SpringBoot2에 Mybatis 프레임워크를 통합하는 방법의 상세 내용입니다. 자세한 내용은 PHP 중국어 웹사이트의 기타 관련 기사를 참조하세요!

핫 AI 도구

Undresser.AI Undress
사실적인 누드 사진을 만들기 위한 AI 기반 앱

AI Clothes Remover
사진에서 옷을 제거하는 온라인 AI 도구입니다.

Undress AI Tool
무료로 이미지를 벗다

Clothoff.io
AI 옷 제거제

Video Face Swap
완전히 무료인 AI 얼굴 교환 도구를 사용하여 모든 비디오의 얼굴을 쉽게 바꾸세요!

인기 기사

뜨거운 도구

메모장++7.3.1
사용하기 쉬운 무료 코드 편집기

SublimeText3 중국어 버전
중국어 버전, 사용하기 매우 쉽습니다.

스튜디오 13.0.1 보내기
강력한 PHP 통합 개발 환경

드림위버 CS6
시각적 웹 개발 도구

SublimeText3 Mac 버전
신 수준의 코드 편집 소프트웨어(SublimeText3)
 iBatis vs. MyBatis: 어느 것이 당신에게 더 좋나요?
Feb 19, 2024 pm 04:38 PM
iBatis vs. MyBatis: 무엇을 선택해야 할까요? 소개: Java 언어의 급속한 발전으로 인해 많은 지속성 프레임워크가 등장했습니다. iBatis와 MyBatis는 두 가지 인기 있는 지속성 프레임워크로, 둘 다 간단하고 효율적인 데이터 액세스 솔루션을 제공합니다. 이 기사에서는 iBatis와 MyBatis의 기능과 장점을 소개하고 적절한 프레임워크를 선택하는 데 도움이 되는 몇 가지 특정 코드 예제를 제공합니다. iBatis 소개: iBatis는 오픈 소스 지속성 프레임워크입니다.
 JPA와 MyBatis의 기능 및 성능 비교 분석
Feb 19, 2024 pm 05:43 PM
JPA와 MyBatis: 기능과 성능의 비교 분석 소개: Java 개발에서 지속성 프레임워크는 매우 중요한 역할을 합니다. 일반적인 지속성 프레임워크에는 JPA(JavaPersistenceAPI) 및 MyBatis가 포함됩니다. 이 기사에서는 두 프레임워크의 기능과 성능을 비교 분석하고 구체적인 코드 예제를 제공합니다. 1. 기능 비교: JPA: JPA는 JavaEE의 일부이며 객체 지향 데이터 지속성 솔루션을 제공합니다. 주석 또는 X가 전달되었습니다.
 MyBatis 동적 SQL 태그의 Set 태그 기능에 대한 자세한 설명
Feb 26, 2024 pm 07:48 PM
MyBatis 동적 SQL 태그 해석: Set 태그 사용법에 대한 자세한 설명 MyBatis는 풍부한 동적 SQL 태그를 제공하고 데이터베이스 작업 명령문을 유연하게 구성할 수 있는 탁월한 지속성 계층 프레임워크입니다. 그 중 Set 태그는 업데이트 작업에서 매우 일반적으로 사용되는 UPDATE 문에서 SET 절을 생성하는 데 사용됩니다. 이 기사에서는 MyBatis에서 Set 태그의 사용법을 자세히 설명하고 특정 코드 예제를 통해 해당 기능을 보여줍니다. Set 태그란 무엇입니까? Set 태그는 MyBati에서 사용됩니다.
 MyBatis에서 일괄 삭제 작업을 구현하는 다양한 방법
Feb 19, 2024 pm 07:31 PM
MyBatis에서 일괄 삭제 문을 구현하는 여러 가지 방법에는 특정 코드 예제가 필요합니다. 최근 몇 년 동안 데이터 양이 증가함에 따라 일괄 작업이 데이터베이스 작업의 중요한 부분이 되었습니다. 실제 개발에서는 데이터베이스의 레코드를 일괄적으로 삭제해야 하는 경우가 많습니다. 이 기사에서는 MyBatis에서 일괄 삭제 문을 구현하는 여러 가지 방법에 중점을 두고 해당 코드 예제를 제공합니다. 일괄 삭제를 구현하려면 foreach 태그를 사용하세요. MyBatis는 세트를 쉽게 탐색할 수 있는 foreach 태그를 제공합니다.
 MyBatis 일괄 삭제 문 사용 방법에 대한 자세한 설명
Feb 20, 2024 am 08:31 AM
MyBatis 일괄 삭제 문을 사용하는 방법에 대한 자세한 설명에는 특정 코드 예제가 필요합니다. 소개: MyBatis는 풍부한 SQL 작업 기능을 제공하는 뛰어난 지속성 계층 프레임워크입니다. 실제 프로젝트 개발을 하다 보면, 데이터를 일괄적으로 삭제해야 하는 상황이 자주 발생합니다. 이 기사에서는 MyBatis 일괄 삭제 문을 사용하는 방법을 자세히 소개하고 특정 코드 예제를 첨부합니다. 사용 시나리오: 데이터베이스의 많은 양의 데이터를 삭제할 때 삭제 문을 하나씩 실행하는 것은 비효율적입니다. 이때 MyBatis의 일괄삭제 기능을 사용할 수 있습니다.
 MyBatis 캐시 메커니즘에 대한 자세한 설명: 한 기사에서 캐시 저장 원리를 이해합니다.
Feb 23, 2024 pm 04:09 PM
MyBatis 캐싱 메커니즘에 대한 자세한 설명: 한 기사에서 캐시 저장의 원리를 읽어보세요. 소개 MyBatis를 데이터베이스 액세스에 사용할 때 캐싱은 데이터베이스에 대한 액세스를 효과적으로 줄이고 시스템 성능을 향상시킬 수 있는 매우 중요한 메커니즘입니다. 이 기사에서는 캐시 분류, 저장 원칙 및 특정 코드 예제를 포함하여 MyBatis의 캐싱 메커니즘을 자세히 소개합니다. 1. 캐시 분류 MyBatis 캐시는 주로 1단계 캐시와 2단계 캐시의 두 가지 유형으로 구분됩니다. 첫 번째 수준 캐시는 SqlSession 수준 캐시입니다.
 MyBatis 1차 캐시에 대한 자세한 설명: 데이터 액세스 효율성을 향상시키는 방법은 무엇입니까?
Feb 23, 2024 pm 08:13 PM
MyBatis 1차 캐시에 대한 자세한 설명: 데이터 액세스 효율성을 향상시키는 방법은 무엇입니까? 개발 과정에서 효율적인 데이터 액세스는 항상 프로그래머의 초점 중 하나였습니다. MyBatis와 같은 지속성 계층 프레임워크의 경우 캐싱은 데이터 액세스 효율성을 향상시키는 주요 방법 중 하나입니다. MyBatis는 두 가지 캐싱 메커니즘을 제공합니다: 첫 번째 수준 캐시와 두 번째 수준 캐시는 기본적으로 활성화됩니다. 이 기사에서는 MyBatis 1단계 캐시의 메커니즘을 자세히 소개하고 독자의 이해를 돕기 위해 구체적인 코드 예제를 제공합니다.
 MyBatis의 배치 삽입 구현 원리에 대한 심층적인 이해
Feb 21, 2024 pm 04:42 PM
MyBatis는 다양한 Java 프로젝트에서 널리 사용되는 인기 있는 Java 지속성 계층 프레임워크입니다. 그중 일괄 삽입은 데이터베이스 작업의 성능을 효과적으로 향상시킬 수 있는 일반적인 작업입니다. 이번 글에서는 MyBatis에서 일괄 Insert의 구현 원리를 심층적으로 살펴보고 구체적인 코드 예제를 통해 자세히 분석해 보겠습니다. MyBatis의 일괄 삽입 MyBatis에서 일괄 삽입 작업은 일반적으로 동적 SQL을 사용하여 구현됩니다. 삽입된 여러 값을 포함하는 S를 구성하여


