cPanel을 사용하여 CentOS 7에서 Nginx 역방향 프록시를 구성하는 방법
cPanel은 현재 세계에서 가장 강력하고 사용하기 쉬우며 가장 인기 있는 가상 호스트 제어 시스템입니다. 많은 외국 호스트가 이 제어판을 사용합니다.

먼저, 이 프로세스를 시작하려면 EPEL 라이브러리를 설치해야 합니다.
1단계: EPEL 라이브러리 설치
root@server1 [/usr]# yum -y install epel-releaseLoaded plugins: fastestmirror, tsflags, universal-hooks
Loading mirror speeds from cached hostfile
* EA4: 66.23.237.210
* base: mirrors.linode.com
* extras: mirrors.linode.com
* updates: mirrors.linode.com
Resolving Dependencies
--> Running transaction check
---> Package epel-release.noarch 0:7-5 will be installed
--> Finished Dependency Resolution

Dependencies Resolved

========================================================================================
   Package Arch Version Repository Size
========================================================================================
Installing:
epel-release noarch 7-5 extras 14 k
2단계: nDeploy의 CentOS RPM 라이브러리 설치
nDeploy의 CentOS RPM 라이브러리를 설치하면 됩니다. 필요한 nDeploy 웹 소프트웨어와 Nginx 플러그인을 설치합니다
root@server1 [/usr]# yum -y install http://rpm.piserve.com/nDeploy-release-centos-1.0-1.noarch.rpmLoaded plugins: fastestmirror, tsflags, universal-hooks
nDeploy-release-centos-1.0-1.noarch.rpm | 1.7 kB 00:00:00
Examining /var/tmp/yum-root-ei5tWJ/nDeploy-release-centos-1.0-1.noarch.rpm: nDeploy-release-centos-1.0-1.noarch
Marking /var/tmp/yum-root-ei5tWJ/nDeploy-release-centos-1.0-1.noarch.rpm to be installed
Resolving Dependencies
--> Running transaction check
---> Package nDeploy-release-centos.noarch 0:1.0-1 will be installed
--> Finished Dependency Resolution

Dependencies Resolved

========================================================================================
Package Arch Version Repository Size
========================================================================================
Installing:
nDeploy-release-centos noarch 1.0-1 /nDeploy-release-centos-1.0-1.noarch 110
3단계: nDeploy 및 Nginx nDeploy 플러그인 설치
root@server1 [/usr]# yum --enablerepo=ndeploy install nginx-nDeploy nDeployLoaded plugins: fastestmirror, tsflags, universal-hooks
epel/x86_64/metalink | 9.9 kB 00:00:00
epel | 4.3 kB 00:00:00
ndeploy | 2.9 kB 00:00:00
(1/4): ndeploy/7/x86_64/primary_db | 14 kB 00:00:00
(2/4): epel/x86_64/group_gz | 169 kB 00:00:00
(3/4): epel/x86_64/primary_db | 3.7 MB 00:00:02

Dependencies Resolved

========================================================================================
Package Arch Version Repository Size
========================================================================================
Installing:
nDeploy noarch 2.0-11.el7 ndeploy 80 k
nginx-nDeploy x86_64 1.8.0-34.el7 ndeploy 36 M
Installing for dependencies:
PyYAML x86_64 3.10-11.el7 base 153 k
libevent x86_64 2.0.21-4.el7 base 214 k
memcached x86_64 1.4.15-9.el7 base 84 k
python-inotify noarch 0.9.4-4.el7 base 49 k
python-lxml x86_64 3.2.1-4.el7 base 758 k

Transaction Summary
========================================================================================
Install 2 Packages (+5 Dependent packages)
서버에 Nginx 플러그인을 설치하고 위 단계에 따라 설치를 완료했습니다. . 이제 Nginx를 역방향 프록시로 구성하고 기존 cPanel 사용자 계정에 대한 가상 호스트를 생성할 수 있습니다. 이에 대해 다음 스크립트를 실행할 수 있습니다.
4단계: Nginx를 기본 프런트 엔드 웹 서버로 시작하고 기본 구성 파일 만들기
root@server1 [/usr]# /opt/nDeploy/scripts/cpanel-nDeploy-setup.sh enableModifying apache http and https port in cpanel

httpd restarted successfully.
Created symlink from /etc/systemd/system/multi-user.target.wants/nginx.service to /usr/lib/systemd/system/nginx.service.
Created symlink from /etc/systemd/system/multi-user.target.wants/ndeploy_watcher.service to /usr/lib/systemd/system/ndeploy_watcher.service.
Created symlink from /etc/systemd/system/multi-user.target.wants/ndeploy_backends.service to /usr/lib/systemd/system/ndeploy_backends.service.
ConfGen:: saheetha
ConfGen:: satest
이 스크립트는 Nginx가 프런트 엔드 웹 서버 역할을 할 수 있도록 Apache 포트를 80에서 다른 포트로 수정하는 것을 볼 수 있습니다. -end web server , 기존 cPanel 사용자를 위한 가상 호스팅 프로필을 생성합니다. 완료되면 Apache 및 Nginx의 상태를 확인합니다.
Apache 상태:
root@server1 [/var/run/httpd]# systemctl status httpd● httpd.service - Apache Web Server
Loaded: loaded (/usr/lib/systemd/system/httpd.service; enabled; vendor preset: disabled)
Active: active (running) since Mon 2016-01-18 06:34:23 UTC; 12s ago
Process: 25606 ExecStart=/usr/sbin/apachectl start (code=exited, status=0/SUCCESS)
Main PID: 24760 (httpd)
CGroup: /system.slice/httpd.service
‣ 24760 /usr/local/apache/bin/httpd -k start

Jan 18 06:34:23 server1.centos7-test.com systemd[1]: Starting Apache Web Server...
Jan 18 06:34:23 server1.centos7-test.com apachectl[25606]: httpd (pid 24760) already running
Jan 18 06:34:23 server1.centos7-test.com systemd[1]: Started Apache Web Server.
Nginx 상태:
root@server1 [~]# systemctl status nginx● nginx.service - nginx-nDeploy - high performance web server
Loaded: loaded (/usr/lib/systemd/system/nginx.service; enabled; vendor preset: disabled)
Active: active (running) since Sun 2016-01-17 17:18:29 UTC; 13h ago
Docs: http://nginx.org/en/docs/
Main PID: 3833 (nginx)
CGroup: /system.slice/nginx.service
├─ 3833 nginx: master process /usr/sbin/nginx -c /etc/nginx/nginx.conf
├─25473 nginx: worker process
├─25474 nginx: worker process
└─25475 nginx: cache manager process

Jan 17 17:18:29 server1.centos7-test.com systemd[1]: Starting nginx-nDeploy - high performance web server...
Jan 17 17:18:29 server1.centos7-test.com nginx[3804]: nginx: the configuration file /etc/nginx/nginx.conf syntax is ok
Jan 17 17:18:29 server1.centos7-test.com nginx[3804]: nginx: configuration file /etc/nginx/nginx.conf test is successful
Jan 17 17:18:29 server1.centos7-test.com systemd[1]: Started nginx-nDeploy - high performance web server.
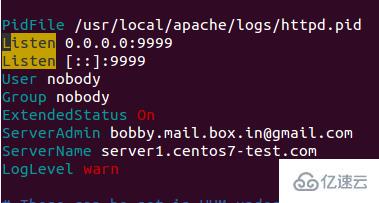
Nginx는 프런트 엔드 서버로 포트 80에서 실행되고 있으며 Apache 구성은 http 포트 9999 및 https 포트 4430에서 수신하도록 변경되었습니다. 그들의 상황을 살펴보시기 바랍니다:
root@server1 [/usr/local/src]# netstat -plan | grep httpdtcp 0 0 0.0.0.0:4430 0.0.0.0:* LISTEN 17270/httpd
tcp 0 0 0.0.0.0:9999 0.0.0.0:* LISTEN 17270/httpd
tcp6 0 0 :::4430 :::* LISTEN 17270/httpd
tcp6 0 0 :::9999 :::* LISTEN 17270/httpd

root@server1 [/usr/local/src]# netstat -plan | grep nginxtcp 0 0 127.0.0.1:80 0.0.0.0:* LISTEN 17802/nginx: master
tcp 0 0 45.79.183.73:80 0.0.0.0:* LISTEN 17802/nginx: master
기존 사용자를 위해 생성된 가상 호스트의 구성 파일은 "/etc/nginx/sites-enabled"에 있습니다. 이 파일 경로에는 기본 Nginx 구성 파일이 포함되어 있습니다.
root@server1 [/etc/nginx/sites-enabled]# ll | grep .conf-rw-r--r-- 1 root root 311 Jan 17 09:02 saheetha.com.conf-rw-r--r-- 1 root root 336 Jan 17 09:02 saheethastest.com.conf
도메인 이름의 가상 호스트 예:
server {

listen 45.79.183.73:80;#CPIPVSIX:80;# ServerNamesserver_name saheetha.com www.saheetha.com;
access_log /usr/local/apache/domlogs/saheetha.com main;
access_log /usr/local/apache/domlogs/saheetha.com-bytes_log bytes_log;

include /etc/nginx/sites-enabled/saheetha.com.include;

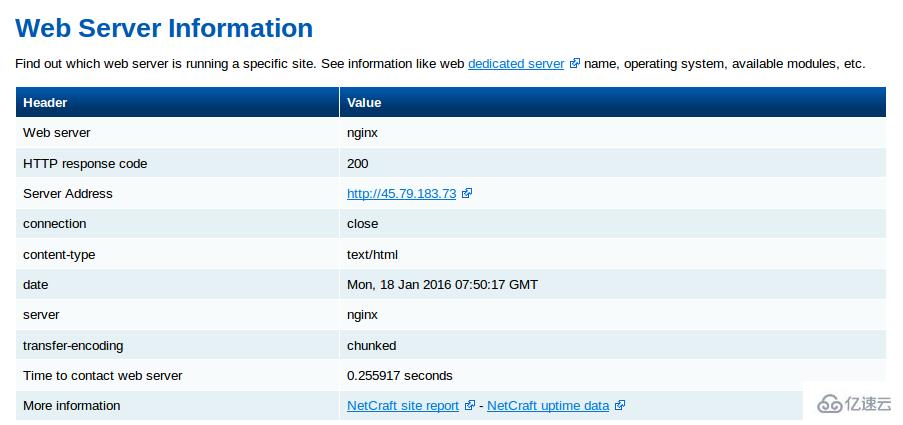
}브라우저를 시작하여 웹사이트를 보고 웹 서버의 작동 상태를 확인할 수 있습니다. 설치 후 서버에서 웹 서비스 정보를 읽어보세요.
root@server1 [/home]# ip a | grep -i eth03: eth0:  mtu 1500 qdisc pfifo_fast state UP qlen 1000
inet 45.79.183.73/24 brd 45.79.183.255 scope global dynamic eth0
root@server1 [/home]# nginx -vnginx version: nginx/1.8.0

다음을 얻으려면 이 문장을 다시 작성하세요. cPanel에서 새로 생성된 모든 계정에 대해 Nginx는 해당 계정에 대한 가상 호스트를 생성합니다. 이러한 간단한 단계를 통해 Nginx를 CentOS 7/cPanel 서버에서 역방향 프록시로 구성할 수 있습니다.
역방향 프록시로서 Nginx의 장점
설치 및 구성이 쉽습니다.
효율이 높고 성능이 좋습니다.
Ddos 공격을 예방하세요.
PHP 재작성 규칙으로 .htaccess 사용을 지원합니다.
위 내용은 cPanel을 사용하여 CentOS 7에서 Nginx 역방향 프록시를 구성하는 방법의 상세 내용입니다. 자세한 내용은 PHP 중국어 웹사이트의 기타 관련 기사를 참조하세요!

핫 AI 도구

Undresser.AI Undress
사실적인 누드 사진을 만들기 위한 AI 기반 앱

AI Clothes Remover
사진에서 옷을 제거하는 온라인 AI 도구입니다.

Undress AI Tool
무료로 이미지를 벗다

Clothoff.io
AI 옷 제거제

AI Hentai Generator
AI Hentai를 무료로 생성하십시오.

인기 기사

뜨거운 도구

메모장++7.3.1
사용하기 쉬운 무료 코드 편집기

SublimeText3 중국어 버전
중국어 버전, 사용하기 매우 쉽습니다.

스튜디오 13.0.1 보내기
강력한 PHP 통합 개발 환경

드림위버 CS6
시각적 웹 개발 도구

SublimeText3 Mac 버전
신 수준의 코드 편집 소프트웨어(SublimeText3)

뜨거운 주제
 7455
7455
 15
15
 1375
1375
 52
52
 77
77
 11
11
 40
40
 19
19
 14
14
 9
9
 Tomcat 서버에 대한 외부 네트워크 액세스를 허용하는 방법
Apr 21, 2024 am 07:22 AM
Tomcat 서버가 외부 네트워크에 액세스하도록 허용하려면 다음을 수행해야 합니다. 외부 연결을 허용하도록 Tomcat 구성 파일을 수정합니다. Tomcat 서버 포트에 대한 액세스를 허용하는 방화벽 규칙을 추가합니다. Tomcat 서버 공용 IP에 대한 도메인 이름을 가리키는 DNS 레코드를 만듭니다. 선택 사항: 역방향 프록시를 사용하여 보안 및 성능을 향상합니다. 선택 사항: 보안 강화를 위해 HTTPS를 설정합니다.
 SCP 사용 팁 - 파일을 재귀적으로 제외
Apr 22, 2024 am 09:04 AM
scp 명령을 사용하여 네트워크 호스트 간에 파일을 안전하게 복사할 수 있습니다. 데이터 전송 및 인증을 위해 SSH를 사용합니다. 일반적인 구문은 다음과 같습니다: scpfile1user@host:/path/to/dest/scp -r/path/to/source/user@host:/path/to/dest/scp 파일 제외 scp 명령을 사용할 때는 할 수 없을 것 같습니다 파일을 필터링하거나 제외합니다. 그러나 파일을 제외하고 SSH를 사용하여 안전하게 복사하는 좋은 해결 방법이 있습니다. 이 페이지에서는 scp를 사용하여 디렉터리를 반복적으로 복사할 때 파일을 필터링하거나 제외하는 방법을 설명합니다. rsync 명령을 사용하여 파일을 제외하는 방법 구문은 다음과 같습니다: rsyncav-essh-
 HTML 파일에서 URL을 생성하는 방법
Apr 21, 2024 pm 12:57 PM
HTML 파일을 URL로 변환하려면 다음 단계를 포함하는 웹 서버가 필요합니다. 웹 서버를 얻습니다. 웹 서버를 설정합니다. HTML 파일을 업로드하세요. 도메인 이름을 만듭니다. 요청을 라우팅합니다.
 nodejs 프로젝트를 서버에 배포하는 방법
Apr 21, 2024 am 04:40 AM
Node.js 프로젝트의 서버 배포 단계: 배포 환경 준비: 서버 액세스 권한 획득, Node.js 설치, Git 저장소 설정. 애플리케이션 빌드: npm run build를 사용하여 배포 가능한 코드와 종속성을 생성합니다. Git 또는 파일 전송 프로토콜을 통해 서버에 코드를 업로드합니다. 종속성 설치: SSH를 서버에 연결하고 npm install을 사용하여 애플리케이션 종속성을 설치합니다. 애플리케이션 시작: node index.js와 같은 명령을 사용하여 애플리케이션을 시작하거나 pm2와 같은 프로세스 관리자를 사용합니다. 역방향 프록시 구성(선택 사항): Nginx 또는 Apache와 같은 역방향 프록시를 사용하여 트래픽을 애플리케이션으로 라우팅합니다.
 nodejs를 외부에서 접근할 수 있나요?
Apr 21, 2024 am 04:43 AM
예, Node.js는 외부에서 액세스할 수 있습니다. 다음 방법을 사용할 수 있습니다. Cloud Functions를 사용하여 함수를 배포하고 공개적으로 액세스할 수 있도록 합니다. Express 프레임워크를 사용하여 경로를 만들고 끝점을 정의합니다. Nginx를 사용하여 Node.js 애플리케이션에 대한 프록시 요청을 역방향으로 수행합니다. Docker 컨테이너를 사용하여 Node.js 애플리케이션을 실행하고 포트 매핑을 통해 노출합니다.
 PHP를 사용하여 웹사이트를 배포하고 유지하는 방법
May 03, 2024 am 08:54 AM
PHP 웹 사이트를 성공적으로 배포하고 유지하려면 다음 단계를 수행해야 합니다. 웹 서버(예: Apache 또는 Nginx) 선택 PHP 설치 데이터베이스 생성 및 PHP 연결 서버에 코드 업로드 도메인 이름 및 DNS 모니터링 웹 사이트 유지 관리 설정 단계에는 PHP 및 웹 서버 업데이트, 웹 사이트 백업, 오류 로그 모니터링 및 콘텐츠 업데이트가 포함됩니다.
 Fail2Ban을 사용하여 무차별 대입 공격으로부터 서버를 보호하는 방법
Apr 27, 2024 am 08:34 AM
Linux 관리자의 중요한 작업은 불법적인 공격이나 액세스로부터 서버를 보호하는 것입니다. 기본적으로 Linux 시스템에는 iptables, UFW(Uncomplicated Firewall), CSF(ConfigServerSecurityFirewall) 등과 같이 잘 구성된 방화벽이 함께 제공되어 다양한 공격을 방지할 수 있습니다. 인터넷에 연결된 모든 컴퓨터는 악의적인 공격의 잠재적인 대상입니다. 서버에 대한 불법 액세스를 완화하는 데 사용할 수 있는 Fail2Ban이라는 도구가 있습니다. Fail2Ban이란 무엇입니까? Fail2Ban[1]은 무차별 공격으로부터 서버를 보호하는 침입 방지 소프트웨어입니다. Python 프로그래밍 언어로 작성되었습니다.
 keepalived+nginx를 사용하여 고가용성을 구축할 때 주의할 몇 가지 사항
Apr 23, 2024 pm 05:50 PM
yum이 keepalived를 설치한 후 마스터 및 백업의 keepalived 구성 파일에서 네트워크 카드 이름은 일반적으로 고가용성에서 사용 가능한 IP로 선택됩니다. LAN 환경 더 많은 것이 있으므로 이 VIP는 두 시스템과 동일한 네트워크 세그먼트에 있는 인트라넷 IP입니다. 외부 네트워크 환경에서 사용하는 경우 클라이언트가 액세스할 수 있는 한 동일한 네트워크 세그먼트에 있는지 여부는 중요하지 않습니다. nginx 서비스를 중지하고 keepalived 서비스를 시작하면 keepalived가 nginx 서비스를 시작하는 것을 볼 수 있습니다. 시작할 수 없고 실패하는 경우 기본적으로 구성 파일 및 스크립트에 문제가 있거나 예방 문제입니다.


