

Nginx 서비스 구성을 최적화하는 방법

1. 캐시 모듈이 만료됩니다
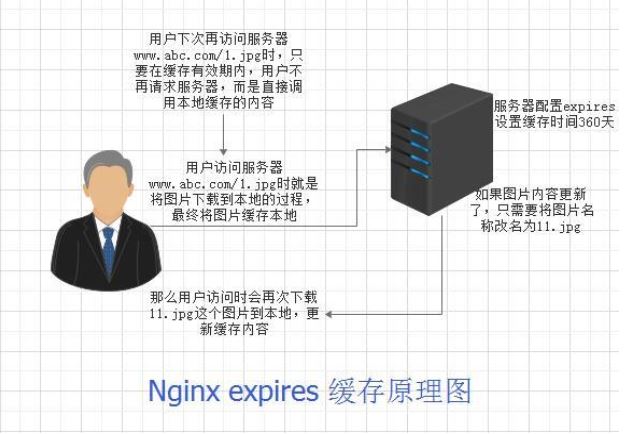
공식 문서를 참조하세요
[root@cairui conf]# cat nginx.conf | egrep -v "#|^$"
user nginx;
worker_processes 1;
events {
  worker_connections 1024;
}
http {
  include    mime.types;
  default_type application/octet-stream;
  sendfile    on;
  keepalive_timeout 65;
  server {
    listen    80;
    server_name localhost;
    location / {
      root  html;
      index index.html index.htm;
    }
location ~ .*\.(gif|jpg|jpeg|png|bmp|swf|js|html|htm|css)$ {
   log_not_found off;
   expires 7d ;
   access_log off;
   proxy_store on;
   proxy_store_access user:rw group:rw all:rw;
}
    error_page  500 502 503 504 /50x.html;
    location = /50x.html {
      root  html;
    }
  }
}

[root@cairui conf]# curl -i http://120.25.255.87/1.jpg
http/1.1 200 ok
server: nginx/1.13.9
date: mon, 05 mar 2018 04:08:41 gmt
content-type: image/jpeg
content-length: 48561
last-modified: wed, 29 nov 2017 08:16:39 gmt
connection: keep-alive
etag: "5a1e6ce7-bdb1"
expires: mon, 12 mar 2018 04:08:41 gmt
cache-control: max-age=604800
accept-ranges: bytes2.nginx 압축 모듈(gzip)
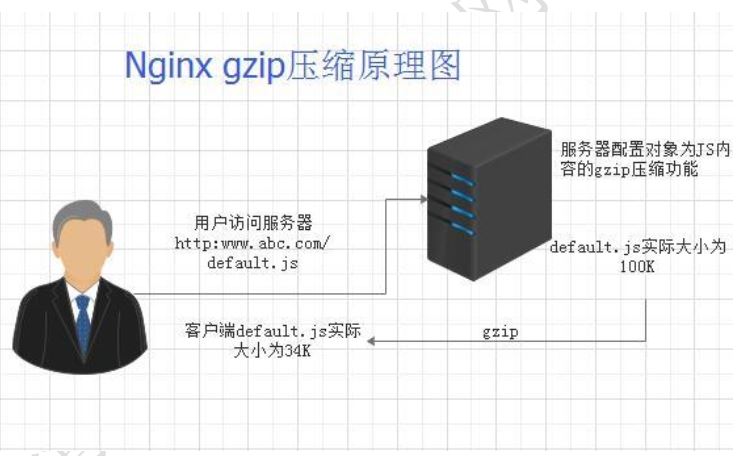
압축 모듈을 구성하세요
[root@localhost vhost]# vi www.vhosts
server {
listen 8001;
server_name 192.168.1.3;
location / {
root /web/www;
index index.html index.htm;
access_log /application/nginx/log/access_www.log commonlog;
}
location ~ .*\.(gif|jpg|jpge|png|bmp|swf)$
{
expires 3560d;
root /web/www;
}
location ~ .*\.(js|css)?$
{
expires 30d;
root /web/www;
}
gzip on; #开启压缩功能
gzip_min_length 1k; #设置允许压缩页面的最小字节数
gzip_buffers 4 16k;
gzip_http_version 1.0;
gzip_comp_level 2;
gzip_types text/plain application/x-javascript text/css application/xml;
gzip_vary on;
}서비스 다시 시작
[root@localhost vhost]# /application/nginx/sbin/nginx -t
nginx: the configuration file /application/nginx-1.10.1/conf/nginx.conf syntax is ok
nginx: configuration file /application/nginx-1.10.1/conf/nginx.conf test is successful
[root@localhost vhost]# /application/nginx/sbin/nginx -s reload
[root@localhost vhost]# cd /web/www/
[root@localhost www]# ll
total 12
-rw-r--r--. 1 root root 20 sep 26 07:00 index.html
-rw-r--r--. 1 root root 5798 sep 19 06:46 mysql.jpg
[root@localhost www]# rz
rz waiting to receive.
starting zmodem transfer. press ctrl+c to cancel.
transferring 1.js...
100% 42 kb 42 kb/s 00:00:01 0 errors
?[root@localhost www]# ll
total 56
-rw-r--r--. 1 root root 43978 sep 27 05:06 1.js
-rw-r--r--. 1 root root 20 sep 26 07:00 index.html
-rw-r--r--. 1 root root 5798 sep 19 06:46 mysql.jpg
客户端访问 http://192.168.1.3:8001/1.js
[root@localhost www]# curl -i http://192.168.1.3:8001/1.js
http/1.1 200 ok
server: nginx/1.10.1
date: tue, 27 sep 2016 04:44:08 gmt
content-type: application/javascript
content-length: 43978
last-modified: tue, 27 sep 2016 02:06:23 gmt
connection: keep-alive
etag: "57e9d41f-abca"
expires: thu, 27 oct 2016 04:44:08 gmt
cache-control: max-age=2592000
accept-ranges: bytes
위 내용은 Nginx 서비스 구성을 최적화하는 방법의 상세 내용입니다. 자세한 내용은 PHP 중국어 웹사이트의 기타 관련 기사를 참조하세요!

핫 AI 도구

Undresser.AI Undress
사실적인 누드 사진을 만들기 위한 AI 기반 앱

AI Clothes Remover
사진에서 옷을 제거하는 온라인 AI 도구입니다.

Undress AI Tool
무료로 이미지를 벗다

Clothoff.io
AI 옷 제거제

AI Hentai Generator
AI Hentai를 무료로 생성하십시오.

인기 기사
뜨거운 도구

메모장++7.3.1
사용하기 쉬운 무료 코드 편집기

SublimeText3 중국어 버전
중국어 버전, 사용하기 매우 쉽습니다.

스튜디오 13.0.1 보내기
강력한 PHP 통합 개발 환경

드림위버 CS6
시각적 웹 개발 도구

SublimeText3 Mac 버전
신 수준의 코드 편집 소프트웨어(SublimeText3)
뜨거운 주제
 7542
7542
 15
1381
52
83
11
55
19
21
87
15
1381
52
83
11
55
19
21
87

 nginx가 시작되었는지 확인하는 방법
Apr 14, 2025 pm 01:03 PM
nginx가 시작되었는지 확인하는 방법
Apr 14, 2025 pm 01:03 PM
nginx가 시작되었는지 확인하는 방법 : 1. 명령 줄을 사용하십시오 : SystemCTL 상태 nginx (linux/unix), netstat -ano | Findstr 80 (Windows); 2. 포트 80이 열려 있는지 확인하십시오. 3. 시스템 로그에서 nginx 시작 메시지를 확인하십시오. 4. Nagios, Zabbix 및 Icinga와 같은 타사 도구를 사용하십시오.
 nginx가 시작되었는지 확인하는 방법은 무엇입니까?
Apr 14, 2025 pm 12:48 PM
nginx가 시작되었는지 확인하는 방법은 무엇입니까?
Apr 14, 2025 pm 12:48 PM
Linux에서는 다음 명령을 사용하여 nginx가 시작되었는지 확인하십시오. SystemCTL 상태 Nginx 판사 명령 출력에 따라 : "active : running"이 표시되면 Nginx가 시작됩니다. "Active : 비활성 (죽음)"이 표시되면 Nginx가 중지됩니다.
 Linux에서 Nginx를 시작하는 방법
Apr 14, 2025 pm 12:51 PM
Linux에서 Nginx를 시작하는 방법
Apr 14, 2025 pm 12:51 PM
Linux에서 Nginx를 시작하는 단계 : Nginx가 설치되어 있는지 확인하십시오. systemctl start nginx를 사용하여 nginx 서비스를 시작하십시오. SystemCTL을 사용하여 NGINX를 사용하여 시스템 시작시 NGINX의 자동 시작을 활성화하십시오. SystemCTL 상태 nginx를 사용하여 시작이 성공했는지 확인하십시오. 기본 환영 페이지를 보려면 웹 브라우저의 http : // localhost를 방문하십시오.
 Windows에서 nginx를 구성하는 방법
Apr 14, 2025 pm 12:57 PM
Windows에서 nginx를 구성하는 방법
Apr 14, 2025 pm 12:57 PM
Windows에서 Nginx를 구성하는 방법은 무엇입니까? nginx를 설치하고 가상 호스트 구성을 만듭니다. 기본 구성 파일을 수정하고 가상 호스트 구성을 포함하십시오. 시작 또는 새로 고침 Nginx. 구성을 테스트하고 웹 사이트를보십시오. SSL을 선택적으로 활성화하고 SSL 인증서를 구성하십시오. 포트 80 및 443 트래픽을 허용하도록 방화벽을 선택적으로 설정하십시오.
 Nginx의 실행 상태를 확인하는 방법
Apr 14, 2025 am 11:48 AM
Nginx의 실행 상태를 확인하는 방법
Apr 14, 2025 am 11:48 AM
nginx의 실행 상태를 보는 방법은 다음과 같습니다. PS 명령을 사용하여 프로세스 상태를보십시오. nginx 구성 파일 /etc/nginx/nginx.conf를 봅니다. Nginx 상태 모듈을 사용하여 상태 끝점을 활성화하십시오. Prometheus, Zabbix 또는 Nagios와 같은 모니터링 도구를 사용하십시오.
 nginx 서버를 시작하는 방법
Apr 14, 2025 pm 12:27 PM
nginx 서버를 시작하는 방법
Apr 14, 2025 pm 12:27 PM
Nginx 서버를 시작하려면 다른 운영 체제에 따라 다른 단계가 필요합니다. Linux/Unix System : Nginx 패키지 설치 (예 : APT-Get 또는 Yum 사용). SystemCTL을 사용하여 nginx 서비스를 시작하십시오 (예 : Sudo SystemCtl start nginx). Windows 시스템 : Windows 바이너리 파일을 다운로드하여 설치합니다. nginx.exe 실행 파일을 사용하여 nginx를 시작하십시오 (예 : nginx.exe -c conf \ nginx.conf). 어떤 운영 체제를 사용하든 서버 IP에 액세스 할 수 있습니다.
 Nginx 크로스 도메인의 문제를 해결하는 방법
Apr 14, 2025 am 10:15 AM
Nginx 크로스 도메인의 문제를 해결하는 방법
Apr 14, 2025 am 10:15 AM
Nginx 크로스 도메인 문제를 해결하는 두 가지 방법이 있습니다. 크로스 도메인 응답 헤더 수정 : 교차 도메인 요청을 허용하고 허용 된 메소드 및 헤더를 지정하고 캐시 시간을 설정하는 지시문을 추가하십시오. CORS 모듈 사용 : 모듈을 활성화하고 CORS 규칙을 구성하여 크로스 도메인 요청, 메소드, 헤더 및 캐시 시간을 허용합니다.
 Nginx403을 해결하는 방법
Apr 14, 2025 am 10:33 AM
Nginx403을 해결하는 방법
Apr 14, 2025 am 10:33 AM
Nginx 403 금지 된 오류를 수정하는 방법은 무엇입니까? 파일 또는 디렉토리 권한을 확인합니다. 2. 확인 파일을 확인하십시오. 3. nginx 구성 파일 확인; 4. nginx를 다시 시작하십시오. 다른 가능한 원인으로는 방화벽 규칙, Selinux 설정 또는 응용 프로그램 문제가 있습니다.
