

Nginx 서버의 위치 구성 예시 분석

的 먼저, Location의 유형과 일치 규칙을 소개하겠습니다. Nginx Wiki의 예에서는 다음과 같이 설명합니다.
location = / {
 # matches the query / only.
 [ configuration a ]
}
location / {
 # matches any query, since all queries begin with /, but regular
 # expressions and any longer conventional blocks will be
 # matched first.
 [ configuration b ]
}
location ^~ /images/ {
 # matches any query beginning with /images/ and halts searching,
 # so regular expressions will not be checked.
 [ configuration c ]
}
location ~* \.(gif|jpg|jpeg)$ {
 # matches any request ending in gif, jpg, or jpeg. however, all
 # requests to the /images/ directory will be handled by
 # configuration c.
 [ configuration d ]
}

location @named {
 # such locations are not used during normal processing of requests,
 # they are intended only to process internally redirected requests (for example error_page, try_files).
 [ configuration e ]
}3, 일반 일치, 일치 순서는 구성 파일에 위치가 나타나는 순서입니다. 일반 위치가 일치하면 중지하고 이 위치의 구성을 사용합니다. 그렇지 않으면 2단계에서 얻은 가장 큰 문자열 일치가 있는 위치 구성을 사용합니다.的 예를 들어, 다음 요청은 다음과 같습니다: 1,/ -& gt; 구성 a
2,/some/Other/url을 사용하여 첫 번째 로컬 일치 중지에 대한 정확한 일치 -& gt; , 일치하는 항목이 없으므로 두 번째 위치의 구성을 사용합니다:configurationb
3, /images /1.jpg -> 먼저 문자열의 접두사 부분이 두 번째 위치와 일치합니다. 그런 다음 세 번째 위치도 접두사 일치가 이루어지며 이때 구성 파일에서 이 URL에 대한 최대 문자열 일치이며 위치에 "^~" 접두사가 있으면 일반 일치가 더 이상 수행되지 않고 구성이 수행됩니다. c4,/some/other/path/to/1.jpg -> 먼저 접두사 부분의 동일한 문자열이 두 번째 위치와 일치한 후 정규 매칭이 성공하면, 구성 d
는 nginx를 사용합니다. URL 일치 규칙은 실제로 약간 부적절합니다. 대부분의 경우 URL을 먼저 문자열 일치한 다음 일반 일치를 해야 합니다. 그러나 실제로 일반 일치가 먼저 수행되고 일치가 없으면 그런 다음 문자열 일치가 수행됩니다. 많은 경우 이렇게 하면 문자열 일치를 수행하는 시간을 절약할 수 있습니다. 어쨌든 nginx 소스 코드의 구현을 살펴보겠습니다. 위치 일치 프로세스를 소개하기 전에 먼저 nginx의 위치 구성을 소개하겠습니다. 실제로 구성 분석 단계에서 nginx는 문자열의 위치를 일치시킵니다. 정규 일치 위치입니다. 위치는 http 코어 모듈의 loc 구성에 있는 ngx_http_core_loc_conf_t 구조의 다음 두 필드에 저장됩니다.
ngx_http_location_tree_node_t  *static_locations;
(ngx_pcre)
ngx_http_core_loc_conf_t    **regex_locations;
if
location tree和regex_locations数组建立过程在ngx_http_block中:
/* create location trees */

  for (s = 0; s < cmcf->servers.nelts; s++) {

    clcf = cscfp[s]->ctx->loc_conf[ngx_http_core_module.ctx_index];

    if (ngx_http_init_locations(cf, cscfp[s], clcf) != ngx_ok) {
      return ngx_conf_error;
    }

    if (ngx_http_init_static_location_trees(cf, clcf) != ngx_ok) {
      return ngx_conf_error;
    }
  }
위의 단계는 일반 위치와 일치합니다. 저장 후 위치 트리는 ngx_http_init_static_location_trees에 설정됩니다.
static ngx_int_t
ngx_http_init_locations(ngx_conf_t *cf, ngx_http_core_srv_conf_t *cscf,
  ngx_http_core_loc_conf_t *pclcf)
{
 ...
  locations = pclcf->locations;

 ...
  /* 按照类型排序location,排序完后的队列: (exact_match 或 inclusive) (排序好的,如果某个exact_match名字和inclusive location相同,exact_match排在前面)
    | regex(未排序)| named(排序好的) | noname(未排序)*/
  ngx_queue_sort(locations, ngx_http_cmp_locations);

  named = null;
  n = 0;
#if (ngx_pcre)
  regex = null;
  r = 0;
#endif

  for (q = ngx_queue_head(locations);
     q != ngx_queue_sentinel(locations);
     q = ngx_queue_next(q))
  {
    lq = (ngx_http_location_queue_t *) q;

    clcf = lq->exact ? lq->exact : lq->inclusive;
    /* 由于可能存在nested location,也就是location里面嵌套的location,这里需要递归的处理一下当前location下面的nested location */
    if (ngx_http_init_locations(cf, null, clcf) != ngx_ok) {
      return ngx_error;
    }

#if (ngx_pcre)

    if (clcf->regex) {
      r++;

      if (regex == null) {
        regex = q;
      }

      continue;
    }

#endif

    if (clcf->named) {
      n++;

      if (named == null) {
        named = q;
      }

      continue;
    }

    if (clcf->noname) {
      break;
    }
  }

  if (q != ngx_queue_sentinel(locations)) {
    ngx_queue_split(locations, q, &tail);
  }
  /* 如果有named location,将它们保存在所属server的named_locations数组中 */
  if (named) {
    clcfp = ngx_palloc(cf->pool,
              (n + 1) * sizeof(ngx_http_core_loc_conf_t **));
    if (clcfp == null) {
      return ngx_error;
    }

    cscf->named_locations = clcfp;

    for (q = named;
       q != ngx_queue_sentinel(locations);
       q = ngx_queue_next(q))
    {
      lq = (ngx_http_location_queue_t *) q;

      *(clcfp++) = lq->exact;
    }

    *clcfp = null;

    ngx_queue_split(locations, named, &tail);
  }

#if (ngx_pcre)
  /* 如果有正则匹配location,将它们保存在所属server的http core模块的loc配置的regex_locations 数组中,
    这里和named location保存位置不同的原因是由于named location只能存在server里面,而regex location可以作为nested location */
  if (regex) {

    clcfp = ngx_palloc(cf->pool,
              (r + 1) * sizeof(ngx_http_core_loc_conf_t **));
    if (clcfp == null) {
      return ngx_error;
    }

    pclcf->regex_locations = clcfp;

    for (q = regex;
       q != ngx_queue_sentinel(locations);
       q = ngx_queue_next(q))
    {
      lq = (ngx_http_location_queue_t *) q;

      *(clcfp++) = lq->exact;
    }

    *clcfp = null;

    ngx_queue_split(locations, regex, &tail);
  }

#endif

  return ngx_ok;
}ngx_http_init_location() 함수에 의해 처리된 후 위치 대기열이 이미 순서대로 되어 있습니다. 삼항 트리를 설정하는 과정은 ngx_http_create_locations_list() 및 ngx_http_create_locations_tree에 있습니다. ()에서 완성된 이 두 함수는 모두 재귀 함수입니다. 첫 번째 함수는 위치 대기열의 각 노드를 반복하고 현재 노드의 이름이 앞에 붙은 위치를 얻습니다. 예를 들어 현재 노드의 목록 필드 아래에 저장합니다. 예를 들어 다음 위치의 경우:
static ngx_int_t
ngx_http_init_static_location_trees(ngx_conf_t *cf,
  ngx_http_core_loc_conf_t *pclcf)
{
  ngx_queue_t        *q, *locations;
  ngx_http_core_loc_conf_t  *clcf;
  ngx_http_location_queue_t *lq;

  locations = pclcf->locations;

  if (locations == null) {
    return ngx_ok;
  }

  if (ngx_queue_empty(locations)) {
    return ngx_ok;
  }
  /* 这里也是由于nested location,需要递归一下 */
  for (q = ngx_queue_head(locations);
     q != ngx_queue_sentinel(locations);
     q = ngx_queue_next(q))
  {
    lq = (ngx_http_location_queue_t *) q;

    clcf = lq->exact ? lq->exact : lq->inclusive;

    if (ngx_http_init_static_location_trees(cf, clcf) != ngx_ok) {
      return ngx_error;
    }
  }
  /* join队列中名字相同的inclusive和exact类型location,也就是如果某个exact_match的location名字和普通字符串匹配的location名字相同的话,
    就将它们合到一个节点中,分别保存在节点的exact和inclusive下,这一步的目的实际是去重,为后面的建立排序树做准备 */
  if (ngx_http_join_exact_locations(cf, locations) != ngx_ok) {
    return ngx_error;
  }
  /* 递归每个location节点,得到当前节点的名字为其前缀的location的列表,保存在当前节点的list字段下 */
  ngx_http_create_locations_list(locations, ngx_queue_head(locations));

  /* 递归建立location三叉排序树 */
  pclcf->static_locations = ngx_http_create_locations_tree(cf, locations, 0);
  if (pclcf->static_locations == null) {
    return ngx_error;
  }

  return ngx_ok;
} 정렬된 결과는 /abc /efg /efgaa =/xyz /xyz /xyza /xyzab /xyzb이고 그 이후의 결과는 다음과 같습니다. 중복 제거는 /abc /efg /efgaa /xyz /xyza /xyzab/xyzb입니다. ngx_http_create_locations_list() 실행 후 결과는 다음과 같습니다.
마지막으로 ngx_http_create_locations_tree 함수를 살펴보겠습니다. 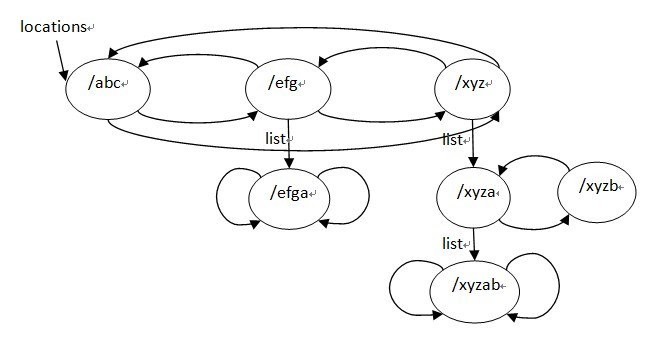
static ngx_http_location_tree_node_t *
ngx_http_create_locations_tree(ngx_conf_t *cf, ngx_queue_t *locations,
  size_t prefix)
{
  ...
  /* 根节点为locations队列的中间节点 */
  q = ngx_queue_middle(locations);

  lq = (ngx_http_location_queue_t *) q;
  len = lq->name->len - prefix;

  node = ngx_palloc(cf->pool,
           offsetof(ngx_http_location_tree_node_t, name) + len);
  if (node == null) {
    return null;
  }

  node->left = null;
  node->right = null;
  node->tree = null;
  node->exact = lq->exact;
  node->inclusive = lq->inclusive;

  node->auto_redirect = (u_char) ((lq->exact && lq->exact->auto_redirect)
              || (lq->inclusive && lq->inclusive->auto_redirect));

  node->len = (u_char) len;
  ngx_memcpy(node->name, &lq->name->data[prefix], len);

  /* 从中间节点开始断开 */
  ngx_queue_split(locations, q, &tail);

  if (ngx_queue_empty(locations)) {
    /*
     * ngx_queue_split() insures that if left part is empty,
     * then right one is empty too
     */
    goto inclusive;
  }

  /* 从locations左半部分得到左子树 */
  node->left = ngx_http_create_locations_tree(cf, locations, prefix);
  if (node->left == null) {
    return null;
  }

  ngx_queue_remove(q);

  if (ngx_queue_empty(&tail)) {
    goto inclusive;
  }


  /* 从locations右半部分得到右子树 */
  node->right = ngx_http_create_locations_tree(cf, &tail, prefix);
  if (node->right == null) {
    return null;
  }

inclusive:

  if (ngx_queue_empty(&lq->list)) {
    return node;
  }

  /* 从list队列得到tree子树 */
  node->tree = ngx_http_create_locations_tree(cf, &lq->list, prefix + len);
  if (node->tree == null) {
    return null;
  }

  return node;
}
     location tree节点的ngx_http_location_tree_node_s结构:
struct ngx_http_location_tree_node_s {
  ngx_http_location_tree_node_t  *left;
  ngx_http_location_tree_node_t  *right;
  ngx_http_location_tree_node_t  *tree;

  ngx_http_core_loc_conf_t    *exact;
  ngx_http_core_loc_conf_t    *inclusive;

  u_char              auto_redirect;
  u_char              len;
  u_char              name[1];
}; location tree结构用到的是left,right,tree 这3个字段, location tree实际上是一个三叉的字符串排序树,而且这里如果某个节点只考虑左,右子树,它是一颗平衡树,它的建立过程有点类似于一颗平衡排序二叉树的建立过程,先排序再用二分查找找到的节点顺序插入,ngx_http_location_tree_node_s的tree节点也是一颗平衡排序树,它是用该节点由ngx_http_create_locations_list()得到的list建立的,也就是该节点的名字是它的tree子树里面的所有节点名字的前缀,所以tree子树里面的所有节点的名字不用保存公共前缀,而且查找的时候,如果是转向tree节点的话,也是不需要再比较父节点的那段字符串了。
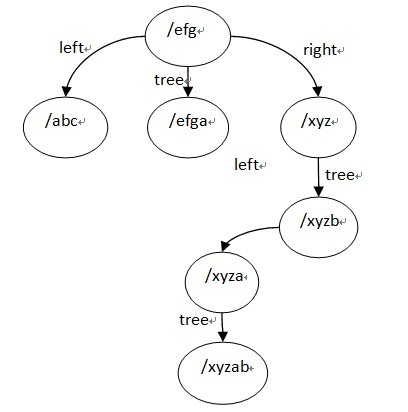
ngx_http_create_locations_tree()函数写的很清晰,它有一个参数是队列locations,它返回一颗三叉树,根节点为locations的中间节点,其左子树为locations队列的左半部分建立的location tree,右子树为location队列的右半部分建立的tree,tree节点为该根节点的list队列建立的tree。
最终建立的location tree如下(为了方便阅读,图中列出了tree节点的完整名字):
ps:关于 location modifier
1. =
这会完全匹配指定的 pattern ,且这里的 pattern 被限制成简单的字符串,也就是说这里不能使用正则表达式。
example:
server {
  server_name jb51.net;
  location = /abcd {
  […]
  }
}匹配情况:
  http://jb51.net/abcd    # 正好完全匹配
  http://jb51.net/abcd    # 如果运行 nginx server 的系统本身对大小写不敏感,比如 windows ,那么也匹配
  http://jb51.net/abcd?param1¶m2  # 忽略查询串参数(query string arguments),这里就是 /abcd 后面的 ?param1¶m2
  http://jb51.net/abcd/  # 不匹配,因为末尾存在反斜杠(trailing slash),nginx 不认为这种情况是完全匹配
  http://jb51.net/abcde  # 不匹配,因为不是完全匹配
2. (none)
可以不写 location modifier ,nginx 仍然能去匹配 pattern 。这种情况下,匹配那些以指定的 patern 开头的 uri,注意这里的 uri 只能是普通字符串,不能使用正则表达式。
example:
server {
  server_name jb51.net;
  location /abcd {
  […]
  }
}匹配情况:
  http://jb51.net/abcd    # 正好完全匹配
  http://jb51.net/abcd    # 如果运行 nginx server 的系统本身对大小写不敏感,比如 windows ,那么也匹配
  http://jb51.net/abcd?param1¶m2  # 忽略查询串参数(query string arguments),这里就是 /abcd 后面的 ?param1¶m2
  http://jb51.net/abcd/  # 末尾存在反斜杠(trailing slash)也属于匹配范围内
  http://jb51.net/abcde  # 仍然匹配,因为 uri 是以 pattern 开头的
3. ~
这个 location modifier 对大小写敏感,且 pattern 须是正则表达式
example:
server {
  server_name jb51.net;
  location ~ ^/abcd$ {
  […]
  }
}匹配情况:
  http://jb51.net/abcd    # 完全匹配
  http://jb51.net/abcd    # 不匹配,~ 对大小写是敏感的
  http://jb51.net/abcd?param1¶m2  # 忽略查询串参数(query string arguments),这里就是 /abcd 后面的 ?param1¶m2
  http://jb51.net/abcd/  # 不匹配,因为末尾存在反斜杠(trailing slash),并不匹配正则表达式 ^/abcd$
  http://jb51.net/abcde  # 不匹配正则表达式 ^/abcd$
注意:对于一些对大小写不敏感的系统,比如 windows ,~ 和 ~* 都是不起作用的,这主要是操作系统的原因。
4. ~*
与 ~ 类似,但这个 location modifier 不区分大小写,pattern 须是正则表达式
example:
server {
  server_name jb51.net;
  location ~* ^/abcd$ {
  […]
  }
}匹配情况:
 http://jb51.net/abcd    # 完全匹配
  http://jb51.net/abcd    # 匹配,这就是它不区分大小写的特性
  http://jb51.net/abcd?param1¶m2  # 忽略查询串参数(query string arguments),这里就是 /abcd 后面的 ?param1¶m2
  http://jb51.net/abcd/  # 不匹配,因为末尾存在反斜杠(trailing slash),并不匹配正则表达式 ^/abcd$
  http://jb51.net/abcde  # 不匹配正则表达式 ^/abcd$
5. ^~
匹配情况类似 2. (none) 的情况,以指定匹配模式开头的 uri 被匹配,不同的是,一旦匹配成功,那么 nginx 就停止去寻找其他的 location 块进行匹配了(与 location 匹配顺序有关)
6. @
用于定义一个 location 块,且该块不能被外部 client 所访问,只能被 nginx 内部配置指令所访问,比如 try_files or error_page
위 내용은 Nginx 서버의 위치 구성 예시 분석의 상세 내용입니다. 자세한 내용은 PHP 중국어 웹사이트의 기타 관련 기사를 참조하세요!

핫 AI 도구

Undresser.AI Undress
사실적인 누드 사진을 만들기 위한 AI 기반 앱

AI Clothes Remover
사진에서 옷을 제거하는 온라인 AI 도구입니다.

Undress AI Tool
무료로 이미지를 벗다

Clothoff.io
AI 옷 제거제

Video Face Swap
완전히 무료인 AI 얼굴 교환 도구를 사용하여 모든 비디오의 얼굴을 쉽게 바꾸세요!

인기 기사
뜨거운 도구

메모장++7.3.1
사용하기 쉬운 무료 코드 편집기

SublimeText3 중국어 버전
중국어 버전, 사용하기 매우 쉽습니다.

스튜디오 13.0.1 보내기
강력한 PHP 통합 개발 환경

드림위버 CS6
시각적 웹 개발 도구

SublimeText3 Mac 버전
신 수준의 코드 편집 소프트웨어(SublimeText3)
뜨거운 주제
 7667
7667
 15
1393
52
1205
24
91
11
73
19
15
1393
52
1205
24
91
11
73
19

 nginx 버전을 확인하는 방법
Apr 14, 2025 am 11:57 AM
nginx 버전을 확인하는 방법
Apr 14, 2025 am 11:57 AM
nginx 버전을 쿼리 할 수있는 메소드는 다음과 같습니다. nginx -v 명령을 사용하십시오. nginx.conf 파일에서 버전 지시문을 봅니다. nginx 오류 페이지를 열고 페이지 제목을 봅니다.
 Nginx에서 클라우드 서버 도메인 이름을 구성하는 방법
Apr 14, 2025 pm 12:18 PM
Nginx에서 클라우드 서버 도메인 이름을 구성하는 방법
Apr 14, 2025 pm 12:18 PM
클라우드 서버에서 nginx 도메인 이름을 구성하는 방법 : 클라우드 서버의 공개 IP 주소를 가리키는 레코드를 만듭니다. Nginx 구성 파일에 가상 호스트 블록을 추가하여 청취 포트, 도메인 이름 및 웹 사이트 루트 디렉토리를 지정합니다. Nginx를 다시 시작하여 변경 사항을 적용하십시오. 도메인 이름 테스트 구성에 액세스하십시오. 기타 참고 : HTTPS를 활성화하려면 SSL 인증서를 설치하고 방화벽에서 포트 80 트래픽을 허용하고 DNS 해상도가 적용되기를 기다립니다.
 nginx가 시작되었는지 확인하는 방법
Apr 14, 2025 pm 01:03 PM
nginx가 시작되었는지 확인하는 방법
Apr 14, 2025 pm 01:03 PM
nginx가 시작되었는지 확인하는 방법 : 1. 명령 줄을 사용하십시오 : SystemCTL 상태 nginx (linux/unix), netstat -ano | Findstr 80 (Windows); 2. 포트 80이 열려 있는지 확인하십시오. 3. 시스템 로그에서 nginx 시작 메시지를 확인하십시오. 4. Nagios, Zabbix 및 Icinga와 같은 타사 도구를 사용하십시오.
 Docker 컨테이너의 이름을 확인하는 방법
Apr 15, 2025 pm 12:21 PM
Docker 컨테이너의 이름을 확인하는 방법
Apr 15, 2025 pm 12:21 PM
단계를 따르면 Docker 컨테이너 이름을 쿼리 할 수 있습니다. 모든 컨테이너 (Docker PS)를 나열하십시오. 컨테이너 목록을 필터링합니다 (GREP 명령 사용). 컨테이너 이름 ( "이름"열에 위치)을 가져옵니다.
 nginx 서버를 시작하는 방법
Apr 14, 2025 pm 12:27 PM
nginx 서버를 시작하는 방법
Apr 14, 2025 pm 12:27 PM
Nginx 서버를 시작하려면 다른 운영 체제에 따라 다른 단계가 필요합니다. Linux/Unix System : Nginx 패키지 설치 (예 : APT-Get 또는 Yum 사용). SystemCTL을 사용하여 nginx 서비스를 시작하십시오 (예 : Sudo SystemCtl start nginx). Windows 시스템 : Windows 바이너리 파일을 다운로드하여 설치합니다. nginx.exe 실행 파일을 사용하여 nginx를 시작하십시오 (예 : nginx.exe -c conf \ nginx.conf). 어떤 운영 체제를 사용하든 서버 IP에 액세스 할 수 있습니다.
 Windows에서 nginx를 구성하는 방법
Apr 14, 2025 pm 12:57 PM
Windows에서 nginx를 구성하는 방법
Apr 14, 2025 pm 12:57 PM
Windows에서 Nginx를 구성하는 방법은 무엇입니까? nginx를 설치하고 가상 호스트 구성을 만듭니다. 기본 구성 파일을 수정하고 가상 호스트 구성을 포함하십시오. 시작 또는 새로 고침 Nginx. 구성을 테스트하고 웹 사이트를보십시오. SSL을 선택적으로 활성화하고 SSL 인증서를 구성하십시오. 포트 80 및 443 트래픽을 허용하도록 방화벽을 선택적으로 설정하십시오.
 Docker 용 컨테이너를 만드는 방법
Apr 15, 2025 pm 12:18 PM
Docker 용 컨테이너를 만드는 방법
Apr 15, 2025 pm 12:18 PM
Docker에서 컨테이너 만들기 : 1. 이미지를 당기기 : Docker Pull [Mirror Name] 2. 컨테이너 만들기 : Docker Run [옵션] [미러 이름] [명령] 3. 컨테이너 시작 : Docker Start [컨테이너 이름]
 nginx apache를 실행하는 방법
Apr 14, 2025 pm 12:33 PM
nginx apache를 실행하는 방법
Apr 14, 2025 pm 12:33 PM
Nginx가 Apache를 실행하려면 다음을 수행해야합니다. 1. Nginx 및 Apache를 설치하십시오. 2. NGINX 에이전트를 구성합니다. 3. nginx와 apache를 시작하십시오. 4. 구성을 테스트하여 도메인 이름에 액세스 한 후 Apache 컨텐츠를 볼 수 있는지 확인하십시오. 또한 포트 번호 매칭, 가상 호스트 구성 및 SSL/TLS 설정과 같은 다른 문제에주의를 기울여야합니다.
