Redis가 지연 대기열을 구현하는 방법
종속성 구성
<?xml version="1.0" encoding="UTF-8"?>
<project xmlns="http://maven.apache.org/POM/4.0.0" xmlns:xsi="http://www.w3.org/2001/XMLSchema-instance"
         xsi:schemaLocation="http://maven.apache.org/POM/4.0.0 https://maven.apache.org/xsd/maven-4.0.0.xsd">
    <modelVersion>4.0.0</modelVersion>
    <parent>
        <groupId>org.springframework.boot</groupId>
        <artifactId>spring-boot-starter-parent</artifactId>
        <version>2.3.12.RELEASE</version>
        <relativePath/> <!-- lookup parent from repository -->
    </parent>
    <groupId>com.homeey</groupId>
    <artifactId>redis-delay-queue</artifactId>
    <version>0.0.1-SNAPSHOT</version>
    <name>redis-delay-queue</name>
    <description>redis-delay-queue</description>
    <properties>
        <java.version>1.8</java.version>
    </properties>
    <dependencies>
        <dependency>
            <groupId>org.springframework.boot</groupId>
            <artifactId>spring-boot-starter-data-redis</artifactId>
        </dependency>
        <dependency>
            <groupId>org.springframework.boot</groupId>
            <artifactId>spring-boot-starter-web</artifactId>
        </dependency>
        <!-- https://mvnrepository.com/artifact/org.redisson/redisson -->
        <dependency>
            <groupId>org.redisson</groupId>
            <artifactId>redisson-spring-boot-starter</artifactId>
            <version>3.19.3</version>
        </dependency>
        <dependency>
            <groupId>org.redisson</groupId>
            <artifactId>redisson-spring-data-23</artifactId>
            <version>3.19.3</version>
        </dependency>
    </dependencies>

    <build>
        <plugins>
            <plugin>
                <groupId>org.springframework.boot</groupId>
                <artifactId>spring-boot-maven-plugin</artifactId>
                <configuration>
                    <excludes>
                        <exclude>
                            <groupId>org.projectlombok</groupId>
                            <artifactId>lombok</artifactId>
                        </exclude>
                    </excludes>
                </configuration>
            </plugin>
        </plugins>
    </build>
</project>사용 구성 [가장 쉬움]
두 번째: 별도의 redisson 구성 파일 사용
세 번째: spring.redis.redisson을 사용하여 구성 키 아래 구성
자세한 통합을 보려면 springboot 통합 redisson 구성
spring:
  redis:
    database: 0
    host: localhost
    port: 6379
    timeout: 10000
    lettuce:
      pool:
        max-active: 8
        max-wait: -1
        min-idle: 0
        max-idle: 8
로그인 후 복사을 참조하세요. 데모 코드package com.homeey.redisdelayqueue.delay; import lombok.RequiredArgsConstructor; import lombok.extern.slf4j.Slf4j; import org.redisson.api.RBlockingQueue; import org.redisson.api.RDelayedQueue; import org.redisson.api.RedissonClient; import org.springframework.context.annotation.Bean; import org.springframework.context.annotation.Configuration; import org.springframework.stereotype.Component; import javax.annotation.PostConstruct; import java.util.concurrent.ExecutorService; import java.util.concurrent.Executors; import java.util.concurrent.TimeUnit; /** * 明天的你会因今天到的努力而幸运 * * @author jt4mrg@qq.com * 23:11 2023-02-19 2023 **/ @Slf4j @Component @RequiredArgsConstructor public class RedissonDelayQueue { private final RDelayedQueue<String> delayedQueue; private final RBlockingQueue<String> blockingQueue; @PostConstruct public void init() { ExecutorService executorService = Executors.newFixedThreadPool(1); executorService.submit(() -> { while (true) { try { String task = blockingQueue.take(); log.info("rev delay task:{}", task); } catch (Exception e) { log.error("occur error", e); } } }); } public void offerTask(String task, long seconds) { log.info("add delay task:{},delay time:{}s", task, seconds); delayedQueue.offer(task, seconds, TimeUnit.SECONDS); } @Configuration static class RedissonDelayQueueConfigure { @Bean public RBlockingQueue<String> blockingQueue(RedissonClient redissonClient) { return redissonClient.getBlockingQueue("TOKEN-RENEWAL"); } @Bean public RDelayedQueue<String> delayedQueue(RBlockingQueue<String> blockingQueue, RedissonClient redissonClient) { return redissonClient.getDelayedQueue(blockingQueue); } } }로그인 후 복사실행 효과
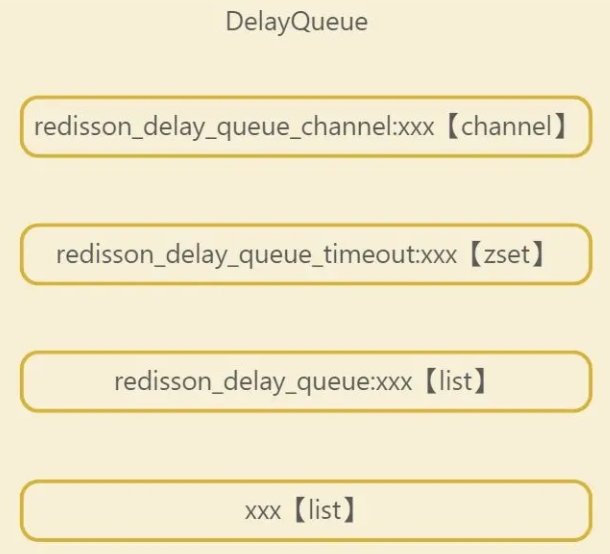
RedissonDelayedQueue 구현에서 네 가지 역할이 있음을 알 수 있습니다

redisson_delay_queue_timeout:xxx, 정렬된 세트 데이터 유형, 모든 지연된 작업은 지연된 작업의 만료 타임스탬프(작업 제출 시 타임스탬프 + 지연 시간)에 따라 저장 및 정렬되므로 목록 앞의 첫 번째 요소는 전체 지연된 대기열에서 실행되는 가장 빠른 작업입니다. important
RedissonDelayedQueue实现中我们看到有四个角色

redisson_delay_queue_timeout:xxx,sorted set数据类型,存放所有延迟任务,按照延迟任务的到期时间戳(提交任务时的时间戳 + 延迟时间)来排序的,所以列表的最前面的第一个元素就是整个延迟队列中最早要被执行的任务,这个概念很重要
redisson_delay_queue:xxx,list数据类型,暂时没发现什么用,只是在提交任务时会写入这里面,队列转移时又会删除里面的元素
xxx:list数据类型,被称为目标队列,这个里面存放的任务都是已经到了延迟时间的,可以被消费者获取的任务,所以上面demo中的RBlockingQueue的take方法是从这个目标队列中获取到任务的
redisson_delay_queue_channel:xxx,是一个channel,用来通知客户端开启一个延迟任务
队列创建
RedissonDelayedQueue延迟队列创建时,指定了队列转移服务,以及实现延迟队列的四个重要校色的key。核心代码是指定队列转移任务
QueueTransferTask task = new QueueTransferTask(commandExecutor.getConnectionManager()) {
@Override
protected RFuture<Long> pushTaskAsync() {
return commandExecutor.evalWriteAsync(getRawName(), LongCodec.INSTANCE, RedisCommands.EVAL_LONG,
"local expiredValues = redis.call('zrangebyscore', KEYS[2], 0, ARGV[1], 'limit', 0, ARGV[2]); "//拿到zset中过期的值列表
+ "if #expiredValues > 0 then " //如果有
+ "for i, v in ipairs(expiredValues) do "
+ "local randomId, value = struct.unpack('dLc0', v);"//解构消息,在提交任务时打包的消息
+ "redis.call('rpush', KEYS[1], value);" //放入无前缀的list 队头
+ "redis.call('lrem', KEYS[3], 1, v);"//移除带前缀list 队尾元素
+ "end; "
+ "redis.call('zrem', KEYS[2], unpack(expiredValues));" //移除zset中本次读取的过期元素
+ "end; "
// get startTime from scheduler queue head task
+ "local v = redis.call('zrange', KEYS[2], 0, 0, 'WITHSCORES'); "//取zset最小分值的元素
+ "if v[1] ~= nil then "
+ "return v[2]; " //返回分值,即过期时间
+ "end "
+ "return nil;",
Arrays.asList(getRawName(), timeoutSetName, queueName),
System.currentTimeMillis(), 100);
}
@Override
protected RTopic getTopic() {
return RedissonTopic.createRaw(LongCodec.INSTANCE, commandExecutor, channelName);
}
};生产者

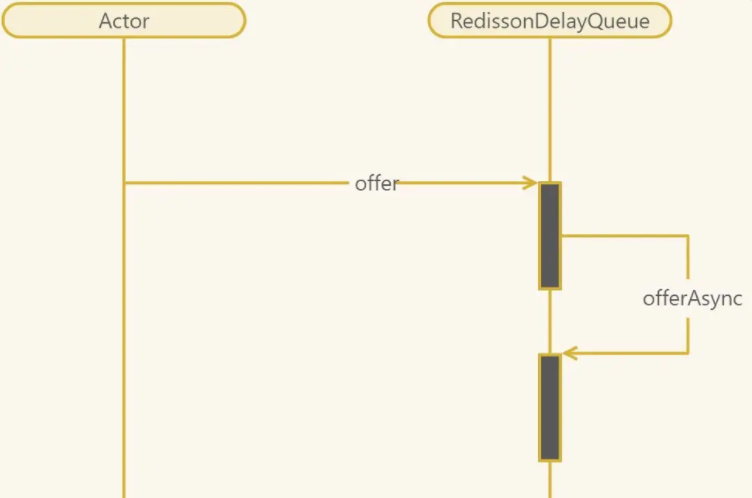
核心代码RedissonDelayedQueue#offerAsync
xxx: 목록 데이터 유형, 대상 대기열이라고 합니다. 여기에 저장된 작업은 지연 시간에 도달한 모든 작업이며 소비자가 얻을 수 있으므로 RBlockingQueue 위의 데모 take 메소드는 이 대상 큐🎜🎜🎜🎜redisson_delay_queue_channel:xxx에서 작업을 가져옵니다. 이 채널은 지연된 작업을 시작하도록 클라이언트에 알리는 데 사용되는 채널입니다🎜🎜🎜🎜큐 생성🎜🎜
RedissonDelayedQueue지연 대기열이 생성되면 대기열 전송 서비스와 지연 대기열에 대한 4가지 중요한 색상 보정 키가 지정됩니다. 핵심 코드는 대기열 전송 작업🎜 return commandExecutor.evalWriteNoRetryAsync(getRawName(), codec, RedisCommands.EVAL_VOID,
"local value = struct.pack('dLc0', tonumber(ARGV[2]), string.len(ARGV[3]), ARGV[3]);" //打包消息体:消息id,消息长度,消息值
+ "redis.call('zadd', KEYS[2], ARGV[1], value);"//zset中加入消息及其超时分值
+ "redis.call('rpush', KEYS[3], value);" //向带前缀的list中添加消息
// if new object added to queue head when publish its startTime
// to all scheduler workers
+ "local v = redis.call('zrange', KEYS[2], 0, 0); "//取出zset中第一个元素
+ "if v[1] == value then " //如果最快过期的元素就是这次发送的消息
+ "redis.call('publish', KEYS[4], ARGV[1]); " //channel中发布一下超时时间
+ "end;",
Arrays.asList(getRawName(), timeoutSetName, queueName, channelName),
timeout, randomId, encode(e)); 🎜🎜핵심 코드
RedissonDelayedQueue#offerAsync🎜rrreee🎜Consumer🎜🎜Consumer는 가장 간단합니다. 접두사 없이 목록에서 직접 BLPOP을 읽습니다🎜위 내용은 Redis가 지연 대기열을 구현하는 방법의 상세 내용입니다. 자세한 내용은 PHP 중국어 웹사이트의 기타 관련 기사를 참조하세요!

핫 AI 도구

Undresser.AI Undress
사실적인 누드 사진을 만들기 위한 AI 기반 앱

AI Clothes Remover
사진에서 옷을 제거하는 온라인 AI 도구입니다.

Undress AI Tool
무료로 이미지를 벗다

Clothoff.io
AI 옷 제거제

AI Hentai Generator
AI Hentai를 무료로 생성하십시오.

인기 기사

뜨거운 도구

메모장++7.3.1
사용하기 쉬운 무료 코드 편집기

SublimeText3 중국어 버전
중국어 버전, 사용하기 매우 쉽습니다.

스튜디오 13.0.1 보내기
강력한 PHP 통합 개발 환경

드림위버 CS6
시각적 웹 개발 도구

SublimeText3 Mac 버전
신 수준의 코드 편집 소프트웨어(SublimeText3)

뜨거운 주제
 7491
7491
 15
15
 1377
1377
 52
52
 77
77
 11
11
 52
52
 19
19
 19
19
 41
41
 Redis 클러스터 모드를 구축하는 방법
Apr 10, 2025 pm 10:15 PM
Redis Cluster Mode는 Sharding을 통해 Redis 인스턴스를 여러 서버에 배포하여 확장 성 및 가용성을 향상시킵니다. 시공 단계는 다음과 같습니다. 포트가 다른 홀수 redis 인스턴스를 만듭니다. 3 개의 센티넬 인스턴스를 만들고, Redis 인스턴스 및 장애 조치를 모니터링합니다. Sentinel 구성 파일 구성, Redis 인스턴스 정보 및 장애 조치 설정 모니터링 추가; Redis 인스턴스 구성 파일 구성, 클러스터 모드 활성화 및 클러스터 정보 파일 경로를 지정합니다. 각 redis 인스턴스의 정보를 포함하는 Nodes.conf 파일을 작성합니다. 클러스터를 시작하고 Create 명령을 실행하여 클러스터를 작성하고 복제본 수를 지정하십시오. 클러스터에 로그인하여 클러스터 정보 명령을 실행하여 클러스터 상태를 확인하십시오. 만들다
 Redis 명령을 사용하는 방법
Apr 10, 2025 pm 08:45 PM
Redis 지시 사항을 사용하려면 다음 단계가 필요합니다. Redis 클라이언트를 엽니 다. 명령 (동사 키 값)을 입력하십시오. 필요한 매개 변수를 제공합니다 (명령어마다 다름). 명령을 실행하려면 Enter를 누르십시오. Redis는 작업 결과를 나타내는 응답을 반환합니다 (일반적으로 OK 또는 -err).
 Redis에서 모든 키를 보는 방법
Apr 10, 2025 pm 07:15 PM
Redis에서 모든 키를 보려면 세 가지 방법이 있습니다. 키 명령을 사용하여 지정된 패턴과 일치하는 모든 키를 반환하십시오. 스캔 명령을 사용하여 키를 반복하고 키 세트를 반환하십시오. 정보 명령을 사용하여 총 키 수를 얻으십시오.
 기본 Redis를 구현하는 방법
Apr 10, 2025 pm 07:21 PM
Redis는 해시 테이블을 사용하여 데이터를 저장하고 문자열, 목록, 해시 테이블, 컬렉션 및 주문한 컬렉션과 같은 데이터 구조를 지원합니다. Redis는 Snapshots (RDB)를 통해 데이터를 유지하고 WRITE 전용 (AOF) 메커니즘을 추가합니다. Redis는 마스터 슬레이브 복제를 사용하여 데이터 가용성을 향상시킵니다. Redis는 단일 스레드 이벤트 루프를 사용하여 연결 및 명령을 처리하여 데이터 원자력과 일관성을 보장합니다. Redis는 키의 만료 시간을 설정하고 게으른 삭제 메커니즘을 사용하여 만료 키를 삭제합니다.
 Redis 카운터를 구현하는 방법
Apr 10, 2025 pm 10:21 PM
Redis Counter는 Redis Key-Value Pair 스토리지를 사용하여 다음 단계를 포함하여 계산 작업을 구현하는 메커니즘입니다. 카운터 키 생성, 카운트 증가, 카운트 감소, 카운트 재설정 및 카운트 얻기. Redis 카운터의 장점에는 빠른 속도, 높은 동시성, 내구성 및 단순성 및 사용 편의성이 포함됩니다. 사용자 액세스 계산, 실시간 메트릭 추적, 게임 점수 및 순위 및 주문 처리 계산과 같은 시나리오에서 사용할 수 있습니다.
 Redis로 서버를 시작하는 방법
Apr 10, 2025 pm 08:12 PM
Redis 서버를 시작하는 단계에는 다음이 포함됩니다. 운영 체제에 따라 Redis 설치. Redis-Server (Linux/MacOS) 또는 Redis-Server.exe (Windows)를 통해 Redis 서비스를 시작하십시오. Redis-Cli Ping (Linux/MacOS) 또는 Redis-Cli.exe Ping (Windows) 명령을 사용하여 서비스 상태를 확인하십시오. Redis-Cli, Python 또는 Node.js와 같은 Redis 클라이언트를 사용하여 서버에 액세스하십시오.
 Redis의 소스 코드를 읽는 방법
Apr 10, 2025 pm 08:27 PM
Redis 소스 코드를 이해하는 가장 좋은 방법은 단계별로 이동하는 것입니다. Redis의 기본 사항에 익숙해집니다. 특정 모듈을 선택하거나 시작점으로 기능합니다. 모듈 또는 함수의 진입 점으로 시작하여 코드를 한 줄씩 봅니다. 함수 호출 체인을 통해 코드를 봅니다. Redis가 사용하는 기본 데이터 구조에 익숙해 지십시오. Redis가 사용하는 알고리즘을 식별하십시오.
 Redis Lock을 사용하는 방법
Apr 10, 2025 pm 08:39 PM
Redis를 사용하여 잠금 작업을 사용하려면 SetNX 명령을 통해 잠금을 얻은 다음 만료 명령을 사용하여 만료 시간을 설정해야합니다. 특정 단계는 다음과 같습니다. (1) SETNX 명령을 사용하여 키 값 쌍을 설정하십시오. (2) 만료 명령을 사용하여 잠금의 만료 시간을 설정하십시오. (3) DEL 명령을 사용하여 잠금이 더 이상 필요하지 않은 경우 잠금을 삭제하십시오.


