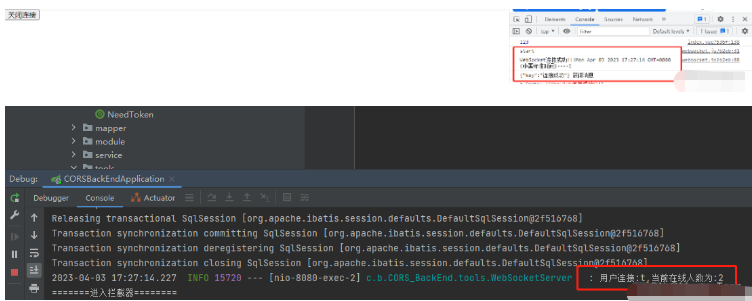
Spring Boot+Vue를 사용하여 소켓 알림 푸시를 구현하는 방법
Spring Boot 측면
첫 번째 단계는 종속성을 도입하는 것입니다
먼저 WebSocket에 필요한 종속성과 출력 형식을 처리하기 위한 종속성을 도입해야 합니다
<!--格式转换-->
<!-- https://mvnrepository.com/artifact/com.alibaba/fastjson -->
<dependency>
   <groupId>com.alibaba</groupId>
   <artifactId>fastjson</artifactId>
   <version>1.2.73</version>
</dependency>
<!--WebSocket依赖-->
<dependency>
    <groupId>org.springframework.boot</groupId>
    <artifactId>spring-boot-starter-websocket</artifactId>
</dependency>두 번째 단계는 WebSocket 구성 클래스를 생성하는 것입니다
import org.springframework.context.annotation.Bean;
import org.springframework.context.annotation.Configuration;
import org.springframework.web.socket.server.standard.ServerEndpointExporter;

/**
 * @author: tjp
 * @create: 2023-04-03 09:58
 * @Description: WebSocket配置
 */
@Configuration
public class WebSocketConfig {
    @Bean
    public ServerEndpointExporter serverEndpointExporter() {
        return new ServerEndpointExporter();
    }

}The 세 번째 단계는 WebSocket 서비스를 생성하는 것입니다
이 단계에서는 userId를 식별자로 사용하여 시스템에서 해당 사용자를 식별하며 향후 이를 기반으로 다른 작업 단계를 수행할 수도 있습니다.
import com.alibaba.fastjson.JSON;
import com.alibaba.fastjson.JSONObject;
import com.alibaba.excel.util.StringUtils;
import lombok.extern.slf4j.Slf4j;
import org.springframework.stereotype.Component;

import javax.websocket.*;
import javax.websocket.server.PathParam;
import javax.websocket.server.ServerEndpoint;
import java.io.IOException;
import java.util.HashMap;
import java.util.Iterator;
import java.util.concurrent.ConcurrentHashMap;

/**
 * @author: tjp
 * @create: 2023-04-03 13:55
 * @Description: WebSocket服务
 */

@ServerEndpoint("/websocket/{userId}")
@Slf4j
@Component
public class WebSocketServer {
    /**
     * 静态变量,用来记录当前在线连接数。应该把它设计成线程安全的。
     */
    private static int onlineCount = 0;
    /**
     * concurrent包的线程安全Set,用来存放每个客户端对应的MyWebSocket对象。
     */
    private static ConcurrentHashMap<String, WebSocketServer> webSocketMap = new ConcurrentHashMap<>();
    /**
     * 与某个客户端的连接会话,需要通过它来给客户端发送数据
     */
    private Session session;
    /**
     * 接收userId
     */
    private String userId = "";

    /**
     * 连接建立成功调用的方法
     */
    @OnOpen
    public void onOpen(Session session, @PathParam("userId") String userId) {
        this.session = session;
        this.userId = userId;
        if (webSocketMap.containsKey(userId)) {
            webSocketMap.remove(userId);
            //加入set中
        } else {
            webSocketMap.put(userId, this);
            //加入set中
            addOnlineCount();
            //在线数加1
        }

        log.info("用户连接:" + userId + ",当前在线人数为:" + getOnlineCount());

        try {
            HashMap<Object, Object> map = new HashMap<>();
            map.put("key", "连接成功");
            sendMessage(JSON.toJSONString(map));
        } catch (IOException e) {
            log.error("用户:" + userId + ",网络异常!!!!!!");
        }
    }


    /**
     * 连接关闭调用的方法
     */
    @OnClose
    public void onClose() {
        if (webSocketMap.containsKey(userId)) {
            webSocketMap.remove(userId);
            //从set中删除
            subOnlineCount();
        }
        log.info("用户退出:" + userId + ",当前在线人数为:" + getOnlineCount());
    }

    /**
     * 收到客户端消息后调用的方法
     *
     * @param message 客户端发送过来的消息
     */
    @OnMessage
    public void onMessage(String message, Session session) {
        log.info("用户消息:" + userId + ",报文:" + message);
        //可以群发消息
        //消息保存到数据库、redis
        if (StringUtils.isNotBlank(message)) {
            try {
                //解析发送的报文
                JSONObject jsonObject = JSONObject.parseObject(message);
                //追加发送人(防止串改)
                jsonObject.put("fromUserId", this.userId);
                String fromUserId = jsonObject.getString("fromUserId");
                //传送给对应toUserId用户的websocket
                if (StringUtils.isNotBlank(fromUserId) && webSocketMap.containsKey(fromUserId)) {
                    webSocketMap.get(fromUserId).sendMessage(jsonObject.toJSONString());
                    //自定义-业务处理

//                    DeviceLocalThread.paramData.put(jsonObject.getString("group"),jsonObject.toJSONString());
                } else {
                    log.error("请求的userId:" + fromUserId + "不在该服务器上");
                    //否则不在这个服务器上,发送到mysql或者redis
                }
            } catch (Exception e) {
                e.printStackTrace();
            }
        }
    }

    /**
     * 发生错误时候
     *
     * @param session
     * @param error
     */
    @OnError
    public void onError(Session session, Throwable error) {
        log.error("用户错误:" + this.userId + ",原因:" + error.getMessage());
        error.printStackTrace();
    }

    /**
     * 实现服务器主动推送
     */
    public void sendMessage(String message) throws IOException {
        //加入线程锁
        synchronized (session) {
            try {
                //同步发送信息
                this.session.getBasicRemote().sendText(message);
            } catch (IOException e) {
                log.error("服务器推送失败:" + e.getMessage());
            }
        }
    }


    /**
     * 发送自定义消息
     * */
    /**
     * 发送自定义消息
     *
     * @param message  发送的信息
     * @param toUserId 如果为null默认发送所有
     * @throws IOException
     */
    public static void sendInfo(String message, String toUserId) throws IOException {
        //如果userId为空,向所有群体发送
        if (StringUtils.isEmpty(toUserId)) {
            //向所有用户发送信息
            Iterator<String> itera = webSocketMap.keySet().iterator();
            while (itera.hasNext()) {
                String keys = itera.next();
                WebSocketServer item = webSocketMap.get(keys);
                item.sendMessage(message);
            }
        }
        //如果不为空,则发送指定用户信息
        else if (webSocketMap.containsKey(toUserId)) {
            WebSocketServer item = webSocketMap.get(toUserId);
            item.sendMessage(message);
        } else {
            log.error("请求的userId:" + toUserId + "不在该服务器上");
        }
    }

    public static synchronized int getOnlineCount() {
        return onlineCount;
    }

    public static synchronized void addOnlineCount() {
        WebSocketServer.onlineCount++;
    }

    public static synchronized void subOnlineCount() {
        WebSocketServer.onlineCount--;
    }

    public static synchronized ConcurrentHashMap<String, WebSocketServer> getWebSocketMap() {
        return WebSocketServer.webSocketMap;
    }

}네 번째 단계, 테스트 전송을 위한 컨트롤러 만들기
현재 온라인 사용자 수 가져오기
import com.......WebSocketServer;

@ApiOperation(value = "获取当前在线人数")
@GetMapping("/getOnlineCount")
public Integer getOnlineCount() {
    return WebSocketServer.getOnlineCount();
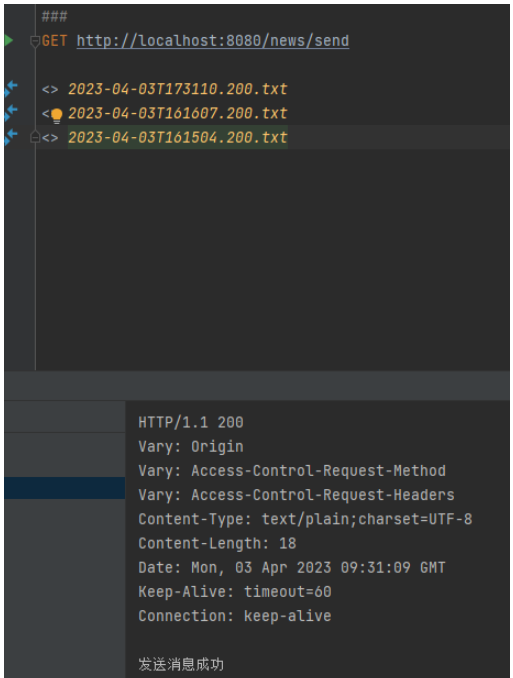
}인터페이스를 통해 프런트 엔드 사용자에게 푸시 메시지
import com.......WebSocketServer;
import org.springframework.web.bind.annotation.GetMapping;
import org.springframework.web.bind.annotation.RequestMapping;
import org.springframework.web.bind.annotation.RestController;

import java.io.IOException;

/**
 * @author: tjp
 * @create: 2023-04-03 13:57
 * @Description: 测试
 */
@RestController
@RequestMapping("/news")
public class NewsController {
    @GetMapping("/send")
    public String send() {
        try {
            WebSocketServer.sendInfo("这是websocket发送过来的消息!", "需要推送的用户的编号");
        } catch (IOException e) {
            throw new RuntimeException(e);
        }
        return "发送消息成功";
    }

}Vue 측
첫 번째 단계, 연결 도구 만들기 class
도구 클래스 websocket.js를 생성합니다. 여기서 userId는 식별자로 사용되는 userId입니다
/**
 * @author: tjp
 * @create: 2023-04-03 11:22
 * @Description: Socket客户端
 */
export class WebSocketClient {
  constructor(userId) {
    this.userId = userId;
    this.websocket = null;
    this.timeout = 10000; // 心跳超时时间,单位ms
    this.timeoutObj = null; // 心跳定时器
    this.serverTimeoutObj = null; // 服务器超时定时器
    this.lockReconnect = false; // 避免重复连接
    this.timeoutnum = null; // 重连延迟定时器
  }

  // 初始化WebSocket连接
  initWebSocket() {
    let wsUrl = `ws://127.0.0.1:8080/websocket/${this.userId}`;
    this.websocket = new WebSocket(wsUrl);
    this.websocket.onopen = this.websocketonopen.bind(this);
    this.websocket.onerror = this.websocketonerror.bind(this);
    this.websocket.onmessage = this.setOnmessageMessage.bind(this);
    this.websocket.onclose = this.websocketclose.bind(this);
    // 监听窗口关闭事件,当窗口关闭时,主动去关闭websocket连接,防止连接还没断开就关闭窗口,server端会抛异常。
    window.onbeforeunload = this.websocketclose.bind(this);
  }

  // 启动心跳
  start() {
    console.log('start');
    // 清除延时器
    this.timeoutObj && clearTimeout(this.timeoutObj);
    this.serverTimeoutObj && clearTimeout(this.serverTimeoutObj);
    /*// 向服务器发送心跳消息
    let actions = { "test": "12345" };
    this.websocket && this.websocket.readyState == 1 && this.websocket.send(JSON.stringify(actions));
    // 启动心跳定时器
    this.timeoutObj = setTimeout(() => {
      this.start();
      // 定义一个延时器等待服务器响应,若超时,则关闭连接,重新请求server建立socket连接
      this.serverTimeoutObj = setTimeout(() => {
        this.websocket.close();
      }, this.timeout)
    }, this.timeout)*/
  }

  // 重置心跳
  reset() {
    // 清除时间
    clearTimeout(this.timeoutObj);
    clearTimeout(this.serverTimeoutObj);
    // 重启心跳
    this.start();
  }

  // 重新连接
  reconnect() {
    if (this.lockReconnect) return;
    this.lockReconnect = true;
    // 没连接上会一直重连,设置延迟避免请求过多
    this.timeoutnum && clearTimeout(this.timeoutnum);
    this.timeoutnum = setTimeout(() => {
      this.initWebSocket();
      this.lockReconnect = false;
    }, 5000)
  }

  // 处理收到的消息
  async setOnmessageMessage(event) {
    console.log(event.data, '获得消息');
    // 重置心跳
    // this.reset();
    // 自定义全局监听事件
    window.dispatchEvent(new CustomEvent('onmessageWS', {
      detail: {
        data: event.data
      }
    }))
    // //发现消息进入    开始处理前端触发逻辑
    // if (event.data === 'success' || event.data === 'heartBath') return
  }

  // WebSocket连接成功回调
  websocketonopen() {
    // 开启心跳
    this.start();
    console.log("WebSocket连接成功!!!" + new Date() + "----" + this.websocket.readyState);
    clearInterval(this.otimer);//停止
  }

  // WebSocket连接错误回调
  websocketonerror(e) {
    console.log("WebSocket连接发生错误" + e);
  }

  // WebSocket连接关闭回调
  websocketclose(e) {
    this.websocket.close();
    clearTimeout(this.timeoutObj);
    clearTimeout(this.serverTimeoutObj);
    console.log("websocketcloe关闭连接")
  }

  // 关闭WebSocket连接
  closeWebSocket() {
    this.websocket.close();
    console.log("closeWebSocket关闭连接")
  }

  // 监听窗口关闭事件
  onbeforeunload() {
    this.closeWebSocket();
  }
}두 번째 단계는 연결을 설정하는 것입니다
연결을 설정하려는 모든 페이지에서 소켓 연결을 설정하세요
For 예를 들어, 사용자가 로그인 버튼을 클릭한 후
여기서 프로토타입을 사용하여 연결 개체를 만들고 연결을 시작할 수 있습니다
<script>
import Vue from "vue";
import {WebSocketClient} from "@/utils/websocket";
......
......
methods:{
handleLogin() {
this.$refs.loginForm.validate(valid => {
if (valid) {
this.loading = true
this.$store.dispatch('user/login', this.loginForm).then(() => {
this.$router.push({path: this.redirect || '/'})
this.loading = false
/*-----------在此处放入原型中------------*/
Vue.prototype.$WebSocketClientInstance = new WebSocketClient('t');
Vue.prototype.$WebSocketClientInstance.initWebSocket()
/*-----------------end------------*/
}).catch(() => {
this.loading = false
})
} else {
this.$message({message: '请填写正确格式的用户名或密码', type: 'error'})
return false
}
})
}
}
.....
.....
</script>
세 번째 단계는 서버에서 보낸 메시지를 듣는 것입니다
페이지에서 모니터링하고 싶다면 리스너를 이용해서 들어보세요
<script>
....
....
mounted() {
// 添加socket通知监听
window.addEventListener('onmessageWS', this.getSocketData)
},
methods: {
// 收到消息处理
getSocketData(res) {
console.log(res.detail)
console.log("llll")
},
}
....
....
</script>이때 백엔드 인터페이스를 통해 보낼 수 있습니다
테스트해 보세요


네 번째 단계는 연결을 끊는 것입니다
Make 버튼
<template>
  <div>
    <button @click="closeConnect">关闭连接</button>
  </div>
</template>

<script>
import {WebSocketClient} from "@/utils/websocket";
import Vue from "vue";

export default {
  methods: {
    closeConnect() {
      console.dir(Vue.prototype)
      Vue.prototype.$WebSocketClientInstance.closeWebSocket();
    },
  }
}
</script>
위 내용은 Spring Boot+Vue를 사용하여 소켓 알림 푸시를 구현하는 방법의 상세 내용입니다. 자세한 내용은 PHP 중국어 웹사이트의 기타 관련 기사를 참조하세요!

핫 AI 도구

Undresser.AI Undress
사실적인 누드 사진을 만들기 위한 AI 기반 앱

AI Clothes Remover
사진에서 옷을 제거하는 온라인 AI 도구입니다.

Undress AI Tool
무료로 이미지를 벗다

Clothoff.io
AI 옷 제거제

AI Hentai Generator
AI Hentai를 무료로 생성하십시오.

인기 기사

뜨거운 도구

메모장++7.3.1
사용하기 쉬운 무료 코드 편집기

SublimeText3 중국어 버전
중국어 버전, 사용하기 매우 쉽습니다.

스튜디오 13.0.1 보내기
강력한 PHP 통합 개발 환경

드림위버 CS6
시각적 웹 개발 도구

SublimeText3 Mac 버전
신 수준의 코드 편집 소프트웨어(SublimeText3)

뜨거운 주제
 7489
7489
 15
15
 1377
1377
 52
52
 77
77
 11
11
 52
52
 19
19
 19
19
 40
40
 vue.js로 JS 파일을 참조하는 방법
Apr 07, 2025 pm 11:27 PM
vue.js에서 JS 파일을 참조하는 세 가지 방법이 있습니다. & lt; script & gt; 꼬리표;; mounted () 라이프 사이클 후크를 사용한 동적 가져 오기; Vuex State Management Library를 통해 수입.
 Vue 용 버튼에 기능을 추가하는 방법
Apr 08, 2025 am 08:51 AM
HTML 템플릿의 버튼을 메소드에 바인딩하여 VUE 버튼에 함수를 추가 할 수 있습니다. 메소드를 정의하고 VUE 인스턴스에서 기능 로직을 작성하십시오.
 Vue에서 시계를 사용하는 방법
Apr 07, 2025 pm 11:36 PM
vue.js의 시계 옵션을 사용하면 개발자가 특정 데이터의 변경 사항을들을 수 있습니다. 데이터가 변경되면 콜백 기능을 트리거하여 업데이트보기 또는 기타 작업을 수행합니다. 구성 옵션에는 즉시 콜백을 실행할지 여부와 DEEP를 지정하는 즉시 포함되며, 이는 객체 또는 어레이에 대한 변경 사항을 재귀 적으로 듣는 지 여부를 지정합니다.
 Vue에서 부트 스트랩을 사용하는 방법
Apr 07, 2025 pm 11:33 PM
vue.js에서 bootstrap 사용은 5 단계로 나뉩니다 : Bootstrap 설치. main.js.의 부트 스트랩 가져 오기 부트 스트랩 구성 요소를 템플릿에서 직접 사용하십시오. 선택 사항 : 사용자 정의 스타일. 선택 사항 : 플러그인을 사용하십시오.
 Vue는 천막/텍스트 스크롤 효과를 인식합니다
Apr 07, 2025 pm 10:51 PM
CSS 애니메이션 또는 타사 라이브러리를 사용하여 VUE에서 Marquee/Text Scrolling Effects를 구현하십시오. 이 기사는 CSS 애니메이션 사용 방법을 소개합니다. & lt; div & gt; CSS 애니메이션을 정의하고 오버플로를 설정하십시오 : 숨겨진, 너비 및 애니메이션. 키 프레임을 정의하고 변환을 설정하십시오 : Translatex () 애니메이션의 시작과 끝에서. 지속 시간, 스크롤 속도 및 방향과 같은 애니메이션 속성을 조정하십시오.
 Vue가 이전 페이지로 돌아 오는 방법
Apr 07, 2025 pm 11:30 PM
vue.js는 이전 페이지로 돌아갈 수있는 네 가지 방법이 있습니다. $ router.go (-1) $ router.back () 사용 & lt; router-link to = & quot;/quot; Component Window.history.back () 및 메소드 선택은 장면에 따라 다릅니다.
 VUE 버전을 쿼리하는 방법
Apr 07, 2025 pm 11:24 PM
Vue DevTools를 사용하여 브라우저 콘솔에서 vue 탭을 보면 VUE 버전을 쿼리 할 수 있습니다. npm을 사용하여 "npm list -g vue"명령을 실행하십시오. package.json 파일의 "종속성"객체에서 vue 항목을 찾으십시오. Vue Cli 프로젝트의 경우 "vue -version"명령을 실행하십시오. & lt; script & gt에서 버전 정보를 확인하십시오. vue 파일을 나타내는 html 파일의 태그.
 Vue Traversal 사용 방법
Apr 07, 2025 pm 11:48 PM
vue.js가 트래버스 어레이 및 객체에 대한 세 가지 일반적인 방법이 있습니다. V- 결합 지시문은 V-FOR와 함께 사용하여 각 요소의 속성 값을 동적으로 설정할 수 있습니다. .MAP 메소드는 배열 요소를 새 배열로 변환 할 수 있습니다.


