Centos에서 Redis 클러스터를 구축하는 방법
필수 도구:
redis-3.0.0.tar
redis-3.0.0.gem(ruby 및 redis 인터페이스)
분석:
우선 클러스터 수에 기반이 필요합니다. 다음은 Simple Redis 클러스터 설정입니다(클러스터된 6개의 Redis 인스턴스).
하나의 서버에서 작동하므로 6개의 포트 번호만 필요합니다. 7001, 7002, 7003, 7004, 7005, 7006입니다.
단계:
1. redis-3.0.0.tar를 서버에 업로드하고(자신의 소프트웨어 디렉터리 지정) redis-3.0.0.tar의 압축을 풉니다.
2. c 언어 환경을 설치합니다. (centos 설치 후 c 언어 환경도 함께 제공됩니다.)
yum install gcc-c++
3. redis-3.0.0 디렉토리에 들어가세요.
make
4. redis를 /usr/local/redis에 설치하세요. 디렉토리
make install prefix=/usr/local/redis
5. 설치 성공 여부 확인(bin 디렉토리가 나타남)

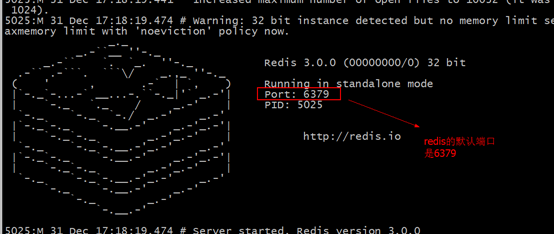
6. 프런트엔드에서 redis 시작(위 그림에서 bin 디렉토리 입력)
./redis-server ( open)
./redis-cli shutdown ( 닫기)

7. 백엔드 시작
redis 압축 해제 소스 코드 패키지(redis-3.0.0 디렉터리 아래)에 redis.conf 파일을 복사해야 합니다. bin 디렉터리로
redis.conf 파일을 수정합니다. daemonize를 yes로 변경하려면 먼저 vim redis.conf

backend 명령을 사용하여 redis를 시작해야 합니다.
bin 디렉터리에서 실행하세요./redis- server redis.conf
시작 성공 여부 확인

종료 후 터미널 시작 방법 :
./redis-cli shutdown
위는 별도의 Redis 설치 후 클러스터 구축!
ruby 설치
yum install ruby
yum install rubygems
다음 파일을 Linux 시스템에 업로드하세요
redis-3.0.0.gem(ruby 및 redis 인터페이스)
디렉토리에 들어가서 gem install redis-3.0.0을 실행하세요. gem
redis-3.0.0 패키지 아래 src 디렉터리에 있는 다음 파일을 /usr/local/redis/redis-cluster/
에 복사하세요. 전제 조건: 먼저 새 redis-cluster 디렉터리를 생성하세요

입니다. 클러스터 3개 호스트를 구축하려면 최소한 필요합니다. 각 호스트가 슬레이브 시스템으로 구성된 경우 최소 6개의 시스템이 필요합니다.
포트 디자인은 다음과 같습니다: 7001-7006
1단계: 7001 머신 복사
/usr/local/redis/ 디렉터리에 들어가서 cp bin ./redis-cluster/7001 –r
2단계를 실행합니다. : 영구 파일이 있으면 삭제하세요
rm -rf appendonly.aof dump.rdb
3단계: 클러스터 매개변수 설정

4단계: 포트 수정

5단계: 7002-7006 머신 복사
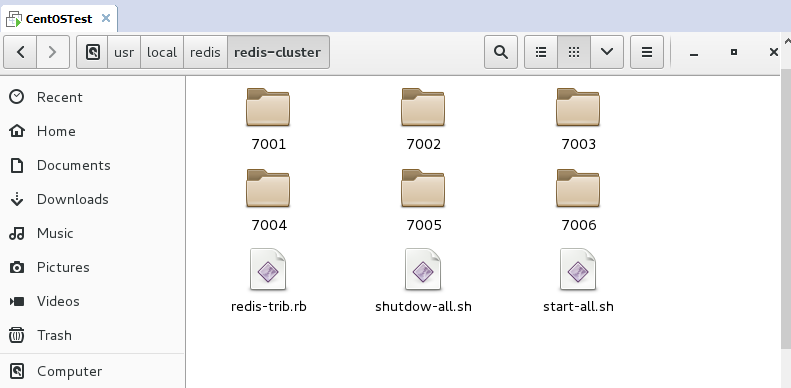
데스크톱 시스템 제공 아래 디렉터리 구조:

다음으로 원클릭을 설정하여 모든 Redis를 시작하거나 Redis 그룹을 닫습니다.
먼저 vim을 사용하여 파일을 열 수 있습니다. 존재하지 않는 것을 저장하면 존재하게 됩니다. (위 사진의 start-all.sh와 shutdown-all.sh는 제가 새로 만든 것입니다.)
start-all.sh:
cd 7001
./redis-server redis.conf
cd ..
cd 7002
./redis-server redis.conf
cd ..
cd 7003
./redis-server redis.conf
cd ..
cd 7004
./redis-server redis.conf
cd ..
cd 7005
./redis-server redis.conf
cd ..
cd 7006
./redis-server redis.conf
cd ..
shutdow-all.sh:
cd 7001
./redis-cli -p 7001 shutdown
cd ..
cd 7002
./redis-cli -p 7002 shutdown
cd ..
cd 7003
./redis-cli -p 7003 shutdown
cd ..
cd 7004
./redis-cli -p 7004 shutdown
cd ..
cd 7005
./redis-cli -p 7005 shutdown
cd ..
cd 7006
./redis-cli -p 7006 shutdown
cd ..
다음으로 권한을 수정합니다. 시작 가능한 스크립트 파일입니다
chmod u+x start-all.sh

chmod u+x shutdown-all.sh
다음으로 Ruby를 사용하여 이러한 클러스터를 연결하고 관리합니다.
/redis-trib.rb create --replicas 1 192.168.78.133:7001 192.168.78.133: 7002 192.168.78.133:7003 192.168.78.133:7004 192.168.78.133:7005 192.168.78.133:7006
표시:
connecting to node 192.168.242.137:7001: ok
connecting to node 192.168.242.137:7002: ok
connecting to node 192.168.242.137:7003: ok
connecting to node 192.168.242.137:7004: ok
connecting to node 192.168.242.137:7005: ok
connecting to node 192.168.242.137:7006: ok
>>> performing hash slots allocation on 6 nodes...
using 3 masters:
192.168.242.137:7001
192.168.242.137:7002
192.168.242.137:7003
adding replica 192.168.242.137:7004 to 192.168.242.137:7001
adding replica 192.168.242.137:7005 to 192.168.242.137:7002
adding replica 192.168.242.137:7006 to 192.168.242.137:7003
m: 8240cd0fe6d6f842faa42b0174fe7c5ddcf7ae24 192.168.242.137:7001
  slots:0-5460 (5461 slots) master
m: 4f52a974f64343fd9f1ee0388490b3c0647a4db7 192.168.242.137:7002
  slots:5461-10922 (5462 slots) master
m: cb7c5def8f61df2016b38972396a8d1f349208c2 192.168.242.137:7003
  slots:10923-16383 (5461 slots) master
s: 66adf006fed43b3b5e499ce2ff1949a756504a16 192.168.242.137:7004
  replicates 8240cd0fe6d6f842faa42b0174fe7c5ddcf7ae24
s: cbb0c9bc4b27dd85511a7ef2d01bec90e692793b 192.168.242.137:7005
  replicates 4f52a974f64343fd9f1ee0388490b3c0647a4db7
s: a908736eadd1cd06e86fdff8b2749a6f46b38c00 192.168.242.137:7006
  replicates cb7c5def8f61df2016b38972396a8d1f349208c2
can i set the above configuration? (type 'yes' to accept): yes
>>> nodes configuration updated
>>> assign a different config epoch to each node
>>> sending cluster meet messages to join the cluster
waiting for the cluster to join..
>>> performing cluster check (using node 192.168.242.137:7001)
m: 8240cd0fe6d6f842faa42b0174fe7c5ddcf7ae24 192.168.242.137:7001
  slots:0-5460 (5461 slots) master
m: 4f52a974f64343fd9f1ee0388490b3c0647a4db7 192.168.242.137:7002
  slots:5461-10922 (5462 slots) master
m: cb7c5def8f61df2016b38972396a8d1f349208c2 192.168.242.137:7003
  slots:10923-16383 (5461 slots) master
m: 66adf006fed43b3b5e499ce2ff1949a756504a16 192.168.242.137:7004
  slots: (0 slots) master
  replicates 8240cd0fe6d6f842faa42b0174fe7c5ddcf7ae24
m: cbb0c9bc4b27dd85511a7ef2d01bec90e692793b 192.168.242.137:7005
  slots: (0 slots) master
  replicates 4f52a974f64343fd9f1ee0388490b3c0647a4db7
m: a908736eadd1cd06e86fdff8b2749a6f46b38c00 192.168.242.137:7006
  slots: (0 slots) master
  replicates cb7c5def8f61df2016b38972396a8d1f349208c2
[ok] all nodes agree about slots configuration.
>>> check for open slots...
>>> check slots coverage...
[ok] all 16384 slots covered.
는 성공을 의미합니다!
테스트하고 7001 디렉토리에 들어가서 다음을 실행하세요: ./redis-cli -h 192.168.242.137 -p 7001 –c

위 내용은 Centos에서 Redis 클러스터를 구축하는 방법의 상세 내용입니다. 자세한 내용은 PHP 중국어 웹사이트의 기타 관련 기사를 참조하세요!

핫 AI 도구

Undresser.AI Undress
사실적인 누드 사진을 만들기 위한 AI 기반 앱

AI Clothes Remover
사진에서 옷을 제거하는 온라인 AI 도구입니다.

Undress AI Tool
무료로 이미지를 벗다

Clothoff.io
AI 옷 제거제

Video Face Swap
완전히 무료인 AI 얼굴 교환 도구를 사용하여 모든 비디오의 얼굴을 쉽게 바꾸세요!

인기 기사

뜨거운 도구

메모장++7.3.1
사용하기 쉬운 무료 코드 편집기

SublimeText3 중국어 버전
중국어 버전, 사용하기 매우 쉽습니다.

스튜디오 13.0.1 보내기
강력한 PHP 통합 개발 환경

드림위버 CS6
시각적 웹 개발 도구

SublimeText3 Mac 버전
신 수준의 코드 편집 소프트웨어(SublimeText3)

뜨거운 주제
 7622
7622
 15
15
 1389
1389
 52
52
 89
89
 11
11
 70
70
 19
19
 31
31
 138
138
 CentOS HDFS 구성을 최적화하는 방법
Apr 14, 2025 pm 07:15 PM
CentOS에서 HDFS 성능 향상 : CentOS에서 HDFS (Hadoop 분산 파일 시스템)를 최적화하기위한 포괄적 인 최적화 안내서에는 하드웨어, 시스템 구성 및 네트워크 설정에 대한 포괄적 인 고려가 필요합니다. 이 기사는 HDFS 성능을 향상시키는 데 도움이되는 일련의 최적화 전략을 제공합니다. 1. 하드웨어 업그레이드 및 선택 리소스 확장 : 서버의 CPU, 메모리 및 저장 용량을 최대한 많이 늘립니다. 고성능 하드웨어 : 고성능 네트워크 카드 및 스위치를 채택하여 네트워크 처리량을 개선합니다. 2. 시스템 구성 미세 조정 커널 매개 변수 조정 : TCP 연결 번호, 파일 핸들 번호 및 메모리 관리와 같은 커널 매개 변수를 최적화하기 위해 /etc/sysctl.conf 파일을 수정합니다. 예를 들어 TCP 연결 상태 및 버퍼 크기를 조정하십시오
 Centos는 유지 보수를 중지합니다. 2024
Apr 14, 2025 pm 08:39 PM
Centos는 2024 년에 상류 분포 인 RHEL 8이 종료 되었기 때문에 폐쇄 될 것입니다. 이 종료는 CentOS 8 시스템에 영향을 미쳐 업데이트를 계속받지 못하게합니다. 사용자는 마이그레이션을 계획해야하며 시스템을 안전하고 안정적으로 유지하기 위해 Centos Stream, Almalinux 및 Rocky Linux가 포함됩니다.
 Centos HDFS 구성을 확인하는 방법
Apr 14, 2025 pm 07:21 PM
CentOS 시스템에서 HDFS 구성 확인에 대한 완전한 안내서이 기사에서는 CentOS 시스템에서 HDF의 구성 및 실행 상태를 효과적으로 확인하는 방법을 안내합니다. 다음 단계는 HDF의 설정 및 작동을 완전히 이해하는 데 도움이됩니다. Hadoop 환경 변수 확인 : 먼저 Hadoop 환경 변수가 올바르게 설정되어 있는지 확인하십시오. 터미널에서 다음 명령을 실행하여 Hadoop이 올바르게 설치되고 구성되었는지 확인하십시오. Hadoopversion Check HDFS 구성 파일 : HDFS의 Core 구성 파일은/etc/hadoop/conf/directory에 있으며 Core-Site.xml 및 HDFS-Site.xml이 중요합니다. 사용
 CentOS 구성 IP 주소
Apr 14, 2025 pm 09:06 PM
CentOS에서 IP 주소를 구성하는 단계 : 현재 네트워크 구성보기 : IP Addr 네트워크 구성 파일 편집 : Sudo vi/etc/ifcfg-eths 스크립트/IFCFG-ETH-Scripts 변경 IP 주소 : iPaddr = 라인 변경 서브넷 마스크 및 게이트웨이 (옵션) (옵션) 네트워크 주소 : Su Systemctl CTL CTL CTLCTCTCTCTC TH SYSTEMCCTL
 Centos Shutdown 명령 줄
Apr 14, 2025 pm 09:12 PM
CentOS 종료 명령은 종료이며 구문은 종료 [옵션] 시간 [정보]입니다. 옵션은 다음과 같습니다. -H 시스템 중지 즉시 옵션; -P 종료 후 전원을 끕니다. -R 다시 시작; -대기 시간. 시간은 즉시 (현재), 분 (분) 또는 특정 시간 (HH : MM)으로 지정할 수 있습니다. 추가 정보는 시스템 메시지에 표시 될 수 있습니다.
 Centos 설치 MySQL
Apr 14, 2025 pm 08:09 PM
Centos에 MySQL을 설치하려면 다음 단계가 필요합니다. 적절한 MySQL Yum 소스 추가. mysql 서버를 설치하려면 yum install mysql-server 명령을 실행하십시오. mysql_secure_installation 명령을 사용하여 루트 사용자 비밀번호 설정과 같은 보안 설정을 작성하십시오. 필요에 따라 MySQL 구성 파일을 사용자 정의하십시오. MySQL 매개 변수를 조정하고 성능을 위해 데이터베이스를 최적화하십시오.
 HDFS에서 CentOS를 구성하는 데 어떤 단계가 필요합니까?
Apr 14, 2025 pm 06:42 PM
Centos 시스템에서 Hadoop 분산 파일 시스템 (HDF)을 구축하려면 여러 단계가 필요합니다. 이 기사는 간단한 구성 안내서를 제공합니다. 1. 초기 단계에서 JDK를 설치할 준비 : 모든 노드에 JavadevelopmentKit (JDK)을 설치하면 버전이 Hadoop과 호환되어야합니다. 설치 패키지는 Oracle 공식 웹 사이트에서 다운로드 할 수 있습니다. 환경 변수 구성 : /etc /프로파일 파일 편집, Java 및 Hadoop 설정 설정 시스템에서 JDK 및 Hadoop의 설치 경로를 찾을 수 있습니다. 2. 보안 구성 : SSH 비밀번호가없는 로그인 SSH 키 : 각 노드에서 ssh-keygen 명령을 사용하십시오.
 CentOS7에 Redis를 설치하는 방법 7
Apr 14, 2025 pm 08:21 PM
공식 Redis 소스에서 소스 코드 패키지를 다운로드하여 최신 버전을 보장하고 개인화 된 방식으로 사용자 정의 할 수 있도록 컴파일하고 설치하십시오. 특정 단계는 다음과 같습니다. 소프트웨어 패키지 목록을 업데이트하고 Redis 디렉토리 생성 Redis 소스 코드 패키지 다운로드 소스 코드 패키지를 압축하고 설치 구성을 컴파일하고 Redis 구성을 수정하여 시작 상태를 확인하십시오.


