Docker에서 nginx+confd를 통해 구성을 동적으로 생성하는 방법
프로젝트가 점점 더 많아지면 nginx 구성을 수정하기 위해 수동으로 서버로 이동하는 것은 매우 번거롭고 문제가 발생할 수 있습니다. nginx+confd+配置中心를 통해 오류를 방지하고 번거로운 프로세스를 줄이는 솔루션을 구현할 수 있습니다.
먼저 nginx+confd
FROM nginx:1.21.6
# 拷贝confd二进制可执行文件 https://github.com/kelseyhightower/confd/releases/tag/v0.16.0
COPY ./confd-0.16.0-linux-amd64 /usr/local/bin/confd
# 拷贝wait-for脚本 https://github.com/Eficode/wait-for
COPY ./wait-for /
# 安装nc支持wait-for脚本
RUN apt-get update \
  && DEBIAN_FRONTEND=noninteractive apt-get install -y \
    net-tools \
  && apt-get clean \
  && rm -rf /var/lib/apt/lists/*
RUN apt-get update \
  && DEBIAN_FRONTEND=noninteractive apt-get install -y \
    netcat \
  && apt-get clean \
  && rm -rf /var/lib/apt/lists/*
# 创建配置文件目录
RUN mkdir -p /etc/confd/conf.d \
# 给可执行权限
&& chmod +x /usr/local/bin/confd \
&& chmod 777 /wait-for \
# 使用脚本启动多进程
&& echo "#!/bin/bash" >> start.sh \
&& echo "nohup /usr/local/bin/confd -config-file /etc/confd/conf/confd.toml &" >> start.sh \
&& echo "nginx -g 'daemon off;'" >> start.sh \
&& chmod 664 ./start.sh
CMD ["bash", "start.sh"]version: '2'
networks:
app-tier:
driver: bridge
ipam:
driver: default
config:
- subnet: 172.22.0.0/16
services:
Etcd:
image: 'bitnami/etcd:3.5.2'
environment:
- ALLOW_NONE_AUTHENTICATION=yes
- ETCD_ADVERTISE_CLIENT_URLS=http://etcd:2379
ports:
- 2379:2379
- 2380:2380
networks:
app-tier:
ipv4_address: 172.22.0.2
EtcdKeeper:
image: 'deltaprojects/etcdkeeper:latest'
- 8000:8080
ipv4_address: 172.22.0.3
Nginx:
image: 'lablelan/nginx-confd'
command: sh -c '/wait-for Etcd:2379 -- bash start.sh'
depends_on:
- Etcd
volumes:
- "./confd.toml:/etc/confd/conf/confd.toml"
- "./nginx.tmpl:/etc/confd/templates/nginx.tmpl"
- "./myapp-nginx.toml:/etc/confd/conf.d/myapp-nginx.toml"
- "./nginx.conf:/etc/nginx/nginx.conf"
- "./conf.d:/etc/nginx/conf.d"
- 80:80
ipv4_address: 172.22.0.4https://hub.docker.com/repository/docker/lablelan/nginx -confd여기에서 docker-compose를 사용하십시오. nginx+confd+etcd+etcdkeeper를 사용하여 nginx 구성을 그래픽으로 수정하는 방법을 보여주기 위해
rrreee
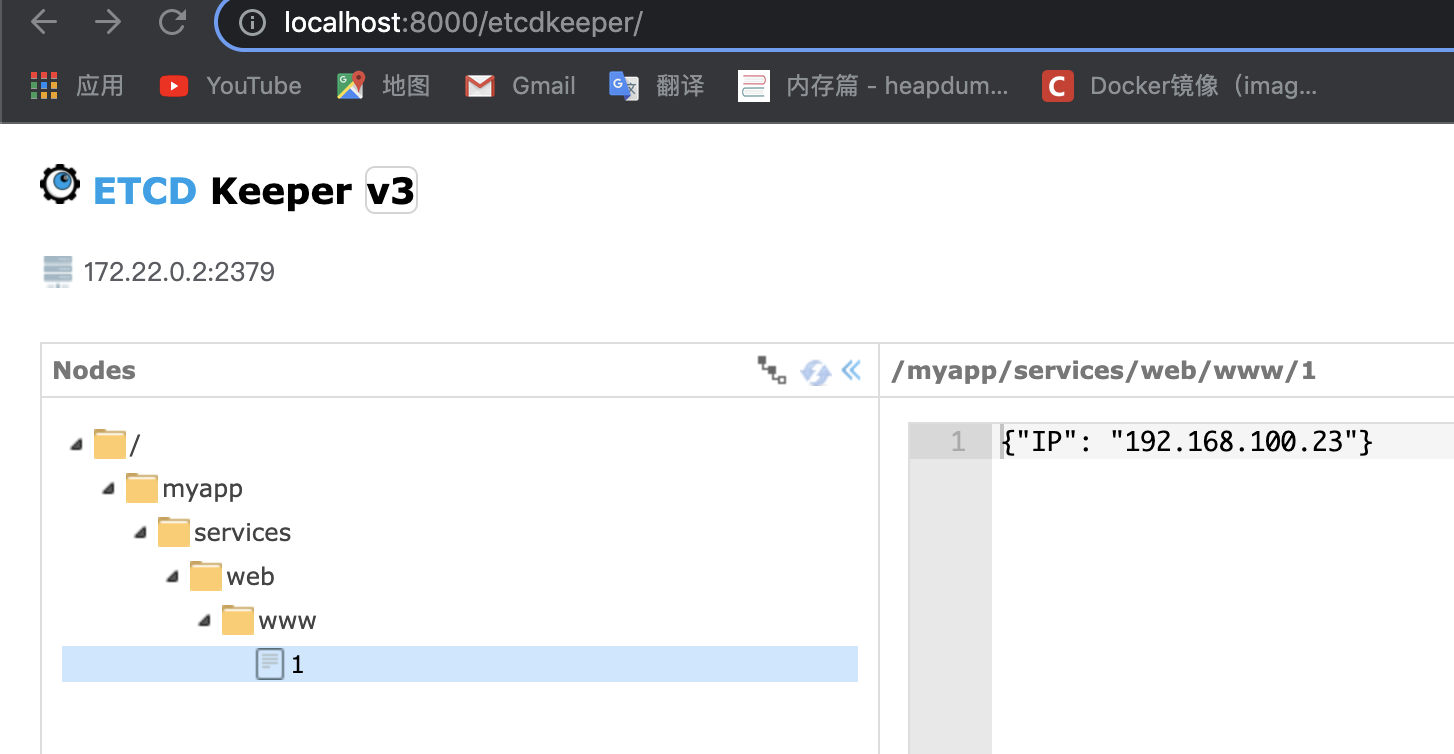
시작 후 /myapp/services/web/www/1이 다음을 통해 생성되거나 업데이트될 때 etcdkeeper를 사용하면 nginx 구성이 동적으로 생성되고(포트 80이 포트 8080을 전달) 자동으로 적용됩니다. 여기에 구성된 IP는 인트라넷 IP이며 127.0.0.1을 사용하지 않습니다. 서비스가 nginx 컨테이너에서 실행되지 않기 때문입니다(www.lablelan.com의 로컬 호스트는 127.0.0.1로 설정되어 있습니다)
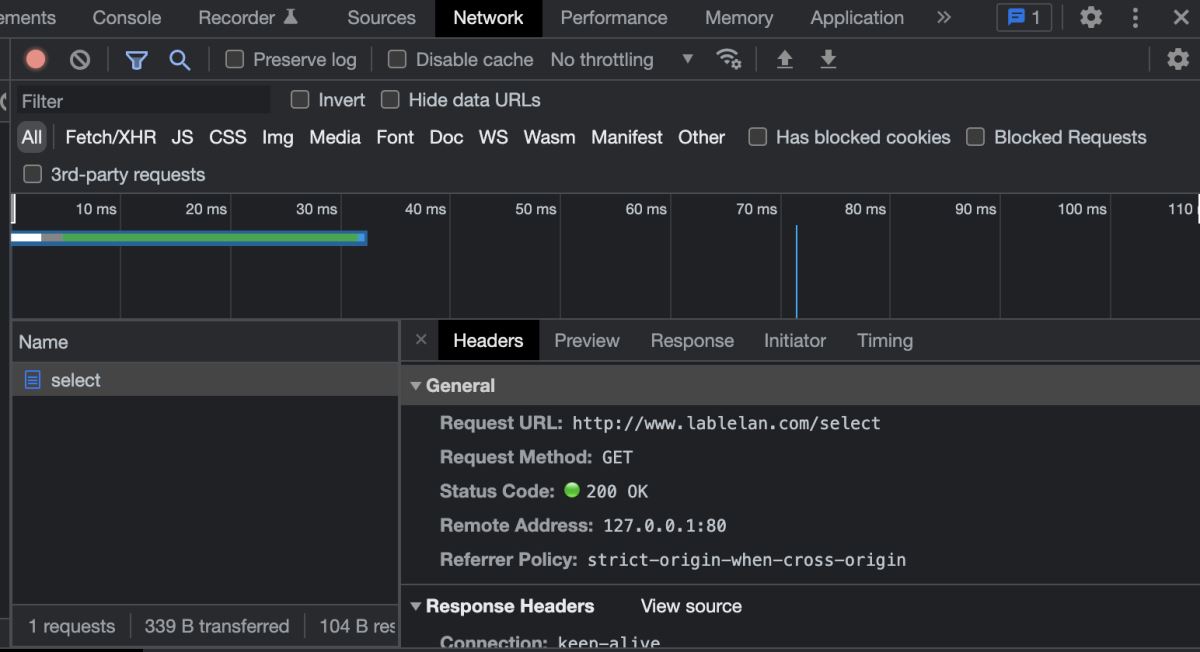
https://gitee.com/lablelan/amis-demoetcd 설정 후 받으시면 됩니다. , 접속 http://www .lablelan.com/select 가 성공적으로 반환된 것을 볼 수 있습니다

위 내용은 Docker에서 nginx+confd를 통해 구성을 동적으로 생성하는 방법의 상세 내용입니다. 자세한 내용은 PHP 중국어 웹사이트의 기타 관련 기사를 참조하세요!

핫 AI 도구

Undresser.AI Undress
사실적인 누드 사진을 만들기 위한 AI 기반 앱

AI Clothes Remover
사진에서 옷을 제거하는 온라인 AI 도구입니다.

Undress AI Tool
무료로 이미지를 벗다

Clothoff.io
AI 옷 제거제

AI Hentai Generator
AI Hentai를 무료로 생성하십시오.

인기 기사

뜨거운 도구

메모장++7.3.1
사용하기 쉬운 무료 코드 편집기

SublimeText3 중국어 버전
중국어 버전, 사용하기 매우 쉽습니다.

스튜디오 13.0.1 보내기
강력한 PHP 통합 개발 환경

드림위버 CS6
시각적 웹 개발 도구

SublimeText3 Mac 버전
신 수준의 코드 편집 소프트웨어(SublimeText3)

뜨거운 주제
 7529
7529
 15
15
 1378
1378
 52
52
 81
81
 11
11
 54
54
 19
19
 21
21
 76
76
 Docker Desktop을 사용하는 방법
Apr 15, 2025 am 11:45 AM
Docker Desktop을 사용하는 방법? Docker Desktop은 로컬 머신에서 Docker 컨테이너를 실행하는 도구입니다. 사용 단계는 다음과 같습니다. 1. Docker Desktop 설치; 2. Docker Desktop을 시작하십시오. 3. Docker 이미지를 만듭니다 (Dockerfile 사용); 4. Docker Image 빌드 (Docker 빌드 사용); 5. 도커 컨테이너를 실행하십시오 (Docker Run 사용).
 중국의 도커 이미지 소스를 변경하는 방법
Apr 15, 2025 am 11:30 AM
국내 거울 소스로 전환 할 수 있습니다. 단계는 다음과 같습니다. 1. 구성 파일 /etc/docker/daemon.json 편집 및 미러 소스 주소를 추가하십시오. 2. 저장 및 종료 후 Docker Service Sudo SystemCTL Docker를 다시 시작하여 이미지 다운로드 속도 및 안정성을 향상시킵니다.
 Docker 버전을 읽는 방법
Apr 15, 2025 am 11:51 AM
Docker 버전을 얻으려면 다음 단계를 수행 할 수 있습니다. Docker 명령 "Docker -version"을 실행하여 클라이언트 및 서버 버전을 볼 수 있습니다. Mac 또는 Windows의 경우 Docker Desktop GUI의 버전 탭 또는 Aff Docker Desktop 메뉴를 통해 버전 정보를 볼 수도 있습니다.
 Docker에서 거울을 만드는 방법
Apr 15, 2025 am 11:27 AM
Docker 이미지 생성 단계 : 빌드 지침이 포함 된 Dockerfile을 작성하십시오. Docker 빌드 명령을 사용하여 터미널에 이미지를 빌드하십시오. Docker 태그 명령을 사용하여 이미지를 태그하고 이름과 태그를 지정하십시오.
 Docker의 이미지를 업데이트하는 방법
Apr 15, 2025 pm 12:03 PM
Docker 이미지를 업데이트하는 단계는 다음과 같습니다. 최신 이미지 태그 가져 오기 새 이미지 특정 태그의 이전 이미지 삭제 (선택 사항) 컨테이너를 다시 시작하십시오 (필요한 경우)
 Docker 컨테이너의 이름을 확인하는 방법
Apr 15, 2025 pm 12:21 PM
단계를 따르면 Docker 컨테이너 이름을 쿼리 할 수 있습니다. 모든 컨테이너 (Docker PS)를 나열하십시오. 컨테이너 목록을 필터링합니다 (GREP 명령 사용). 컨테이너 이름 ( "이름"열에 위치)을 가져옵니다.
 Docker의 개인 저장소 구축 방법
Apr 15, 2025 am 11:06 AM
Docker Private Repositories를 구축하여 컨테이너 이미지를 안전하게 저장하고 관리하여 엄격한 제어 및 보안을 제공 할 수 있습니다. 단계에는 리포지토리 생성, 액세스 부여, 저장소 배포, 이미지 밀기 및 이미지를 당기는 단계가 포함됩니다. 보안, 버전 제어, 네트워크 트래픽 감소 및 사용자 정의가 장점이 있습니다.
 Docker LNMP에 전화하는 방법
Apr 15, 2025 am 11:15 AM
Docker LNMP 컨테이너 호출 단계 : 컨테이너 실행 : Docker Run -D-- 이름 LNMP -Container -P 80:80 -P 443 : 443 LNMP -Stack 컨테이너 IP를 얻으려면 Docker LNMP -Container | grep iPaddress 액세스 웹 사이트 : http : // & lt; 컨테이너 ip & gt;/index.phpssh 액세스 : docker exec -it lnmp -container bash access mysql : mysql -u roo


