

Docker가 nginx를 사용하여 Tomcat 클러스터를 구축하는 방법

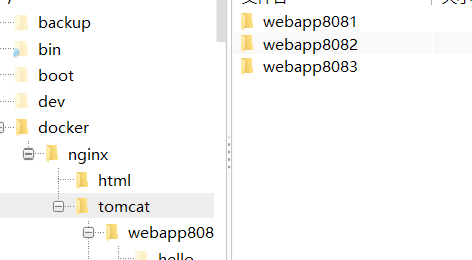
먼저 docker 구성을 용이하게 하기 위해 루트 디렉터리에 직접 만듭니다. 1단계: 폴더 만들기: 게시 폴더
mkdir -p /docker/tomcat/webapp8081

mkdir -p /docker/tomcat/webapp8082

mkdir -p /docker/tomcat/webapp8083
2단계: tomcat 컨테이너(포트)를 만듭니다. 실제 교체에 따라 맞춤 설정 가능)
docker run -d --name tomcat8081 -p 8081:8080 -v /docker/tomcat/webapp8081:/usr/local/tomcat/webapps/ tomcat
docker run -d --name tomcat8082 -p 8082:8080 -v /docker/tomcat/webapp8082:/usr/local/tomcat/webapps/ tomcat
docker run -d --name tomcat8083 -p 8083:8080 -v /docker/tomcat/webapp8083:/usr/local/tomcat/webapps/ tomcat
생성 완료 후 docker ps 명령어를 사용하여 생성 성공 여부를 확인한 후

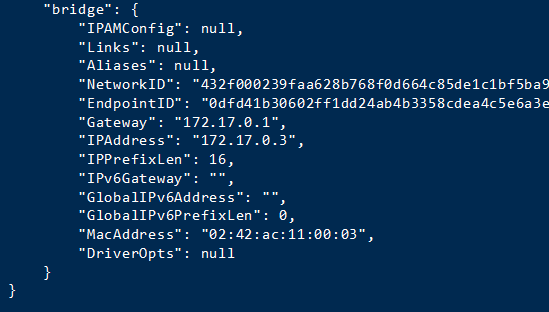
명령어를 사용하여 tomcat의 IP를 확인합니다. 순서대로 첫 번째 예만 사용됩니다
dockerspect tomcat8081docker inspect tomcat8081
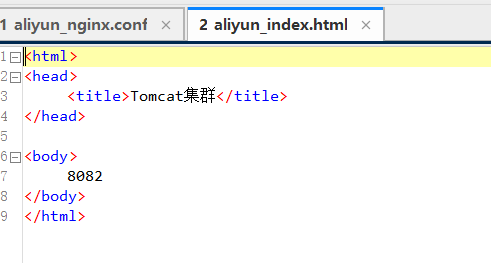
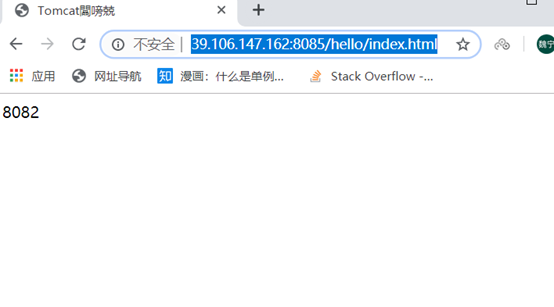
第四步:为了方便测试 我这里就不上传war包了,直接 在里面创建了一个hello/index.html 文件
注意:如果nginx为docker容器,必须使用tomact容器ip,否则连不上
首先在官网上下载nginx的官方版本
官网:
点击右边导航栏的download,进入下载界面 选择对应的版本 进行下载,我这里就使用nginx-1.6.2.tar
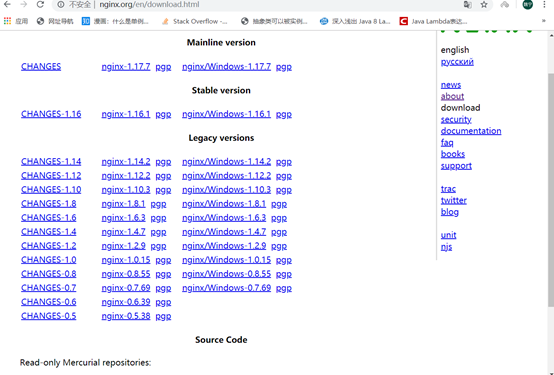
下载完成后,将文件放到自定义的文件夹,我这里放到/usr/local/tools/nginx-1.6.2

使用 这个命令将nginx 解压:
tar vxf nginx-1.6.2.tar.gz
4단계: 테스트의 편의를 위해 여기에는 war 패키지를 업로드하지 않고 hello/index.html 파일을 직접 생성하겠습니다. 참고 : nginx가 docker 컨테이너인 경우 tomact 컨테이너 ip를 사용해야 합니다. 그렇지 않으면 연결되지 않습니다먼저 공식 웹사이트로 이동하세요. nginx 공식 버전을 다운로드하세요공식 웹사이트:오른쪽 탐색 모음에서 다운로드를 클릭하세요. 다운로드 인터페이스에 들어가서 다운로드할 해당 버전을 선택하려면 여기에서 nginx-1.6.2.tar를 사용하겠습니다다운로드가 완료된 후 파일을 사용자 정의 폴더에 넣습니다. 여기에 넣습니다. /usr/local/tools/nginx- 1.6.2
nginx의 압축을 풀려면 이 명령을 사용하세요:
tar vxf nginx-1.6.2.tar.gz압축 해제가 완료되면 여기 루트로 돌아갑니다. 디렉토리, 루트에 호스트 폴더를 만듭니다. 디렉토리의 목적은 nginx를 마운트할 수 있도록 파일을 생성하는 것입니다(사용자 정의할 수도 있음) 여기에서 호스트 폴더를 생성하세요mkdir -p /docker/nginx/ vim /docker/nginx/nginx.conf mkdir -p /docker/nginx/html
#error_log logs/error.log;
#error_log logs/error.log notice;
#error_log logs/error.log info;
#pid logs/nginx.pid;
events {
worker_connections 1024; #最大连接数量
}
http {
include mime.types;
default_type application/octet-stream;
upstream mytomcat{
server 172.17.0.3:8080 weight=10;
# 另外mytomcat 这里名字和下方的名字保持一致 这里需要和你的tomcat ip保持一致
server 172.17.0.4:8080 weight=50;
server 172.17.0.5:8080 weight=10;
}
#log_format main '$remote_addr - $remote_user [$time_local] "$request" '
# '$status $body_bytes_sent "$http_referer" '
# '"$http_user_agent" "$http_x_forwarded_for"';
#access_log logs/access.log main;
sendfile on;
#tcp_nopush on;
#keepalive_timeout 0;
keepalive_timeout 65;
#gzip on;
server {
listen 80;
server_name mytomcat;
#charset koi8-r;
#access_log logs/host.access.log main;
location / {
# root html;
# index index.html index.htm;
proxy_connect_timeout 50;
proxy_read_timeout 10;
proxy_send_timeout 20;
proxy_pass http://mytomcat;
}
#error_page 404 /404.html;
# redirect server error pages to the static page /50x.html
#
error_page 500 502 503 504 /50x.html;
location = /50x.html {
root html;
}
# proxy the php scripts to apache listening on 127.0.0.1:80
#
#location ~ \.php$ {
# proxy_pass http://127.0.0.1;
#}
# pass the php scripts to fastcgi server listening on 127.0.0.1:9000
#
#location ~ \.php$ {
# root html;
# fastcgi_pass 127.0.0.1:9000;
# fastcgi_index index.php;
# fastcgi_param script_filename /scripts$fastcgi_script_name;
# include fastcgi_params;
#}
# deny access to .htaccess files, if apache's document root
# concurs with nginx's one
#
#location ~ /\.ht {
# deny all;
#}
}
# another virtual host using mix of ip-, name-, and port-based configuration
#
#server {
# listen 8000;
# listen somename:8080;
# server_name somename alias another.alias;
# location / {
# root html;
# index index.html index.htm;
# }
#}
# https server
#
#server {
# listen 443 ssl;
# server_name localhost;
# ssl_certificate cert.pem;
# ssl_certificate_key cert.key;
# ssl_session_cache shared:ssl:1m;
# ssl_session_timeout 5m;
# ssl_ciphers high:!anull:!md5;
# ssl_prefer_server_ciphers on;
# location / {
# root html;
# index index.html index.htm;
# }
#}
} docker를 사용하여 시작🎜🎜🎜컨테이너 생성 및 실행🎜🎜81: 외부 네트워크 액세스를 위한 포트입니다. 실제 상황에 따라 수정될 수 있습니다🎜🎜/docker/nginx/nginx. conf 로컬 호스트 파일🎜🎜/etc/nginx/nginx.conf 압축 해제된 디렉터리(변경하지 않고 그대로 둘 수도 있음)🎜🎜/docker/nginx/html 로컬 호스트 파일🎜🎜/usr/share/nginx /html 압축 해제된 디렉터리🎜
docker run -d --name nginx81 -p 81:80 -v /docker/nginx/nginx.conf:/etc/nginx/nginx.conf -v /docker/nginx/html:/usr/share/nginx/html nginx
위 내용은 Docker가 nginx를 사용하여 Tomcat 클러스터를 구축하는 방법의 상세 내용입니다. 자세한 내용은 PHP 중국어 웹사이트의 기타 관련 기사를 참조하세요!

핫 AI 도구

Undresser.AI Undress
사실적인 누드 사진을 만들기 위한 AI 기반 앱

AI Clothes Remover
사진에서 옷을 제거하는 온라인 AI 도구입니다.

Undress AI Tool
무료로 이미지를 벗다

Clothoff.io
AI 옷 제거제

AI Hentai Generator
AI Hentai를 무료로 생성하십시오.

인기 기사
뜨거운 도구

메모장++7.3.1
사용하기 쉬운 무료 코드 편집기

SublimeText3 중국어 버전
중국어 버전, 사용하기 매우 쉽습니다.

스튜디오 13.0.1 보내기
강력한 PHP 통합 개발 환경

드림위버 CS6
시각적 웹 개발 도구

SublimeText3 Mac 버전
신 수준의 코드 편집 소프트웨어(SublimeText3)
뜨거운 주제
 7480
7480
 15
1377
52
77
11
51
19
19
33
15
1377
52
77
11
51
19
19
33

 PI 노드 교육 : PI 노드 란 무엇입니까? Pi 노드를 설치하고 설정하는 방법은 무엇입니까?
Mar 05, 2025 pm 05:57 PM
PI 노드 교육 : PI 노드 란 무엇입니까? Pi 노드를 설치하고 설정하는 방법은 무엇입니까?
Mar 05, 2025 pm 05:57 PM
Pinetwork 노드에 대한 자세한 설명 및 설치 안내서이 기사에서는 Pinetwork Ecosystem을 자세히 소개합니다. Pi 노드, Pinetwork 생태계의 주요 역할을 수행하고 설치 및 구성을위한 전체 단계를 제공합니다. Pinetwork 블록 체인 테스트 네트워크가 출시 된 후, PI 노드는 다가오는 주요 네트워크 릴리스를 준비하여 테스트에 적극적으로 참여하는 많은 개척자들의 중요한 부분이되었습니다. 아직 Pinetwork를 모른다면 Picoin이 무엇인지 참조하십시오. 리스팅 가격은 얼마입니까? PI 사용, 광업 및 보안 분석. Pinetwork 란 무엇입니까? Pinetwork 프로젝트는 2019 년에 시작되었으며 독점적 인 Cryptocurrency Pi Coin을 소유하고 있습니다. 이 프로젝트는 모든 사람이 참여할 수있는 사람을 만드는 것을 목표로합니다.
 DeepSeek을 설치하는 방법
Feb 19, 2025 pm 05:48 PM
DeepSeek을 설치하는 방법
Feb 19, 2025 pm 05:48 PM
Docker 컨테이너를 사용하여 사전 컴파일 된 패키지 (Windows 사용자의 경우)를 사용하여 소스 (숙련 된 개발자)를 컴파일하는 것을 포함하여 DeepSeek를 설치하는 방법에는 여러 가지가 있습니다. 공식 문서는 신중하게 문서를 작성하고 불필요한 문제를 피하기 위해 완전히 준비합니다.
 Docker 컨테이너를 사용하여 JavaEE 애플리케이션 배포
Jun 05, 2024 pm 08:29 PM
Docker 컨테이너를 사용하여 JavaEE 애플리케이션 배포
Jun 05, 2024 pm 08:29 PM
Docker 컨테이너를 사용하여 Java EE 애플리케이션 배포: Dockerfile을 생성하여 이미지를 정의하고, 이미지를 빌드하고, 컨테이너를 실행하고, 포트를 매핑한 다음, 브라우저에서 애플리케이션에 액세스합니다. 샘플 JavaEE 애플리케이션: REST API는 Docker를 통해 배포한 후 localhost에서 액세스할 수 있는 데이터베이스와 상호 작용합니다.
 WordPress 사이트 파일 액세스가 제한됩니다. 도메인 이름을 통해 .txt 파일에 액세스 할 수없는 이유는 무엇입니까?
Apr 01, 2025 pm 03:00 PM
WordPress 사이트 파일 액세스가 제한됩니다. 도메인 이름을 통해 .txt 파일에 액세스 할 수없는 이유는 무엇입니까?
Apr 01, 2025 pm 03:00 PM
WordPress 사이트 파일 액세스가 제한됩니다. 최근 .txt 파일에 액세스 할 수없는 이유를 문제 해결하십시오. 미니 프로그램 비즈니스 도메인 이름을 구성 할 때 일부 사용자는 문제가 발생했습니다.
 Docker 환경에서 PECL을 사용하여 확장자를 설치할 때 오류가 발생하는 이유는 무엇입니까? 그것을 해결하는 방법?
Apr 01, 2025 pm 03:06 PM
Docker 환경에서 PECL을 사용하여 확장자를 설치할 때 오류가 발생하는 이유는 무엇입니까? 그것을 해결하는 방법?
Apr 01, 2025 pm 03:06 PM
Docker 환경을 사용할 때 Docker 환경에 Extensions를 설치하기 위해 PECL을 사용하여 오류의 원인 및 솔루션. 종종 일부 두통이 발생합니다 ...
 동일한 서버에서 NGINX 구성을 통해 PHP5.6 및 PHP7이 공존하는 방법은 무엇입니까?
Apr 01, 2025 pm 03:15 PM
동일한 서버에서 NGINX 구성을 통해 PHP5.6 및 PHP7이 공존하는 방법은 무엇입니까?
Apr 01, 2025 pm 03:15 PM
같은 시스템에서 여러 PHP 버전을 동시에 실행하는 것은 특히 다른 프로젝트가 다른 버전의 PHP에 의존 할 때 일반적인 요구 사항입니다. 똑같은 방법 ...
 H5 프로젝트를 실행하는 방법
Apr 06, 2025 pm 12:21 PM
H5 프로젝트를 실행하는 방법
Apr 06, 2025 pm 12:21 PM
H5 프로젝트를 실행하려면 다음 단계가 필요합니다. Web Server, Node.js, 개발 도구 등과 같은 필요한 도구 설치. 개발 환경 구축, 프로젝트 폴더 작성, 프로젝트 초기화 및 코드 작성. 개발 서버를 시작하고 명령 줄을 사용하여 명령을 실행하십시오. 브라우저에서 프로젝트를 미리보고 개발 서버 URL을 입력하십시오. 프로젝트 게시, 코드 최적화, 프로젝트 배포 및 웹 서버 구성을 설정하십시오.
 램프 아키텍처에서 Node.js 또는 Python 서비스를 효율적으로 통합하는 방법은 무엇입니까?
Apr 01, 2025 pm 02:48 PM
램프 아키텍처에서 Node.js 또는 Python 서비스를 효율적으로 통합하는 방법은 무엇입니까?
Apr 01, 2025 pm 02:48 PM
많은 웹 사이트 개발자는 램프 아키텍처에서 Node.js 또는 Python 서비스를 통합하는 문제에 직면 해 있습니다. 기존 램프 (Linux Apache MySQL PHP) 아키텍처 웹 사이트 요구 사항 ...
