

SpringBoot+MyBatisPlus 신속한 개발 스캐폴딩을 구축하는 방법

작은 쇼핑몰 프로젝트에 대해 이야기해 봅시다
일부 친구들은 아직 이 비계를 이해하지 못할 수도 있습니다. 먼저 그것에 대해 이야기해 봅시다!
프로젝트 소개
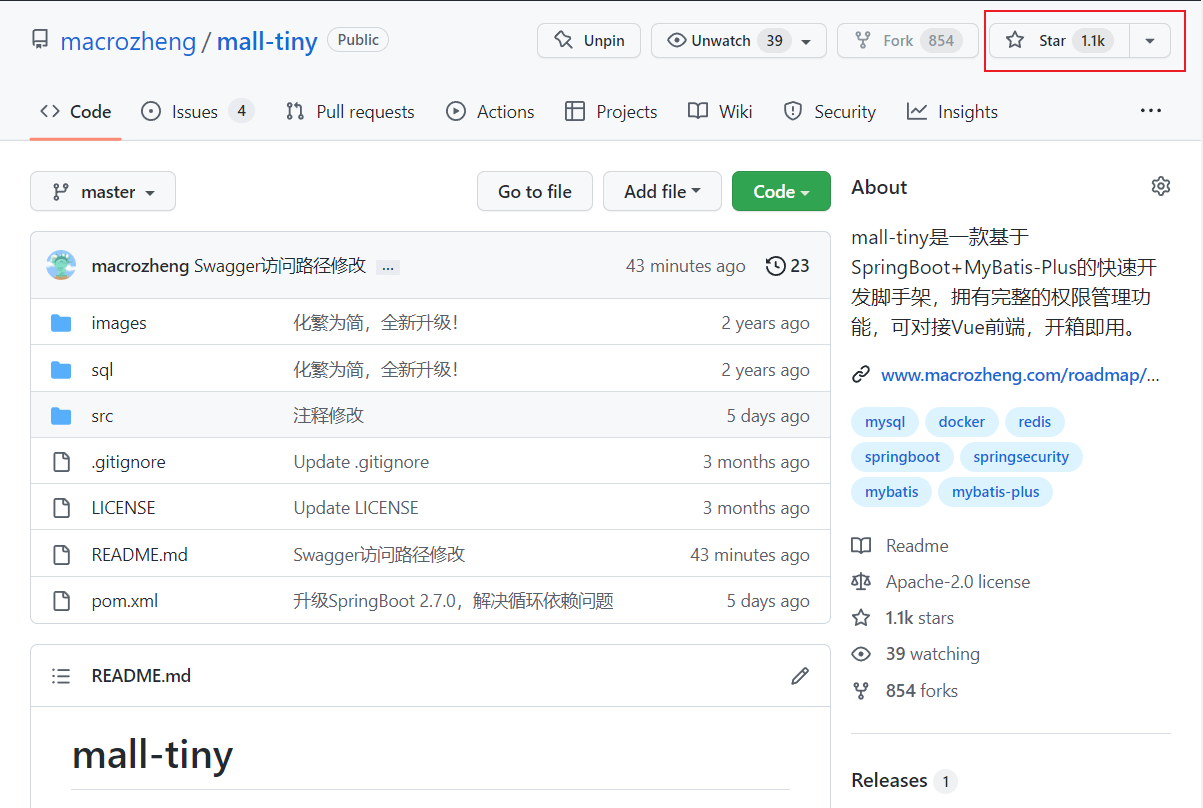
mall-tiny는 SpringBoot+MyBatis-Plus를 기반으로 한 신속한 개발 스캐폴딩입니다. 현재 Github에는 1100개 이상의 별이 있습니다. 완전한 권한 관리 기능을 갖추고 있으며 MyBatis-Plus 코드 생성기를 사용하여 코드를 생성하도록 지원하며 쇼핑몰 프로젝트의 Vue 프런트 엔드에 연결하여 즉시 사용할 수 있습니다.
프로젝트 시연
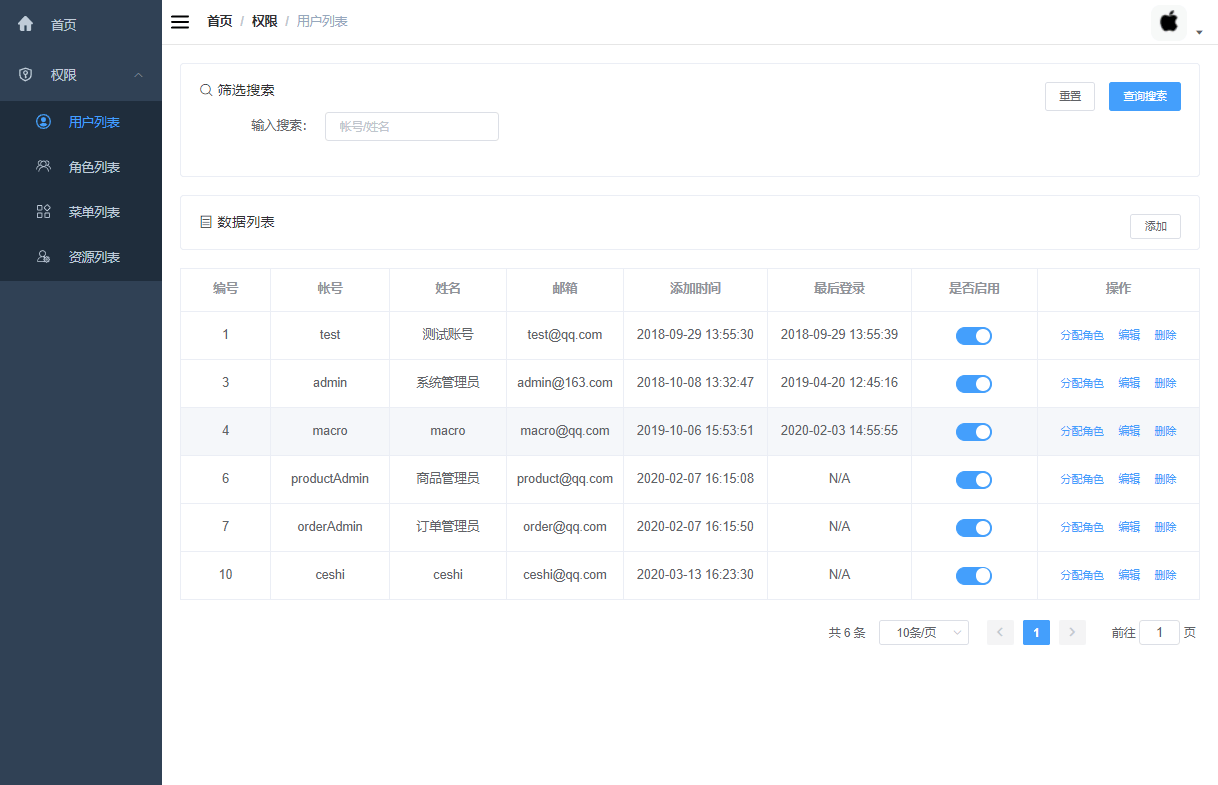
몰-티니 프로젝트는 몰-관리-웹 프런트엔드 프로젝트로 원활하게 연결될 수 있으며, 몰 이후 프런트엔드와 백엔드 분리 비계가 단 몇 초 만에 변형될 수 있습니다. -tiny 프로젝트는 기본적인 권한 관리 기능만 구현하며, 프런트엔드 도킹 이후에는 권한 관리와 관련된 기능만 표시됩니다.
Technical Selection
이번 업그레이드는 Spring Boot 2.7.0을 지원할 뿐만 아니라 다른 종속 버전도 최신 버전으로 업그레이드되었습니다.
| 기술 | 버전 | 설명 |
|---|---|---|
| SpringBoot | 2.7.0 | 컨테이너+MVC 프레임워크 |
| SpringSecurity | 5 .7.1 | 인증 및 권한 부여 프레임워크 |
| MyBatis | 3.5.9 | ORM 프레임워크 |
| MyBatis-Plus | 3.5.1 | MyBatis 향상 도구 |
| MyBatis-Plus 생성기 | 3.5.1 | 데이터 계층 코드 생성기 |
| 스웨거 - UI | 3.0.0 | 문서 제작 도구 |
| Redis | 5.0 | 분산 캐시 |
| Docker | 18.09.0 | Application Container Engine |
| Druid | 1.2.9 | 데이터베이스 연결 풀 |
| Hutool | 5.8.0 | Java 도구 라이브러리 |
| JWT | 0.9.1 | JWT 로그인 지원 |
| Lombok | 1.1 8.24 | 객체 단순화 패키징 도구 |
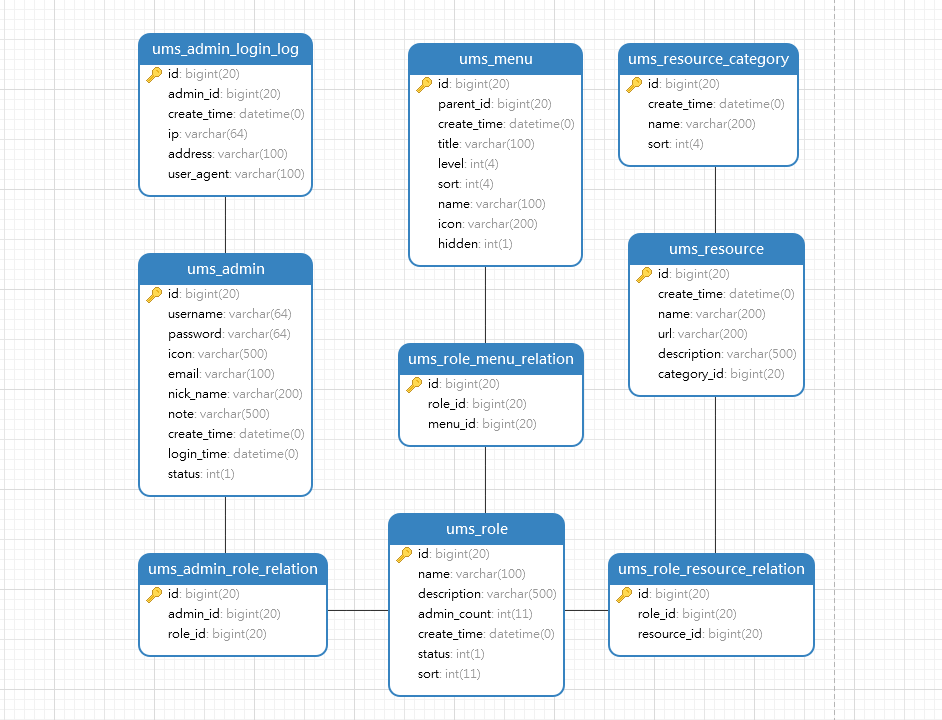
数据库表结构
化繁为简,仅保留了权限管理功能相关的9张表,业务简单更加方便定制开发,觉得mall项目学习太复杂的小伙伴可以先学习下mall-tiny。
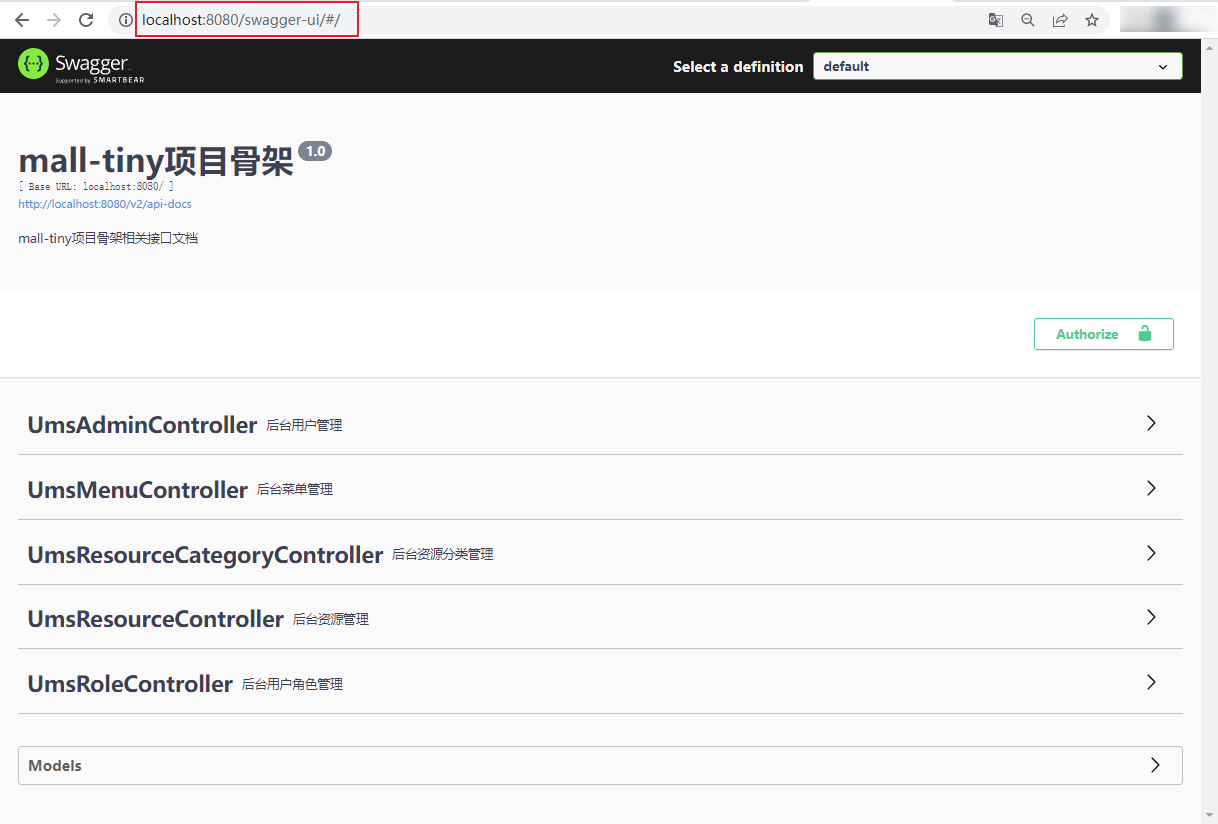
接口文档
由于升级了Swagger版本,原来的接口文档访问路径已经改变,最新访问路径:http://localhost:8080/swagger-ui/
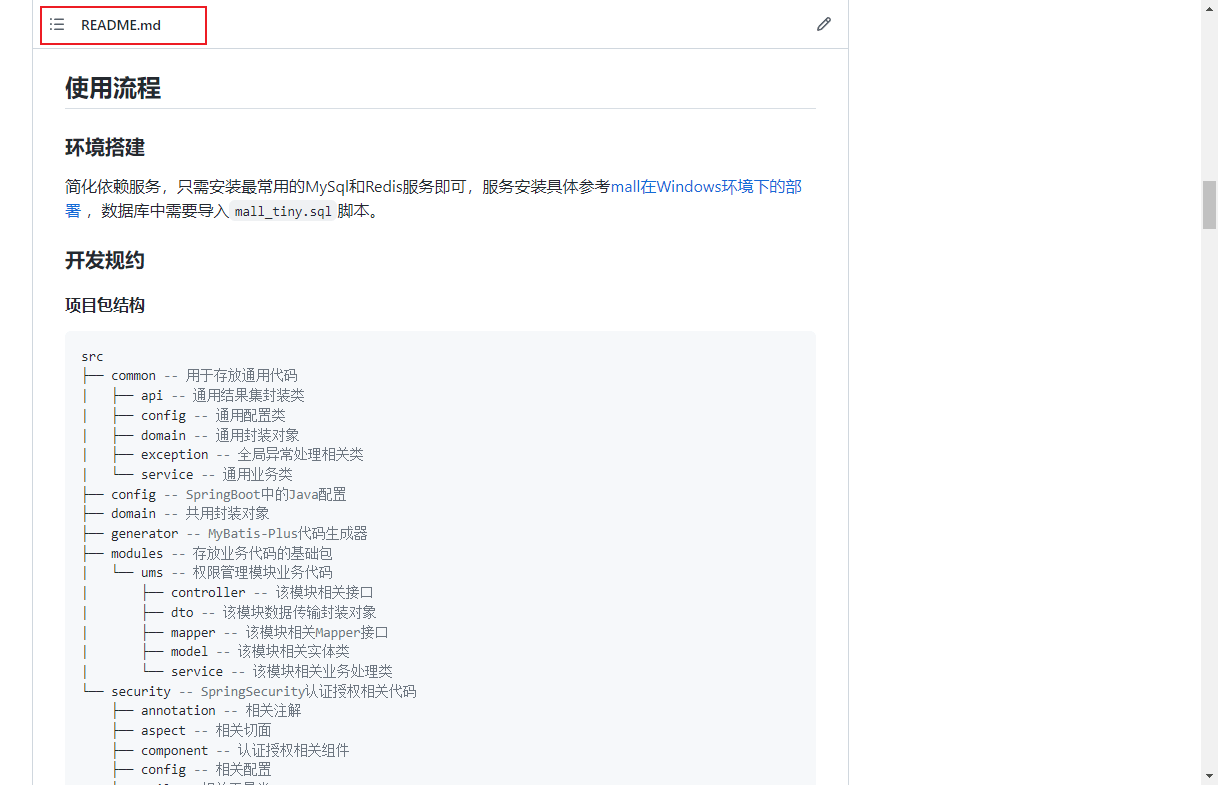
使用流程
升级版本基本不影响之前的使用方式,具体使用流程可以参考最新版README文件:
升级过程
接下来我们再来聊聊项目升级Spring Boot 2.7.0版本遇到的问题,这些应该是升级该版本的通用问题,你如果想升级2.7.0版本的话,了解下会很有帮助!
Swagger升级
在升级Spring Boot 2.6.x版本的时候,其实Swagger就有一定的兼容性问题,需要在配置中添加BeanPostProcessor这个Bean,具体可以参考升级 SpringBoot 2.6.x 版本后,Swagger 没法用了! ;
/**
 * Swagger API文档相关配置
 * Created by macro on 2018/4/26.
 */
@Configuration
@EnableSwagger2
public class SwaggerConfig extends BaseSwaggerConfig {
    @Bean
    public static BeanPostProcessor springfoxHandlerProviderBeanPostProcessor() {
        return new BeanPostProcessor() {
            @Override
            public Object postProcessAfterInitialization(Object bean, String beanName) throws BeansException {
                if (bean instanceof WebMvcRequestHandlerProvider || bean instanceof WebFluxRequestHandlerProvider) {
                    customizeSpringfoxHandlerMappings(getHandlerMappings(bean));
                }
                return bean;
            }
            private <T extends RequestMappingInfoHandlerMapping> void customizeSpringfoxHandlerMappings(List<T> mappings) {
                List<T> copy = mappings.stream()
                        .filter(mapping -> mapping.getPatternParser() == null)
                        .collect(Collectors.toList());
                mappings.clear();
                mappings.addAll(copy);
            }
            @SuppressWarnings("unchecked")
            private List<RequestMappingInfoHandlerMapping> getHandlerMappings(Object bean) {
                try {
                    Field field = ReflectionUtils.findField(bean.getClass(), "handlerMappings");
                    field.setAccessible(true);
                    return (List<RequestMappingInfoHandlerMapping>) field.get(bean);
                } catch (IllegalArgumentException | IllegalAccessException e) {
                    throw new IllegalStateException(e);
                }
            }
        };
    }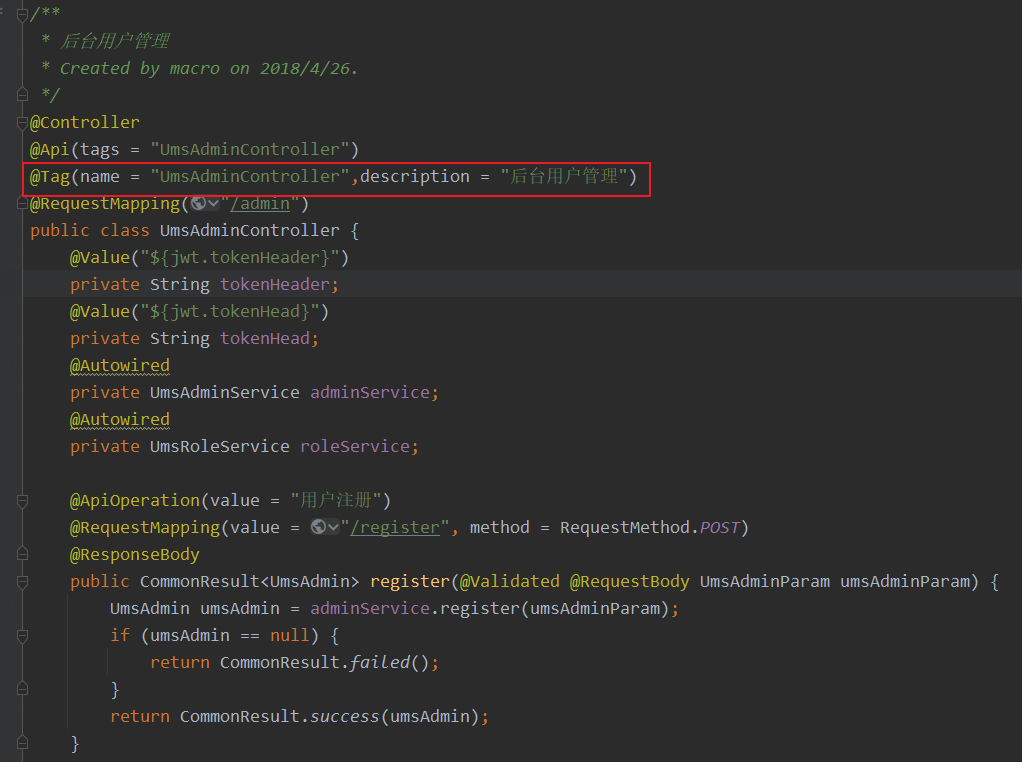
}之前我们通过@Api注解的description属性来配置接口描述的方法已经被弃用了;
我们可以使用@Tag注解来配置接口说明,并使用@Api注解中的tags属性来指定。
Spring Security升级
升级Spring Boot 2.7.0版本后,原来通过继承WebSecurityConfigurerAdapter来配置的方法已经被弃用了,仅需配置SecurityFilterChainBean即可,具体参考Spring Security最新用法。
/**
 * SpringSecurity 5.4.x以上新用法配置
 * 为避免循环依赖,仅用于配置HttpSecurity
 * Created by macro on 2019/11/5.
 */
@Configuration
public class SecurityConfig {
    @Autowired
    private IgnoreUrlsConfig ignoreUrlsConfig;
    @Autowired
    private RestfulAccessDeniedHandler restfulAccessDeniedHandler;
    @Autowired
    private RestAuthenticationEntryPoint restAuthenticationEntryPoint;
    @Autowired
    private JwtAuthenticationTokenFilter jwtAuthenticationTokenFilter;
    @Autowired
    private DynamicSecurityService dynamicSecurityService;
    @Autowired
    private DynamicSecurityFilter dynamicSecurityFilter;
    @Bean
    SecurityFilterChain filterChain(HttpSecurity httpSecurity) throws Exception {
        ExpressionUrlAuthorizationConfigurer<HttpSecurity>.ExpressionInterceptUrlRegistry registry = httpSecurity
                .authorizeRequests();
        //不需要保护的资源路径允许访问
        for (String url : ignoreUrlsConfig.getUrls()) {
            registry.antMatchers(url).permitAll();
        }
        //允许跨域请求的OPTIONS请求
        registry.antMatchers(HttpMethod.OPTIONS)
                .permitAll();
        // 任何请求需要身份认证
        registry.and()
                .authorizeRequests()
                .anyRequest()
                .authenticated()
                // 关闭跨站请求防护及不使用session
                .and()
                .csrf()
                .disable()
                .sessionManagement()
                .sessionCreationPolicy(SessionCreationPolicy.STATELESS)
                // 自定义权限拒绝处理类
                .and()
                .exceptionHandling()
                .accessDeniedHandler(restfulAccessDeniedHandler)
                .authenticationEntryPoint(restAuthenticationEntryPoint)
                // 自定义权限拦截器JWT过滤器
                .and()
                .addFilterBefore(jwtAuthenticationTokenFilter, UsernamePasswordAuthenticationFilter.class);
        //有动态权限配置时添加动态权限校验过滤器
        if(dynamicSecurityService!=null){
            registry.and().addFilterBefore(dynamicSecurityFilter, FilterSecurityInterceptor.class);
        }
        return httpSecurity.build();
    }
}MyBatis-Plus升级
MyBatis-Plus从之前的版本升级到了3.5.1版本,用法没有大的改变,感觉最大的区别就是代码生成器的用法改了。以前我们使用的方法是创建一个新对象,然后通过设置各种属性来进行配置,具体例子请参考以下代码:
/**
 * MyBatisPlus代码生成器
 * Created by macro on 2020/8/20.
 */
public class MyBatisPlusGenerator {
    /**
     * 初始化全局配置
     */
    private static GlobalConfig initGlobalConfig(String projectPath) {
        GlobalConfig globalConfig = new GlobalConfig();
        globalConfig.setOutputDir(projectPath + "/src/main/java");
        globalConfig.setAuthor("macro");
        globalConfig.setOpen(false);
        globalConfig.setSwagger2(true);
        globalConfig.setBaseResultMap(true);
        globalConfig.setFileOverride(true);
        globalConfig.setDateType(DateType.ONLY_DATE);
        globalConfig.setEntityName("%s");
        globalConfig.setMapperName("%sMapper");
        globalConfig.setXmlName("%sMapper");
        globalConfig.setServiceName("%sService");
        globalConfig.setServiceImplName("%sServiceImpl");
        globalConfig.setControllerName("%sController");
        return globalConfig;
    }
}而新版的MyBatis-Plus代码生成器已经改成使用建造者模式来配置了,具体可以参考MyBatisPlusGenerator类中的代码。
/**
 * MyBatisPlus代码生成器
 * Created by macro on 2020/8/20.
 */
public class MyBatisPlusGenerator {
    /**
     * 初始化全局配置
     */
    private static GlobalConfig initGlobalConfig(String projectPath) {
        return new GlobalConfig.Builder()
                .outputDir(projectPath + "/src/main/java")
                .author("macro")
                .disableOpenDir()
                .enableSwagger()
                .fileOverride()
                .dateType(DateType.ONLY_DATE)
                .build();
    }
}解决循环依赖问题
其实Spring Boot从2.6.x版本已经开始不推荐使用循环依赖了,如果你的项目中使用的循环依赖比较多的话,可以使用如下配置开启;
spring:
  main:
allow-circular-references: true不过既然官方都不推荐使用了,我们最好还是避免循环依赖的好,这里分享下我解决循环依赖问题的一点思路。如果一个类有多个依赖项,可以避免配置不必要的Bean,而应该使用单独的类来进行Bean的配置。比如SecurityConfig这个配置类中,我只声明了必要的SecurityFilterChain配置;
/**
 * SpringSecurity 5.4.x以上新用法配置
 * 为避免循环依赖,仅用于配置HttpSecurity
 * Created by macro on 2019/11/5.
 */
@Configuration
public class SecurityConfig {
    @Autowired
    private IgnoreUrlsConfig ignoreUrlsConfig;
    @Autowired
    private RestfulAccessDeniedHandler restfulAccessDeniedHandler;
    @Autowired
    private RestAuthenticationEntryPoint restAuthenticationEntryPoint;
    @Autowired
    private JwtAuthenticationTokenFilter jwtAuthenticationTokenFilter;
    @Autowired
    private DynamicSecurityService dynamicSecurityService;
    @Autowired
    private DynamicSecurityFilter dynamicSecurityFilter;
    @Bean
    SecurityFilterChain filterChain(HttpSecurity httpSecurity) throws Exception {
        //省略若干代码...
        return httpSecurity.build();
    }
}其他配置都被我移动到了CommonSecurityConfig配置类中,这样就避免了之前的循环依赖;
/**
 * SpringSecurity通用配置
 * 包括通用Bean、Security通用Bean及动态权限通用Bean
 * Created by macro on 2022/5/20.
 */
@Configuration
public class CommonSecurityConfig {
    @Bean
    public PasswordEncoder passwordEncoder() {
        return new BCryptPasswordEncoder();
    }
    @Bean
    public IgnoreUrlsConfig ignoreUrlsConfig() {
        return new IgnoreUrlsConfig();
    }
    @Bean
    public JwtTokenUtil jwtTokenUtil() {
        return new JwtTokenUtil();
    }
    @Bean
    public RestfulAccessDeniedHandler restfulAccessDeniedHandler() {
        return new RestfulAccessDeniedHandler();
    }
    @Bean
    public RestAuthenticationEntryPoint restAuthenticationEntryPoint() {
        return new RestAuthenticationEntryPoint();
    }
    @Bean
    public JwtAuthenticationTokenFilter jwtAuthenticationTokenFilter(){
        return new JwtAuthenticationTokenFilter();
    }
    @Bean
    public DynamicAccessDecisionManager dynamicAccessDecisionManager() {
        return new DynamicAccessDecisionManager();
    }
    @Bean
    public DynamicSecurityMetadataSource dynamicSecurityMetadataSource() {
        return new DynamicSecurityMetadataSource();
    }
    @Bean
    public DynamicSecurityFilter dynamicSecurityFilter(){
        return new DynamicSecurityFilter();
    }
}还有一个典型的循环依赖问题,UmsAdminServiceImpl和UmsAdminCacheServiceImpl相互依赖了;
/**
 * 后台管理员管理Service实现类
 * Created by macro on 2018/4/26.
 */
@Service
public class UmsAdminServiceImpl extends ServiceImpl<UmsAdminMapper,UmsAdmin> implements UmsAdminService {
    @Autowired
    private UmsAdminCacheService adminCacheService;
}
/**
 * 后台用户缓存管理Service实现类
 * Created by macro on 2020/3/13.
 */
@Service
public class UmsAdminCacheServiceImpl implements UmsAdminCacheService {
    @Autowired
    private UmsAdminService adminService;
}我们可以创建一个用于获取Spring容器中的Bean的工具类来实现;
/**
 * Spring工具类
 * Created by macro on 2020/3/3.
 */
@Component
public class SpringUtil implements ApplicationContextAware {
    private static ApplicationContext applicationContext;
    // 获取applicationContext
    public static ApplicationContext getApplicationContext() {
        return applicationContext;
    }
    @Override
    public void setApplicationContext(ApplicationContext applicationContext) throws BeansException {
        if (SpringUtil.applicationContext == null) {
            SpringUtil.applicationContext = applicationContext;
        }
    }
    // 通过name获取Bean
    public static Object getBean(String name) {
        return getApplicationContext().getBean(name);
    }
    // 通过class获取Bean
    public static <T> T getBean(Class<T> clazz) {
        return getApplicationContext().getBean(clazz);
    }
    // 通过name,以及Clazz返回指定的Bean
    public static <T> T getBean(String name, Class<T> clazz) {
        return getApplicationContext().getBean(name, clazz);
    }
}然后在UmsAdminServiceImpl中使用该工具类获取Bean来解决循环依赖。
/**
 * 后台管理员管理Service实现类
 * Created by macro on 2018/4/26.
 */
@Service
public class UmsAdminServiceImpl extends ServiceImpl<UmsAdminMapper,UmsAdmin> implements UmsAdminService {
    @Override
    public UmsAdminCacheService getCacheService() {
        return SpringUtil.getBean(UmsAdminCacheService.class);
    }
}解决跨域问题
在使用Spring Boot 2.7.0版本时,如果不修改之前的跨域配置,通过前端访问会出现跨域问题,后端报错如下。
java.lang.IllegalArgumentException: When allowCredentials is true, allowedOrigins cannot contain the special value "*" since that cannot be set on the "Access-Control-Allow-Origin" response header.
To allow credentials to a set of origins, list them explicitly or consider using "allowedOriginPatterns" instead.
具体的意思就是allowedOrigins已经不再支持通配符*的配置了,改为需要使用allowedOriginPatterns来设置,具体配置修改如下。
/**
 * 全局跨域配置
 * Created by macro on 2019/7/27.
 */
@Configuration
public class GlobalCorsConfig {
    /**
     * 允许跨域调用的过滤器
     */
    @Bean
    public CorsFilter corsFilter() {
        CorsConfiguration config = new CorsConfiguration();
        //允许所有域名进行跨域调用
        config.addAllowedOriginPattern("*");
        //该用法在SpringBoot 2.7.0中已不再支持
        //config.addAllowedOrigin("*");
        //允许跨越发送cookie
        config.setAllowCredentials(true);
        //放行全部原始头信息
        config.addAllowedHeader("*");
        //允许所有请求方法跨域调用
        config.addAllowedMethod("*");
        UrlBasedCorsConfigurationSource source = new UrlBasedCorsConfigurationSource();
        source.registerCorsConfiguration("/**", config);
        return new CorsFilter(source);
    }
}위 내용은 SpringBoot+MyBatisPlus 신속한 개발 스캐폴딩을 구축하는 방법의 상세 내용입니다. 자세한 내용은 PHP 중국어 웹사이트의 기타 관련 기사를 참조하세요!

핫 AI 도구

Undresser.AI Undress
사실적인 누드 사진을 만들기 위한 AI 기반 앱

AI Clothes Remover
사진에서 옷을 제거하는 온라인 AI 도구입니다.

Undress AI Tool
무료로 이미지를 벗다

Clothoff.io
AI 옷 제거제

Video Face Swap
완전히 무료인 AI 얼굴 교환 도구를 사용하여 모든 비디오의 얼굴을 쉽게 바꾸세요!

인기 기사
뜨거운 도구

메모장++7.3.1
사용하기 쉬운 무료 코드 편집기

SublimeText3 중국어 버전
중국어 버전, 사용하기 매우 쉽습니다.

스튜디오 13.0.1 보내기
강력한 PHP 통합 개발 환경

드림위버 CS6
시각적 웹 개발 도구

SublimeText3 Mac 버전
신 수준의 코드 편집 소프트웨어(SublimeText3)


 Springboot가 Jasypt를 통합하여 구성 파일 암호화를 구현하는 방법
Jun 01, 2023 am 08:55 AM
Springboot가 Jasypt를 통합하여 구성 파일 암호화를 구현하는 방법
Jun 01, 2023 am 08:55 AM
Jasypt 소개 Jasypt는 개발자가 최소한의 노력으로 프로젝트에 기본 암호화 기능을 추가할 수 있게 해주며 암호화 작동 방식에 대한 깊은 이해가 필요하지 않은 단방향 및 양방향 암호화에 대한 높은 보안을 제공합니다. 표준 기반 암호화 기술. 비밀번호, 텍스트, 숫자, 바이너리 암호화... Spring 기반 애플리케이션, 개방형 API와의 통합에 적합하며 모든 JCE 공급자와 함께 사용할 수 있습니다... 다음 종속성을 추가합니다: com.github.ulisesbocchiojasypt-spring-boot-starter2. Jasypt의 이점은 코드가 유출되더라도 데이터 소스를 보장할 수 있어 시스템 보안을 보호합니다.
 Redis를 사용하여 SpringBoot에서 분산 잠금을 구현하는 방법
Jun 03, 2023 am 08:16 AM
Redis를 사용하여 SpringBoot에서 분산 잠금을 구현하는 방법
Jun 03, 2023 am 08:16 AM
1. Redis는 분산 잠금 원칙과 분산 잠금이 필요한 이유를 구현합니다. 분산 잠금에 대해 이야기하기 전에 분산 잠금이 필요한 이유를 설명해야 합니다. 분산 잠금의 반대는 독립형 잠금입니다. 다중 스레드 프로그램을 작성할 때 공유 변수를 동시에 작동하여 발생하는 데이터 문제를 방지하기 위해 일반적으로 잠금을 사용하여 공유 변수를 상호 제외합니다. 공유 변수의 사용 범위는 동일한 프로세스에 있습니다. 동시에 공유 리소스를 운영해야 하는 여러 프로세스가 있는 경우 어떻게 상호 배타적일 수 있습니까? 오늘날의 비즈니스 애플리케이션은 일반적으로 마이크로서비스 아키텍처입니다. 이는 하나의 애플리케이션이 여러 프로세스를 배포한다는 의미이기도 합니다. 여러 프로세스가 MySQL에서 동일한 레코드 행을 수정해야 하는 경우 잘못된 작업으로 인해 발생하는 더티 데이터를 방지하려면 배포가 필요합니다. 현재 소개할 스타일은 잠겨 있습니다. 포인트를 얻고 싶다
 SpringBoot가 Redisson을 통합하여 지연 대기열을 구현하는 방법
May 30, 2023 pm 02:40 PM
SpringBoot가 Redisson을 통합하여 지연 대기열을 구현하는 방법
May 30, 2023 pm 02:40 PM
사용 시나리오 1. 주문이 성공적으로 이루어졌으나 30분 이내에 결제가 이루어지지 않았습니다. 결제 시간이 초과되어 주문이 자동으로 취소되었습니다. 2. 주문이 서명되었으며 서명 후 7일 동안 평가가 수행되지 않았습니다. 주문 시간이 초과되어 평가되지 않으면 시스템은 기본적으로 긍정적 평가로 설정됩니다. 3. 판매자가 5분 동안 주문을 받지 않으면 주문이 취소됩니다. 문자 메시지 알림이 전송됩니다... 지연이 길고 실시간 성능이 낮은 시나리오의 경우 작업 예약을 사용하여 정기적인 폴링 처리를 수행할 수 있습니다. 예: xxl-job 오늘은 다음을 선택하겠습니다.
 springboot가 파일을 jar 패키지로 읽은 후 파일에 액세스할 수 없는 문제를 해결하는 방법
Jun 03, 2023 pm 04:38 PM
springboot가 파일을 jar 패키지로 읽은 후 파일에 액세스할 수 없는 문제를 해결하는 방법
Jun 03, 2023 pm 04:38 PM
Springboot가 파일을 읽지만 jar 패키지로 패키징한 후 최신 개발에 액세스할 수 없습니다. springboot가 파일을 jar 패키지로 패키징한 후 파일을 읽을 수 없는 상황이 발생합니다. 그 이유는 패키징 후 파일의 가상 경로 때문입니다. 유효하지 않으며 읽기를 통해서만 액세스할 수 있습니다. 파일은 리소스 publicvoidtest(){Listnames=newArrayList();InputStreamReaderread=null;try{ClassPathResourceresource=newClassPathResource("name.txt");Input 아래에 있습니다.
 여러 테이블을 추가하기 위해 SQL 문을 사용하지 않고 Springboot+Mybatis-plus를 구현하는 방법
Jun 02, 2023 am 11:07 AM
여러 테이블을 추가하기 위해 SQL 문을 사용하지 않고 Springboot+Mybatis-plus를 구현하는 방법
Jun 02, 2023 am 11:07 AM
Springboot+Mybatis-plus가 다중 테이블 추가 작업을 수행하기 위해 SQL 문을 사용하지 않을 때 내가 직면한 문제는 테스트 환경에서 생각을 시뮬레이션하여 분해됩니다. 매개 변수가 있는 BrandDTO 개체를 생성하여 배경으로 매개 변수 전달을 시뮬레이션합니다. Mybatis-plus에서 다중 테이블 작업을 수행하는 것은 매우 어렵다는 것을 Mybatis-plus-join과 같은 도구를 사용하지 않으면 해당 Mapper.xml 파일을 구성하고 냄새나고 긴 ResultMap만 구성하면 됩니다. 해당 SQL 문을 작성합니다. 이 방법은 번거로워 보이지만 매우 유연하며 다음을 수행할 수 있습니다.
 SpringBoot와 SpringMVC의 비교 및 차이점 분석
Dec 29, 2023 am 11:02 AM
SpringBoot와 SpringMVC의 비교 및 차이점 분석
Dec 29, 2023 am 11:02 AM
SpringBoot와 SpringMVC는 모두 Java 개발에서 일반적으로 사용되는 프레임워크이지만 둘 사이에는 몇 가지 분명한 차이점이 있습니다. 이 기사에서는 이 두 프레임워크의 기능과 용도를 살펴보고 차이점을 비교할 것입니다. 먼저 SpringBoot에 대해 알아봅시다. SpringBoot는 Spring 프레임워크를 기반으로 하는 애플리케이션의 생성 및 배포를 단순화하기 위해 Pivotal 팀에서 개발되었습니다. 독립 실행형 실행 파일을 구축하는 빠르고 가벼운 방법을 제공합니다.
 SpringBoot가 Redis를 사용자 정의하여 캐시 직렬화를 구현하는 방법
Jun 03, 2023 am 11:32 AM
SpringBoot가 Redis를 사용자 정의하여 캐시 직렬화를 구현하는 방법
Jun 03, 2023 am 11:32 AM
1. RedisAPI 기본 직렬화 메커니즘인 RedisTemplate1.1을 사용자 정의합니다. API 기반 Redis 캐시 구현은 데이터 캐싱 작업에 RedisTemplate 템플릿을 사용합니다. 여기서 RedisTemplate 클래스를 열고 클래스의 소스 코드 정보를 봅니다. 키 선언, 값의 다양한 직렬화 방법, 초기 값은 비어 있음 @NullableprivateRedisSe
 springboot에서 application.yml의 값을 얻는 방법
Jun 03, 2023 pm 06:43 PM
springboot에서 application.yml의 값을 얻는 방법
Jun 03, 2023 pm 06:43 PM
프로젝트에서는 일부 구성 정보가 필요한 경우가 많습니다. 이 정보는 테스트 환경과 프로덕션 환경에서 구성이 다를 수 있으며 실제 비즈니스 상황에 따라 나중에 수정해야 할 수도 있습니다. 이러한 구성은 코드에 하드 코딩할 수 없습니다. 예를 들어 이 정보를 application.yml 파일에 작성할 수 있습니다. 그렇다면 코드에서 이 주소를 어떻게 얻거나 사용합니까? 2가지 방법이 있습니다. 방법 1: @Value 주석이 달린 ${key}를 통해 구성 파일(application.yml)의 키에 해당하는 값을 가져올 수 있습니다. 이 방법은 마이크로서비스가 상대적으로 적은 상황에 적합합니다. 프로젝트, 업무가 복잡할 때는 논리
