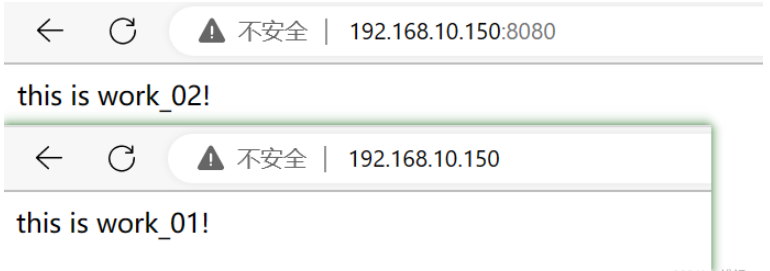
동일한 도메인 이름, 다양한 포트, 다양한 파일
#两个不同文件夹,分别存放不同文件
[root@nginx ~]# mkdir /www/work_01 -p
[root@nginx ~]# mkdir /www/work_02
[root@nginx ~]# vim /www/work_01/index.html
this is work_01!
[root@nginx ~]# vim /www/work_02/index.html
this is work_02!
#서버 모듈을 편집하고 포트 80이 있는 사이트를 폴더에 지정한 다음 아래 서버를 복사하고 포트를 수정하세요
[root@nginx ~]# vim /usr/local/nginx/conf/nginx.conf
worker_processes  1;
events {
    worker_connections  1024;
}
http {
    include       mime.types;
    default_type  application/octet-stream;
    sendfile        on;
    keepalive_timeout  65;
#80端口,指向work_01的文件夹
    server {
        listen       80;
        server_name  localhost;
        location / {
            root   /www/work_01;
            index  index.html index.htm;
        }
        error_page   500 502 503 504  /50x.html;
        location = /50x.html {
            root   html;
        }
    }
#8080端口,指向work_02的文件夹
    server {
    listen 8080;
    server_name localhost;
    location / {
    root /www/work_02;
    index index.html index.htm;
    }
    error_page 500 502 503 504 /50x.html;
    location = /50x.html {
        root html;
    }
}
}#브라우저 액세스

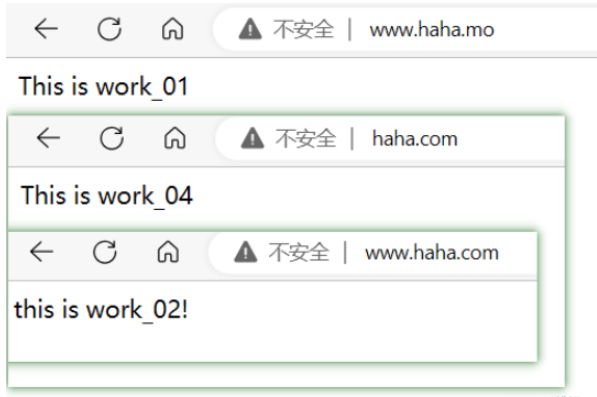
동일한 포트, 다른 도메인 이름, 다른 파일
#4개의 폴더, 다른 파일 내용에 해당
[root@nginx ~]# cd /www/
[root@nginx www]# mkdir work_03
[root@nginx www]# mkdir work_04
[root@nginx www]# echo "This is work_03" > work_03/index.html
[root@nginx www]# echo "This is work_04" > work_04/index.html
[root@nginx www]# ls
work_01  work_02  work_03  work_04
#구성 파일 수정
[root@nginx www]# vim /usr/local/nginx/conf/nginx.conf
worker_processes  1;
events {
    worker_connections  1024;
}
http {
    include       mime.types;
    sendfile        on;
    keepalive_timeout  65;
#通配符在后的域名
    server {
        listen       80;
        server_name  www.haha.*;
        location / {
            root   /www/work_01;
            index  index.html index.htm;
        }
        error_page   500 502 503 504  /50x.html;
        location = /50x.html {
            root   html;
        }
    }
#精确域名
    server {
    listen 80;
    server_name www.haha.com;
    location / {
    root /www/work_02;
    index index.html index.htm;
    }
    error_page 500 502 503 504 /50x.html;
    location = /50x.html {
        root html;
    }
}
#通配符在前的域名
    server {
        listen 80;
        server_name *.haha.com;
    location / {
        root /www/work_03;
        index index.html index.htm;
    }
    error_page 500 502 503 504 /50x.html;
    location = /50x.html {
        root html;
    }
}
#正则表达式域名
    server {
        listen 80;
        server_name ~\w+.com;
    location / {
        root /www/work_04;
        index index.html index.htm;
    }
    error_page 500 502 503 504 /50x.html;
    location = /50x.html {
        root html;
    }
}
}
[root@nginx www]# systemctl restart nginx#호스트 호스트 파일을 구성하고 "C:WindowsSystem32driversetchosts"

#

[root@nginx ~]# vim /usr/local/nginx/conf/nginx.conf
worker_processes  1;
events {
    worker_connections  1024;
}
http {
    include       mime.types;
    default_type  application/octet-stream;
    sendfile        on;
    keepalive_timeout  65;
#只需要在server_name再添加一个域名,不需要在复制一个server_name
    server {
        listen       80;
        server_name  www.xixi.com www.qiqi.com;
        location / {
            root   /www/work_01;
            index  index.html index.htm;
        }
        error_page   500 502 503 504  /50x.html;
        location = /50x.html {
            root   html;
        }
    }
}
[root@nginx ~]# systemctl restart nginx#접속 결과는 다음과 같습니다. :
위 내용은 Nginx 호스트 도메인 이름을 구성하는 방법의 상세 내용입니다. 자세한 내용은 PHP 중국어 웹사이트의 기타 관련 기사를 참조하세요!