이 튜토리얼에서는 PayPal REST API와 C#을 사용하여 결제하는 방법을 보여 드리겠습니다. Ruby, Node.js, Python, PHP 등과 같은 다양한 언어에 제공되는 모든 라이브러리는 매우 유사하므로 여기에 있는 모든 개념은 모든 라이브러리에 적용 가능합니다.
프로젝트 설정
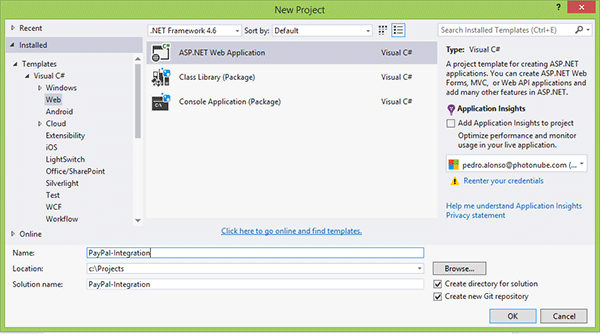
먼저 Visual Studio 2015에서 파일 > 새로 만들기 > 프로젝트 로 MVC 프로젝트를 만들고 ASP.NET Application을 선택했습니다.
새로운 MVC 6을 사용하는 ASP.NET 5 Web Application 템플릿을 선택합니다. 익숙하다면 MVC 5와 유사합니다.
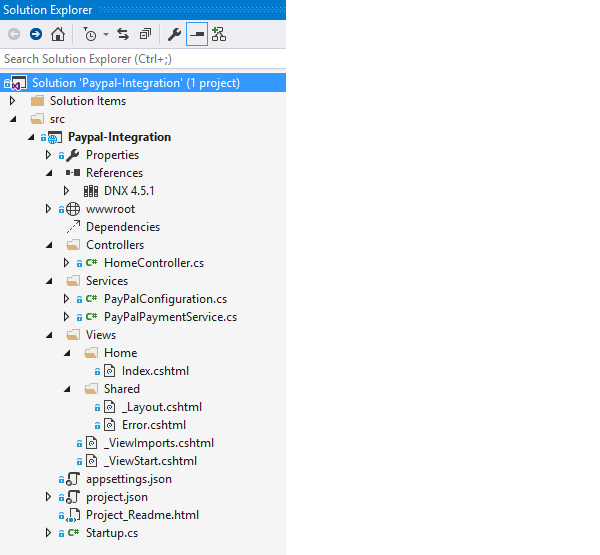
아래 사진에서 볼 수 있듯이 솔루션에 일부 파일과 폴더를 추가했습니다. 주목해야 할 두 가지 주요 사항은 다음과 같습니다.
References에서 이 프로젝트를 Mac OS X 또는 Linux에서 실행할 수 있는 대상 DNX Core 5.0을 제거했지만 필요한 PayPal 라이브러리는 아직 업데이트되지 않았습니다.
컨트롤러를 간단하고 명확하게 유지할 수 있도록 PayPal 호출 논리를 캡슐화할 "서비스" 폴더를 추가했습니다.
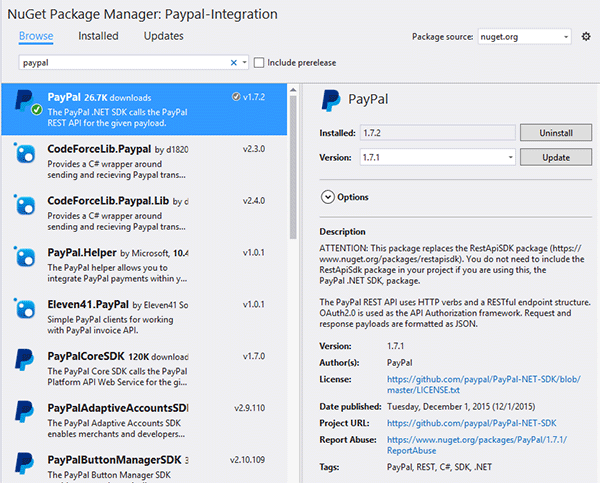
NuGet을 사용하여 PayPal SDK를 설치하세요. 솔루션 이름을 마우스 오른쪽 버튼으로 클릭하고 NuGet 패키지 관리를 선택한 다음 "PayPal"을 검색하여 설치하세요.
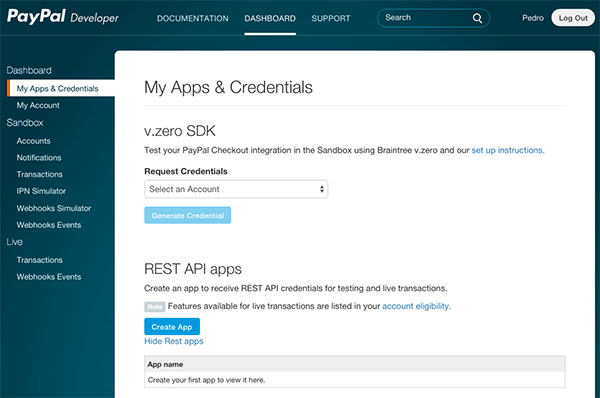
PayPal 앱 만들기
애플리케이션을 PayPal과 통합하려면 PayPal 개발자로 이동하여 REST API 애플리케이션에서 애플리케이션 만들기를 클릭해야 합니다.
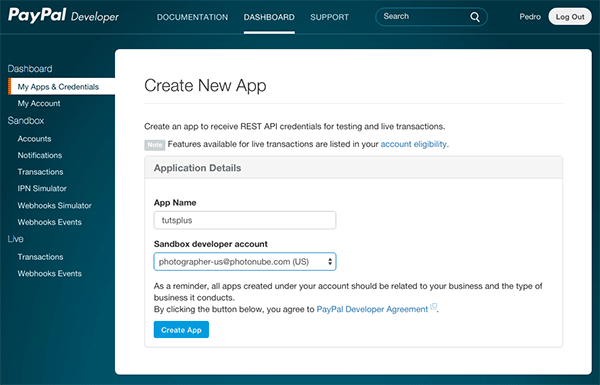
앱 이름을 지정하고 앱과 연결할 샌드박스 개발자 계정을 선택하세요. 테스트 목적으로 http://sandbox.paypal.com으로 이동하여 샌드박스 로그인 세부 정보를 사용하여 로그인하여 테스트 PayPal 계정 및 거래를 볼 수 있습니다.
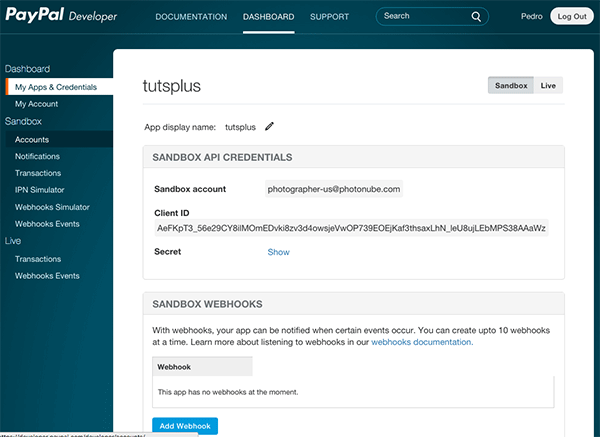
앱 만들기를 클릭하면 클라이언트 ID와 비밀 토큰이 포함된 확인 화면이 나타납니다.
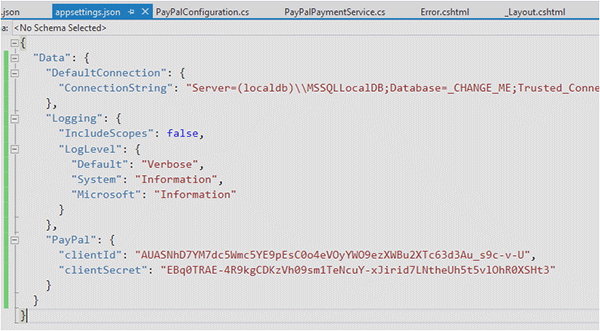
아래 스크린샷과 같이 clientId 및 clientSecret 토큰을 appsettings.json에 복사합니다.
테스트 결제
PayPal은 테스트를 위한 샌드박스 환경을 제공합니다. 여기에서 테스트 구매자 및 판매자 계정을 생성할 수 있습니다. 가입하고 나면 개발자 계정과 연결된 샌드박스에 기업 계정이 생성됩니다.
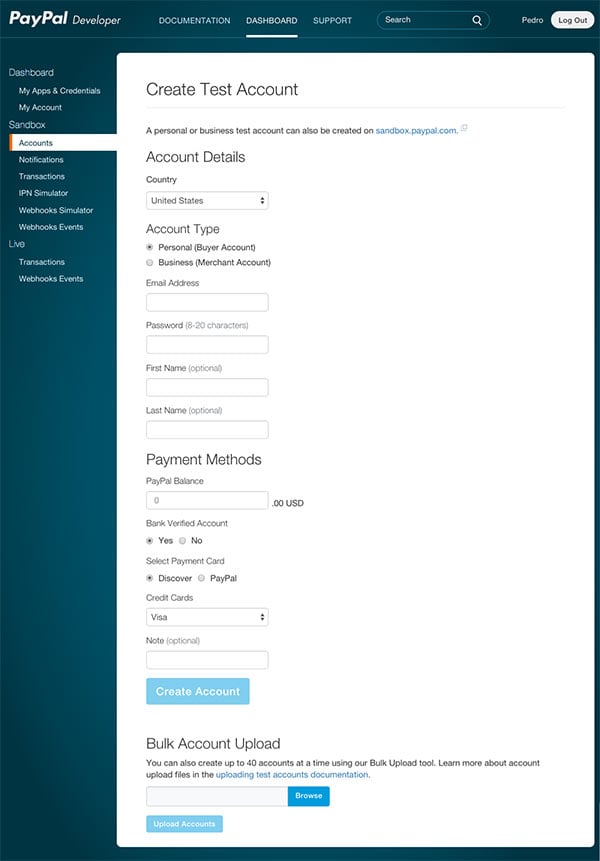
새 테스트 계정을 만들려면 개발자 웹사이트에 로그인한 다음 제어판 탭을 클릭하고 샌드박스 > 계정으로 이동하세요. 여기에서 테스트 계정 목록(사용 가능한 경우)을 볼 수 있습니다.
아직 테스트 계정을 만들지 않았다면 오른쪽 상단의 계정 만들기를 클릭하여 최소한 테스트 개인 계정과 테스트 비즈니스 계정을 만드세요.
테스트 계정을 만든 후 이전 양식에서 각 계정에 할당한 테스트 이메일 주소와 비밀번호를 사용하여 www.sandbox.paypal.com을 통해 로그인할 수 있습니다. 이는 개인 테스트 계정을 사용하여 구매할 때 자금이 테스트 비즈니스 계정으로 이체되는지 여부를 테스트하는 데 유용합니다. 이제 PayPal과의 통합을 시작하고 자금이 한 계좌에서 다른 계좌로 이체되는지 테스트할 준비가 되었습니다.
public static Payment CreatePayment(string baseUrl, string intent)
{
    // ### Api Context
    // Pass in a `APIContext` object to authenticate
    // the call and to send a unique request id
    // (that ensures idempotency). The SDK generates
    // a request id if you do not pass one explicitly.
    var apiContext = PayPalConfiguration.GetAPIContext();

    // Payment Resource
    var payment = new Payment()
    {
        intent = intent,    // `sale` or `authorize`
        payer = new Payer() { payment_method = "paypal" },
        transactions = GetTransactionsList(),
        redirect_urls = GetReturnUrls(baseUrl, intent)
    };

    // Create a payment using a valid APIContext
    var createdPayment = payment.Create(apiContext);

    return createdPayment;
}

private static List<Transaction> GetTransactionsList()
{
    // A transaction defines the contract of a payment
    // what is the payment for and who is fulfilling it.
    var transactionList = new List<Transaction>();

    // The Payment creation API requires a list of Transaction;
    // add the created Transaction to a List
    transactionList.Add(new Transaction()
    {
        description = "Transaction description.",
        invoice_number = GetRandomInvoiceNumber(),
        amount = new Amount()
        {
            currency = "USD",
            total = "100.00",       // Total must be equal to sum of shipping, tax and subtotal.
            details = new Details() // Details: Let's you specify details of a payment amount.
            {
                tax = "15",
                shipping = "10",
                subtotal = "75"
            }
        },
        item_list = new ItemList()
        {
            items = new List<Item>()
            {
                new Item()
                {
                    name = "Item Name",
                    currency = "USD",
                    price = "15",
                    quantity = "5",
                    sku = "sku"
                }
            }
        }
    });
    return transactionList;
}

private static RedirectUrls GetReturnUrls(string baseUrl, string intent)
{
    var returnUrl = intent == "sale" ? "/Home/PaymentSuccessful" : "/Home/AuthorizeSuccessful";

    // Redirect URLS
    // These URLs will determine how the user is redirected from PayPal
    // once they have either approved or canceled the payment.
    return new RedirectUrls()
    {
        cancel_url = baseUrl + "/Home/PaymentCancelled",
        return_url = baseUrl + returnUrl
    };
}

public static Payment ExecutePayment(string paymentId, string payerId)
{
    // ### Api Context
    // Pass in a `APIContext` object to authenticate
    // the call and to send a unique request id
    // (that ensures idempotency). The SDK generates
    // a request id if you do not pass one explicitly.
    var apiContext = PayPalConfiguration.GetAPIContext();

    var paymentExecution = new PaymentExecution() { payer_id = payerId };
    var payment = new Payment() { id = paymentId };

    // Execute the payment.
    var executedPayment = payment.Execute(apiContext, paymentExecution);

    return executedPayment;
}
public static Capture CapturePayment(string paymentId)
{
    var apiContext = PayPalConfiguration.GetAPIContext();

    var payment = Payment.Get(apiContext, paymentId);
    var auth = payment.transactions[0].related_resources[0].authorization;

    // Specify an amount to capture.  By setting 'is_final_capture' to true, all remaining funds held by the authorization will be released from the funding instrument.
    var capture = new Capture()
    {
        amount = new Amount()
        {
            currency = "USD",
            total = "4.54"
        },
        is_final_capture = true
    };

    // Capture an authorized payment by POSTing to
    // URI v1/payments/authorization/{authorization_id}/capture
    var responseCapture = auth.Capture(apiContext, capture);

    return responseCapture;
}
로그인 후 복사
然后,我在 HomeController 中添加了两个新操作来显示此类付款:
public IActionResult AuthorizePayment()
{
    var payment = PayPalPaymentService.CreatePayment(GetBaseUrl(), "authorize");

    return Redirect(payment.GetApprovalUrl());
}

public IActionResult AuthorizeSuccessful(string paymentId, string token, string PayerID)
{
    // Capture Payment
    var capture = PayPalPaymentService.CapturePayment(paymentId);

    return View();
}
// Define the plan and attach the payment definitions and merchant preferences.
// More Information: https://developer.paypal.com/webapps/developer/docs/api/#create-a-plan
var billingPlan = new Plan
{
    name = "Tuts+ Plus",
    description = "Monthly plan for courses.",
    type = "fixed",
    // Define the merchant preferences.
    // More Information: https://developer.paypal.com/webapps/developer/docs/api/#merchantpreferences-object
    merchant_preferences = new MerchantPreferences()
    {
        setup_fee = GetCurrency("0"), // $0
        return_url = "returnURL", // Retrieve from config
        cancel_url = "cancelURL", // Retrieve from config
        auto_bill_amount = "YES",
        initial_fail_amount_action = "CONTINUE",
        max_fail_attempts = "0"
    },
    payment_definitions = new List<PaymentDefinition>
    {
        // Define a trial plan that will only charge $9.99 for the first
        // month. After that, the standard plan will take over for the
        // remaining 11 months of the year.
        new PaymentDefinition()
        {
            name = "Trial Plan",
            type = "TRIAL",
            frequency = "MONTH",
            frequency_interval = "1",
            amount = GetCurrency("0"), // Free for the 1st month
            cycles = "1",
            charge_models = new List<ChargeModel>
            {
                new ChargeModel()
                {
                    type = "TAX",
                    amount = GetCurrency("1.65") // If we need to charge Tax
                },
                new ChargeModel()
                {
                    type = "SHIPPING",
                    amount = GetCurrency("9.99") // If we need to charge for Shipping
                }
            }
        },
        // Define the standard payment plan. It will represent a monthly
        // plan for $19.99 USD that charges once month for 11 months.
        new PaymentDefinition
        {
            name = "Standard Plan",
            type = "REGULAR",
            frequency = "MONTH",
            frequency_interval = "1",
            amount = GetCurrency("15.00"),
            // > NOTE: For `IFNINITE` type plans, `cycles` should be 0 for a `REGULAR` `PaymentDefinition` object.
            cycles = "11",
            charge_models = new List<ChargeModel>
            {
                new ChargeModel
                {
                    type = "TAX",
                    amount = GetCurrency("2.47")
                },
                new ChargeModel()
                {
                    type = "SHIPPING",
                    amount = GetCurrency("9.99")
                }
            }
        }
    }
};

// Get PayPal Config
var apiContext = PayPalConfiguration.GetAPIContext();

// Create Plan
plan.Create(apiContext);
로그인 후 복사
新创建的结算计划处于 CREATED 状态。将其激活为“活动”状态,以便您的客户可以订阅该计划。要激活该计划,我们需要发出 PATCH 请求:
// Activate the plan
var patchRequest = new PatchRequest()
{
    new Patch()
    {
        op = "replace",
        path = "/",
        value = new Plan() { state = "ACTIVE" }
    }
};
plan.Update(apiContext, patchRequest);
로그인 후 복사
如您所见,PayPal 库是其 REST API 的直接包装器,这很好,但与 Stripe 等其他 API 相比,该 API 也非常复杂。因此,将所有 PayPal 通信包装在对象中,为我们的应用程序提供更清晰、更简单的 API,这确实是一个不错的选择。在这里您可以看到封装在多个带有参数的函数中的代码的样子:
public static Plan CreatePlanObject(string planName, string planDescription, string returnUrl, string cancelUrl,
    string frequency, int frequencyInterval, decimal planPrice,
    decimal shippingAmount = 0, decimal taxPercentage = 0, bool trial = false, int trialLength = 0, decimal trialPrice = 0)
{
    // Define the plan and attach the payment definitions and merchant preferences.
    // More Information: https://developer.paypal.com/docs/rest/api/payments.billing-plans/
    return new Plan
    {
        name = planName,
        description = planDescription,
        type = PlanType.Fixed,

        // Define the merchant preferences.
        // More Information: https://developer.paypal.com/webapps/developer/docs/api/#merchantpreferences-object
        merchant_preferences = new MerchantPreferences()
        {
            setup_fee = GetCurrency("1"),
            return_url = returnUrl,
            cancel_url = cancelUrl,
            auto_bill_amount = "YES",
            initial_fail_amount_action = "CONTINUE",
            max_fail_attempts = "0"
        },
        payment_definitions = GetPaymentDefinitions(trial, trialLength, trialPrice, frequency, frequencyInterval, planPrice, shippingAmount, taxPercentage)
    };
}

private static List<PaymentDefinition> GetPaymentDefinitions(bool trial, int trialLength, decimal trialPrice,
    string frequency, int frequencyInterval, decimal planPrice, decimal shippingAmount, decimal taxPercentage)
{
    var paymentDefinitions = new List<PaymentDefinition>();

    if (trial)
    {
        // Define a trial plan that will charge 'trialPrice' for 'trialLength'
        // After that, the standard plan will take over.
        paymentDefinitions.Add(
            new PaymentDefinition()
            {
                name = "Trial",
                type = "TRIAL",
                frequency = frequency,
                frequency_interval = frequencyInterval.ToString(),
                amount = GetCurrency(trialPrice.ToString()),
                cycles = trialLength.ToString(),
                charge_models = GetChargeModels(trialPrice, shippingAmount, taxPercentage)
            });
    }

    // Define the standard payment plan. It will represent a 'frequency' (monthly, etc)
    // plan for 'planPrice' that charges 'planPrice' (once a month) for #cycles.
    var regularPayment = new PaymentDefinition
    {
        name = "Standard Plan",
        type = "REGULAR",
        frequency = frequency,
        frequency_interval = frequencyInterval.ToString(),
        amount = GetCurrency(planPrice.ToString()),
        // > NOTE: For `IFNINITE` type plans, `cycles` should be 0 for a `REGULAR` `PaymentDefinition` object.
        cycles = "11",
        charge_models = GetChargeModels(trialPrice, shippingAmount, taxPercentage)
    };
    paymentDefinitions.Add(regularPayment);

    return paymentDefinitions;
}

private static List<ChargeModel> GetChargeModels(decimal planPrice, decimal shippingAmount, decimal taxPercentage)
{
    // Create the Billing Plan
    var chargeModels = new List<ChargeModel>();
    if (shippingAmount > 0)
    {
        chargeModels.Add(new ChargeModel()
        {
            type = "SHIPPING",
            amount = GetCurrency(shippingAmount.ToString())
        });
    }
    if (taxPercentage > 0)
    {
        chargeModels.Add(new ChargeModel()
        {
            type = "TAX",
            amount = GetCurrency(String.Format("{0:f2}", planPrice * taxPercentage / 100))
        });
    }

    return chargeModels;
}
로그인 후 복사
更新结算计划
您可以通过提出“PATCH”请求来更新现有结算方案的信息。这是一个包装该调用的函数:
public static void UpdateBillingPlan(string planId, string path, object value)
{
    // PayPal Authentication tokens
    var apiContext = PayPalConfiguration.GetAPIContext();

    // Retrieve Plan
    var plan = Plan.Get(apiContext, planId);

    // Activate the plan
    var patchRequest = new PatchRequest()
    {
        new Patch()
        {
            op = "replace",
            path = path,
            value = value
        }
    };
    plan.Update(apiContext, patchRequest);
}
로그인 후 복사
要更新计费计划描述,我们可以调用此函数并传递正确的参数:
UpdateBillingPlan(
    planId: "P-5FY40070P6526045UHFWUVEI",
    path: "/",
    value: new Plan { description = "new description" });
public static void ExecuteBillingAgreement(string token)
{
    // PayPal Authentication tokens
    var apiContext = PayPalConfiguration.GetAPIContext();

    var agreement = new Agreement() { token = token };
    var executedAgreement = agreement.Execute(apiContext);
}
로그인 후 복사
暂停计费协议
使用此方法暂停协议:
public static void SuspendBillingAgreement(string agreementId)
{
    var apiContext = PayPalConfiguration.GetAPIContext();

    var agreement = new Agreement() { id = agreementId };
    agreement.Suspend(apiContext, new AgreementStateDescriptor()
        { note = "Suspending the agreement" });
}
로그인 후 복사
重新激活计费协议
这个与上一个非常相似:
public static void ReactivateBillingAgreement(string agreementId)
{
    var apiContext = PayPalConfiguration.GetAPIContext();

    var agreement = new Agreement() { id = agreementId };
    agreement.ReActivate(apiContext, new AgreementStateDescriptor()
        { note = "Reactivating the agreement" });
}
로그인 후 복사
取消计费协议
使用此功能取消计划:
public static void CancelBillingAgreement(string agreementId)
{
    var apiContext = PayPalConfiguration.GetAPIContext();

    var agreement = new Agreement() { id = agreementId };
    agreement.Cancel(apiContext, new AgreementStateDescriptor()
        { note = "Cancelling the agreement" });
}
기술 및 산업 요구에 따라 Python 및 JavaScript 개발자에 대한 절대 급여는 없습니다. 1. 파이썬은 데이터 과학 및 기계 학습에서 더 많은 비용을 지불 할 수 있습니다. 2. JavaScript는 프론트 엔드 및 풀 스택 개발에 큰 수요가 있으며 급여도 상당합니다. 3. 영향 요인에는 경험, 지리적 위치, 회사 규모 및 특정 기술이 포함됩니다.
JavaScript는 현대 웹 개발의 초석이며 주요 기능에는 이벤트 중심 프로그래밍, 동적 컨텐츠 생성 및 비동기 프로그래밍이 포함됩니다. 1) 이벤트 중심 프로그래밍을 사용하면 사용자 작업에 따라 웹 페이지가 동적으로 변경 될 수 있습니다. 2) 동적 컨텐츠 생성을 사용하면 조건에 따라 페이지 컨텐츠를 조정할 수 있습니다. 3) 비동기 프로그래밍은 사용자 인터페이스가 차단되지 않도록합니다. JavaScript는 웹 상호 작용, 단일 페이지 응용 프로그램 및 서버 측 개발에 널리 사용되며 사용자 경험 및 크로스 플랫폼 개발의 유연성을 크게 향상시킵니다.
엔트리 레벨 타입 스크립트 자습서를 마스터 한 후에는 TypeScript를 지원하고 JavaScript로 컴파일하는 IDE에서 자신의 코드를 작성할 수 있어야합니다. 이 튜토리얼은 TypeScript의 다양한 데이터 유형으로 뛰어납니다.
JavaScript에는 NULL, UNDEFINED, BOOLEAN, 번호, 문자열, 기호 (ES6에 의해 소개 됨) 및 객체의 7 가지 데이터 유형이 있습니다. TypeScript는이 기반으로 더 많은 유형을 정의 하며이 튜토리얼은이 모든 튜토리얼을 자세히 다룹니다.
널 데이터 유형
JavaScript와 마찬가지로 Null in TypeScript
JavaScript는 PowerPoint에서 실행할 수 있으며 외부 JavaScript 파일을 호출하거나 VBA를 통해 HTML 파일을 포함시켜 구현할 수 있습니다. 1. VBA를 사용하여 JavaScript 파일을 호출하려면 매크로를 활성화하고 VBA 프로그래밍 지식이 있어야합니다. 2. JavaScript가 포함 된 HTML 파일을 포함시켜 간단하고 사용하기 쉽지만 보안 제한이 적용됩니다. 장점에는 확장 된 기능과 유연성이 포함되며, 단점에는 보안, 호환성 및 복잡성이 포함됩니다. 실제로 보안, 호환성, 성능 및 사용자 경험에주의를 기울여야합니다.


 7569
7569
 15
15

 프론트 엔드 열 용지 영수증에 대한 차량 코드 인쇄를 만나면 어떻게해야합니까?
Apr 04, 2025 pm 02:42 PM
프론트 엔드 열 용지 영수증에 대한 차량 코드 인쇄를 만나면 어떻게해야합니까?
Apr 04, 2025 pm 02:42 PM
 누가 더 많은 파이썬이나 자바 스크립트를 지불합니까?
Apr 04, 2025 am 12:09 AM
누가 더 많은 파이썬이나 자바 스크립트를 지불합니까?
Apr 04, 2025 am 12:09 AM
 JavaScript를 사용하여 동일한 ID와 동일한 ID로 배열 요소를 하나의 객체로 병합하는 방법은 무엇입니까?
Apr 04, 2025 pm 05:09 PM
JavaScript를 사용하여 동일한 ID와 동일한 ID로 배열 요소를 하나의 객체로 병합하는 방법은 무엇입니까?
Apr 04, 2025 pm 05:09 PM
 Demystifying JavaScript : 그것이하는 일과 중요한 이유
Apr 09, 2025 am 12:07 AM
Demystifying JavaScript : 그것이하는 일과 중요한 이유
Apr 09, 2025 am 12:07 AM
 Console.log 출력 결과의 차이 : 두 통화가 다른 이유는 무엇입니까?
Apr 04, 2025 pm 05:12 PM
Console.log 출력 결과의 차이 : 두 통화가 다른 이유는 무엇입니까?
Apr 04, 2025 pm 05:12 PM
 Shiseido의 공식 웹 사이트와 같은 시차 스크롤 및 요소 애니메이션 효과를 달성하는 방법은 무엇입니까?
또는:
Shiseido의 공식 웹 사이트와 같은 페이지 스크롤과 함께 애니메이션 효과를 어떻게 달성 할 수 있습니까?
Apr 04, 2025 pm 05:36 PM
Shiseido의 공식 웹 사이트와 같은 시차 스크롤 및 요소 애니메이션 효과를 달성하는 방법은 무엇입니까?
또는:
Shiseido의 공식 웹 사이트와 같은 페이지 스크롤과 함께 애니메이션 효과를 어떻게 달성 할 수 있습니까?
Apr 04, 2025 pm 05:36 PM
 초보자를위한 타이프 스크립트, 2 부 : 기본 데이터 유형
Mar 19, 2025 am 09:10 AM
초보자를위한 타이프 스크립트, 2 부 : 기본 데이터 유형
Mar 19, 2025 am 09:10 AM
 PowerPoint가 JavaScript를 실행할 수 있습니까?
Apr 01, 2025 pm 05:17 PM
PowerPoint가 JavaScript를 실행할 수 있습니까?
Apr 01, 2025 pm 05:17 PM
