

WordPress 설정 API의 테마 옵션 탐색, 4부

이전 기사에서는 WordPress API에서 지원하는 다양한 유형의 메뉴에 대해 자세히 살펴보았습니다. 반드시 설정 API의 일부는 아니지만, 특히 고급 플러그인과 테마를 개발할 때 개발에서 중요한 역할을 합니다.
이 기사에서는 기존 설정을 리팩토링하고 몇 가지 새 페이지를 추가하여 샌드박스 테마 구축을 시작하면서 메뉴를 실제로 사용할 것입니다. 방금 우리에 합류하는 경우 이전 기사를 읽고 GitHub 저장소에서 최신 버전의 샌드박스 테마를 가져왔는지 확인하세요.
시작하기 전에: 이 문서에는 많은 코드가 포함되어 있습니다. 이 기사의 전반부에서는 기존 코드를 리팩터링합니다. 하반기에는 일부 기능을 처음부터 작성하겠습니다. 다음 섹션으로 넘어가기 전에 시간을 내어 각 섹션과 해당 코드를 읽고 무슨 일이 일어나고 있는지 완전히 이해했는지 확인하는 것이 중요합니다. 아래 코드를 복사하여 붙여넣지 마세요.
작성자 메모: 이 문서에서는 테마 옵션 설정의 새로운 섹션을 소개하는 과정을 안내하지만 프로세스가 완료되지는 않습니다. 이 댓글 스레드에서 자세한 내용을 읽어보세요. 나는 이것을 알고 있다는 것을 알고 있습니다. 게시물에서 명확하게 설명하지 못해 죄송합니다. 이번 달 말에 다음 게시물에서 전체 작업 버전을 다루겠습니다!
일부 하우스키핑
이전 예제를 완료했다면 functions.php에 다양한 메뉴가 구성되어 있어야 합니다. 주제에 대해 보다 실용적인 접근 방식을 취할 것이므로 이전 예에서 작성한 내용 중 일부를 정리해야 합니다. 단지 삭제하기 위해 많은 코드를 작성하는 것이 다소 번거롭다는 것을 알지만, 이전 예제는 WordPress가 제공하는 기능을 이해하고 기능을 실제로 적용할 수 있는 기반을 마련하기 위한 것입니다.
가장 먼저 해야 할 일은 플러그인 메뉴에 샌드박스 옵션을 추가하는 두 가지 함수 호출을 찾는 것입니다.
으아악functions.php에서 제거하세요.
다음으로 최상위 메뉴를 추가하는 옵션을 제거하고 싶습니다. 이 문서의 뒷부분에서 이 코드를 다시 살펴보겠지만 원래 만든 코드와는 약간 다릅니다.
으아악이 시점에서 우리가 만든 WordPress 관리 영역에 두 가지 특정 기능을 남겨 두어야 합니다.
- Appearance 메뉴 아래의 "샌드박스 테마" 메뉴 항목입니다.
- 설정 메뉴의 일반 설정에 있는 세 가지 옵션 집합입니다.
이 두 가지 옵션이 보이면 그대로 진행하세요. 그렇지 않으면 functions.php가 다음 코드와 같은지 확인하세요.
으아악이제 시작할 준비가 되었습니다.
옵션 계획하기
코드를 작성하기 전에 무엇을 할지 계획을 세우는 것이 중요합니다. 이 시점에서 우리는 몇 가지 유용한 기능을 작성했습니다. 즉, 사용자가 머리글, 콘텐츠 및 바닥글 영역의 표시 여부를 전환할 수 있도록 했습니다. 문제는 이러한 옵션이 현재 설정 메뉴의 일반 페이지에 있다는 것입니다. 테마를 개발 중이므로 해당 테마를 테마 옵션 페이지에 포함해야 합니다.
결론은 이 세 가지 옵션만으로는 유용한 테마에 충분하지 않다는 것입니다. 사용자가 자신의 소셜 네트워크를 블로그에 소개하는 것이 점점 보편화되고 있으므로 우리는 사용자에게 자신의 Twitter, Facebook 및 Google+ 계정에 링크를 추가할 수 있는 기능을 제공할 계획입니다.
이를 염두에 두고 다음 두 부분을 계획할 수 있습니다.
- 디스플레이 옵션
- 제목
- 콘텐츠
- 바닥글
- 소셜 옵션
- 트위터
- 페이스북
- 구글+
한 단계 더 나아가 샌드박스 테마의 옵션 페이지에 이러한 옵션을 소개하겠습니다. 이 페이지는 Appearance 메뉴에서 액세스할 수 있습니다. 또한 각 섹션은 페이지 탐색의 자체 탭을 통해 액세스할 수 있습니다.
제작 옵션
리팩토링 옵션 페이지
이 문서에서는 옵션 페이지가 더욱 발전할 예정이므로 이에 대비하는 것이 가장 좋습니다. 옵션 페이지를 보면 콜백 함수는 다음과 같습니다.
으아악더 발전될 예정이므로 약간의 리팩토링이 필요합니다. 구체적으로 다음을 수행합니다.
- 워드프레스 디자인과 더 일관되도록 옵션 페이지에 아이콘을 제공하세요
- 페이지 설명 삭제
- 시간 제한을 더 쉽게 유지할 수 있도록 HTML의 PHP 문자열을 HTML 블록으로 리팩터링했습니다.
- 설정 오류 표시 기능 소개
- 옵션을 담을 양식 만들기
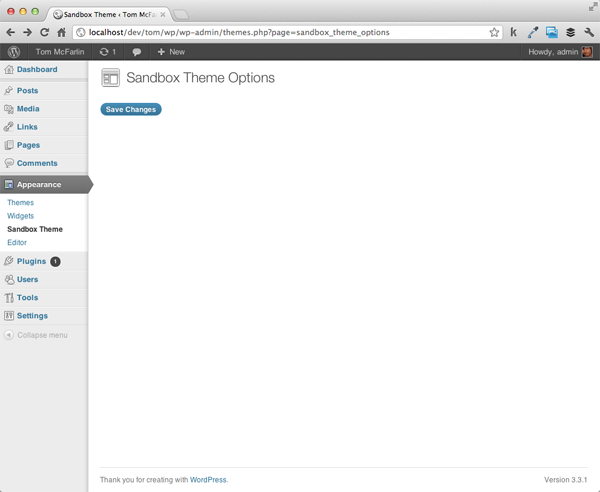
이것은 비교적 간단합니다. 이 경우 코드는 우리가 하는 일을 더 잘 설명할 수 있습니다. 한 줄씩 나누어 보십시오. 아래 코드를 보고 주석에 세심한 주의를 기울여 콜백이 다음과 같은지 확인하세요.
으아악모든 코드가 올바른 경우 옵션 페이지는 다음과 같습니다.
重新调整我们的选择
现在主题的选项页面已经成型,是时候将我们到目前为止创建的选项(即显示选项)移动到主题的选项页面上。回想一下上一篇文章,我们将每个新选项添加到“常规”设置页面的“沙盒选项”标签下。现在我们要将其移至其自己的页面,我们将需要进行一些修改。我们将逐一详细介绍我们正在做的事情。
第 1 步验证选项是否存在
由于我们要创建自己的自定义选项组,而不是将字段添加到现有集合中,因此我们需要确保我们的选项集合存在于数据库中。为此,我们将调用 get_option 函数。如果它返回 false,那么我们将使用 add_option 函数添加新的选项集。
为此,请将以下代码块添加为 sandbox_initialize_theme_options 函数中的第一行:
if( false == get_option( 'sandbox_theme_display_options' ) ) {
	add_option( 'sandbox_theme_display_options' );
} // end if
第 2 步重构我们的部分
找到对 add_settings_section 的调用并记下“title”参数。现在,它应该看起来像这样:
add_settings_section(
	'general_settings_section',			// ID used to identify this section and with which to register options
	'Sandbox Options',					// Title to be displayed on the administration page
	'sandbox_general_options_callback',	// Callback used to render the description of the section
	'general'							// Page on which to add this section of options
);
由于这些选项现在位于“沙盒选项”页面下,因此我们不希望该部分被如此标记。相反,我们将其更改为“显示选项”。
add_settings_section(
	'general_settings_section',			// ID used to identify this section and with which to register options
	'Display Options',					// Title to be displayed on the administration page
	'sandbox_general_options_callback',	// Callback used to render the description of the section
	'sandbox_theme_display_options'		// Page on which to add this section of options
);
其次,我们不再在“常规设置”页面上呈现此内容,因此我们需要将最后一个参数更改为我们主题特有的内容。我选择使用 sandbox_theme_display_options:
add_settings_section(
	'general_settings_section',			// ID used to identify this section and with which to register options
	'Display Options',					// Title to be displayed on the administration page
	'sandbox_general_options_callback',	// Callback used to render the description of the section
	'sandbox_theme_display_options'		// Page on which to add this section of options
);
第 3 步更新我们的设置字段
现在我们已经为显示选项提供了唯一的页面标识符,我们需要确保我们的设置正确引用页面,以便正确呈现它们。目前,我们对 add_settings_field 的所有调用均指“常规设置”页面:
add_settings_field(
	'show_header',						// ID used to identify the field throughout the theme
	'Header',							// The label to the left of the option interface element
	'sandbox_toggle_header_callback',	// The name of the function responsible for rendering the option interface
	'general',							// The page on which this option will be displayed
	'general_settings_section',			// The name of the section to which this field belongs
	array(								// The array of arguments to pass to the callback. In this case, just a description.
		'Activate this setting to display the header.'
	)
);
我们需要更改第四个参数 - 即页面参数 - 以便它引用我们的新显示选项页面而不是常规页面。只需将字符串更改为 sandbox_theme_display_options 即可。这三个选项现在应如下所示:
add_settings_field(
	'show_header',						// ID used to identify the field throughout the theme
	'Header',							// The label to the left of the option interface element
	'sandbox_toggle_header_callback',	// The name of the function responsible for rendering the option interface
	'sandbox_theme_display_options',	// The page on which this option will be displayed
	'general_settings_section',			// The name of the section to which this field belongs
	array(								// The array of arguments to pass to the callback. In this case, just a description.
		'Activate this setting to display the header.'
	)
);

add_settings_field(
	'show_content',
	'Content',
	'sandbox_toggle_content_callback',
	'sandbox_theme_display_options',
	'general_settings_section',
	array(
		'Activate this setting to display the content.'
	)
);

add_settings_field(
	'show_footer',
	'Footer',
	'sandbox_toggle_footer_callback',
	'sandbox_theme_display_options',
	'general_settings_section',
	array(
		'Activate this setting to display the footer.'
	)
);
第 4 步注册新设置
到目前为止,我们已使用常规页面上的设置单独注册了每个选项:
register_setting(
	'general',
	'show_header'
);

register_setting(
	'general',
	'show_content'
);

register_setting(
	'general',
	'show_footer'
);
由于我们创建了自己的选项页面以及我们自己的部分,因此我们可以将这三个注册调用合并为一个调用,该调用将为我们的新选项部分注册字段:
register_setting(
	'sandbox_theme_display_options',
	'sandbox_theme_display_options'
);
这可能是最难掌握的想法。回想一下本系列的第二篇文章,设置是它们所属的字段和部分的组合。由于我们所有的字段都属于同一部分(显示选项),因此我们使用 WordPress 注册该部分。
第 5 步更新选项元素
不要错过这一点:到目前为止,我们的选项已作为单独的设置保存在数据库中。这意味着我们可以简单地通过 ID 查找它们(例如 get_option('show_header');,但由于我们现在已将它们添加到自定义部分,因此它们是选项集合的一部分。这意味着为了读取我们的选项,我们必须首先访问选项集合,然后请求该集合的单个选项。
现在我们需要更新每个输入元素。为此,请在 functions.php 文件中找到回调函数。第一个选项应如下所示:
function sandbox_toggle_header_callback($args) {

	$html = '<input type="checkbox" id="show_header" name="show_header" value="1" ' . checked(1, get_option('show_header'), false) . '/>';
	$html .= '<label for="show_header"> '  . $args[0] . '</label>';

	echo $html;

} // end sandbox_toggle_header_callback
如上所述,我们的每个选项现在都是集合的一部分,因此我们需要更新引用它们的方式。我们需要...
- 阅读 WordPress 的选项集合
- 访问集合中的单个选项
- 更新输入元素的属性以正确引用选项集合
虽然听起来很多,但步骤很简单。查看下面的代码,密切注意注释:
function sandbox_toggle_header_callback($args) {

	// First, we read the options collection
	$options = get_option('sandbox_theme_display_options');

	// Next, we update the name attribute to access this element's ID in the context of the display options array
	// We also access the show_header element of the options collection in the call to the checked() helper function
	$html = '<input type="checkbox" id="show_header" name="sandbox_theme_display_options[show_header]" value="1" ' . checked(1, $options['show_header'], false) . '/>';

	// Here, we'll take the first argument of the array and add it to a label next to the checkbox
	$html .= '<label for="show_header"> '  . $args[0] . '</label>';

	echo $html;

} // end sandbox_toggle_header_callback
很简单,对吧?由于我们有三个元素,因此我们需要对每个元素进行相应的更改。除了选项名称之外,每个函数看起来几乎相同。它将读取 show_content 或 show_footer,而不是 show_header。
完成后,三个表单元素的最终版本应如下所示:
function sandbox_toggle_header_callback($args) {

	$options = get_option('sandbox_theme_display_options');

	$html = '<input type="checkbox" id="show_header" name="sandbox_theme_display_options[show_header]" value="1" ' . checked(1, $options['show_header'], false) . '/>';
	$html .= '<label for="show_header"> '  . $args[0] . '</label>';

	echo $html;

} // end sandbox_toggle_header_callback

function sandbox_toggle_content_callback($args) {

	$options = get_option('sandbox_theme_display_options');

	$html = '<input type="checkbox" id="show_content" name="sandbox_theme_display_options[show_content]" value="1" ' . checked(1, $options['show_content'], false) . '/>';
	$html .= '<label for="show_content"> '  . $args[0] . '</label>';

	echo $html;

} // end sandbox_toggle_content_callback

function sandbox_toggle_footer_callback($args) {

	$options = get_option('sandbox_theme_display_options');

	$html = '<input type="checkbox" id="show_footer" name="sandbox_theme_display_options[show_footer]" value="1" ' . checked(1, $options['show_footer'], false) . '/>';
	$html .= '<label for="show_footer"> '  . $args[0] . '</label>';

	echo $html;

} // end sandbox_toggle_footer_callback
第 6 步渲染选项
最后,我们准备在新的主题选项页面上呈现选项。只需调用 Settings API 中的两个函数就可以了:
- settings_fields 负责为选项表单呈现多种安全措施。
- do_settings_sections 实际上将选项呈现到页面。
每个函数都采用我们将渲染的页面的 ID。在我们的例子中,这是 sandbox_theme_display_options。为了呈现我们的选项,我们将 form 更新为如下所示:
	<form method="post" action="options.php">
		<?php settings_fields( 'sandbox_theme_display_options' ); ?>
		<?php do_settings_sections( 'sandbox_theme_display_options' ); ?>
		<?php submit_button(); ?>
	</form>
此时,您应该能够刷新沙盒主题选项页面并看到我们的三个选项呈现如下:
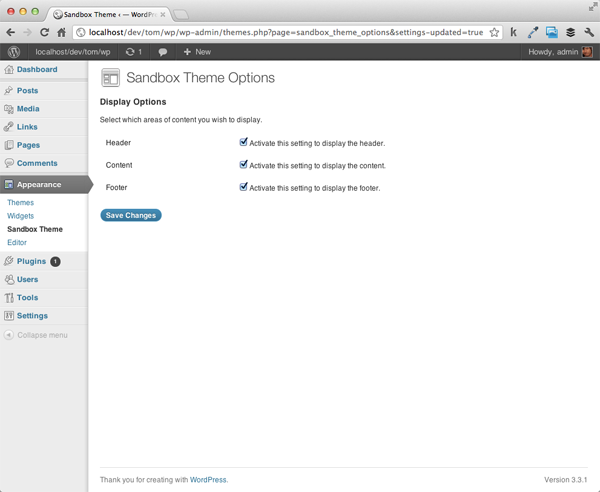
functions.php 的最终版本现在应如下所示:
Select which areas of content you wish to display.'; } // end sandbox_general_options_callback function sandbox_toggle_header_callback($args) { // First, we read the options collection $options = get_option('sandbox_theme_display_options'); // Next, we update the name attribute to access this element's ID in the context of the display options array // We also access the show_header element of the options collection in the call to the checked() helper function $html = '<input type="checkbox" id="show_header" name="sandbox_theme_display_options[show_header]" value="1" ' . checked(1, $options['show_header'], false) . '/>'; // Here, we'll take the first argument of the array and add it to a label next to the checkbox $html .= '<label for="show_header"> ' . $args[0] . '</label>'; echo $html; } // end sandbox_toggle_header_callback function sandbox_toggle_content_callback($args) { $options = get_option('sandbox_theme_display_options'); $html = ''; $html .= ''; echo $html; } // end sandbox_toggle_content_callback function sandbox_toggle_footer_callback($args) { $options = get_option('sandbox_theme_display_options'); $html = ''; $html .= ''; echo $html; } // end sandbox_toggle_footer_callback ?>Sandbox Theme Options
引入社交选项
我知道这部分有点详尽。我们采用了之前编写的大量代码并对其进行了重构以适应全新的页面。设置 API 可能具有挑战性!仅仅将现有代码重构到新页面中是不够的。因此,为了确保我们采取了自定义选项页面的流程并从头到尾引入新选项,我们现在将引入一组全新的选项。
为了与我们通常的流程保持一致,让我们准确地计划一下我们要做什么:
- 我们需要创建一个新的字段部分
- 将添加三个字段:一个用于 Facebook,一个用于 Twitter,一个用于 Google+
- 我们需要更新选项页面以呈现这些新选项
创建我们的部分、字段和设置
社交选项部分
首先,让我们继续设置一个新函数并将其添加到 admin_init 挂钩中。该功能专门用于设置我们的社交选项。与我们的显示选项一样,它需要执行检查以确保选项存在,如果不存在,则应该创建它们。
这是初始函数。也请注意评论!
/**
 * Initializes the theme's social options by registering the Sections,
 * Fields, and Settings.
 *
 * This function is registered with the 'admin_init' hook.
 */
function sandbox_theme_intialize_social_options() {

	// If the social options don't exist, create them.
	if( false == get_option( 'sandbox_theme_social_options' ) ) {
		add_option( 'sandbox_theme_social_options' );
	} // end if

} // end sandbox_theme_intialize_social_options
add_action( 'admin_init', 'sandbox_theme_intialize_social_options' );
接下来,我们需要添加新的设置部分。这是在上面的代码之后立即完成的:
add_settings_section(
	'social_settings_section',			// ID used to identify this section and with which to register options
	'Social Options',					// Title to be displayed on the administration page
	'sandbox_social_options_callback',	// Callback used to render the description of the section
	'sandbox_theme_social_options'		// Page on which to add this section of options
);
但我们注意到已经完成了!回想一下,第三个选项是指本节的回调函数。不要忘记定义它:
function sandbox_social_options_callback() {
	echo '<p>Provide the URL to the social networks you\'d like to display.</p>';
} // end sandbox_general_options_callback
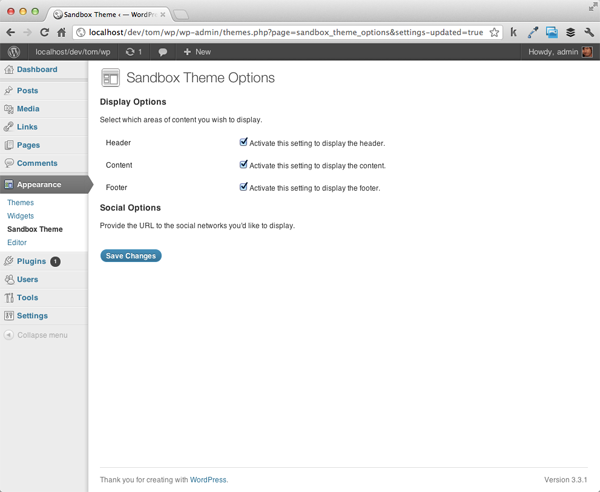
此时,我们可以进行健全性检查,以确保该部分已正确注册到设置 API。跳回 sandbox_theme_display 函数并将以下两行添加到表单元素中。他们可以直接转到 sandbox_theme_display_options 对应项下方:
<?php settings_fields( 'sandbox_theme_social_options' ); ?>
<?php do_settings_sections( 'sandbox_theme_social_options' ); ?>
如果您已正确编写代码,您的选项页面现在应如下所示:
社交选项字段
现在我们准备开始向页面添加社交选项字段。让我们首先为 Twitter 添加一个字段。在调用 add_settings_section 的下面,我们编写以下函数:
add_settings_field(
	'twitter',
	'Twitter',
	'sandbox_twitter_callback',
	'sandbox_theme_social_options',
	'social_settings_section'
);
请注意 - 我们已将回调定义为 sandbox_twitter_callback 因此我们也需要实现该函数。正如我们对之前的选项所做的那样,我们需要获取选项集合,为该选项创建 HTML 元素,并正确设置其属性以引用该选项。请特别注意下面代码中的条件 - 为了清楚起见,对其进行了注释,但这是确保我们不会尝试读取空选项的最佳实践:
function sandbox_twitter_callback() {

	// First, we read the social options collection
	$options = get_option( 'sandbox_theme_social_options' );

	// Next, we need to make sure the element is defined in the options. If not, we'll set an empty string.
	$url = '';
	if( isset( $options['twitter'] ) ) {
		$url = $options['twitter'];
	} // end if

	// Render the output
	echo '<input type="text" id="twitter" name="sandbox_theme_social_options[twitter]" value="' . $options['twitter'] . '" />';

} // end sandbox_twitter_callback
最后,我们跳回 sandbox_theme_intialize_social_options 函数并使用 WordPress 注册新设置:
register_setting(
	'sandbox_theme_social_options',
	'sandbox_theme_social_options',
	'sandbox_theme_sanitize_social_options'
);
这里有一个重要的区别:到目前为止,我们只为 register_setting 函数提供两个参数 – 选项组和选项名称 – 但这一次,我们提供了第三个参数: 回调函数的名称。具体来说,该函数在数据写入数据库之前被调用。它允许您在保存参数之前处理所有参数。一般来说,这是您想要清理数据以防止保存恶意代码或格式错误的信息的时间。
所以让我们继续并删除该函数:
function sandbox_theme_sanitize_social_options( $input ) {
} // end sandbox_theme_sanitize_social_options
请注意,上面的回调接受一个我们命名为 $input 的参数。此参数是社交选项部分存在的选项的集合。由于我们允许用户在输入字段中输入原始文本,因此我们需要防止保存任何恶意代码(例如 JavaScript 或 SQL)。
为此,我们需要执行以下操作:
- 创建一个数组,用于存储处理后的数据
- 循环遍历每个选项并正确清理数据
- 返回更新后的选项集合
让我们继续编写代码来执行此操作。将函数更新为如下所示:
function sandbox_theme_sanitize_social_options( $input ) {

	// Define the array for the updated options
	$output = array();

	// Loop through each of the options sanitizing the data
	foreach( $input as $key => $val ) {

		if( isset ( $input[$key] ) ) {
			$output[$key] = esc_url_raw( strip_tags( stripslashes( $input[$key] ) ) );
		} // end if

	} // end foreach

	// Return the new collection
	return apply_filters( 'sandbox_theme_sanitize_social_options', $output, $input );

} // end sandbox_theme_sanitize_social_options
请注意,上面我们使用了三个函数,每个函数都有助于确保用户提交的数据是干净的:
- stripslashes 是一个原生 PHP 函数,它将“取消引用带引号的”字符串
- strip_tags 是另一个原生 PHP 函数,用于从字符串中删除 HTML 和 PHP 标签
- esc_url_raw 是一个 WordPress 函数,它将强制使用干净的 URL
当然,上述过程很激进,但如果您想确保只允许将 URL 保存到数据库中,那么它是有效的。
请注意,最后一行实际上返回 apply_filters 函数的结果而不是数组本身。这是确保附加到同一钩子的其他函数也将被调用的最佳实践。在这个主题的背景下,显然没有其他功能;但是,这是进行专业主题开发的良好实践。
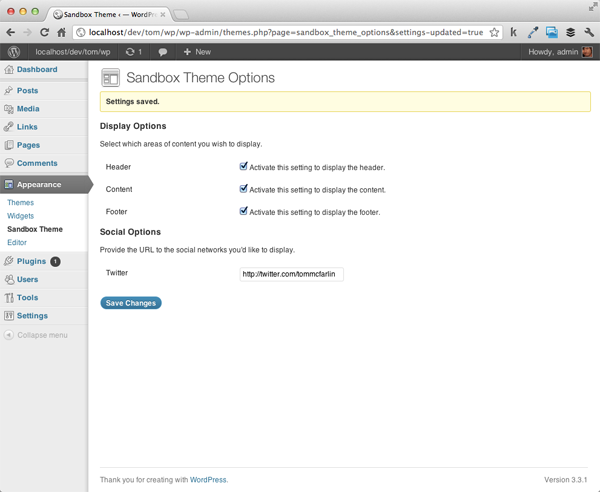
此时,保存您的工作并刷新浏览器。您的选项页面现在不仅应该显示“显示选项”,还应该显示第一个社交选项。更重要的是,您应该能够提供您的 Twitter 个人资料的 URL 并将其保存到数据库中。
包括其余选项
引入 Facebook 和 Google+ 将遵循与添加 Twitter 支持所需的完全相同的步骤。主要是:
- 定义设置字段
- 设置回调
很简单,对吧?由于设置 API,其他一切都已处理完毕。当然,我们需要完整 - 以下是如何添加对以下网络的支持。
首先,我们将定义两个设置字段:
add_settings_field(
	'facebook',
	'Facebook',
	'sandbox_facebook_callback',
	'sandbox_theme_social_options',
	'social_settings_section'
);

add_settings_field(
	'googleplus',
	'Google+',
	'sandbox_googleplus_callback',
	'sandbox_theme_social_options',
	'social_settings_section'
);
接下来,我们将定义它们的两个回调:
function sandbox_facebook_callback() {

	$options = get_option( 'sandbox_theme_social_options' );

	$url = '';
	if( isset( $options['facebook'] ) ) {
		$url = $options['facebook'];
	} // end if

	// Render the output
	echo '<input type="text" id="facebook" name="sandbox_theme_social_options[facebook]" value="' . $options['facebook'] . '" />';

} // end sandbox_facebook_callback

function sandbox_googleplus_callback() {

	$options = get_option( 'sandbox_theme_social_options' );

	$url = '';
	if( isset( $options['googleplus'] ) ) {
		$url = $options['googleplus'];
	} // end if

	// Render the output
	echo '<input type="text" id="googleplus" name="sandbox_theme_social_options[googleplus]" value="' . $options['googleplus'] . '" />';

} // end sandbox_googleplus_callback
保存您的工作,然后再次刷新您的选项页面。现在应该有两个额外的字段 - 一个用于 Facebook,一个用于 Google+。也请随意尝试一下。
关于安全性的说明:虽然此示例可以正常运行,但在将选项保存到数据库时,我们仍然应该采取一些安全措施。在本系列的后面部分,当我们更深入地了解每个输入字段时,我们将研究最佳实践,以确保在保存数据之前对其进行清理。
渲染字段
如果我们不在实际网站上访问它们,那么这些选项有什么用呢?在结束本文之前,让我们对主题的 index 模板进行一些小更新。也就是说,我们需要确保引用我们的新选项并引入显示社交网络的功能:
<!DOCTYPE html>
<html>
	<head>
		<title>The Complete Guide To The Settings API | Sandbox Theme</title>
	</head>
	<body>

		<?php $display_options = get_option( 'sandbox_theme_display_options' ); ?>
		<?php $social_options = get_option ( 'sandbox_theme_social_options' ); ?>

		<?php if( $display_options[ 'show_header' ] ) { ?>
			<div id="header">
				<h1>Sandbox Header</h1>
			</div><!-- /#header -->
		<?php } // end if ?>

		<?php if( $display_options[ 'show_content' ] ) { ?>
			<div id="content">
				<?php echo $social_options['twitter'] ? '<a href="' . $social_options['twitter'] . '">Twitter</a>' : ''; ?>
				<?php echo $social_options['facebook'] ? '<a href="' . $social_options['facebook'] . '">Facebook</a>' : ''; ?>
				<?php echo $social_options['googleplus'] ? '<a href="' . $social_options['googleplus'] . '">Google+</a>' : ''; ?>
			</div><!-- /#content -->
		<?php } // end if ?>

		<?php if( $display_options[ 'show_footer' ] ) { ?>
			<div id="footer">
				<p>© <?php echo date('Y'); ?> All Rights Reserved.</p>
			</div><!-- /#footer -->
		<?php } // end if ?>

	</body>
</html>
结论
这可以说是我们在这个特定系列中曾经(或将会)最激烈的文章。如果您喜欢它,您应该非常适合开始使用设置 API 进行更高级的工作。在接下来的两篇文章中,我们将介绍导航菜单(选项卡式导航和顶级导航)到我们的菜单中。这些文章应该更短一些,代码密集度也更少。之后,我们将研究每种元素类型。
同时,尝试一下我们到目前为止所介绍的内容!
作者注:
非常感谢那些花时间评论并分享此特定帖子问题的人。希望以下内容能够澄清这一点,并继续使其成为尽可能有价值的系列!
在本教程中,我们已经添加了大量代码;但是,仍然没有有效的设置页面。在下一篇文章中,我们将对此进行完善并添加功能,以便真正为这些选项注入一些活力,因此请务必继续阅读。
也就是说,如果您碰巧遇到许多选项未保存或某些验证错误的问题。验证错误已得到修复,最新代码可在 GitHub 上找到,因此请务必查看。请注意,我会保持该项目的最新状态,以便在出现问题时,我会尽快解决它们。
相关来源
- 获取选项
- 添加选项
- admin_init
- 设置字段
- do_settings_section
위 내용은 WordPress 설정 API의 테마 옵션 탐색, 4부의 상세 내용입니다. 자세한 내용은 PHP 중국어 웹사이트의 기타 관련 기사를 참조하세요!

핫 AI 도구

Undresser.AI Undress
사실적인 누드 사진을 만들기 위한 AI 기반 앱

AI Clothes Remover
사진에서 옷을 제거하는 온라인 AI 도구입니다.

Undress AI Tool
무료로 이미지를 벗다

Clothoff.io
AI 옷 제거제

AI Hentai Generator
AI Hentai를 무료로 생성하십시오.

인기 기사
뜨거운 도구

메모장++7.3.1
사용하기 쉬운 무료 코드 편집기

SublimeText3 중국어 버전
중국어 버전, 사용하기 매우 쉽습니다.

스튜디오 13.0.1 보내기
강력한 PHP 통합 개발 환경

드림위버 CS6
시각적 웹 개발 도구

SublimeText3 Mac 버전
신 수준의 코드 편집 소프트웨어(SublimeText3)
뜨거운 주제
 7518
7518
 15
1378
52
80
11
53
19
21
67
15
1378
52
80
11
53
19
21
67

 ALIPAY PHP SDK 전송 오류 : '클래스 부호 데이터를 선언 할 수 없음'의 문제를 해결하는 방법은 무엇입니까?
Apr 01, 2025 am 07:21 AM
ALIPAY PHP SDK 전송 오류 : '클래스 부호 데이터를 선언 할 수 없음'의 문제를 해결하는 방법은 무엇입니까?
Apr 01, 2025 am 07:21 AM
Alipay PHP ...
 JWT (JSON Web Tokens) 및 PHP API의 사용 사례를 설명하십시오.
Apr 05, 2025 am 12:04 AM
JWT (JSON Web Tokens) 및 PHP API의 사용 사례를 설명하십시오.
Apr 05, 2025 am 12:04 AM
JWT는 주로 신분증 인증 및 정보 교환을 위해 당사자간에 정보를 안전하게 전송하는 데 사용되는 JSON을 기반으로 한 개방형 표준입니다. 1. JWT는 헤더, 페이로드 및 서명의 세 부분으로 구성됩니다. 2. JWT의 작업 원칙에는 세 가지 단계가 포함됩니다. JWT 생성, JWT 확인 및 Parsing Payload. 3. PHP에서 인증에 JWT를 사용하면 JWT를 생성하고 확인할 수 있으며 사용자 역할 및 권한 정보가 고급 사용에 포함될 수 있습니다. 4. 일반적인 오류에는 서명 검증 실패, 토큰 만료 및 대형 페이로드가 포함됩니다. 디버깅 기술에는 디버깅 도구 및 로깅 사용이 포함됩니다. 5. 성능 최적화 및 모범 사례에는 적절한 시그니처 알고리즘 사용, 타당성 기간 설정 합리적,
 PHP에서 늦은 정적 결합의 개념을 설명하십시오.
Mar 21, 2025 pm 01:33 PM
PHP에서 늦은 정적 결합의 개념을 설명하십시오.
Mar 21, 2025 pm 01:33 PM
기사는 PHP 5.3에 도입 된 PHP의 LSB (Late STATIC BING)에 대해 논의하여 정적 방법의 런타임 해상도가보다 유연한 상속을 요구할 수있게한다. LSB의 실제 응용 프로그램 및 잠재적 성능
 프레임 워크 보안 기능 : 취약점 보호.
Mar 28, 2025 pm 05:11 PM
프레임 워크 보안 기능 : 취약점 보호.
Mar 28, 2025 pm 05:11 PM
기사는 입력 유효성 검사, 인증 및 정기 업데이트를 포함한 취약점을 방지하기 위해 프레임 워크의 필수 보안 기능을 논의합니다.
 PHP의 CURL 라이브러리를 사용하여 JSON 데이터가 포함 된 게시물 요청을 보내는 방법은 무엇입니까?
Apr 01, 2025 pm 03:12 PM
PHP의 CURL 라이브러리를 사용하여 JSON 데이터가 포함 된 게시물 요청을 보내는 방법은 무엇입니까?
Apr 01, 2025 pm 03:12 PM
PHP 개발에서 PHP의 CURL 라이브러리를 사용하여 JSON 데이터를 보내면 종종 외부 API와 상호 작용해야합니다. 일반적인 방법 중 하나는 컬 라이브러리를 사용하여 게시물을 보내는 것입니다 ...
 프레임 워크 사용자 정의/확장 : 사용자 정의 기능을 추가하는 방법.
Mar 28, 2025 pm 05:12 PM
프레임 워크 사용자 정의/확장 : 사용자 정의 기능을 추가하는 방법.
Mar 28, 2025 pm 05:12 PM
이 기사에서는 프레임 워크에 사용자 정의 기능 추가, 아키텍처 이해, 확장 지점 식별 및 통합 및 디버깅을위한 모범 사례에 중점을 둡니다.
 확실한 원칙과 PHP 개발에 적용되는 방법을 설명하십시오.
Apr 03, 2025 am 12:04 AM
확실한 원칙과 PHP 개발에 적용되는 방법을 설명하십시오.
Apr 03, 2025 am 12:04 AM
PHP 개발에서 견고한 원칙의 적용에는 다음이 포함됩니다. 1. 단일 책임 원칙 (SRP) : 각 클래스는 하나의 기능 만 담당합니다. 2. Open and Close Principle (OCP) : 변경은 수정보다는 확장을 통해 달성됩니다. 3. Lisch의 대체 원칙 (LSP) : 서브 클래스는 프로그램 정확도에 영향을 미치지 않고 기본 클래스를 대체 할 수 있습니다. 4. 인터페이스 격리 원리 (ISP) : 의존성 및 사용되지 않은 방법을 피하기 위해 세밀한 인터페이스를 사용하십시오. 5. 의존성 반전 원리 (DIP) : 높고 낮은 수준의 모듈은 추상화에 의존하며 종속성 주입을 통해 구현됩니다.
 세션 납치는 어떻게 작동하며 PHP에서 어떻게 완화 할 수 있습니까?
Apr 06, 2025 am 12:02 AM
세션 납치는 어떻게 작동하며 PHP에서 어떻게 완화 할 수 있습니까?
Apr 06, 2025 am 12:02 AM
세션 납치는 다음 단계를 통해 달성 할 수 있습니다. 1. 세션 ID를 얻으십시오. 2. 세션 ID 사용, 3. 세션을 활성 상태로 유지하십시오. PHP에서 세션 납치를 방지하는 방법에는 다음이 포함됩니다. 1. 세션 _regenerate_id () 함수를 사용하여 세션 ID를 재생산합니다. 2. 데이터베이스를 통해 세션 데이터를 저장하십시오.
