 Operation and Maintenance
 Linux Operation and Maintenance
 Teach you how to configure fail2ban to protect the Apache server
Teach you how to configure fail2ban to protect the Apache server
This article mainly introduces the method of configuring fail2ban to protect the Apache server, mainly to filter IP addresses. The example is based on the Linux system. Friends in need can refer to it
In production environment The Apache server may be vulnerable to different attacks. An attacker may attempt to gain access to unauthorized or prohibited directories through brute force attacks or the execution of malicious scripts. Some malicious crawlers may scan your website for various security vulnerabilities, or send spam by collecting email addresses and web forms.
The Apache server has a comprehensive log function that can capture abnormal events reflected in various attacks. However, it is not yet able to systematically parse specific apache logs and quickly react to potential attacks (eg, ban/unban IP addresses). At this time, fail2ban can save all this and free up the system administrator's work.
fail2ban is an intrusion prevention tool that can detect different tools based on system logs and automatically take protective measures, such as banning IPs through iptables, blocking connections through /etc/hosts.deny, or sending notifications through email . fail2ban has a series of predefined "jails" that use specific program log filters to detect common attacks. You can also write custom rules to detect attacks from arbitrary programs.
In this tutorial, I will demonstrate how to configure fail2ban to protect your apache server. I assume you already have apache and fail2ban installed.
What is Fail2ban Jail
Let’s take a deeper look at fail2ban jail. Jail defines specific application policies, which trigger a protection measure for a specified program. fail2ban has predefined jails under /etc/fail2ban/jail.conf for some popular programs such as Apache, Dovecot, Lighttpd, MySQL, Postfix, SSH, etc. Each jail detects common attacks through specific program log filters (under /etc/fail2ban/filter.d). Let me look at an example jail: SSH jail.
The code is as follows:
[ssh]
    enabled   = true
    port      = ssh
    filter    = sshd
    logpath   = /var/log/auth.log
    maxretry  = 6
banaction = iptables-multiportThe configuration of the SSH prison defines these parameters:
[ssh]: The square brackets are the prison's name.
enabled: whether to enable the jail
port: port number (or corresponding service name)
filter: log parsing rules for detecting attacks
logpath: detected log file
maxretry: maximum failure Number of times
banaction: The banned operations
Any parameters defined in the jail configuration will override the corresponding default configuration parameters in fail2ban-wide. Instead, any missing parameters use the default value defined in the [DEFAULT] field.
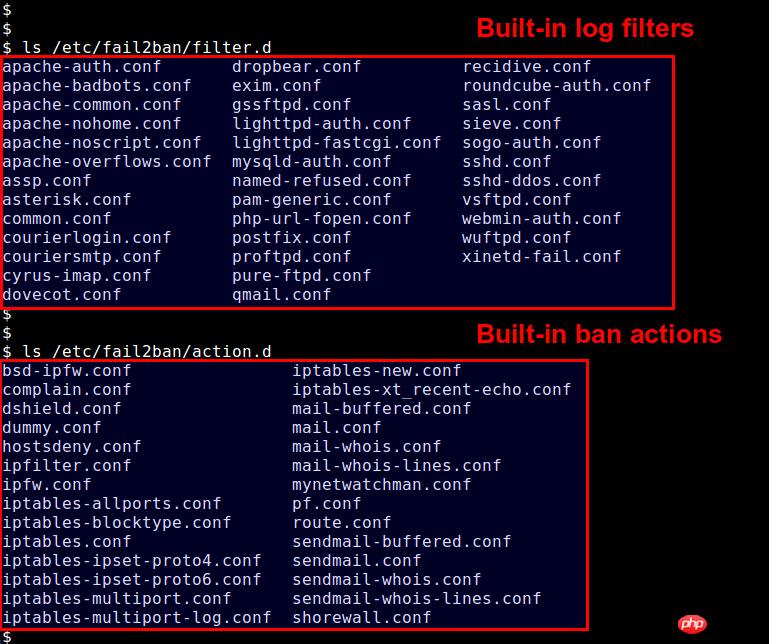
Predefined log filters are placed in /etc/fail2ban/filter.d, and the prohibited actions that can be taken are placed in /etc/fail2ban/action.d.

If you want to override fail2ban's default behavior or define any custom jails, you can create /etc/fail2ban/jail.local* files. In this tutorial, I will use /etc/fail2ban/jail.local.
Enable predefined apache jails
The default installation of fail2ban provides some predefined jails and filters for the Apache service. I want to enable these built-in Apache jails. Since Debian and RedHat are configured slightly differently, I will provide their configuration files separately.
Enabling Apache jail on Debian or Ubuntu
To enable the predefined apache jail on Debian-based systems, create /etc/fail2ban/jail.local as follows.
$ sudo vi /etc/fail2ban/jail.local
The code is as follows:
# 检测密码认证失败
    [apache]
    enabled  = true
    port     = http,https
    filter   = apache-auth
    logpath  = /var/log/apache*/*error.log
    maxretry = 6
    # 检测漏洞和 PHP 脆弱性扫描
    [apache-noscript]
    enabled  = true
    port     = http,https
    filter   = apache-noscript
    logpath  = /var/log/apache*/*error.log
    maxretry = 6
    # 检测 Apache 溢出攻击
    [apache-overflows]
    enabled  = true
    port     = http,https
    filter   = apache-overflows
    logpath  = /var/log/apache*/*error.log
    maxretry = 2
    # 检测在服务器寻找主目录的尝试
    [apache-nohome]
    enabled  = true
    port     = http,https
    filter   = apache-nohome
    logpath  = /var/log/apache*/*error.log
maxretry = 2Since the above jails do not specify measures, these jails will trigger default measures. To see the default action, find "banaction" under [DEFAULT] in /etc/fail2ban/jail.conf.
The code is as follows:
banaction = iptables-multiport
In this example, the default operation is iptables-multiport (defined in /etc/fail2ban/action.d/iptables-multiport.conf). This measure uses iptable's multiport module to ban an IP address.
After enabling the jail, you must restart fail2ban to load the jail.
$ sudo service fail2ban restart
Enabling Apache jails in CentOS/RHEL or Fedora
To enable predefined jails in Red Hat-based systems, create /etc/fail2ban/ as follows jail.local.
$ sudo vi /etc/fail2ban/jail.local
The code is as follows:
# 检测密码认证失败
    [apache]
    enabled  = true
    port     = http,https
    filter   = apache-auth
    logpath  = /var/log/httpd/*error_log
    maxretry = 6
    # 检测抓取邮件地址的爬虫
    [apache-badbots]
    enabled  = true
    port     = http,https
    filter   = apache-badbots
    logpath  = /var/log/httpd/*access_log
    bantime  = 172800
    maxretry = 1
    # 检测漏洞和 PHP 脆弱性扫描
    [apache-noscript]
    enabled  = true
    port     = http,https
    filter   = apache-noscript
    logpath  = /var/log/httpd/*error_log
    maxretry = 6
    # 检测 Apache 溢出攻击
    [apache-overflows]
    enabled  = true
    port     = http,https
    filter   = apache-overflows
    logpath  = /var/log/httpd/*error_log
    maxretry = 2
    # 检测在服务器寻找主目录的尝试
    [apache-nohome]
    enabled  = true
    port     = http,https
    filter   = apache-nohome
    logpath  = /var/log/httpd/*error_log
    maxretry = 2
    # 检测执行不存在的脚本的企图
    # 这些都是流行的网站服务程序
    # 如:webmail, phpMyAdmin,WordPress
    port     = http,https
    filter   = apache-botsearch
    logpath  = /var/log/httpd/*error_log
maxretry = 2Note that the default operation of these jail files is iptables-multiport (defined in "banaction" under the [DEFAULT] field in /etc/fail2ban/jail.conf ). This measure uses iptable's multiport module to ban an IP address.
After enabling the jail, you must restart fail2ban to load the jail.
In Fedora or CentOS/RHEL 7:
$ sudo systemctl restart fail2ban
In CentOS/RHEL 6:
$ sudo service fail2ban restart
Check and manage fail2ban ban status
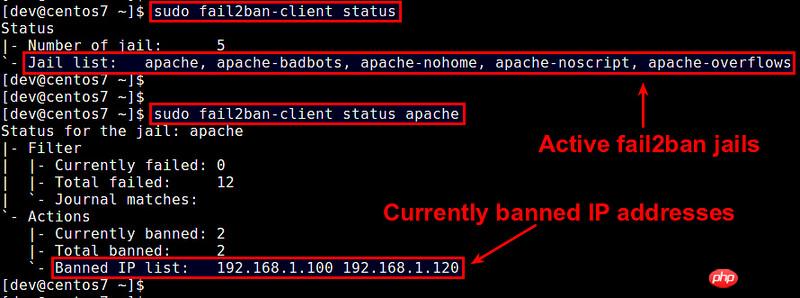
Once the jail is activated, you can use the fail2ban client command line tool to monitor the current ban status.
View the list of active jails:
$ sudo fail2ban-client status
View the status of a specific jail (including a list of banned IPs):
$ sudo fail2ban-client status [监狱名]

你也可以手动禁止或者解禁IP地址:
要用制定监狱禁止IP:
$ sudo fail2ban-client set [name-of-jail] banip [ip-address]
要解禁指定监狱屏蔽的IP:
$ sudo fail2ban-client set [name-of-jail] unbanip [ip-address]
总结
本篇教程解释了fail2ban监狱如何工作以及如何使用内置的监狱来保护Apache服务器。依赖于你的环境以及要保护的web服务器类型,你或许要调整已有的监狱或者编写自定义监狱和日志过滤器。查看outfail2ban的官方Github页面来获取最新的监狱和过滤器示例。
The above is the detailed content of Teach you how to configure fail2ban to protect the Apache server. For more information, please follow other related articles on the PHP Chinese website!

Hot AI Tools

Undresser.AI Undress
AI-powered app for creating realistic nude photos

AI Clothes Remover
Online AI tool for removing clothes from photos.

Undress AI Tool
Undress images for free

Clothoff.io
AI clothes remover

AI Hentai Generator
Generate AI Hentai for free.

Hot Article

Hot Tools

Notepad++7.3.1
Easy-to-use and free code editor

SublimeText3 Chinese version
Chinese version, very easy to use

Zend Studio 13.0.1
Powerful PHP integrated development environment

Dreamweaver CS6
Visual web development tools

SublimeText3 Mac version
God-level code editing software (SublimeText3)

Hot Topics
 1385
1385
 52
52
 How to set character encoding on the server side to solve Bootstrap Table garbled
Apr 07, 2025 pm 12:00 PM
To set character encoding on the server side to solve the garbled Bootstrap Table, you need to follow the following steps: check the server character encoding; edit the server configuration file; set the character encoding to UTF-8; save and restart the server; verify the encoding.
 How to set the cgi directory in apache
Apr 13, 2025 pm 01:18 PM
To set up a CGI directory in Apache, you need to perform the following steps: Create a CGI directory such as "cgi-bin", and grant Apache write permissions. Add the "ScriptAlias" directive block in the Apache configuration file to map the CGI directory to the "/cgi-bin" URL. Restart Apache.
 How to start apache
Apr 13, 2025 pm 01:06 PM
The steps to start Apache are as follows: Install Apache (command: sudo apt-get install apache2 or download it from the official website) Start Apache (Linux: sudo systemctl start apache2; Windows: Right-click the "Apache2.4" service and select "Start") Check whether it has been started (Linux: sudo systemctl status apache2; Windows: Check the status of the "Apache2.4" service in the service manager) Enable boot automatically (optional, Linux: sudo systemctl
 How to check Debian OpenSSL configuration
Apr 12, 2025 pm 11:57 PM
This article introduces several methods to check the OpenSSL configuration of the Debian system to help you quickly grasp the security status of the system. 1. Confirm the OpenSSL version First, verify whether OpenSSL has been installed and version information. Enter the following command in the terminal: If opensslversion is not installed, the system will prompt an error. 2. View the configuration file. The main configuration file of OpenSSL is usually located in /etc/ssl/openssl.cnf. You can use a text editor (such as nano) to view: sudonano/etc/ssl/openssl.cnf This file contains important configuration information such as key, certificate path, and encryption algorithm. 3. Utilize OPE
 How to delete more than server names of apache
Apr 13, 2025 pm 01:09 PM
To delete an extra ServerName directive from Apache, you can take the following steps: Identify and delete the extra ServerName directive. Restart Apache to make the changes take effect. Check the configuration file to verify changes. Test the server to make sure the problem is resolved.
 How to use Debian Apache logs to improve website performance
Apr 12, 2025 pm 11:36 PM
This article will explain how to improve website performance by analyzing Apache logs under the Debian system. 1. Log Analysis Basics Apache log records the detailed information of all HTTP requests, including IP address, timestamp, request URL, HTTP method and response code. In Debian systems, these logs are usually located in the /var/log/apache2/access.log and /var/log/apache2/error.log directories. Understanding the log structure is the first step in effective analysis. 2. Log analysis tool You can use a variety of tools to analyze Apache logs: Command line tools: grep, awk, sed and other command line tools.
 How to connect to the database of apache
Apr 13, 2025 pm 01:03 PM
Apache connects to a database requires the following steps: Install the database driver. Configure the web.xml file to create a connection pool. Create a JDBC data source and specify the connection settings. Use the JDBC API to access the database from Java code, including getting connections, creating statements, binding parameters, executing queries or updates, and processing results.
 How to view your apache version
Apr 13, 2025 pm 01:15 PM
There are 3 ways to view the version on the Apache server: via the command line (apachectl -v or apache2ctl -v), check the server status page (http://<server IP or domain name>/server-status), or view the Apache configuration file (ServerVersion: Apache/<version number>).


