CoreText其实不难,只要跑一个HelloWord起来了,理解起来就容易多了,以下是老外写的一个教程 (http://www.cocoanetics.com/2011/01/befriending-core-text/) Befriending Core Text Before the iPad was released you had basically two ways how to get
CoreText其实不难,只要跑一个HelloWord起来了,理解起来就容易多了,以下是老外写的一个教程 (http://www.cocoanetics.com/2011/01/befriending-core-text/)
Before the iPad was released you had basically two ways how to get text on screen. Either you would stick with UILabel or UITextView provided by UIKit or if you felt hard-core you would draw the text yourself on the Quartz level incurring all the headaches induced by having to mentally switch between Objective-C and C API functions.
As of iOS 3.2 we gained a third alternative in Core Text promising full control over styles, thread safety and performance. However for most of my apps I did not want to break 3.x compatibility and so I procrastinated looking at this powerful new API. Apps running only on iPads could have made use of Core Text from day 1, but to me it made more sense supporting iPad via hybrid apps where the iPhone part would still be backwards compatible.
Now as the year has turned the adoption of 4.x on all iOS platforms is ever more accelerating. Many new iPads where found under the Christmas tree and by now even the most stubborn people (read needing 3.x for jailbreaking and sim-unlocking) have little reason to stick with 3.x. Thus we have almost no incentive left to stick with 3.x compatibility. Yay!
Which brings us to Core Text. This API has been available on OSX for a while already, some of the advanced features like vertical text have been left out of the iPhone API.
Which methods do we know to draw text on screen? We have the low-level text drawing functions on the CoreGraphics level. We have UIKit classes UILabel and UITextView. But neither of these provide any easy way to draw mixed-style text. Often developers have to resort to using HTML in UIWebView just to draw something like bold words or a hyperlink amongst regular plain text.
This is the need that gets filled by CoreText. Almost.
The basic unit to describe strings with formatting are NSAttributedString and its mutable descendant NSMutibleAttributedString. As their names suggest they consist of NSStrings where different parts can have varying attributes. Now if you look at the documentation of NSAttributedString on OSX they have methods to create such strings straight from HTML. Boy that would be really handy. But until Apple chooses to port these methods over to iOS we are stuck with creating our own attributed strings.
Nevertheless even at this somewhat crippled stage CoreText is worth looking at to ease some of the mixed-style text drawing problems we might be facing.
At its simplest you draw individual lines with Core Text. For this you create a font, create an attributed text and then just draw the line. Even at its simplest there is quite a bit of typing involved. Of course we need to add the CoreText framework and header, in this case I am customizing a UIView subclass.


}
It’s particularly unnerving that Apple is mixing CF-style and Objective-C , but we have to live with that.
Note that the core text font object used here is not the one we are used to using, UIFont. Thus we also don’t get the toll-free bridging to CGFontRef. This one here is optimized for Core Text. The example uses the method analogous to systemFontWithSize:, there are several more options to get a usable font.
// create it from the postscript name
CTFontRef helveticaBold = CTFontCreateWithName(CFSTR("Helvetica-Bold"), 24.0, NULL);
// create it by replacing traits of existing font, this replaces bold with italic
CTFontRef helveticaItalic = CTFontCreateCopyWithSymbolicTraits(helveticaBold, 24.0, NULL,
kCTFontItalicTrait, kCTFontBoldTrait | kCTFontItalicTrait);
Where a font name is used you have to use the postscript name. A sample list of all built-in fonts on iPhone/iPad refer to my article on Understanding UIFont. As of iOS 3.2 you can also add your own fonts by registering them in the info.plist and adding them to the app bundle.
To appreciate the level of customization available to use consider the different font traits available, on UIFont we had only normal, bold, italic and bold-italic.
If the above has not tied your brain in a knot yet, then thinking about the transformation matrices surely will. You are dealing with multiple coordinate systems which have their origin (0,0) in different locations. Quartz generally has it in the lower left, CoreText in the upper left. Add to this the fact that UIKit preflips the context you get to use in drawRect.
Underlining is not a feature of the font itself, but of NSAttributedString, likely because you can underline text in ANY font. These are your options:
These can be bitwise OR combined with several underlining line styles:
For this graphic I drew the same text once without flipped transformation matrix and once with flipping it. Behind it have a rectangle (0,0,100,100). So you can see that without flipping the text is on it’s head. With flipping it’s right side up, but now located in relation to the lower left corner. Additional confusion is added by the fact that you don’t position the outer bounding rect of the text, but instead the baseline causing descenders and the underline to be outside of the rectangles.

The Framesetter knows how much text fits into one frame and you can query the frame as to what range from the attributed string fit. Adding a second frame is analogous to the creating the first with the only difference that you have to specify the index to start from.
We already used a CTLine in the simple drawing example, one frame is made up of as many such lines as fit into the bounds of the frame. The smallest unit if drawing in CoreText is a Glyph Run, which are basically several characters with identical attributes. A special feature on iOS is that you can specify a run delegate which is able to customize the look of individual runs.
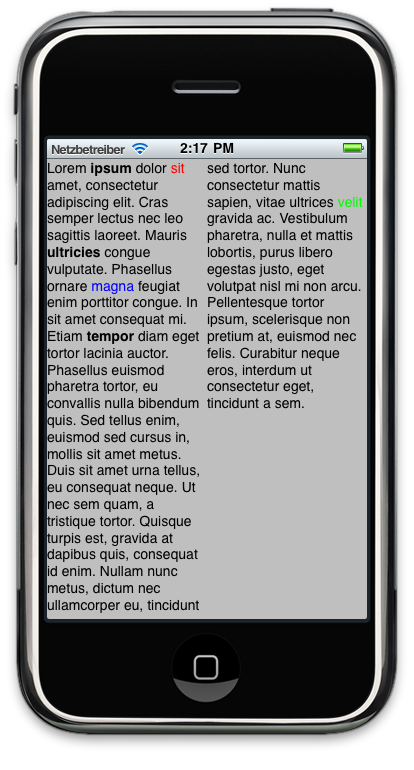
For an example lets create a long text and have this flow in two columns. As additional demonstration set bold font and text color for some spots.

Now brace yourself, there is quite a lot of code to achieve that, especially because there is no easier way to add the attributes.


}
This really cries out for having some helper methods to simplify the process. Also in real life you probably would not want to recreate the framesetter on every drawRect. Instead you would hold it in an instance variable and release it at the end of the life of this view.
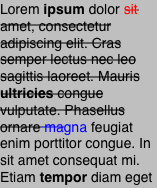
On OSX there is an attribute to specify that text should be in strikethrough style. Unfortunately not on iOS. Let me show you a method to work around this limitation.

Basically you can add any kind of custom attribute to NSAttributedString, I am adding a bool NSNumber to specify that I want an area to be strikethrough.
// add custom attribute
[string addAttribute:@"DTCustomStrikeOut"
value:[NSNumber numberWithBool:YES]
range:NSMakeRange(18, 138)];
After drawing our frames I am getting the lines from the framesetter. In there I am getting the glyph runs all the while tracking where we are in screen coordinates. This way we can calculate a box for each glypth run and then draw a horizontal line.
Warning: I am not certain that the calculation of screen positions is perfect, I might have misunderstood something. So please tell me in the comments if I made a mistake. Also if there actually is an easier way. I searched for hours and could not find one.
// reset text position

CGContextSetTextPosition(context, 0, 0);
// get lines
CFArrayRef leftLines = CTFrameGetLines(leftFrame);
CGPoint *origins = malloc(sizeof(CGPoint)*[(NSArray *)leftLines count]);
CTFrameGetLineOrigins(leftFrame,
CFRangeMake(0, 0), origins);
NSInteger lineIndex = 0;
for (id oneLine in (NSArray *)leftLines)
{
CFArrayRef runs = CTLineGetGlyphRuns((CTLineRef)oneLine);
CGRect lineBounds = CTLineGetImageBounds((CTLineRef)oneLine, context);
lineBounds.origin.x += origins[lineIndex].x;
lineBounds.origin.y += origins[lineIndex].y;
lineIndex++;
CGFloat offset = 0;
for (id oneRun in (NSArray *)runs)
{
CGFloat ascent = 0;
CGFloat descent = 0;
CGFloat width = CTRunGetTypographicBounds((CTRunRef) oneRun,
CFRangeMake(0, 0),
&ascent,
&descent, NULL);
NSDictionary *attributes = (NSDictionary *)CTRunGetAttributes((CTRunRef) oneRun);
BOOL strikeOut = [[attributes objectForKey:@"DTCustomStrikeOut"] boolValue];
if (strikeOut)
{
CGRect bounds = CGRectMake(lineBounds.origin.x + offset,
lineBounds.origin.y,
width, ascent + descent);
// don't draw too far to the right
if (bounds.origin.x + bounds.size.width > CGRectGetMaxX(lineBounds))
{
bounds.size.width = CGRectGetMaxX(lineBounds) - bounds.origin.x;
}
// get text color or use black
id color = [attributes objectForKey:(id)kCTForegroundColorAttributeName];
if (color)
{
CGContextSetStrokeColorWithColor(context, (CGColorRef)color);
}
else
{
CGContextSetGrayStrokeColor(context, 0, 1.0);
}
CGFloat y = roundf(bounds.origin.y + bounds.size.height / 2.0);
CGContextMoveToPoint(context, bounds.origin.x, y);
CGContextAddLineToPoint(context, bounds.origin.x + bounds.size.width, y);
CGContextStrokePath(context);
}
offset += width;
}
}
// cleanup
free(origins);

Conclusion
CoreText on iOS is a step in the right direction and using it can be beneficial if you are not afraid of constantly switching between the NS and CF worlds. To be actually of real use to us there needs to be work done on creating some convenience methods to be able to create NSAttributedStrings way more easily.
I envision that next we’d like to create a simplified HTML parser that would generate the appropriate attributed strings for us so that we can at least keep the formatted text in files as opposed to having to hand-code each bold word individually. Next it would be nice to create replacements for UILabel and UITextView that take attributed strings. This would enable us to display rich text.
The holy grail of texting definitely is to have copy/paste and editing support for these attributed text views. In one word: Rich Text Editing. But that’s a long way off. Maybe the iWork apps are an omen and Apple is really using them as a test case for that. If this is the case then we might already see the missing pieces in iOS 5 coming Summer 2011.
 apakah maksud antara muka usb
 Bagaimana untuk menyelesaikan masalah yang Ethernet tidak dapat menyambung ke internet
 penyelesaian pengecualian instantiationexception
 Apakah syiling aviv?
 Kod sumber laman web percuma
 Bagaimana untuk melukis garis putus-putus dalam PS
 Pengenalan kepada perisian tengah laravel
 Tutorial melaraskan jarak baris dalam dokumen perkataan


