Apabila kita memerhatikan sistem perlahan, naluri pertama kita mungkin melabelkannya sebagai gagal. Anggapan ini meluas dan menyerlahkan kebenaran asas: prestasi adalah sinonim dengan kematangan aplikasi dan kesediaan untuk pengeluaran.
Dalam aplikasi web, di mana milisaat boleh menentukan kejayaan atau kegagalan interaksi pengguna, pertaruhannya adalah sangat tinggi. Prestasi bukan sekadar penanda aras teknikal, tetapi asas kepuasan pengguna dan kecekapan operasi.
Prestasi merangkumi responsif sistem di bawah beban kerja yang berbeza-beza, dikira mengikut metrik seperti penggunaan CPU dan memori, masa tindak balas, skalabiliti dan daya pemprosesan.
Dalam artikel ini, kami akan meneroka cara AppSignal boleh memantau dan meningkatkan prestasi aplikasi Django.
Jom mulakan!
Mencapai prestasi optimum dalam aplikasi Django melibatkan pendekatan pelbagai rupa. Ini bermakna membangunkan aplikasi yang berjalan dengan cekap dan mengekalkan kecekapannya mengikut skala. Metrik utama adalah penting dalam proses ini, menyediakan data ketara untuk membimbing usaha pengoptimuman kami. Mari terokai beberapa metrik ini.
Dalam artikel ini, kami akan membina kedai e-dagang berasaskan Django yang sedia untuk acara trafik tinggi, menyepadukan AppSignal untuk memantau, mengoptimumkan dan memastikan ia berskala lancar di bawah beban. Kami juga akan menunjukkan cara untuk meningkatkan aplikasi sedia ada dengan AppSignal untuk prestasi yang lebih baik (dalam kes ini, sistem pengurusan pembelajaran Open edX).
Untuk mengikuti, anda memerlukan:
Sekarang mari buat direktori untuk projek kami dan klonkannya daripada GitHub. Kami akan memasang semua keperluan dan menjalankan migrasi:
mkdir django-performance && cd django-performance
python3.12 -m venv venv
source venv/bin/activate
git clone -b main https://github.com/amirtds/mystore
cd mystore
python3.12 -m pip install -r requirements.txt
python3.12 manage.py migrate
python3.12 manage.py runserver
Sekarang lawati 127.0.0.1:8000. Anda sepatutnya melihat sesuatu seperti ini:

Aplikasi Django ini ialah kedai e-dagang ringkas yang menyediakan senarai produk, butiran dan halaman pembayaran untuk pengguna. Selepas berjaya mengklon dan memasang apl, gunakan arahan pengurusan Django createsuperuser untuk mencipta superuser.
Sekarang mari buat beberapa produk dalam aplikasi kami. Mula-mula, kami akan memasukkan aplikasi Django kami dengan menjalankan:
python3.12 manage.py shell
Buat 3 kategori dan 3 produk:
from store.models import Category, Product

# Create categories
electronics = Category(name='Electronics', description='Gadgets and electronic devices.')
books = Category(name='Books', description='Read the world.')
clothing = Category(name='Clothing', description='Latest fashion and trends.')

# Save categories to the database
electronics.save()
books.save()
clothing.save()

# Now let's create new Products with slugs and image URLs
Product.objects.create(
    category=electronics,
    name='Smartphone',
    description='Latest model with high-end specs.',
    price=799.99,
    stock=30,
    available=True,
    slug='smartphone',
    image='products/iphone_14_pro_max.png'
)

Product.objects.create(
    category=books,
    name='Python Programming',
    description='Learn Python programming with this comprehensive guide.',
    price=39.99,
    stock=50,
    available=True,
    slug='python-programming',
    image='products/python_programming_book.png'
)

Product.objects.create(
    category=clothing,
    name='Jeans',
    description='Comfortable and stylish jeans for everyday wear.',
    price=49.99,
    stock=20,
    available=True,
    slug='jeans',
    image='products/jeans.png'
)
Sekarang tutup shell dan jalankan pelayan. Anda sepatutnya melihat sesuatu seperti berikut:

Kami akan memasang AppSignal dan opentelemetry-instrumentation-django dalam projek kami.
Sebelum memasang pakej ini, log masuk ke AppSignal menggunakan kelayakan anda (anda boleh mendaftar untuk percubaan 30 hari percuma). Selepas memilih organisasi, klik pada Tambah apl di bahagian atas sebelah kanan bar navigasi. Pilih Python sebagai bahasa anda dan anda akan menerima push-api-key.
Pastikan persekitaran maya anda diaktifkan dan jalankan arahan berikut:
python3.12 -m pip install appsignal==1.2.1
python3.12 -m appsignal install --push-api-key [YOU-KEY]
python3.12 -m pip install opentelemetry-instrumentation-django==0.45b0
Berikan nama apl kepada gesaan CLI. Selepas pemasangan, anda sepatutnya melihat fail baharu yang dipanggil __appsignal__.py dalam projek anda.
Now let's create a new file called .env in the project root and add APPSIGNAL_PUSH_API_KEY=YOUR-KEY (remember to change the value to your actual key). Then, let's change the content of the __appsignal__.py file to the following:
# __appsignal__.py
import os
from appsignal import Appsignal

# Load environment variables from the .env file
from dotenv import load_dotenv
load_dotenv()

# Get APPSIGNAL_PUSH_API_KEY from environment
push_api_key = os.getenv('APPSIGNAL_PUSH_API_KEY')

appsignal = Appsignal(
    active=True,
    name="mystore",
    push_api_key=os.getenv("APPSIGNAL_PUSH_API_KEY"),
)
Next, update the manage.py file to read like this:
# manage.py
#!/usr/bin/env python
"""Django's command-line utility for administrative tasks."""
import os
import sys

# import appsignal
from __appsignal__ import appsignal # new line


def main():
    """Run administrative tasks."""
    os.environ.setdefault("DJANGO_SETTINGS_MODULE", "mystore.settings")

    # Start Appsignal
    appsignal.start() # new line

    try:
        from django.core.management import execute_from_command_line
    except ImportError as exc:
        raise ImportError(
            "Couldn't import Django. Are you sure it's installed and "
            "available on your PYTHONPATH environment variable? Did you "
            "forget to activate a virtual environment?"
        ) from exc
    execute_from_command_line(sys.argv)


if __name__ == "__main__":
    main()
We've imported AppSignal and started it using the configuration from __appsignal.py.
Please note that the changes we made to manage.py are for a development environment. In production, we should change wsgi.py or asgi.py. For more information, visit AppSignal's Django documentation.
As we approach the New Year sales on our Django-based e-commerce platform, we recall last year's challenges: increased traffic led to slow load times and even some downtime. This year, we aim to avoid these issues by thoroughly testing and optimizing our site beforehand. We'll use Locust to simulate user traffic and AppSignal to monitor our application's performance.
First, we'll create a locustfile.py file that simulates simultaneous users navigating through critical parts of our site: the homepage, a product detail page, and the checkout page. This simulation helps us understand how our site performs under pressure.
Create the locustfile.py in the project root:
# locustfile.py
from locust import HttpUser, between, task

class WebsiteUser(HttpUser):
    wait_time = between(1, 3)  # Users wait 1-3 seconds between tasks

    @task
    def index_page(self):
        self.client.get("/store/")

    @task(3)
    def view_product_detail(self):
        self.client.get("/store/product/smartphone/")

    @task(2)
    def view_checkout_page(self):
        self.client.get("/store/checkout/smartphone/")
In locustfile.py, users primarily visit the product detail page, followed by the checkout page, and occasionally return to the homepage. This pattern aims to mimic realistic user behavior during a sale.
Before running Locust, ensure you have a product with the smartphone slug in the Django app. If you don't, go to /admin/store/product/ and create one.
Before we start, let's define what we consider an acceptable response time. For a smooth user experience, we aim for:
These targets ensure users experience minimal delay, keeping their engagement high.
With our Locust test ready, we run it to simulate the 500 users and observe the results in real time. Here's how:
After running Locust, you can find information about the load test in its dashboard:

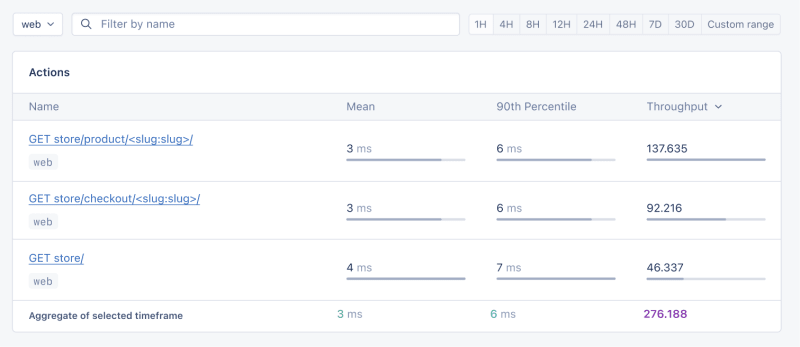
Now, go to your application page in AppSignal. Under the Performance section, click on Actions and you should see something like this:

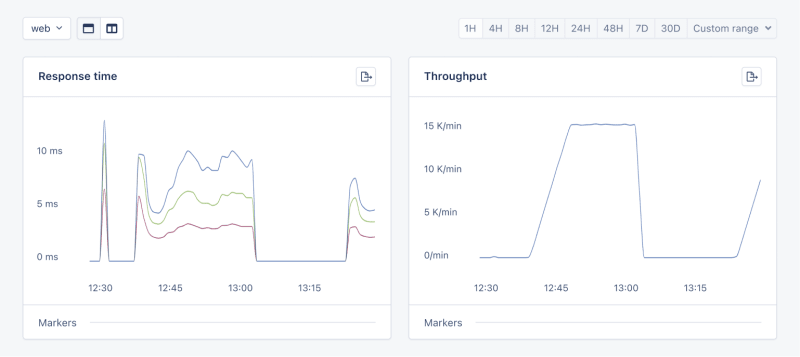
Now let's click on the Graphs under Performance:

We need to prepare our site for the New Year sales, as response times might exceed our targets. Here's a simplified plan:
When it comes to web applications, one of the most common sources of slow performance is database queries. Every time a user performs an action that requires data retrieval or manipulation, a query is made to the database.
If these queries are not well-optimized, they can take a considerable amount of time to execute, leading to a sluggish user experience. That's why it's crucial to monitor and optimize our queries, ensuring they're efficient and don't become the bottleneck in our application's performance.
Before diving into the implementation, let's clarify two key concepts in performance monitoring:
Instrumentation is the process of augmenting code to measure its performance and behavior during execution. Think of it like fitting your car with a dashboard that tells you not just the speed, but also the engine's performance, fuel efficiency, and other diagnostics while you drive.
Spans, on the other hand, are the specific segments of time measured by instrumentation. In our car analogy, a span would be the time taken for a specific part of your journey, like from your home to the highway. In the context of web applications, a span could represent the time taken to execute a database query, process a request, or complete any other discrete operation.
Instrumentation helps us create a series of spans that together form a detailed timeline of how a request is handled. This timeline is invaluable for pinpointing where delays occur and understanding the overall flow of a request through our system.
With our PurchaseProductView, we're particularly interested in the database interactions that create customer records and process purchases. By adding instrumentation to this view, we'll be able to measure these interactions and get actionable data on their performance.
Here's how we integrate AppSignal's custom instrumentation into our Django view:
# store/views.py
# Import OpenTelemetry's trace module for creating custom spans
from opentelemetry import trace
# Import AppSignal's set_root_name for customizing the trace name
from appsignal import set_root_name

# Inside the PurchaseProductView
def post(self, request, *args, **kwargs):
    # Initialize the tracer for this view
    tracer = trace.get_tracer(__name__)

    # Start a new span for the view using 'with' statement
    with tracer.start_as_current_span("PurchaseProductView"):
        # Customize the name of the trace to be more descriptive
        set_root_name("POST /store/purchase/<slug>")

        # ... existing code to handle the purchase ...

        # Start another span to monitor the database query performance
        with tracer.start_as_current_span("Database Query - Retrieve or Create Customer"):
            # ... code to retrieve or create a customer ...

            # Yet another span to monitor the purchase record creation
            with tracer.start_as_current_span("Database Query - Create Purchase Record"):
                # ... code to create a purchase record ...
See the full code of the view after the modification.
In this updated view, custom instrumentation is added to measure the performance of database queries when retrieving or creating a customer and creating a purchase record.
Now, after purchasing a product in the Slow events section of the Performance dashboard, you should see the purchase event, its performance, and how long it takes to run the query.

purchase is the event we added to our view.
In this section, we are going to see how we can integrate AppSignal with Open edX, an open-source learning management system based on Python and Django.
Monitoring the performance of learning platforms like Open edX is highly important, since a slow experience directly impacts students' engagement with learning materials and can have a negative impact (for example, a high number of users might decide not to continue with a course).
Here, we can follow similar steps as the Project Setup section. However, for Open edX, we will follow Production Setup and initiate AppSignal in wsgi.py. Check out this commit to install and integrate AppSignal with Open edX.
Now we'll interact with our platform and see the performance result in the dashboard.
Let's register a user, log in, enroll them in multiple courses, and interact with the course content.
Going to Actions, let's order the actions based on their mean time and find slow events:

As we can see, for 3 events (out of the 34 events we tested) the response time is higher than 1 second.
Host Metrics in AppSignal show resource usage:

Sistem kami tidak mengalami beban berat — purata beban ialah 0.03 — tetapi penggunaan memori adalah tinggi.
Kami juga boleh menambah pencetus untuk mendapatkan pemberitahuan apabila penggunaan sumber mencapai keadaan tertentu. Sebagai contoh, kita boleh menetapkan pencetus apabila penggunaan memori menjadi lebih tinggi daripada 80% untuk mendapatkan pemberitahuan dan mengelakkan gangguan.

Apabila kami mencapai syarat, anda sepatutnya mendapat pemberitahuan seperti berikut:

Dalam Open edX, kami menggunakan Celery untuk tugas tak segerak dan berjalan lama seperti penjanaan sijil, penggredan dan fungsi e-mel pukal.
Bergantung pada tugasan dan bilangan pengguna, sesetengah tugasan ini boleh dijalankan untuk masa yang lama dan menyebabkan masalah prestasi dalam platform kami.
Sebagai contoh, jika beribu-ribu pengguna mendaftar dalam kursus dan kami perlu menjaringkan semula mereka, tugas ini boleh mengambil sedikit masa. Kami mungkin mendapat aduan daripada pengguna bahawa gred mereka tidak ditunjukkan dalam papan pemuka kerana tugasan masih berjalan. Mempunyai maklumat tentang tugasan Saderi, masa jalannya dan penggunaan sumbernya memberi kami cerapan penting dan kemungkinan penambahbaikan untuk aplikasi kami.
Mari gunakan AppSignal untuk mengesan tugas Saderi kami dalam Open edX dan lihat hasilnya dalam papan pemuka. Pertama, pastikan keperluan yang diperlukan dipasang. Seterusnya, mari kita tetapkan tugas kita untuk mengesan prestasi Saderi seperti dalam komit ini.
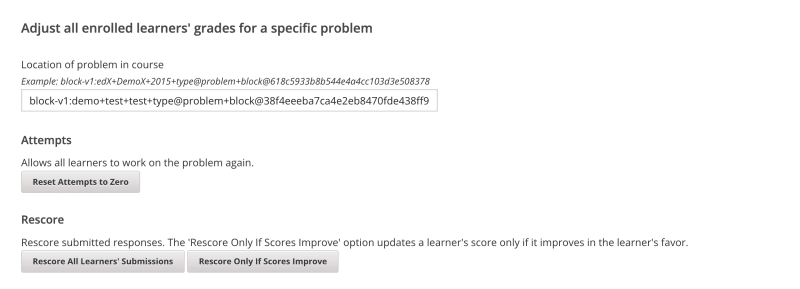
Sekarang, mari jalankan beberapa tugasan dalam papan pemuka Open edX untuk menetapkan semula percubaan dan skor semula penyerahan pelajar:

Kami akan pergi ke papan pemuka Prestasi dalam AppSignal -> Acara perlahan dan kita akan melihat sesuatu seperti:

Dengan mengklik pada Celery, kita akan melihat semua tugasan yang telah dijalankan pada Open edX:

Ini adalah maklumat hebat yang membantu kami melihat sama ada tugas kami berjalan lebih lama daripada yang dijangkakan, jadi kami boleh menangani sebarang kemungkinan kesesakan prestasi.
Dan itu sahaja!
Dalam artikel ini, kami melihat cara AppSignal boleh memberi kami cerapan tentang prestasi apl Django kami.
Kami memantau aplikasi Django e-dagang ringkas, termasuk metrik seperti pengguna serentak, pertanyaan pangkalan data dan masa tindak balas.
Sebagai kajian kes, kami menyepadukan AppSignal dengan Open edX, mendedahkan cara pemantauan prestasi boleh memainkan peranan penting dalam meningkatkan pengalaman pengguna, terutamanya bagi pelajar yang menggunakan platform.
Selamat mengekod!
P.S. Jika anda ingin membaca siaran Python sebaik sahaja ia keluar dari akhbar, langgan surat berita Python Wizardry kami dan jangan sekali-kali terlepas satu pun siaran!
Atas ialah kandungan terperinci Pantau Prestasi Apl Python Django Anda dengan AppSignal. Untuk maklumat lanjut, sila ikut artikel berkaitan lain di laman web China PHP!


