Mampatan imej ialah teknologi kritikal dalam penglihatan komputer yang membolehkan kami menyimpan dan menghantar imej dengan lebih cekap sambil mengekalkan kualiti visual. Sebaik-baiknya, kami ingin mempunyai fail kecil dengan kualiti terbaik. Walau bagaimanapun, kita mesti membuat pertukaran dan memutuskan mana yang lebih penting.
Tutorial ini akan mengajar pemampatan imej dengan OpenCV, meliputi teori dan aplikasi praktikal. Pada akhirnya, anda akan memahami cara memampatkan foto dengan jayanya untuk projek penglihatan komputer (atau mana-mana projek lain yang mungkin anda miliki).
Mampatan imej sedang mengurangkan saiz fail imej sambil mengekalkan tahap kualiti visual yang boleh diterima. Terdapat dua jenis pemampatan utama:
Jika "ruang cakera murah," seperti yang sering kita dengar, maka mengapa memampatkan imej sama sekali? Pada skala kecil, pemampatan imej tidak begitu penting, tetapi pada skala besar, ia adalah penting.
Sebagai contoh, jika anda mempunyai beberapa imej pada cakera keras anda, anda boleh memampatkannya dan menyimpan beberapa megabait data. Ini tidak banyak memberi kesan apabila cakera keras diukur dalam Terabait. Tetapi bagaimana jika anda mempunyai 100,000 imej pada cakera keras anda? Sesetengah pemampatan asas menjimatkan masa dan wang sebenar. Dari perspektif prestasi, ia adalah sama. Jika anda mempunyai tapak web dengan banyak imej dan 10,000 orang melawat tapak web anda sehari, pemampatan adalah penting.
Ini sebab kami melakukannya:
Teknik pemampatan imej mengeksploitasi dua jenis redundansi:
Lewahan ruang mengambil kesempatan daripada fakta bahawa piksel jiran cenderung mempunyai nilai yang sama dalam kebanyakan imej semula jadi. Ini mewujudkan peralihan yang lancar. Banyak foto "kelihatan nyata" kerana terdapat aliran semula jadi dari satu kawasan ke kawasan yang lain. Apabila piksel jiran mempunyai nilai yang sangat berbeza, anda mendapat imej "bising". Piksel berubah untuk menjadikan peralihan tersebut kurang "licin" dengan mengumpulkan piksel ke dalam satu warna, menjadikan imej lebih kecil.

Lewahan warna, sebaliknya, memfokuskan pada cara kawasan bersebelahan dalam imej sering berkongsi warna yang serupa. Fikirkan langit biru atau medan hijau—bahagian besar imej mungkin mempunyai nilai warna yang hampir sama. Mereka juga boleh dikumpulkan bersama dan dijadikan satu warna untuk menjimatkan ruang.

OpenCV menawarkan alat yang kukuh untuk bekerja dengan idea ini. Menggunakan redundansi spatial, fungsi cv2.inpaint() OpenCV, contohnya, mengisi kawasan gambar yang hilang atau rosak menggunakan maklumat daripada piksel berdekatan. OpenCV membenarkan pembangun menggunakan cv2.cvtColor() untuk menterjemah imej antara beberapa ruang warna berkenaan dengan lebihan warna. Ini agak membantu sebagai langkah prapemprosesan dalam banyak teknik pemampatan kerana sesetengah ruang warna lebih berkesan daripada yang lain dalam pengekodan jenis imej tertentu.
Kami akan menguji beberapa teori ini sekarang. Mari kita bermain dengannya.
Mari kita terokai cara memampatkan imej menggunakan pengikatan Python OpenCV. Tulis kod ini atau salin:
Anda juga boleh mendapatkan kod sumber di sini
import cv2
import numpy as np

def compress_image(image_path, quality=90):
    # Read the image
 img = cv2.imread(image_path)

    # Encode the image with JPEG compression
 encode_param = [int(cv2.IMWRITE_JPEG_QUALITY), quality]
 _, encoded_img = cv2.imencode('.jpg', img, encode_param)

    # Decode the compressed image
 decoded_img = cv2.imdecode(encoded_img, cv2.IMREAD_COLOR)

    return decoded_img

# Example usage
original_img = cv2.imread('original_image.jpg')
compressed_img = compress_image('original_image.jpg', quality=50)

# Display results
cv2.imshow('Original', original_img)
cv2.imshow('Compressed', compressed_img)
cv2.waitKey(0)
cv2.destroyAllWindows()

# Calculate compression ratio
original_size = original_img.nbytes
compressed_size = compressed_img.nbytes
compression_ratio = original_size / compressed_size
print(f"Compression ratio: {compression_ratio:.2f}")
Contoh ini mengandungi fungsi compress_image yang mengambil dua parameter:
Kemudian, kami akan memuatkan imej asal ke dalam original_img. Kami kemudian memampatkan imej yang sama sebanyak 50% dan memuatkannya ke dalam contoh baharu, compressed_image.
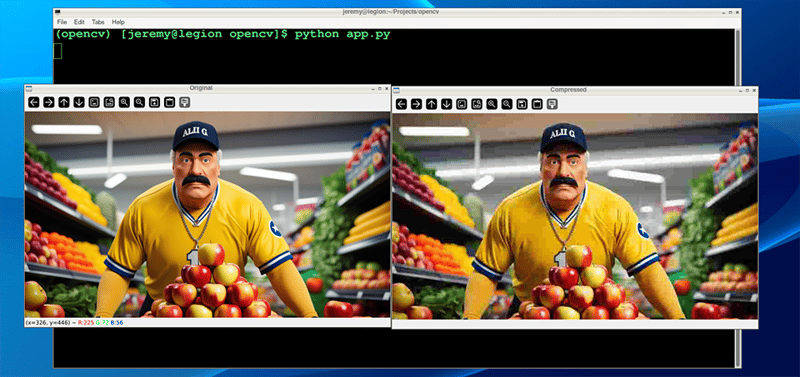
Kemudian kami akan menunjukkan imej asal dan dimampatkan supaya anda boleh melihatnya sebelah menyebelah.
Kami kemudian mengira dan memaparkan nisbah mampatan.
Contoh ini menunjukkan cara untuk memampatkan imej menggunakan pemampatan JPEG dalam OpenCV. Parameter kualiti mengawal saiz fail dan pertukaran kualiti imej.
Jom jalankan:

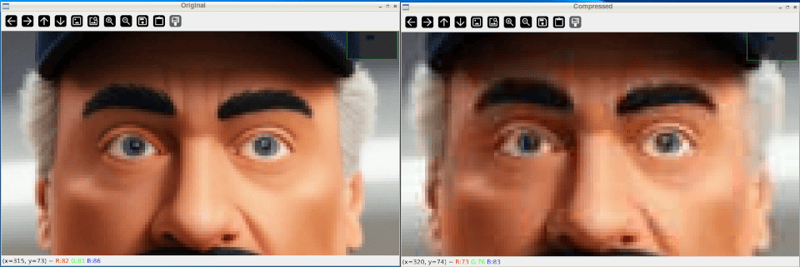
While intially looking at the images, you see little difference. However, zooming in shows you the difference in the quality:

And after closing the windows and looking at the files, we can see the file was reduced in size dramatically:

Also, if we take it down further, we can change our quality to 10%
compressed_img = compress_image('sampleimage.jpg', quality=10)
And the results are much more drastic:

And the file size results are more drastic as well:

You can adjust these parameters quite easily and achieve the desired balance between quality and file size.
To assess the impact of compression, we can use metrics like:
Mean Squared Error (MSE) measures how different two images are from each other. When you compress an image, MSE helps you determine how much the compressed image has changed compared to the original.
It does this by sampling the differences between the colors of corresponding pixels in the two images, squaring those differences, and averaging them. The result is a single number: a lower MSE means the compressed image is closer to the original. In comparison, a higher MSE means there's a more noticeable loss of quality.
Here's some Python code to measure that:
def calculate_mse(img1, img2):
    return np.mean((img1 - img2) ** 2)

mse = calculate_mse(original_img, compressed_img)
print(f"Mean Squared Error: {mse:.2f}")
Here's what our demo image compression looks like:

Peak Signal-to-Noise Ratio (PSNR) is a measure that shows how much an image's quality has degraded after compression. This is often visible with your eyes, but it assigns a set value. It compares the original image to the compressed one and expresses the difference as a ratio.
A higher PSNR value means the compressed image is closer in quality to the original, indicating less loss of quality. A lower PSNR means more visible degradation. PSNR is often used alongside MSE, with PSNR providing an easier-to-interpret scale where higher is better.
Here is some Python code that measures that:
def calculate_psnr(img1, img2):
 mse = calculate_mse(img1, img2)
    if mse == 0:
        return float('inf')
 max_pixel = 255.0
    return 20 * np.log10(max_pixel / np.sqrt(mse))

psnr = calculate_psnr(original_img, compressed_img)
print(f"PSNR: {psnr:.2f} dB")
Here's what our demo image compression looks like:

"Eyeballing" your images after compression to determine quality is fine; however, at a large scale, having scripts do this is a much easier way to set standards and ensure the images follow them.
Let's look at a couple other techniques:
For more advanced compression, OpenCV supports various algorithms:
You can convert your images to PNG format, which has many advantages. Use the following line of code, and you can set your compression from 0 to 9, depending on your needs. 0 means no compression whatsoever, and 9 is maximum. Keep in mind that PNGs are a "lossless" format, so even at maximum compression, the image should remain intact. The big trade-off is file size and compression time.
Here is the code to use PNG compression with OpenCV:
cv2.imwrite('compressed.png', img, [cv2.IMWRITE_PNG_COMPRESSION, 9])
And here is our result:

Note: You may notice sometimes that PNG files are actually larger in size, as in this case. It depends on the content of the image.
You can also convert your images to .webp format. This is a newer method of compression that's gaining in popularity. I have been using this compression on the images on my blog for years.
In the following code, we can write our image to a webp file and set the compression level from 0 to 100. It's the opposite of PNG's scale because 0, because we're setting quality instead of compression. This small distinction matters, because a setting of 0 is the lowest possible quality, with a small file size and significant loss. 100 is the highest quality, which means large files with the best image quality.
Here's the Python code to make that happen:
cv2.imwrite('compressed.webp', img, [cv2.IMWRITE_WEBP_QUALITY, 80])
And here is our result:

These two techniques are great for compressing large amounts of data. You can write scripts to compress thousands or hundreds of thousands of images automatically.
Image compression is fantastic. It's essential for computer vision tasks in many ways, especially when saving space or increasing processing speed. There are also many use cases outside of computer vision anytime you want to reduce hard drive space or save bandwidth. Image compression can help a lot.
By understanding the theory behind it and applying it, you can do some powerful things with your projects.
Remember, the key to effective compression is finding the sweet spot between file size reduction and maintaining acceptable visual quality for your application.
Thanks for reading, and feel free to reach out if you have any comments or questions!
Atas ialah kandungan terperinci Panduan Lengkap untuk Pemampatan Imej dengan OpenCV. Untuk maklumat lanjut, sila ikut artikel berkaitan lain di laman web China PHP!


