Bagaimana untuk membina pemasa undur menggunakan CSS
Ditulis oleh Carlos Mucuho✏️
Pemasa undur ialah ciri popular di banyak tapak web, meningkatkan fungsi untuk acara, jualan dan penglibatan pengguna. Walaupun JavaScript biasanya digunakan untuk tingkah laku dinamik di web, anda juga boleh mencipta pemasa kira detik yang berfungsi dan menarik secara visual menggunakan CSS sahaja.
Dalam tutorial ini, kami akan meneroka kedua-dua pendekatan, bermula dengan pemasa kira detik JavaScript asas dan kemudian beralih kepada pemasa kira detik CSS sahaja. Pada akhirnya, kami akan membandingkan prestasi kedua-dua pendekatan menggunakan Chrome DevTools dan membincangkan setiap kebaikan dan keburukan mereka.
Mencipta pemasa kira detik JavaScript asas
Kami akan mulakan dengan mencipta pemasa undur mudah yang dikemas kini setiap saat. Pemasa akan menyertakan butang mula dan jeda untuk mengawal operasinya.
Mencipta struktur direktori
Sebelum kami mencipta pemasa undur JavaScript, kami perlu mencipta direktori untuk menyimpan aplikasi yang akan kami bina sepanjang tutorial ini.
Buka tetingkap terminal, navigasi ke direktori yang sesuai untuk projek anda dan gunakan arahan berikut untuk mencipta direktori bernama countdown-timer:
mkdir countdown-timer
Kemudian, navigasi ke direktori ini:
cd countdown-timer
Buat dua subdirektori bernama javascript-countdown dan css-only-countdown, dan di dalam setiap subdirektori, buat subdirektori bernama public:
mkdir javascript-countdown && mkdir javascript-countdown/public
mkdir css-only-countdown && mkdir css-only-countdown/public
Mencipta pelayan aplikasi
Seterusnya, navigasi ke subdirektori kira detik javascript, mulakan projek nod baharu dengan tetapan lalai dan pasang pakej ekspres:
cd javascript-countdown
npm init -y
npm install express
Buka editor teks kegemaran anda, buat fail bernama server.js, dan tambahkan kod berikut padanya:
const express = require('express');
const app = express();
const port = 3001

app.use(express.static('public'));
app.listen(port, () => {
  console.log(`Javascript countdown app server started on port ${port}`);
});
Kod di atas mencipta pelayan ekspres yang akan digunakan untuk menyampaikan aplikasi kira detik JavaScript dalam port 3001.
struktur HTML
Masih dalam editor teks anda, buat fail berikut dalam subdirektori awam yang terletak di dalam direktori hitung detik javascript:
- index.html untuk kod HTML
- styles.css untuk kod CSS
- index.js untuk kod JavaScript
Tambahkan kod berikut pada index.html:
<!DOCTYPE html>
<html lang="en">
<head>
  <meta charset="UTF-8">
  <meta name="viewport" content="width=device-width, initial-scale=1.0">
  <link rel="stylesheet" href="styles.css">
  <title>Javascript Countdown Timer</title>
</head>

<body>
  <div class="container">
    <div class="controls">
      <button id="startBtn">Start</button>
      <button id="pauseBtn">Pause</button>
    </div>
    <div class="countdown-container">
      <div class="countdown"></div>
    </div>
  </div>
  <script src="index.js"></script>
</body>

</html>
Fail HTML ini menyediakan struktur asas dengan bekas yang memegang butang kawalan dan kawasan paparan kira detik.
Melaksanakan logik undur menggunakan JavaScript
Seterusnya, kami akan menambah JavaScript untuk mengurus logik kira detik. Tambahkan kod berikut pada index.js:
window.addEventListener("load", () => {
  const startBtn = document.getElementById('startBtn');
  const pauseBtn = document.getElementById('pauseBtn');
  const countdownView = document.getElementsByClassName('countdown')[0];

  let totalTime = 10;
  let timeLeft;
  let countDownIntervalID;
  let isPaused = false;

  pauseBtn.style.display = 'none';
});
Dalam blok kod ini, kami memulakan elemen startBtn, pauseBtn dan countdownView mengikut ID dan kelas masing-masing. Kami juga menetapkan beberapa pembolehubah awal: totalTime, timeLeft, countDownIntervalID dan isPaused. Selain itu, kami menetapkan butang jeda untuk bersembunyi pada mulanya.
Sekarang, mari tambahkan pendengar acara untuk butang mula dan jeda:
startBtn.addEventListener('click', startOrStopTimer);
pauseBtn.addEventListener('click', pauseOrResumeTimer);
Barisan ini melampirkan pendengar acara klik pada butang mula dan jeda. Fungsi startOrStopTimer dan pauseOrResumeTimer ditakrifkan kemudian untuk mengendalikan klik butang.
Tambah kod berikut untuk menentukan fungsi startOrStopTimer:
function startOrStopTimer() {
  startBtn.innerHTML = startBtn.innerHTML === 'Start' ? 'Stop' : 'Start';
  if (countDownIntervalID === undefined && !isPaused) {
    timeLeft = totalTime;
    startTimer();
    pauseBtn.style.display = 'inline';
  } else {
    stopTimer();
    countdownView.innerHTML = '';
    pauseBtn.style.display = 'none';
    isPaused = false;
    pauseBtn.innerHTML = 'Pause';
  }
}
Dalam fungsi ini, kami menogol teks butang mula antara Mula dan Berhenti. Jika kira detik tidak berjalan dan tidak dijeda, kami memulakan timeLeft kepada totalTime dan memulakan pemasa. Jika tidak, kami menghentikan pemasa dan menetapkan semula paparan.
Sekarang, tentukan fungsi Pemasa mula:
function startTimer() {
  countDownIntervalID = setInterval(() => {
    countdownView.innerHTML = timeLeft;

    if (timeLeft === 0) {
      stopTimer();
      startBtn.innerHTML = 'Start';
      pauseBtn.style.display = 'none';
      countdownView.innerHTML = '';
    } else {
      timeLeft = timeLeft - 1;
    }
  }, 1000);
}
Fungsi ini menetapkan selang waktu untuk mengemas kini kira detik setiap saat. Jika timeLeft mencecah sifar, kami menghentikan pemasa, menetapkan semula teks butang mula dan menyembunyikan butang jeda.
Seterusnya, tambahkan fungsi StopTimer:
function stopTimer() {
  if (countDownIntervalID !== undefined) {
    clearInterval(countDownIntervalID);
    countDownIntervalID = undefined;
  }
}
Fungsi ini mengosongkan selang undur dan menetapkan semula countDownIntervalID. Akhir sekali, tambahkan fungsi pauseOrResumeTimer:
function pauseOrResumeTimer() {
  isPaused = !isPaused;
  pauseBtn.innerHTML = isPaused ? 'Resume' : 'Pause';

  if (countDownIntervalID !== undefined) {
    stopTimer();
  } else {
    startTimer();
  }
}
Dalam fungsi ini, kami menogol keadaan jeda dan teks butang antara Jeda dan Sambung semula. Jika kira detik berjalan, kami menghentikan pemasa; jika tidak, kita mulakannya semula.
Penggayaan CSS
Sekarang, mari kita gayakan pemasa undur menggunakan CSS. Tambahkan kod berikut pada styles.css:
body {
  background-color: black;
  font-family: Arial, sans-serif;
  height: 100%;
}

.container {
  display: flex;
  flex-direction: column;
  justify-content: center;
  align-items: center;
}

.controls {
  width: 20%;
  margin-top: 10%;
  display: flex;
  justify-content: space-between;
  flex-direction: row;
  flex-wrap: wrap;
}

.countdown-container {
  position: relative;
  width: 20vw;
  height: 20vw;
  margin-top: 2%;
  border: 0.4em solid #9b51e0;
}

button {
  font-size: 1.5em;
  border: none;
  padding: 0.3em;
  background-color: #9b51e0;
  border-radius: 0.4em;
  color: white;
}

.countdown {
  position: relative;
  width: 100%;
  height: 100%;
  list-style: none;
  padding: 0;
  margin: 0;
  display: flex;
  justify-content: center;
  align-items: center;
  font-size: 5em;
  color: #9b51e0;
}
CSS ini mentakrifkan gaya untuk antara muka pemasa undur. Latar belakang badan ditetapkan kepada hitam, dan kami menggunakan Arial sebagai fon utama. Kelas .container digayakan untuk memusatkan kandungannya dan memberikan jarak antara elemen. Kelas .controls menggayakan butang untuk memulakan dan menjeda pemasa, memastikan ia sama rata dan responsif. Kelas .countdown-container mentakrifkan saiz dan rupa paparan kira detik, termasuk jidar dan jidar.
Kembali ke terminal anda dan jalankan arahan berikut untuk mula menyediakan aplikasi kira detik JavaScript:
node server.js
Open a new tab in your browser, navigate to http://localhost:3001, and you should see something similar to the following: 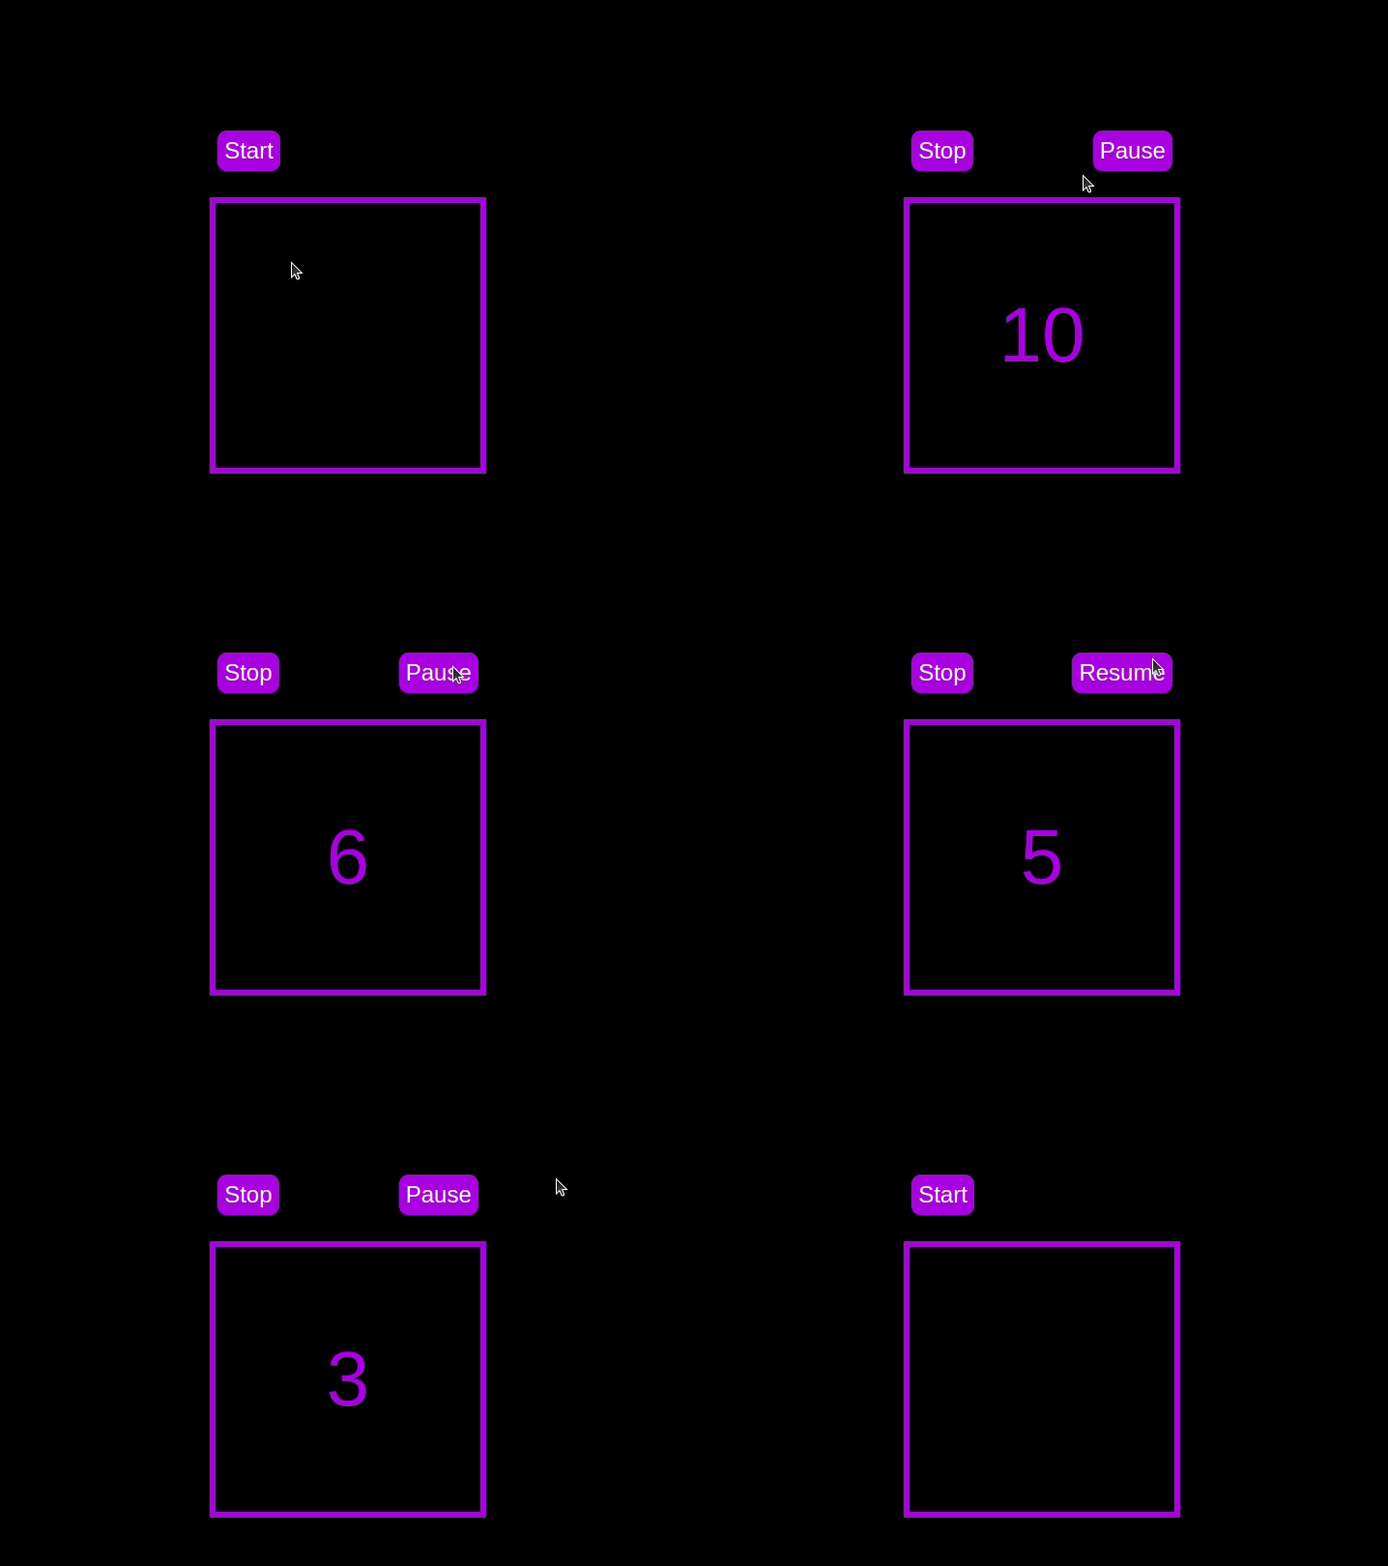 Test out the countdown timer and once you are done, terminate the server application and move to the next step.
Adding a circular progress indicator
To enhance the user experience of our countdown timer, let’s add a circular progress indicator to give the user a visual representation of the time remaining.
First, we need to modify our HTML code to include the circular progress element. In index.html, we add a span element with a class of circular-progress inside the countdown-container div. This span element will be used to create the circular progress indicator:
<div class="countdown-container">
  <span class="circular-progress"></span>
  <div class="countdown"></div>
</div>
Next, we need to define the CSS for the circular progress indicator. In styles.css, we add the following code:
.countdown-container {
  ...
  /* border : 0.4em solid #9b51e0; */
}
.circular-progress {
  width: 20vw;
  height: 20vw;
  border-radius: 50%;
  display: flex;
  justify-content: center;
  align-items: center;
  position: absolute;
  transition: 0.5s;
  background-color: #13171f;
}

.circular-progress::before {
  width: 18.5vw;
  height: 18.5vw;
  content: "";
  position: absolute;
  border-radius: 50%;
  background-color: black;
}
This code first removes the border from the countdown-container div, then sets the dimensions and shape of the circular progress indicator, as well as its position and background color. We also add a ::before pseudo-element to create the inner circle of the progress indicator.
Now we need to add the JavaScript code to animate the circular progress indicator.
Add the following code in the variables initialization block:
const circularProgressEl = document.getElementsByClassName("circular-progress")[0];
let circularProgress;
let circularProgressIntervalID;
This code initializes the circularProgressEl variable to target the circular progress element and creates two new variables, circularProgress and circularProgressIntervalID, that will be used to animate the progress indicator.
Add the following code below the pauseOrResumeTimer() function:
function startCircularProgressAnimation() {
  let start = totalTime - timeLeft;
  let degreesPerSecond = 360 / totalTime;
  let degreesPerInterval = degreesPerSecond / 20;
  circularProgress = degreesPerSecond * start;

  circularProgressIntervalID = setInterval(() => {
    if (Math.round(circularProgress) === 360) {
      clearInterval(circularProgressIntervalID);
    } else {
      circularProgress = circularProgress + degreesPerInterval;
      circularProgressEl.style.background = `conic-gradient(#9b51e0 ${circularProgress}deg, #13171f 0deg)`;
    }
  }, 50);
}
This code defines the startCircularProgressAnimation function, which calculates the starting point and degree of rotation for the circular progress indicator, and sets up an interval to animate the progress indicator.
Add the following code below the startCircularProgressAnimation:
function resumeCircularProgressAnimation() {
  startCircularProgressAnimation();
}

function pauseCircularProgressAnimation() {
  clearInterval(circularProgressIntervalID);
}

function stopCircularProgressAnimation() {
  clearInterval(circularProgressIntervalID);
  circularProgressEl.style.background = `conic-gradient(#9b51e0 0deg, #13171f 0deg)`;
}
This code defines the resumeCircularProgressAnimation, pauseCircularProgressAnimation, and stopCircularProgressAnimation functions, which are used to start, pause, and stop the circular progress animation.
Finally, we need to modify the startOrStopTimer and pauseOrResumeTimer functions to start and stop the circular progress animation along with the timer:
function startOrStopTimer() {
  // ...
  if (countDownIntervalID === undefined && !isPaused) {
    // ...
    startCircularProgressAnimation();
  } else {
    // ...
    stopCircularProgressAnimation();
  }
}

function pauseOrResumeTimer() {
  // ...
  if (countDownIntervalID !== undefined) {
    stopTimer();
    pauseCircularProgressAnimation();
  } else {
    startTimer();
    resumeCircularProgressAnimation();
  }
}
With these modifications, our countdown timer now includes a circular progress indicator that animates along with the timer.
Return to your terminal and run the following command to start serving the JavaScript countdown application:
node server.js
Go back to the tab in your browser where you visited the http://localhost:3001 URL, refresh the page, and you should see something similar to the following: 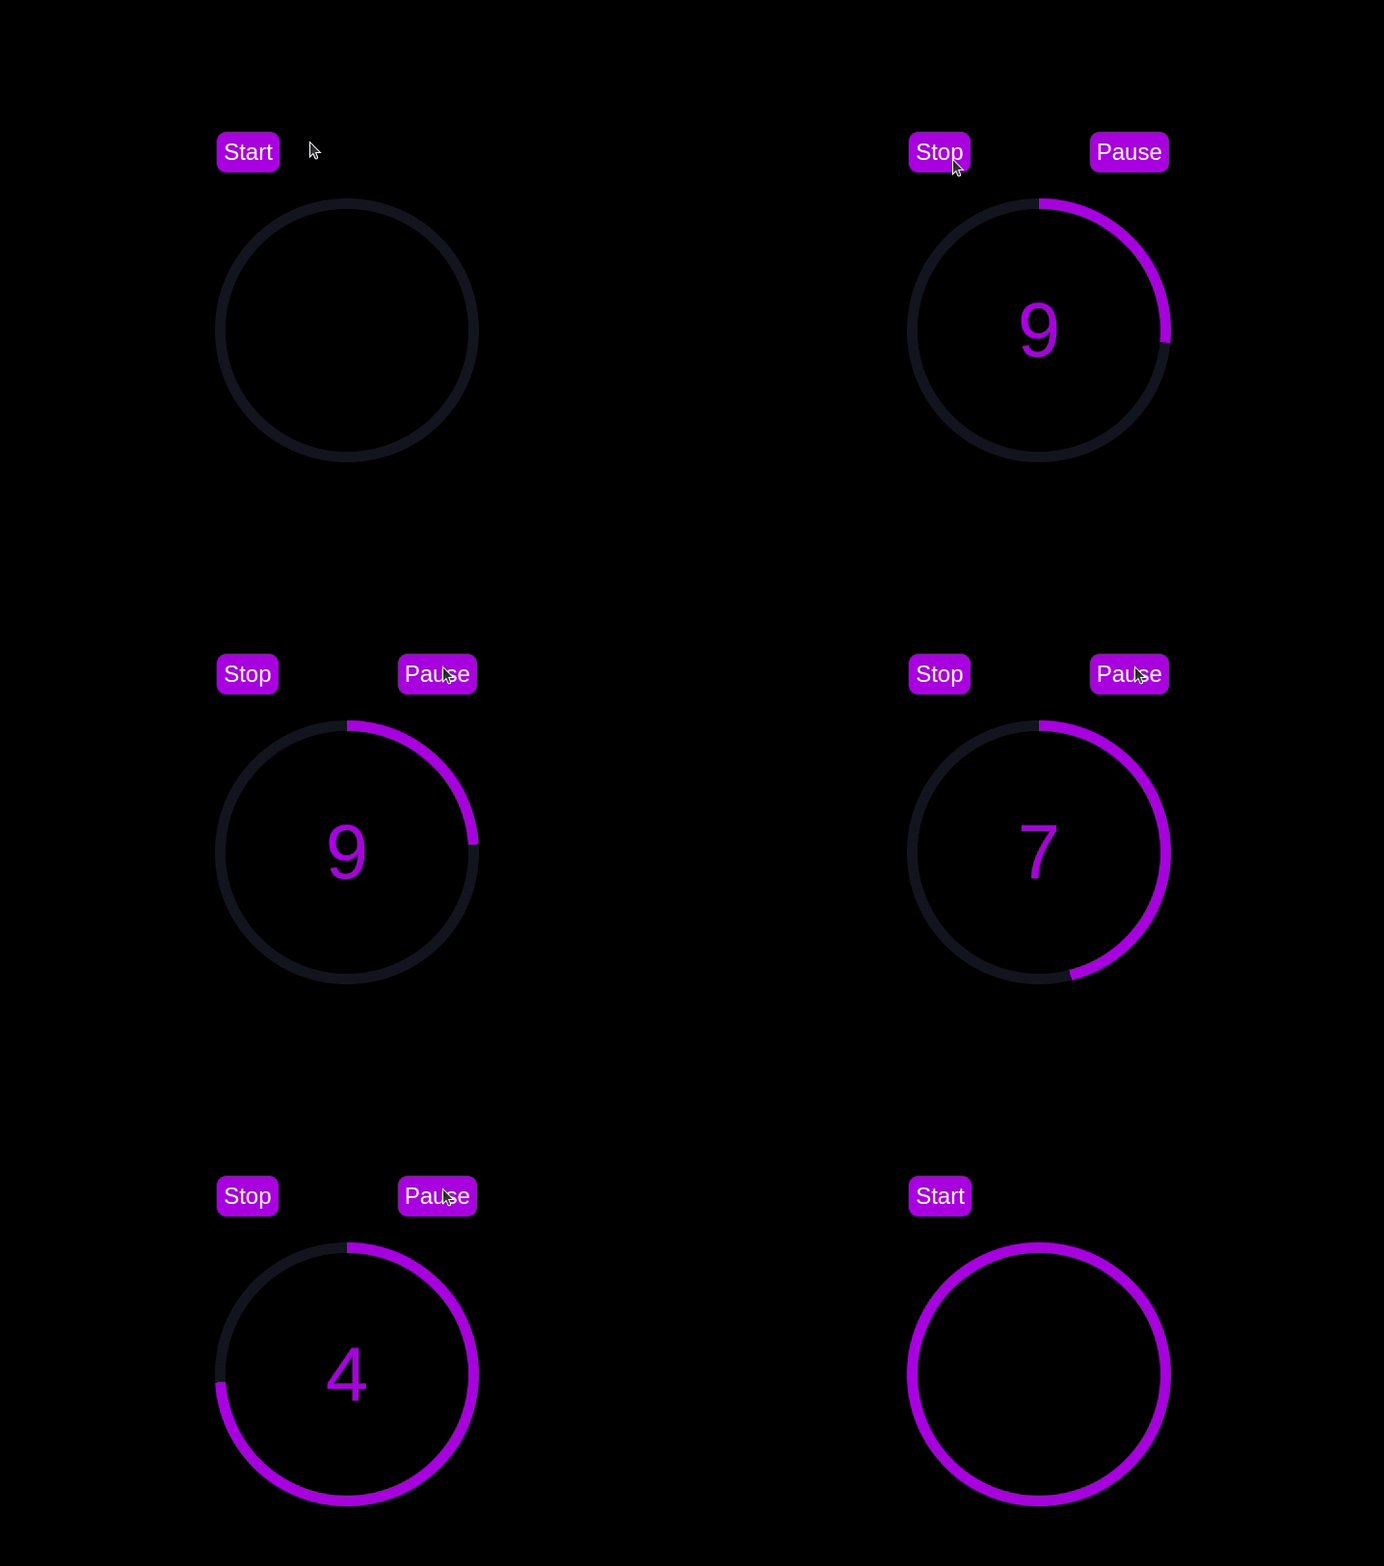
Implementing a CSS-only countdown timer
In this section, we'll dive into creating a countdown timer that updates every second and is made using only CSS. Our timer will be simple yet functional, featuring start and pause buttons to control its operation.
Creating the application server
Navigate to the css-only-countdown subdirectory, initialize a new node project, and install the express package:
cd ../css-only-countdown
npm init -y
npm install express
Then, return to your text editor, create a file named server.js, and add the following code to it:
const express = require('express');
const app = express();
const port = 3002
app.use(express.static('public'));

app.listen(port, () => {
  console.log(`Css-only countdown app server started on port ${port}`);
});
The code above creates an express server that will be used to serve the JavaScript countdown application in port 3002.
HTML structure
Still in your text editor, create the following files in the public subdirectory:
- index.html for the HTML code
- styles.css for the CSS code
Add the following code to the index.html file:
<!DOCTYPE html>
<html lang="en">
<head>
  <meta charset="UTF-8">
  <meta name="viewport" content="width=device-width, initial-scale=1.0">
  <link rel="stylesheet" href="styles.css">
  <title>CSS Countdown Timer</title>
</head>
<body>
  <div class="container">
    <div class="controls">
      <input type="checkbox" id="startBtn" class="checkbox-wrapper">
      <label for="startBtn" id="startLabel">
        <span>Stop</span>
        <span>Start</span>
      </label>
      <input type="checkbox" id="pauseBtn" class="checkbox-wrapper">
      <label for="pauseBtn" id="pauseLabel">
        <span>Resume</span>
        <span>Pause</span>
      </label>
      <div class="countdown-container">
        <ul class="countdown">
          <li>10</li>
          <li>9</li>
          <li>8</li>
          <li>7</li>
          <li>6</li>
          <li>5</li>
          <li>4</li>
          <li>3</li>
          <li>2</li>
          <li>1</li>
        </ul>
      </div>
    </div>
  </div>
</body>
</html>
This code sets up the basic structure of our countdown timer. It includes a container div that holds the controls for starting and pausing the timer, as well as the countdown display itself. The controls div contains two checkboxes with labels that will serve as our start and pause buttons. These buttons toggle their respective states using CSS, thanks to the checkbox hack.
The countdown-container div holds an unordered list (ul) of list items (li) representing the countdown numbers from 10 to one. These numbers will be displayed one by one as the timer counts down.
CSS styling
Now, let's style the countdown timer using CSS. Add the following code to styles.css:
body {
  background-color: black;
  font-family: Arial, sans-serif;
  height: 100%;
}

.container {
  display: flex;
  flex-direction: column;
  justify-content: center;
  align-items: center;
}

.controls {
  width: 20%;
  margin-top: 10%;
  display: flex;
  justify-content: space-between;
  flex-direction: row;
  flex-wrap: wrap;
}

.countdown-container {
  position: relative;
  width: 20vw;
  height: 20vw;
  margin-top: 12%;
  border : 0.4em solid #9b51e0;
}

#startLabel span {
  display: none;
}

label {
  cursor: pointer;
  font-size: 1.5em;
  padding: 0.3em;
  background-color: #9b51e0;
  border-radius: 0.4em;
  color: white;
}

#startBtn:checked~#startLabel span:nth-child(1) {
  display: inline;
}

#startBtn:not(:checked)~#startLabel span:nth-child(2) {
  display: inline;
}

#startBtn:not(:checked)~#pauseLabel,
#pauseBtn {
  display: none;
}

#pauseLabel span {
  display: none;
}

#pauseBtn:checked~#pauseLabel span:nth-child(1) {
  display: inline;
}

#pauseBtn:not(:checked)~#pauseLabel span:nth-child(2) {
  display: inline;
}

.checkbox-wrapper {
  display: none;
}
In this CSS file, we start by setting some basic styles for the body and container. The body has a black background and uses the Arial font. The container is centered using flexbox and has a margin to push it down from the top of the viewport.
The controls div is styled to be responsive and to ensure that the buttons are spaced out evenly. The countdown-container div is styled with a border, which will later be replaced by the circular progress indicator.
We use the checkbox hack to toggle the visibility of the labels for the start and pause buttons. Depending on whether the checkboxes are checked or not, different spans within the labels are displayed. This allows the labels to show different text (Start or Stop, Pause or Resume) based on the state of the checkboxes.
Now, add the following code to the bottom of the styles.css file:
.countdown {
  position: relative;
  width: 100%;
  height: 100%;
  list-style: none;
  padding: 0;
  margin: 0;
  display: flex;
  justify-content: center;
  align-items: center;
  font-size: 5em;
  color: #9b51e0;
}

.countdown li {
  position: absolute;
  opacity: 0;
  transition: opacity 1s linear;
}

#startBtn:checked~.countdown-container .countdown li:nth-child(1) {
  animation-delay: 0s;
}

#startBtn:checked~.countdown-container .countdown li:nth-child(2) {
  animation-delay: 1s;
}

#startBtn:checked~.countdown-container .countdown li:nth-child(3) {
  animation-delay: 2s;
}

#startBtn:checked~.countdown-container .countdown li:nth-child(4) {
  animation-delay: 3s;
}

#startBtn:checked~.countdown-container .countdown li:nth-child(5) {
  animation-delay: 4s;
}

#startBtn:checked~.countdown-container .countdown li:nth-child(6) {
  animation-delay: 5s;
}

#startBtn:checked~.countdown-container .countdown li:nth-child(7) {
  animation-delay: 6s;
}

#startBtn:checked~.countdown-container .countdown li:nth-child(8) {
  animation-delay: 7s;
}

#startBtn:checked~.countdown-container .countdown li:nth-child(9) {
  animation-delay: 8s;
}

#startBtn:checked~.countdown-container .countdown li:nth-child(10) {
  animation-delay: 9s;
}

@keyframes countdownAnimation {
  0%,
  10% {
    opacity: 1;
  }
  11%,
  100% {
    opacity: 0;
  }
}

#startBtn:checked~.countdown-container .countdown li {
  animation: countdownAnimation 10s steps(10) forwards;
}

#pauseBtn:checked~.countdown-container .countdown li {
  animation-play-state: paused;
}
With this code, we style the countdown list. The countdown class is positioned absolutely within the countdown-container, and its list items are initially hidden with opacity: 0.
We then use keyframes and the animation property to create the countdown effect. The list items are displayed one by one with a delay using the animation-delay property. The countdownAnimation keyframes control the visibility of each list item, making them visible for a short period before hiding them again.
We also pause the animation when the pause button is checked, using the animation-play-state property.
Go back to your terminal and run the following command to start serving the CSS-only countdown application:
node server.js
Open a new tab in your browser, navigate to http://localhost:3002 URL, and you should see something similar to the following: 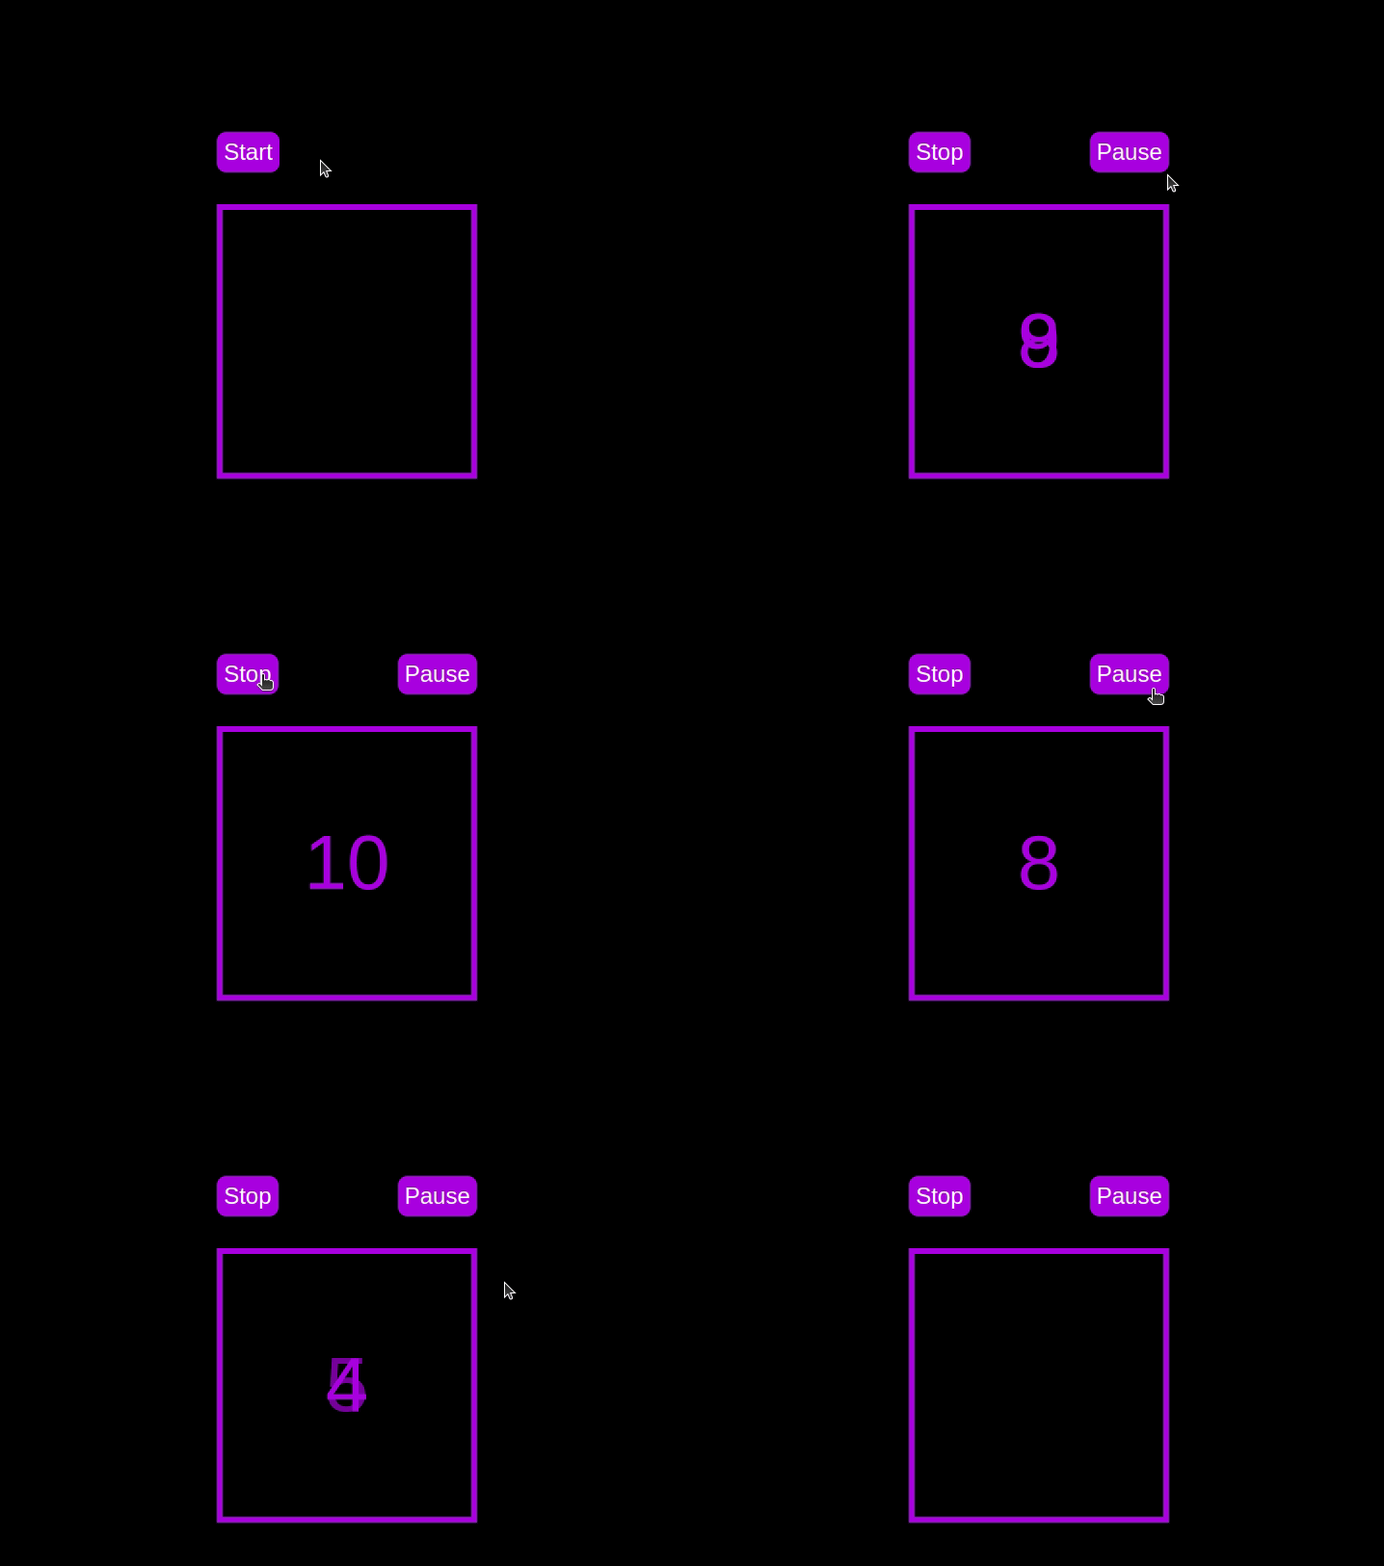 Test out the countdown timer and once you are done, terminate the server application and move to the next step.
Adding a circular progress indicator
To make the countdown timer more visually appealing, we can add a circular progress indicator that shows the remaining time. To do this, we will modify the HTML and CSS code as follows:
First, replace the countdown-container div in the index.html file with the following code:
<div class="countdown-container">
  <span class="circular-progress">
  </span>
  <ul class="countdown">
    <li>10</li>
    <li>9</li>
    <li>8</li>
    <li>7</li>
    <li>6</li>
    <li>5</li>
    <li>4</li>
    <li>3</li>
    <li>2</li>
    <li>1</li>
  </ul>
</div>
In this code, we add a span element with a class of circular-progress inside the countdown-container div.
Next, add the following code to the styles.css file:
.countdown-container {
  ...
  /* border : 0.4em solid #9b51e0; */
}

.circular-progress {
  width: 20vw;
  height: 20vw;
  border-radius: 50%;
  display: flex;
  justify-content: center;
  align-items: center;
  position: absolute;
  transition: 0.5s;
  background: conic-gradient(#9b51e0 var(--angle), #13171f 0deg);
}

.circular-progress::before {
  width: 18.5vw;
  height: 18.5vw;
  content: "";
  position: absolute;
  border-radius: 50%;
  background-color: black;
}

@keyframes circularProgressAnimation {
  to {
    --angle: 360deg;
  }
}

@property --angle {
  syntax: "<angle>";
  initial-value: 0deg;
  inherits: false;
}

#startBtn:checked~.countdown-container .circular-progress {
  opacity: 1;
  animation: circularProgressAnimation 10s linear;
}

#pauseBtn:checked~.countdown-container .circular-progress {
  animation-play-state: paused;
}
In this code, we first remove the border from the countdown-container div, and then add styles for the circular-progress class. The circular progress indicator is a span element that is absolutely positioned within the countdown-container. It uses a conic gradient to create the circular progress effect.
We also define a keyframe animation, circularProgressAnimation, that animates the progress indicator from 0 to 360 degrees over the duration of the countdown. The --angle CSS property is used to control the angle of the gradient.
Finally, we use the checkbox hack to start and pause the circular progress animation along with the countdown numbers. The animation is applied to the circular-progress span when the start button is checked and paused when the pause button is checked.
With these modifications, our countdown timer now includes a circular progress indicator that animates along with the timer.
Go back to your terminal and run the following command to start serving the CSS-only countdown application:
node server.js
Return to the tab in your browser where you visited the http://localhost:3002 URL, refresh the page, and you should see something similar to the following: 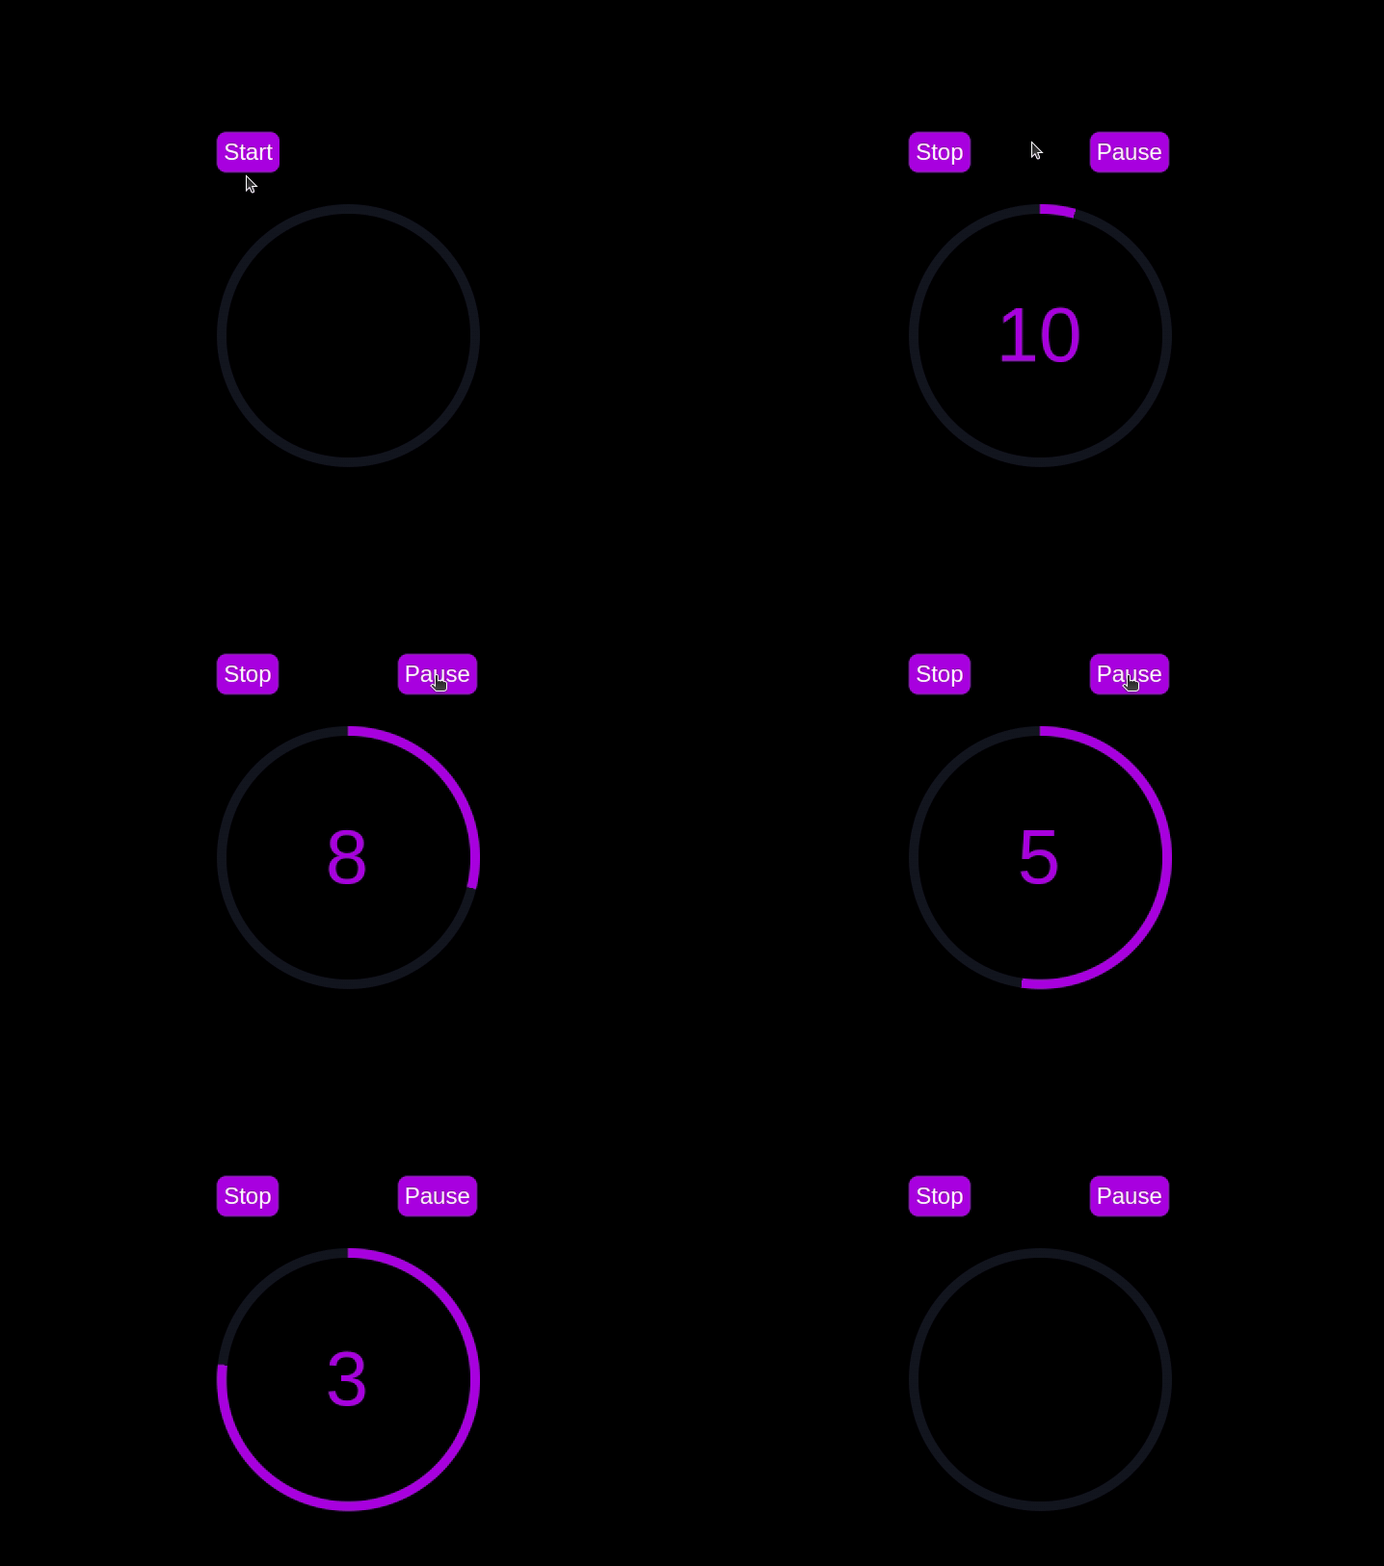
Using Chrome DevTools to compare timer performance
Now that we have implemented both the CSS-only and JavaScript countdown timers, let's compare their performance using Chrome DevTools.
To get started, open the Chrome browser and navigate to the webpage containing the countdown timers. Right-click anywhere on the page and select Inspect to open Chrome DevTools.
In the DevTools window, click on the Network tab and then refresh both the JavaScript and CSS-only countdown pages. This tab allows you to monitor all network requests made by the page, including HTML, CSS, JavaScript, and other resources: 
By analyzing the requests, you can determine how many resources are being loaded, their sizes, and the overall impact on page load time:
| CSS-only countdown timer | JavaScript countdown timer | |
|---|---|---|
| Number of requests | 2 | 3 |
| Total size | 4.5 KB | 4.7 KB |
| Page load | 24 ms | 27 ms |
D'après ces résultats, nous pouvons voir que le compte à rebours CSS uniquement nécessite moins de requêtes et a une taille totale légèrement inférieure à celle du compte à rebours JavaScript. Cela conduit à un temps de chargement de page légèrement plus rapide pour la version CSS uniquement, ce qui la rend plus efficace en termes de chargement initial.
Maintenant, dans la fenêtre DevTools, accédez à l'onglet Performance et lancez une session d'enregistrement en cliquant sur le bouton Enregistrer. Pour évaluer le compte à rebours JavaScript, cliquez sur le bouton Démarrer situé sur sa page respective et laissez le compte à rebours suivre son cours. Une fois le timer arrêté, arrêtez l'enregistrement dans l'onglet Performance.
Effectuez ce processus pour les pages de compte à rebours JS et CSS uniquement afin de collecter des données de performances pour chaque implémentation. L'onglet Performances propose une analyse complète des performances d'exécution de votre page, englobant les temps de script, de rendu et de peinture. En analysant ces métriques, vous pouvez identifier les domaines qui peuvent nécessiter une optimisation pour améliorer les performances de votre application Web :
| CSS-only countdown timer | JavaScript countdown timer | |
|---|---|---|
| Scripting | 2 ms | 49 ms |
| Rendering | 510 ms | 103 ms |
| Painting | 275 ms | 55 ms |
En interprétant ces résultats, nous observons que le temps de script pour le compte à rebours CSS uniquement est nettement inférieur à celui du compte à rebours JavaScript, ce qui indique une surcharge d'exécution minimale. Cependant, le compte à rebours CSS uniquement a des temps de rendu et de peinture plus élevés. En effet, les animations CSS peuvent parfois nécessiter plus d'efforts de la part du navigateur pour être rendues, en particulier pour les styles ou les transitions complexes.
En revanche, le compte à rebours JavaScript affiche un temps de script plus élevé en raison de la logique impliquée dans la mise à jour du compte à rebours, mais il bénéficie de temps de rendu et de peinture inférieurs. Cela suggère que même si JavaScript ajoute une certaine surcharge en termes d'exécution de script, il peut être plus efficace en termes de mise à jour du DOM et de rendu des modifications.
Dans l'ensemble, le compte à rebours CSS uniquement est plus efficace pour les scénarios dans lesquels la minimisation du temps d'exécution du script est critique, tandis que le minuteur JavaScript peut mieux fonctionner dans les cas où les temps de rendu et de peinture sont la principale préoccupation.
Avantages et inconvénients de chaque approche
Après avoir exploré les comptes à rebours CSS uniquement et JavaScript, pesons leurs avantages et leurs inconvénients pour déterminer quelle approche convient le mieux à vos besoins.
Compte à rebours CSS uniquement
Le compte à rebours CSS uniquement exploite du CSS pur pour obtenir l'effet de compte à rebours, offrant ainsi une solution légère et simple.
Ses avantages sont les suivants :
- Surcharge minimale de script : comme le montre notre analyse des performances, le minuteur CSS uniquement nécessite très peu de scripts, ce qui entraîne une utilisation moindre du processeur pour l'exécution du script. Cela peut être bénéfique pour améliorer les performances globales des pages, en particulier sur les appareils dotés d'une puissance de traitement limitée
- Base de code simplifiée : en utilisant CSS pour les animations, le code reste plus propre et plus maintenable. Cette approche réduit la complexité de la mise en œuvre et peut permettre aux développeurs de comprendre et de gérer plus facilement le code
Les inconvénients de cette approche incluent :
- Temps de rendu et de peinture plus élevés : le minuteur CSS uniquement a tendance à avoir des temps de rendu et de peinture plus élevés. Cela est dû à la nature des animations CSS, qui peuvent être plus exigeantes sur le moteur de rendu du navigateur. Cela pourrait avoir un impact sur les performances sur les pages comportant plusieurs animations ou des mises en page complexes
- Interactivité limitée : les animations CSS sont intrinsèquement moins flexibles que JavaScript. La mise en œuvre de fonctionnalités plus interactives, telles que les mises à jour dynamiques ou la logique conditionnelle, peut s'avérer difficile et nécessiter du JavaScript supplémentaire, annulant en partie l'avantage de la simplicité
Compte à rebours JavaScript
Le compte à rebours JavaScript, quant à lui, utilise JavaScript pour gérer la logique du compte à rebours et les mises à jour du DOM. Cette approche offre plus de contrôle et de flexibilité.
Les avantages de cette approche incluent :
- Contrôle et flexibilité améliorés : JavaScript fournit un contrôle précis sur la logique du compte à rebours et la manipulation du DOM. Cela permet des interactions plus complexes, un comportement conditionnel et des mises à jour dynamiques, ce qui le rend adapté aux applications plus sophistiquées
- Rendu et peinture efficaces : Comme l'indique notre analyse des performances, le minuteur JavaScript bénéficie de temps de rendu et de peinture réduits. JavaScript peut optimiser les mises à jour du DOM, ce qui entraîne des animations plus fluides et de meilleures performances dans des scénarios impliquant des mises à jour fréquentes
Les inconvénients incluent :
- Surcharge de script plus élevée : Le principal inconvénient du compte à rebours JavaScript est l'augmentation du temps de script. La logique JavaScript introduit une surcharge supplémentaire du processeur, ce qui peut avoir un impact sur les performances, en particulier sur les appareils dotés d'une puissance de traitement inférieure ou sur les pages utilisant beaucoup de scripts
- Complexité accrue : La mise en œuvre d'un compte à rebours JavaScript implique d'écrire et de gérer davantage de code, ce qui peut augmenter la complexité du projet. Cette complexité supplémentaire peut rendre la base de code plus difficile à maintenir et à déboguer
Le minuteur CSS uniquement est léger et facile à comprendre, ce qui en fait un bon choix pour des comptes à rebours simples avec un minimum de scripts. Cependant, il peut avoir des difficultés avec des animations plus complexes et des fonctionnalités interactives. D'autre part, le minuteur JavaScript offre un plus grand contrôle et une plus grande flexibilité, permettant des interactions plus dynamiques. Cela se fait au prix d’une surcharge de script plus élevée et d’une complexité accrue.
En fin de compte, le choix entre les deux approches dépend des besoins spécifiques de votre projet et des compromis que vous êtes prêt à accepter.
Conclusion
Dans ce tutoriel, nous avons exploré deux méthodes pour créer un compte à rebours : en utilisant JavaScript et en utilisant uniquement CSS. Nous avons commencé avec un compte à rebours JavaScript de base, en ajoutant des fonctionnalités et un style pour le rendre convivial et visuellement attrayant. Ensuite, nous avons implémenté un compte à rebours uniquement CSS, mettant en valeur la puissance du CSS pour créer des animations simples mais efficaces.
Que vous choisissiez l'approche CSS uniquement pour sa simplicité ou l'approche JavaScript pour sa flexibilité, vous disposez désormais des outils et des connaissances nécessaires pour mettre en œuvre un compte à rebours adapté aux besoins de votre projet.
Votre interface monopolise-t-elle le processeur de vos utilisateurs ?
À mesure que les interfaces Web deviennent de plus en plus complexes, les fonctionnalités gourmandes en ressources exigent de plus en plus du navigateur. Si vous souhaitez surveiller et suivre l'utilisation du processeur côté client, l'utilisation de la mémoire et bien plus encore pour tous vos utilisateurs en production, essayez LogRocket.
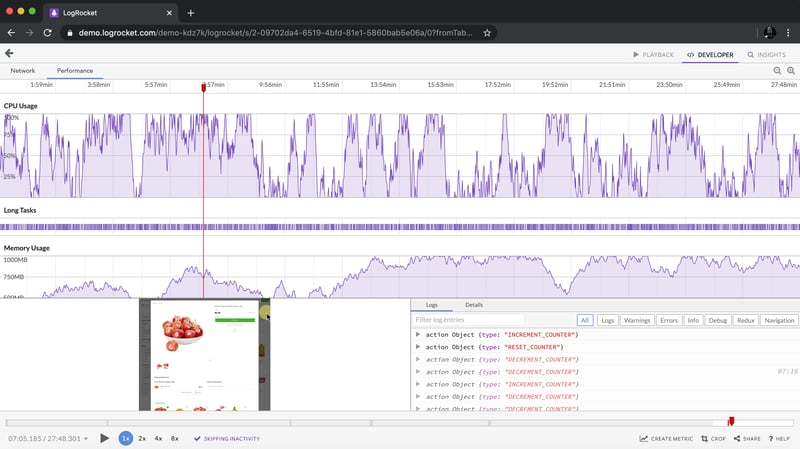
LogRocket est comme un DVR pour les applications Web et mobiles, enregistrant tout ce qui se passe dans votre application Web, votre application mobile ou votre site Web. Au lieu de deviner pourquoi les problèmes surviennent, vous pouvez regrouper et créer des rapports sur les principales mesures de performances du front-end, relire les sessions utilisateur avec l'état de l'application, enregistrer les requêtes réseau et faire apparaître automatiquement toutes les erreurs.
Modernisez la façon dont vous déboguez les applications Web et mobiles : démarrez la surveillance gratuitement.
Atas ialah kandungan terperinci Bagaimana untuk membina pemasa undur menggunakan CSS. Untuk maklumat lanjut, sila ikut artikel berkaitan lain di laman web China PHP!

Alat AI Hot

Undresser.AI Undress
Apl berkuasa AI untuk mencipta foto bogel yang realistik

AI Clothes Remover
Alat AI dalam talian untuk mengeluarkan pakaian daripada foto.

Undress AI Tool
Gambar buka pakaian secara percuma

Clothoff.io
Penyingkiran pakaian AI

Video Face Swap
Tukar muka dalam mana-mana video dengan mudah menggunakan alat tukar muka AI percuma kami!

Artikel Panas

Alat panas

Notepad++7.3.1
Editor kod yang mudah digunakan dan percuma

SublimeText3 versi Cina
Versi Cina, sangat mudah digunakan

Hantar Studio 13.0.1
Persekitaran pembangunan bersepadu PHP yang berkuasa

Dreamweaver CS6
Alat pembangunan web visual

SublimeText3 versi Mac
Perisian penyuntingan kod peringkat Tuhan (SublimeText3)

Topik panas
 1671
1671
 14
14
 1428
1428
 52
52
 1329
1329
 25
25
 1276
1276
 29
29
 1256
1256
 24
24
 Perbandingan pembekal bentuk statik
Apr 16, 2025 am 11:20 AM
Mari kita cuba menyusun istilah di sini: "Penyedia Borang Statik." Anda membawa html anda
 Bukti konsep untuk menjadikan sass lebih cepat
Apr 16, 2025 am 10:38 AM
Pada permulaan projek baru, kompilasi SASS berlaku dalam sekejap mata. Ini terasa hebat, terutamanya apabila ia dipasangkan dengan BrowserSync, yang dimuat semula
 Berita Platform Mingguan: Atribut Memuat HTML, Spesifikasi ARIA Utama, dan Bergerak Dari IFRAME ke Shadow Dom
Apr 17, 2025 am 10:55 AM
Pada minggu ini, berita platform, Chrome memperkenalkan atribut baru untuk memuatkan, spesifikasi aksesibiliti untuk pemaju web, dan gerakan BBC
 Beberapa tangan dengan elemen dialog HTML
Apr 16, 2025 am 11:33 AM
Ini saya melihat elemen HTML untuk kali pertama. Saya telah menyedarinya untuk seketika, tetapi Haven ' t mengambilnya untuk putaran lagi. Ia mempunyai cukup keren dan
 Kertas kerja
Apr 16, 2025 am 11:24 AM
Beli atau Membina adalah perdebatan klasik dalam teknologi. Membina barang sendiri mungkin berasa lebih murah kerana tidak ada item baris pada bil kad kredit anda, tetapi
 Di manakah 'Langgan Podcast' pautan ke?
Apr 16, 2025 pm 12:04 PM
Untuk sementara waktu, iTunes adalah anjing besar dalam podcasting, jadi jika anda mengaitkan "Langgan Podcast" untuk suka:
 Berita Platform Mingguan: Bookmarket Jarak Teks, Menunggu Tahap Teratas, Penunjuk Memuatkan AMP Baru
Apr 17, 2025 am 11:26 AM
Pada minggu ini, roundup, sebuah bookmarklet yang berguna untuk memeriksa tipografi, menggunakan menunggu untuk mengamuk dengan cara modul JavaScript mengimport satu sama lain, ditambah Facebook ' s
 Pilihan untuk menganjurkan analisis berasaskan bukan JavaScript anda sendiri
Apr 15, 2025 am 11:09 AM
Terdapat banyak platform analisis untuk membantu anda mengesan data pelawat dan penggunaan di laman web anda. Mungkin paling penting Google Analytics, yang digunakan secara meluas


