

Wasp: Jawapan JavaScript kepada Django untuk Pembangunan Web

Wasp v Django: Membina aplikasi tindanan penuh menjadi lebih mudah
Hai, saya Sam, seorang jurutera bahagian belakang yang mempunyai banyak pengalaman dengan Django. Saya mahu membuat lompatan dan mempelajari beberapa bahagian hadapan untuk apl tindanan penuh. Saya dengan cepat mengalami sifat sukar projek React-with-Django dan menganggap kesakitan itu hanyalah sebahagian daripada proses pembangunan. Walau bagaimanapun, saya menemui rangka kerja tindanan penuh baharu yang sangat hebat yang dipanggil Wasp.
Tebuan ialah alat pembangun yang menakjubkan untuk aplikasi tindanan penuh. Menggabungkan perkara seperti React, Node.js dan Prisma, Wasp membolehkan pembangunan dipercepatkan dengan cara yang tidak pernah dilihat sebelum ini.
Dalam artikel ini, saya akan meneruskan penciptaan aplikasi tindanan penuh dalam Django versus Wasp untuk membuktikan kesederhanaan Wasp terhadap teknologi tindanan penuh yang sangat konvensional. Saya juga akan membuat frontend tindak balas yang disambungkan ke Django. Intinya adalah untuk menyerlahkan ketidakcekapan, kesukaran dan isu yang boleh (dan akan) timbul dengan Django/react yang dibuat dengan lebih mudah melalui
Artikel ini tidak dimaksudkan sebagai cara, tetapi saya menyediakan beberapa kod untuk menyerlahkan sifat menyeluruh apl Django.

Bahagian 1: Biar Ada Cahaya!
Mari buat beberapa projek dan sediakan perkara
Bahagian ini adalah satu-satunya bahagian yang terdapat pertindihan yang ketara antara Django dan Wasp. Kedua-duanya bermula dari terminal, mari buat apl tugasan mudah (saya andaikan anda telah memasang Django dan Wasp dan dalam laluan anda).
Django ?
django-admin startproject
python manage.py starapp Todo
Tebuan ?
wasp new Todo
wasp start
Kini Wasp mula panas keluar dari pintu pagar. Semak menu yang anda berikan di bawah. Wasp boleh sama ada memulakan apl asas untuk anda atau anda boleh memilih daripada pelbagai templat pra-dibuat (termasuk apl SaaS yang berfungsi sepenuhnya) atau juga menggunakan apl yang dijana AI berdasarkan penerangan anda!

Sementara itu, Django berfungsi sebagai projek dengan apl dalam projek (sekali lagi, ini pada asasnya untuk operasi bahagian belakang) dan boleh terdapat banyak apl untuk satu projek Django. Oleh itu, anda perlu mendaftarkan setiap apl dalam tetapan projek Django.
python `manage.py` startapp todo
tetapan.py:
INSTALLED_APPS [
...
'Todo'
]
Masa Pangkalan Data
Jadi sekarang kami memerlukan pangkalan data, dan ini adalah satu lagi kawasan di mana Wasp benar-benar bersinar. Dengan Django, kita perlu mencipta model dalam fail models.py. Sementara itu, Wasp menggunakan Prisma kerana ia adalah ORM yang membolehkan kami mentakrifkan dengan jelas medan yang diperlukan dan menjadikan penciptaan pangkalan data mudah dengan cara yang mudah difahami.
Django ?
models.py:
from django.db import models

class Task(models.Model):
    title = models.CharField(max_length=200)
    completed = models.BooleanField(default=False)

    def __str__(self):
        return self.title
Tebuan ?
skema.prisma:
model Task {
    id          Int     @id @default(autoincrement())
    description String
    isDone      Boolean @default(false)
}
Django dan Wasp berkongsi cara yang sama untuk memindahkan pangkalan data:
Django ?
python manage.py makemigrations
python manage.py migrate
Tebuan ?
wasp db migrate-dev
Tetapi dengan Wasp, anda juga boleh melakukan beberapa perkara pangkalan data yang cantik yang Django tidak boleh.
Sekarang kami menggunakan SQLite, tetapi bagaimana pula dengan segera menyediakan pangkalan data Posgres pembangunan? Wasp boleh melakukannya dengan:
wasp db start
Itu sahaja! Dengan itu anda mempunyai bekas docker yang menjalankan contoh Postgres dan ia disambungkan dengan serta-merta ke apl Wasp anda. ?
Atau bagaimana jika anda ingin melihat pangkalan data anda dalam masa nyata melalui UI studio pangkalan data Prisma, sesuatu yang tidak mungkin tanpa sambungan pihak ketiga dengan Django. Untuk itu, jalankan sahaja:
wasp db studio
Adakah anda mula nampak apa yang saya maksudkan sekarang?
Laluan
Laluan di Django dan Wasp mengikut corak yang agak serupa. Walau bagaimanapun, jika anda biasa dengan React, maka sistem Wasp adalah jauh lebih baik.
Django berfungsi melalui bahagian belakang (views.py, yang akan saya sampaikan kemudian dalam artikel ini) yang melakukan semua operasi CRUD. Fungsi paparan tersebut dikaitkan dengan laluan tertentu dalam apl dalam projek (saya tahu, banyak), dan ia boleh menjadi lebih rumit jika anda mula menggunakan kunci utama dan ID. Anda perlu mencipta fail urls.py dan mengarahkan fail dan fungsi paparan khusus anda ke laluan. Url apl tersebut kemudiannya disambungkan ke url projek. Fuh.
Cara Wasp: tentukan laluan dan halakannya ke komponen.
Django ?
todo/urls.py:
from django.urls import path
from . import views

urlpatterns = [
    path('', views.index, name='index'),
    path('update/<str:pk>/', views.updateTask, name='update_task'),
    path('delete/<str:pk>/', views.deleteTask, name='delete_task'),
]
./urls.py:
from django.contrib import admin
from django.urls import path, include

urlpatterns = [
    path('admin/', admin.site.urls),
    path('', include('todo.urls')),
]
Tebuan ?
utama.tebuan:
route TaskRoute { path: "/", to: TaskPage }
page TaskPage {
  component: import { TaskPage } from "@src/TaskPage"
}
CRUD
Ok, di sinilah manfaat Wasp akan menjadi lebih ketara.
Firstly, I am going to revisit the views.py file. This is where magic is going to happen for Django backend. Here is a simple version of what the create, update, and delete functions could look like for our Task/Todo example:
Django ?
todo/views.py:
from django.shortcuts import render, redirect
from .models import Task
from .forms import TaskForm

def index(request):
    tasks = Task.objects.all()
    form = TaskForm()
    if request.method == 'POST':
        form = TaskForm(request.POST)
        if form.is_valid():
            form.save()
        return redirect('/')
    context = {'tasks': tasks, 'form': form}
    return render(request, 'todo/index.html', context)

def updateTask(request, pk):
    task = Task.objects.get(id=pk)
    form = TaskForm(instance=task)
    if request.method == 'POST':
        form = TaskForm(request.POST, instance=task)
        if form.is_valid():
            form.save()
        return redirect('/')
    context = {'form': form}
    return render(request, 'todo/update_task.html', context)

def deleteTask(request, pk):
    task = Task.objects.get(id=pk)
    if request.method == 'POST':
        task.delete()
        return redirect('/')
    context = {'task': task}
    return render(request, 'todo/delete.html', context)
app/forms.py:
from django import forms
from .models import Task

class TaskForm(forms.ModelForm):
    class Meta:
        model = Task
        fields = ['title', 'completed']
Wasp ?
main.wasp:
query getTasks {
  fn: import { getTasks } from "@src/operations",
  // Tell Wasp that this operation affects the `Task` entity. Wasp will automatically
  // refresh the client (cache) with the results of the operation when tasks are modified.
  entities: [Task]
}

action updateTask {
  fn: import { updateTask } from "@src/operations",
  entities: [Task]
}

action deleteTask {
  fn: import { deleteTask } from "@src/operations",
  entities: [Task]
}
operations.js:
export const getTasks = async (args, context) => {
  return context.entities.Task.findMany({
    orderBy: { id: 'asc' },
  })
}

export const updateTask = async ({ id, data }, context) => {
  return context.entities.Task.update({
    where: { id },
    data
  })
}

export const deleteTask = async ({ id }, context) => {
  return context.entities.Task.delete({
    where: { id }
  })
}
So right now, Wasp has a fully functioning backend with middleware configured for you. At this point we can create some React components, and then import and call these operations from the client. That is not the case with Django, unfortunately there is still a lot we need to do to configure React in our app and get things working together, which we will look at below.
Part 2: So you want to use React with Django?

At this point we could just create a simple client with HTML and CSS to go with our Django app, but then this wouldn't be a fair comparison, as Wasp is a true full-stack framework and gives you a managed React-NodeJS-Prisma app out-of-the-box. So let's see what we'd have to do to get the same thing set up with Django.
Note that this section is going to highlight Django, so keep in mind that you can skip all the following steps if you just use Wasp. :)
Django ?
First thing’s first. Django needs a REST framework and CORS (Cross Origin Resource Sharing):
pip install djangorestframework
pip install django-cors-headers
Include Rest Framework and Cors Header as installed apps, CORS headers as middleware, and then also set a local host for the react frontend to be able to communicate with the backend (Django) server (again, there is no need to do any of this initial setup in Wasp as it's all handled for you).
settings.py:
INSTALLED_APPS = [
    ...
    'corsheaders',
]

MIDDLEWARE = [
    ...
    'corsheaders.middleware.CorsMiddleware',
    ...
]

CORS_ALLOWED_ORIGINS = [
    'http://localhost:3000',
]
And now a very important step, which is to serialize all the data from Django to be able to work in json format for React frontend.
app/serializers.py:
from rest_framework import serializers
from .models import Task

class TaskSerializer(serializers.ModelSerializer):
    class Meta:
        model = Task
        fields = '__all__'
Now, since we are handling CRUD on the React side, we can change the views.py file:
from rest_framework import viewsets
from .models import Task
from .serializers import TaskSerializer

class TaskViewSet(viewsets.ModelViewSet):
    queryset = Task.objects.all()
    serializer_class = TaskSerializer
And now we need to change both app and project URLS since we have a frontend application on a different url than our backend.
urls.py:
from django.contrib import admin
from django.urls import path, include

urlpatterns = [
    path('admin/', admin.site.urls),
    path('api/', include('todo.urls')),  # Add this line
]
from django.urls import path, include
from rest_framework.routers import DefaultRouter
from .views import TaskViewSet

router = DefaultRouter()
router.register(r'tasks', TaskViewSet)

urlpatterns = [
    path('', include(router.urls)),
]
By now you should be understanding why I've made the switch to using Wasp when building full-stack apps. Anyways, now we are actually able to make a react component with a Django backend ?
React time
Ok, so now we can actually get back to comparing Wasp and Django.
Django ?
To start, lets create our React app in our Django project:
npx create-react-app frontend
Finally, we can make a component in React. A few things:
I am using axios in the Django project here. Wasp comes bundled with React-Query (aka Tanstack Query), so the execution of (CRUD) operations is a lot more elegant and powerful.
The api call is to my local server, obviously this will change in development.
You can make this many different ways, I tried to keep it simple.
main.jsx:
import React, { useEffect, useState } from 'react';
import axios from 'axios';

const TaskList = () => {
  const [tasks, setTasks] = useState([]);
  const [newTask, setNewTask] = useState('');
  const [editingTask, setEditingTask] = useState(null);

  useEffect(() => {
      fetchTasks();
  }, []);

  const fetchTasks = () => {
    axios.get('http://127.0.0.1:8000/api/tasks/')
      .then(response => {
        setTasks(response.data);
      })
      .catch(error => {
        console.error('There was an error fetching the tasks!', error);
      });
  };

  const handleAddTask = () => {
    if (newTask.trim()) {
      axios.post('http://127.0.0.1:8000/api/tasks/', { title: newTask, completed: false })
        .then(() => {
          setNewTask('');
          fetchTasks();
        })
        .catch(error => {
          console.error('There was an error adding the task!', error);
        });
    }
  };

  const handleUpdateTask = (task) => {
    axios.put(`http://127.0.0.1:8000/api/tasks/${task.id}/`, task)
      .then(() => {
        fetchTasks();
        setEditingTask(null);
      })
      .catch(error => {
        console.error('There was an error updating the task!', error);
      });
  };

  const handleDeleteTask = (taskId) => {
    axios.delete(`http://127.0.0.1:8000/api/tasks/${taskId}/`)
      .then(() => {
        fetchTasks();
      })
      .catch(error => {
        console.error('There was an error deleting the task!', error);
      });
  };

  const handleEditTask = (task) => {
    setEditingTask(task);
  };

  const handleChange = (e) => {
    setNewTask(e.target.value);
  };

  const handleEditChange = (e) => {
    setEditingTask({ ...editingTask, title: e.target.value });
  };

  const handleEditCompleteToggle = () => {
    setEditingTask({ ...editingTask, completed: !editingTask.completed });
  };

  return (
    <div>
      <h1>To-Do List</h1>
      <input type="text" value={newTask} onChange={handleChange} placeholder="Add new task" />
      <button onClick={handleAddTask}>Add Task</button>
      <ul>
        {tasks.map(task => (
          <li key={task.id}>
            {editingTask && editingTask.id === task.id ? (
              <div>
                <input type="text" value={editingTask.title} onChange={handleEditChange} />
                <button onClick={() => handleUpdateTask(editingTask)}>Save</button>
                <button onClick={() => setEditingTask(null)}>Cancel</button>
                <button onClick={handleEditCompleteToggle}>
                  {editingTask.completed ? 'Mark Incomplete' : 'Mark Complete'}
                </button>
              </div>
          ) : (
            <div>
              {task.title} - {task.completed ? 'Completed' : 'Incomplete'}
              <button onClick={() => handleEditTask(task)}>Edit</button>
              <button onClick={() => handleDeleteTask(task.id)}>Delete</button>
            </div>
            )}
          </li>
        ))}
      </ul>
    </div>
  );
};

export default TaskList;
Wasp ?
And here's the Wasp React client for comparison. Take note how we're able to import the operations we defined earlier and call them here easily on the client with less configuration than the Django app. We also get the built-in caching power of the useQuery hook, as well as the ability to pass in our authenticated user as a prop (we'll get into this more below).
Main.jsx:
import React, { FormEventHandler, FormEvent } from "react";
import { type Task } from "wasp/entities";
import { type AuthUser, getUsername } from "wasp/auth";
import { logout } from "wasp/client/auth";
import { createTask, updateTask, deleteTasks, useQuery, getTasks } from "wasp/client/operations";
import waspLogo from "./waspLogo.png";

import "./Main.css";

export const MainPage = ({ user }) => {
  const { data: tasks, isLoading, error } = useQuery(getTasks);

  if (isLoading) return "Loading...";
  if (error) return "Error: " + error;

  const completed = tasks?.filter((task) => task.isDone).map((task) => task.id);

  return (
    <main>
      <img src={waspLogo} alt="wasp logo" />
      {user && user.identities.username && (
        <h1>
          {user.identities.username.id}
          {`'s tasks :)`}
        </h1>
      )}
      <NewTaskForm />
      {tasks && <TasksList tasks={tasks} />}
      <div className="buttons">
        <button
          className="logout"
          onClick={() => deleteTasks(completed ?? [])}
        >
          Delete completed
        </button>
        <button className="logout" onClick={logout}>
          Logout
        </button>
      </div>
    </main>
  );
};

function Todo({ id, isDone, description }) {
  const handleIsDoneChange = async (
    event
  ) => {
    try {
      await updateTask({
        id,
        isDone: event.currentTarget.checked,
      });
    } catch (err: any) {
      window.alert("Error while updating task " + err?.message);
    }
  };

  return (
    <li>
      <span className="todo-item">
        <input
          type="checkbox"
          id={id.toString()}
          checked={isDone}
          onChange={handleIsDoneChange}
        />
        <span>{description}</span>
        <button onClick={() => void deleteTasks([id])}>Delete</button>
      </span>
    </li>
  );
}

function TasksList({ tasks }) {
  if (tasks.length === 0) return <p>No tasks yet.</p>;
  return (
    <ol className="tasklist">
      {tasks.map((task, idx) => (
        <Todo {...task} key={idx} />
      ))}
    </ol>
  );
}

function NewTaskForm() {
  const handleSubmit = async (event) => {
    event.preventDefault();

    try {
      const description = event.currentTarget.description.value;
      console.log(description);
      event.currentTarget.reset();
      await createTask({ description });
    } catch (err: any) {
      window.alert("Error: " + err?.message);
    }
  };

  return (
    <form onSubmit={handleSubmit}>
      <input name="description" type="text" defaultValue="" />
      <input type="submit" value="Create task" />
    </form>
  );
}
Very nice! In the Wasp app you can see how much easier it is to call the server-side code via Wasp operations. Plus, Wasp gives you the added benefit of refreshing the client-side cache for the Entity that's referenced in the operation definition (in this case Task). And the cherry on top is how easy it is to pass the authenticated user to the component, something we haven't even touched on in the Django app, and which we will talk about more below.
Part 3: Auth with Django? No way, José

So we already started to get a feel in the above code for how simple it is to pass an authenticated user around in Wasp. But how do we actually go about implementing full-stack Authentication in Wasp and Django.
This is one of Wasp’s biggest advantages. It couldn't be easier or more intuitive. On the other hand, the Django implementation is so long and complicated I'm not going to even bother showing you the code and I'll just list out the stps instead;
Wasp ?
main.wasp:
app TodoApp {
  wasp: {
    version: "^0.14.0"
  },

  title: "Todo App",

  auth: {
    userEntity: User,
    methods: {
      usernameAndPassword: {}
    }
  }

  //...
And that's all it takes to implement full-stack Auth with Wasp! But that's just one example, you can also add other auth methods easily, like google: {}, gitHub: {} and discord: {} social auth, after configuring the apps and adding your environment variables.
Wasp allows you to get building without worrying about so many things. I don’t need to worry about password hashing, multiple projects and apps, CORS headers, etc. I just need to add a couple lines of code.
Wasp just makes sense.

Django ?
Let's check out what it takes to add a simple username and password auth implementation to a Django app (remember, this isn't even the code, just a checklist!):
Install Necessary Packages:
- Use pip to install djangorestframework, djoser, and djangorestframework-simplejwt for Django.
- Use npm to install axios and jwt-decode for React.
Update Django Settings:
- Add required apps (rest_framework, djoser, corsheaders, and your Django app) to INSTALLED_APPS.
- Configure middleware to include CorsMiddleware.
- Set up Django REST Framework settings for authentication and permissions.
- Configure SimpleJWT settings for token expiration and authorization header types.
Set Up URL Routing:
- Include the djoser URLs for authentication and JWT endpoints in Django’s urls.py.
Implement Authentication Context in React:
- Create an authentication context in React to manage login state and tokens.
- Provide methods for logging in and out, and store tokens in local storage.
Create Login Component in React:
- Build a login form component in React that allows users to enter their credentials and authenticate using the Django backend.
Protect React Routes and Components:
- Use React Router to protect routes that require authentication.
- Ensure that API requests include the JWT token for authenticated endpoints.
Implement Task Update and Delete Functionality:
- Add methods in the React components to handle updating and deleting tasks.
- Use axios to make PUT and DELETE requests to the Django API.
Add Authentication to Django Views:
- Ensure that Django views and endpoints require authentication.
- Use Django REST Framework permissions to protect API endpoints.
One Final Thing
I just want to highlight one more aspect of Wasp that I really love. In Django, we're completely responsible for dealing with all the boilerplate code when setting up a new app. In other words, we have to set up new apps from scratch every time (even if it's been done before a million times by us and other devs). But with Wasp we can scaffold a new app template in a number of ways to really jump start the development process.
Let's check out these other ways to get a full-stack app started in Wasp.
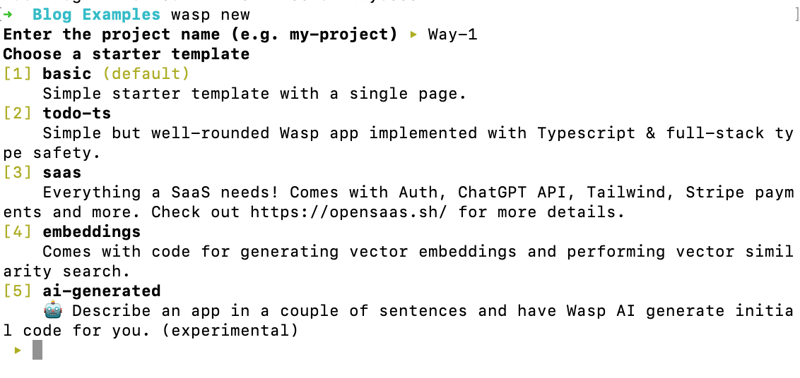
Way #1: Straight Outta Terminal
A simple wasp new in the terminal shows numerous starting options and app templates. If I really want to make a todo app for example, well there you have it, option 2.
Right out of the box you have a to-do application with authentication, CRUD functionality, and some basic styling. All of this is ready to be amended for your specific use case.
Or what if you want to turn code into money? Well, you can also get a fully functioning SaaS app. Interested in the latest AI offereings? You also have a vector embeddings template, or an AI full-stack app protoyper! 5 options that save you from having to write a ton of boilerplate code.
Way #2: Mage.ai (Free!)
Just throw a name, prompt, and select a few of your desired settings and boom, you get a fully functioning prototype app. From here you can use other other AI tools, like Cursor's AI code editor, to generate new features and help you debug!
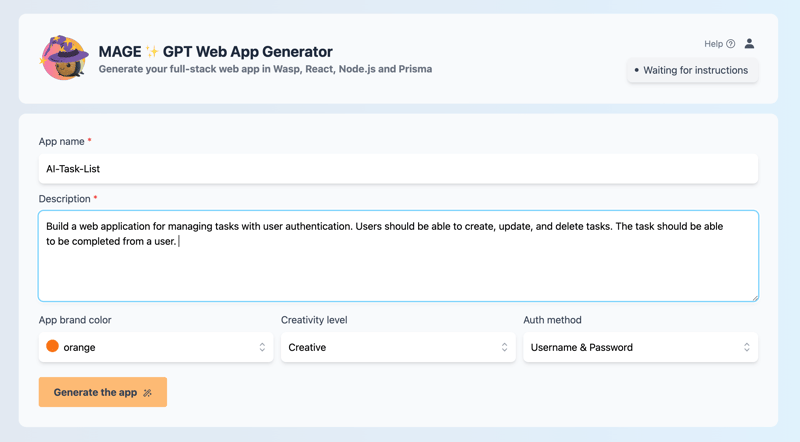
? Note that the Mage functionality is also achievable via the terminal ("ai-generated"), but you need to provide your own open-ai api key for it to work.
Bolehkah anda menunjukkan sokongan anda kepada kami?

Adakah anda berminat dengan lebih banyak kandungan seperti ini? Daftar untuk surat berita kami dan berikan kami bintang di GitHub! Kami memerlukan sokongan anda untuk terus memajukan projek kami ?
⭐️ Star Wasp di GitHub ?
Kesimpulan
Jadi begitulah. Seperti yang saya katakan pada mulanya, datang dari Django saya kagum betapa mudahnya membina apl tindanan penuh dengan Wasp, yang memberi inspirasi kepada saya untuk menulis artikel ini.
Semoga saya dapat menunjukkan kepada anda sebab melepaskan diri daripada Django demi Wasp boleh memberi manfaat dalam masa, tenaga dan emosi.
Atas ialah kandungan terperinci Wasp: Jawapan JavaScript kepada Django untuk Pembangunan Web. Untuk maklumat lanjut, sila ikut artikel berkaitan lain di laman web China PHP!

Alat AI Hot

Undresser.AI Undress
Apl berkuasa AI untuk mencipta foto bogel yang realistik

AI Clothes Remover
Alat AI dalam talian untuk mengeluarkan pakaian daripada foto.

Undress AI Tool
Gambar buka pakaian secara percuma

Clothoff.io
Penyingkiran pakaian AI

Video Face Swap
Tukar muka dalam mana-mana video dengan mudah menggunakan alat tukar muka AI percuma kami!

Artikel Panas
Alat panas

Notepad++7.3.1
Editor kod yang mudah digunakan dan percuma

SublimeText3 versi Cina
Versi Cina, sangat mudah digunakan

Hantar Studio 13.0.1
Persekitaran pembangunan bersepadu PHP yang berkuasa

Dreamweaver CS6
Alat pembangunan web visual

SublimeText3 versi Mac
Perisian penyuntingan kod peringkat Tuhan (SublimeText3)
Topik panas
 1673
1673
 14
1429
52
1333
25
1278
29
1257
24
14
1429
52
1333
25
1278
29
1257
24

 Python vs JavaScript: Keluk Pembelajaran dan Kemudahan Penggunaan
Apr 16, 2025 am 12:12 AM
Python vs JavaScript: Keluk Pembelajaran dan Kemudahan Penggunaan
Apr 16, 2025 am 12:12 AM
Python lebih sesuai untuk pemula, dengan lengkung pembelajaran yang lancar dan sintaks ringkas; JavaScript sesuai untuk pembangunan front-end, dengan lengkung pembelajaran yang curam dan sintaks yang fleksibel. 1. Sintaks Python adalah intuitif dan sesuai untuk sains data dan pembangunan back-end. 2. JavaScript adalah fleksibel dan digunakan secara meluas dalam pengaturcaraan depan dan pelayan.
 JavaScript dan Web: Fungsi teras dan kes penggunaan
Apr 18, 2025 am 12:19 AM
JavaScript dan Web: Fungsi teras dan kes penggunaan
Apr 18, 2025 am 12:19 AM
Penggunaan utama JavaScript dalam pembangunan web termasuk interaksi klien, pengesahan bentuk dan komunikasi tak segerak. 1) kemas kini kandungan dinamik dan interaksi pengguna melalui operasi DOM; 2) pengesahan pelanggan dijalankan sebelum pengguna mengemukakan data untuk meningkatkan pengalaman pengguna; 3) Komunikasi yang tidak bersesuaian dengan pelayan dicapai melalui teknologi Ajax.
 JavaScript in Action: Contoh dan projek dunia nyata
Apr 19, 2025 am 12:13 AM
JavaScript in Action: Contoh dan projek dunia nyata
Apr 19, 2025 am 12:13 AM
Aplikasi JavaScript di dunia nyata termasuk pembangunan depan dan back-end. 1) Memaparkan aplikasi front-end dengan membina aplikasi senarai TODO, yang melibatkan operasi DOM dan pemprosesan acara. 2) Membina Restfulapi melalui Node.js dan menyatakan untuk menunjukkan aplikasi back-end.
 Memahami Enjin JavaScript: Butiran Pelaksanaan
Apr 17, 2025 am 12:05 AM
Memahami Enjin JavaScript: Butiran Pelaksanaan
Apr 17, 2025 am 12:05 AM
Memahami bagaimana enjin JavaScript berfungsi secara dalaman adalah penting kepada pemaju kerana ia membantu menulis kod yang lebih cekap dan memahami kesesakan prestasi dan strategi pengoptimuman. 1) aliran kerja enjin termasuk tiga peringkat: parsing, penyusun dan pelaksanaan; 2) Semasa proses pelaksanaan, enjin akan melakukan pengoptimuman dinamik, seperti cache dalam talian dan kelas tersembunyi; 3) Amalan terbaik termasuk mengelakkan pembolehubah global, mengoptimumkan gelung, menggunakan const dan membiarkan, dan mengelakkan penggunaan penutupan yang berlebihan.
 Python vs JavaScript: Komuniti, Perpustakaan, dan Sumber
Apr 15, 2025 am 12:16 AM
Python vs JavaScript: Komuniti, Perpustakaan, dan Sumber
Apr 15, 2025 am 12:16 AM
Python dan JavaScript mempunyai kelebihan dan kekurangan mereka sendiri dari segi komuniti, perpustakaan dan sumber. 1) Komuniti Python mesra dan sesuai untuk pemula, tetapi sumber pembangunan depan tidak kaya dengan JavaScript. 2) Python berkuasa dalam bidang sains data dan perpustakaan pembelajaran mesin, sementara JavaScript lebih baik dalam perpustakaan pembangunan dan kerangka pembangunan depan. 3) Kedua -duanya mempunyai sumber pembelajaran yang kaya, tetapi Python sesuai untuk memulakan dengan dokumen rasmi, sementara JavaScript lebih baik dengan MDNWebDocs. Pilihan harus berdasarkan keperluan projek dan kepentingan peribadi.
 Python vs JavaScript: Persekitaran dan Alat Pembangunan
Apr 26, 2025 am 12:09 AM
Python vs JavaScript: Persekitaran dan Alat Pembangunan
Apr 26, 2025 am 12:09 AM
Kedua -dua pilihan Python dan JavaScript dalam persekitaran pembangunan adalah penting. 1) Persekitaran pembangunan Python termasuk Pycharm, Jupyternotebook dan Anaconda, yang sesuai untuk sains data dan prototaip cepat. 2) Persekitaran pembangunan JavaScript termasuk node.js, vscode dan webpack, yang sesuai untuk pembangunan front-end dan back-end. Memilih alat yang betul mengikut keperluan projek dapat meningkatkan kecekapan pembangunan dan kadar kejayaan projek.
 Peranan C/C dalam JavaScript Jurubah dan Penyusun
Apr 20, 2025 am 12:01 AM
Peranan C/C dalam JavaScript Jurubah dan Penyusun
Apr 20, 2025 am 12:01 AM
C dan C memainkan peranan penting dalam enjin JavaScript, terutamanya digunakan untuk melaksanakan jurubahasa dan penyusun JIT. 1) C digunakan untuk menghuraikan kod sumber JavaScript dan menghasilkan pokok sintaks abstrak. 2) C bertanggungjawab untuk menjana dan melaksanakan bytecode. 3) C melaksanakan pengkompil JIT, mengoptimumkan dan menyusun kod hot-spot semasa runtime, dan dengan ketara meningkatkan kecekapan pelaksanaan JavaScript.
 Python vs JavaScript: Gunakan Kes dan Aplikasi Membandingkan
Apr 21, 2025 am 12:01 AM
Python vs JavaScript: Gunakan Kes dan Aplikasi Membandingkan
Apr 21, 2025 am 12:01 AM
Python lebih sesuai untuk sains data dan automasi, manakala JavaScript lebih sesuai untuk pembangunan front-end dan penuh. 1. Python berfungsi dengan baik dalam sains data dan pembelajaran mesin, menggunakan perpustakaan seperti numpy dan panda untuk pemprosesan data dan pemodelan. 2. Python adalah ringkas dan cekap dalam automasi dan skrip. 3. JavaScript sangat diperlukan dalam pembangunan front-end dan digunakan untuk membina laman web dinamik dan aplikasi satu halaman. 4. JavaScript memainkan peranan dalam pembangunan back-end melalui Node.js dan menyokong pembangunan stack penuh.
