
 pembangunan bahagian belakang
Tutorial Python
Automatikkan Proses Bina, Uji & Pasang dengan Tindakan GitHub
pembangunan bahagian belakang
Tutorial Python
Automatikkan Proses Bina, Uji & Pasang dengan Tindakan GitHub
Automatikkan Proses Bina, Uji & Pasang dengan Tindakan GitHub

Projek ini ialah projek contoh pantas yang menunjukkan automasi proses binaan, ujian dan penggunaan aplikasi kepada persekitaran pementasan semasa menolak ke cawangan utama.
Untuk menunjukkan saluran paip CI/CD dengan secukupnya, kami akan mencipta projek Python mudah dengan kod minimum dan kemudian menyepadukannya ke dalam Tindakan GitHub.
Buat Projek Python Mudah
Seperti yang saya nyatakan sebelum ini, kami akan membuat projek mudah yang akan kami gunakan dalam perancangan kami. Saya memilih untuk melakukan ini dalam python tanpa sebab tertentu, anda boleh menggunakan mana-mana bahasa pengaturcaraan lain yang anda pilih, utama projek ini adalah untuk menunjukkan saluran paip.
Buat Folder Projek
Jadi, teruskan dan buat folder projek dan navigasi ke dalam folder itu:
mkdir automated-testing
cd automated-testing
Tulis Fail Permohonan
Sekarang kita akan menulis aplikasi python mudah. Cipta fail app.py baharu dalam folder projek.
touch app.py
Tambahkan blok kod di bawah pada fail:
def hello():
  return "Hello, World!"

if __name__ == "__main__":
  print(hello())
Ini ialah fungsi "Hello world" ular sawa yang sangat mudah yang berfungsi sebagai contoh fungsi asas yang boleh diuji dalam saluran paip CI.
def hello() mentakrifkan fungsi bernama hello yang tidak memerlukan hujah. Apabila fungsi ini dipanggil, ia mengembalikan rentetan "Hello, World!".
if __name__ == "__main__" ialah binaan Python standard yang digunakan untuk memastikan bahawa kod tertentu hanya berjalan apabila fail dilaksanakan secara langsung (bukan apabila diimport sebagai modul). Ia bertindak sebagai titik masuk untuk skrip.
Apabila app.py dijalankan secara langsung (cth., dengan menjalankan python app.py), skrip akan memanggil fungsi hello() dan mencetak hasilnya, iaitu "Hello, World!".
Buat Fail Keperluan.
Projek biasa akan mempunyai kebergantungan dan dalam projek ular sawa mereka biasanya ditakrifkan dalam fail requirements.txt.
Buat keperluan fail baharu.txt
touch requirements.txt
Tambahkan ini pada fail:
pytest
Buat Ujian Unit
Kini kami akan menambah fail ujian asas, test_app.py, untuk menguji fungsi dalam app.py. Tambahkan di bawah pada fail:
from app import hello

def test_hello():
  assert hello() == "Hello, World!"
Kini kami bersedia untuk mencipta saluran paip kami.
Sediakan Tindakan GitHub untuk CI/CD
Untuk mengkonfigurasi tindakan GitHub, kami perlu mencipta folder .github/workflows di dalam repo kami, ini adalah cara kami memberitahu GitHub tentang saluran paip CI/CD dalam repo kami.
Buat fail baharu:
mkdir -p .github/workflows
Anda boleh mempunyai berbilang saluran paip dalam satu repo, jadi buat fail proj.yml dalam folder .github/workflows. Di sinilah kami akan menentukan langkah untuk membina, menguji dan menggunakan projek Python kami.
Tambahkan kod di bawah pada fail anda:
name: Build, Test and Deploy

# Trigger the workflow on pushes to the main branch
on:
  push:
    branches:
      - main

jobs:
  build-and-test:
    runs-on: ubuntu-latest

    steps:
    # Checkout the code from the repository
    - name: Checkout repo
      uses: actions/checkout@v4

    # Set up Python environment
    - name: Setup Python
      uses: actions/setup-python@v5
      with:
        python-version: '3.x'

    # Install dependencies
    - name: Install Dependecies
      run: |
        python -m pip install --upgrade pip
        pip install -r requirements.txt

    # Build (this project deosn't require a build but we will simulate a build by creating a file)
    - name: Build Project
      run: |
        mkdir -p build
        # Simulate build output by creating a file
        touch build/output_file.txt

    # Run tests using pytest
    - name: Run tests
      run:
        pytest

    # Upload the build output as an artifact (we created a file in the build step to simulate an artifact)
    - name: Upload build artifact
      uses: actions/upload-artifact@v4
      with:
        name: build-artifact
        path: build/

  deploy:
    runs-on: ubuntu-latest
    needs: build-and-test
    if: success()

    steps:
    # Download the artifact from the build stage
    - name: Download build artifact
      uses: actions/download-artifact@v4
      with:
        name: build-artifact
        path: build/

    - name: Simulate Deployment
      run: |
        echo "Deploying to staging..."
        ls build/
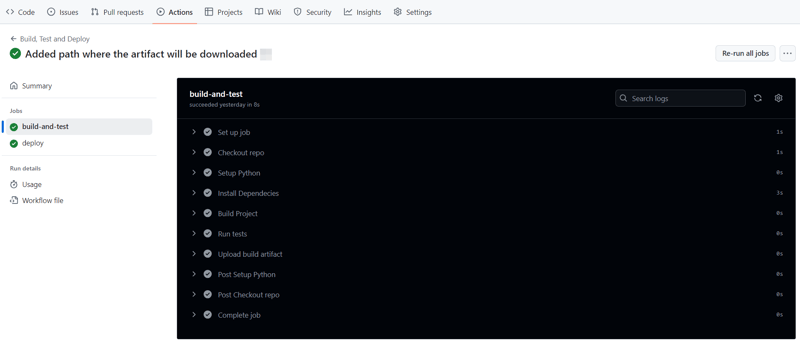
Breakdown of the CI/CD Pipeline Steps
- Trigger on Push to main: The pipeline is triggered whenever there is a push to the main branch.
- Checkout Code: This step uses GitHub’s checkout action to pull our code from the repository.
- Set Up Python: The pipeline sets up a Python environment on the CI runner (GitHub's virtual machine), ensuring that the correct Python version is used.
- Install Dependencies: It installs the required dependencies for our Python project (pytest in this case). This dependency was just added as an example of when a project has dependencies as this particular sample python application does not require any.
- Build: This stage was also just added for demonstration purposes, supposing this was a JavaScript/Node.js project this is where we would run the npm run build command and this will create an artifact we can upload and use in the deploy stage. Since this is a python project and it doesn't really require a build, we will create a file and folder in this stage. The file will serve as our artifact for the deploy stage.
- Run Tests: It runs the tests using pytest to validate the code.
- Upload Build Artifact: After running the tests, the build-and-test stage creates and saves a build artifact (in this case, a simulated output_file.txt in the build folder from the build step). The action upload-artifact is used to store this artifact. You can replace this with whatever actual build output your project creates.
- Deploy Stage: Our application will only be deployed if the test was successful which is why I have added the conditionals needs and if. Using “needs” we can require that the deploy job won’t even run unless the test job is successful. The download-artifact action retrieves the build artifact and the last step "Simulate Deployment" simulates deployment by printing a message and lists the artifact. If this was a live project we would have the actual deployment commands to deploy to a real staging environment here. You can replace the echo and ls commands with actual deployment commands (e.g., deploying to a cloud platform). This approach ensures that the output from the build-and-test stage is properly passed to the deploy stage, simulating how a real deployment would work with build artifacts.
Push to GitHub
If you haven't already, you need to initialize a git repository using the commands below:
git init
git add .
git commit -m "Create project as well as CI/CD pipeline"
Now we push to GitHub. Create a GitHub repository and push your code using the below commands:
git remote add origin <your-repo-url>
git push -u origin main
Verify the Pipeline
After pushing the code, you can visit the Actions tab in your GitHub repository. You should see the pipeline triggered, running the steps defined in your proj.yml file.
If everything is set up correctly, the pipeline will build, test, and simulate deployment. You can changes things around in your project and make new pushes to see the the pipeline works, create errors intentional so you can see how the pipeline works when the tests fail.
On a successful run this is how your Actions tab should look.
And that's it, this setup provides a working example of a CI/CD pipeline for a very basic Python project. If you found this helpful, please share with your connection and if you have any questions, do not hesitate to drop the question in the comments.
Atas ialah kandungan terperinci Automatikkan Proses Bina, Uji & Pasang dengan Tindakan GitHub. Untuk maklumat lanjut, sila ikut artikel berkaitan lain di laman web China PHP!

Alat AI Hot

Undresser.AI Undress
Apl berkuasa AI untuk mencipta foto bogel yang realistik

AI Clothes Remover
Alat AI dalam talian untuk mengeluarkan pakaian daripada foto.

Undress AI Tool
Gambar buka pakaian secara percuma

Clothoff.io
Penyingkiran pakaian AI

Video Face Swap
Tukar muka dalam mana-mana video dengan mudah menggunakan alat tukar muka AI percuma kami!

Artikel Panas
Alat panas

Notepad++7.3.1
Editor kod yang mudah digunakan dan percuma

SublimeText3 versi Cina
Versi Cina, sangat mudah digunakan

Hantar Studio 13.0.1
Persekitaran pembangunan bersepadu PHP yang berkuasa

Dreamweaver CS6
Alat pembangunan web visual

SublimeText3 versi Mac
Perisian penyuntingan kod peringkat Tuhan (SublimeText3)
Topik panas


 Bagaimana untuk mengelakkan dikesan oleh penyemak imbas apabila menggunakan fiddler di mana-mana untuk membaca lelaki-dalam-tengah?
Apr 02, 2025 am 07:15 AM
Bagaimana untuk mengelakkan dikesan oleh penyemak imbas apabila menggunakan fiddler di mana-mana untuk membaca lelaki-dalam-tengah?
Apr 02, 2025 am 07:15 AM
Cara mengelakkan dikesan semasa menggunakan fiddlerevery di mana untuk bacaan lelaki-dalam-pertengahan apabila anda menggunakan fiddlerevery di mana ...
 Bagaimana untuk mengendalikan parameter pertanyaan senarai yang dipisahkan koma di FastAPI?
Apr 02, 2025 am 06:51 AM
Bagaimana untuk mengendalikan parameter pertanyaan senarai yang dipisahkan koma di FastAPI?
Apr 02, 2025 am 06:51 AM
Fastapi ...
 Bagaimana menyelesaikan masalah kebenaran apabila menggunakan perintah Python -version di Terminal Linux?
Apr 02, 2025 am 06:36 AM
Bagaimana menyelesaikan masalah kebenaran apabila menggunakan perintah Python -version di Terminal Linux?
Apr 02, 2025 am 06:36 AM
Menggunakan Python di Terminal Linux ...
 Bagaimana Mengajar Asas Pengaturcaraan Pemula Komputer Dalam Kaedah Projek dan Masalah Dikemukakan Dalam masa 10 Jam?
Apr 02, 2025 am 07:18 AM
Bagaimana Mengajar Asas Pengaturcaraan Pemula Komputer Dalam Kaedah Projek dan Masalah Dikemukakan Dalam masa 10 Jam?
Apr 02, 2025 am 07:18 AM
Bagaimana Mengajar Asas Pengaturcaraan Pemula Komputer Dalam masa 10 jam? Sekiranya anda hanya mempunyai 10 jam untuk mengajar pemula komputer beberapa pengetahuan pengaturcaraan, apa yang akan anda pilih untuk mengajar ...
 Sambungan Python Asyncio Telnet diputuskan dengan segera: Bagaimana menyelesaikan masalah menyekat pelayan?
Apr 02, 2025 am 06:30 AM
Sambungan Python Asyncio Telnet diputuskan dengan segera: Bagaimana menyelesaikan masalah menyekat pelayan?
Apr 02, 2025 am 06:30 AM
Mengenai Pythonasyncio ...
 Bagaimana untuk mendapatkan data berita yang melangkaui mekanisme anti-crawler Investing.com?
Apr 02, 2025 am 07:03 AM
Bagaimana untuk mendapatkan data berita yang melangkaui mekanisme anti-crawler Investing.com?
Apr 02, 2025 am 07:03 AM
Memahami Strategi Anti-Crawling of Investing.com Ramai orang sering cuba merangkak data berita dari Investing.com (https://cn.investing.com/news/latest-news) ...
 Python 3.6 Memuatkan Ralat Fail Pickle ModulenotFoundError: Apa yang perlu saya lakukan jika saya memuatkan fail acar '__builtin__'?
Apr 02, 2025 am 06:27 AM
Python 3.6 Memuatkan Ralat Fail Pickle ModulenotFoundError: Apa yang perlu saya lakukan jika saya memuatkan fail acar '__builtin__'?
Apr 02, 2025 am 06:27 AM
Memuatkan Fail Pickle di Python 3.6 Kesalahan Alam Sekitar: ModulenotFoundError: Nomodulenamed ...
 Apakah sebab mengapa fail saluran paip tidak dapat ditulis apabila menggunakan crawler scapy?
Apr 02, 2025 am 06:45 AM
Apakah sebab mengapa fail saluran paip tidak dapat ditulis apabila menggunakan crawler scapy?
Apr 02, 2025 am 06:45 AM
Perbincangan mengenai sebab -sebab mengapa fail saluran paip tidak dapat ditulis apabila menggunakan crawler scapy apabila belajar dan menggunakan crawler scapy untuk penyimpanan data yang berterusan, anda mungkin menghadapi fail saluran paip ...
