
 pembangunan bahagian belakang
Tutorial Python
Pengenalan Kepada Penglihatan Komputer dengan Python (Bahagian 1)
pembangunan bahagian belakang
Tutorial Python
Pengenalan Kepada Penglihatan Komputer dengan Python (Bahagian 1)
Pengenalan Kepada Penglihatan Komputer dengan Python (Bahagian 1)

Note: In this post, we will only be working with Grey-Scale images to make it easy to follow.
What is an Image?
An image can be thought of as a matrix of values, where each value represents the intensity of a pixel. There are three main types of image formats:
- Binary: An image in this format is represented by a single 2-D matrix with values of 0 (black) and 1 (white). It's the simplest form of image representation.

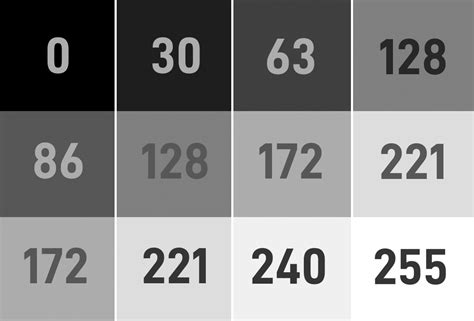
- Grey-Scale: In this format, an image is represented by a single 2-D matrix with values ranging from 0 to 255; where 0 represents black and 255 represents white. The intermediate values represent varying shades of grey.
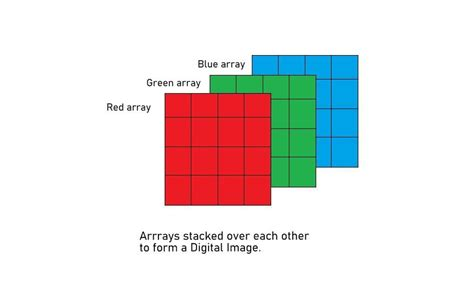
- RGB Scale: Here, an image is represented by three 2-D matrices (one for each color channel: Red, Green, and Blue), with values ranging from 0 to 255. Each matrix contains pixel values for one color component, and combining these three channels gives us the full color image.
Filters
Filters are tools used to modify images by applying certain operations. A filter is a matrix (also called a kernel) that moves across the image, performing computations on the pixel values within its window. We’ll cover two common types of filters: Mean Filters and Median Filters.
Mean Filters
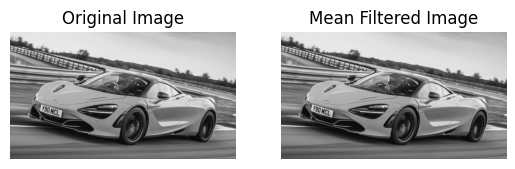
A Mean Filter is used to reduce noise by averaging the pixel values within a window. It replaces the center pixel in the window with the average of all the pixel values within that window. The cv2.blur() function applies a mean filter with a kernel size of 3x3, which means it considers a 3x3 window of pixels around each pixel to compute the average. This helps in smoothing the image.
import cv2
import matplotlib.pyplot as plt

image = cv2.imread('McLaren-720S-Price-1200x675.jpg', cv2.IMREAD_GRAYSCALE)

# Applies a Mean Filter of size 3 x 3
blurred_image = cv2.blur(image, (3, 3))

plt.subplot(1, 2, 1)
plt.imshow(image, cmap='gray')
plt.title('Original Image')
plt.axis("off")

plt.subplot(1, 2, 2)
plt.imshow(blurred_image, cmap='gray')
plt.title('Mean Filtered Image')
plt.axis("off")
plt.show()
Median Filters
A Median Filter is used to reduce noise by replacing each pixel's value with the median value of all pixels in a window. It’s particularly effective in removing salt-and-pepper noise. The cv2.medianBlur() function applies a median filter with a kernel size of 3. This method replaces each pixel with the median value of the pixel values in its neighborhood, which helps in preserving edges while removing noise. Here the larger the kernel size the more blurred the image gets.
import cv2
import matplotlib.pyplot as plt

image = cv2.imread('McLaren-720S-Price-1200x675.jpg', cv2.IMREAD_GRAYSCALE)

# Applies a Median Filter with a kernel size of 3
blurred_image = cv2.medianBlur(image, 3)

plt.subplot(1, 2, 1)
plt.imshow(image, cmap='gray')
plt.title('Original Image')
plt.axis("off")

plt.subplot(1, 2, 2)
plt.imshow(blurred_image, cmap='gray')
plt.title('Median Filtered Image')
plt.axis("off")
plt.show()

Custom Filters
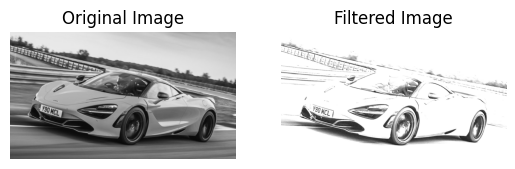
You can create custom filters to apply specific operations on your images. The cv2.filter2D() function allows you to apply any custom kernel to an image. The cv2.filter2D() function applies a custom kernel (filter) to the image. The kernel is a matrix that defines the operation to be performed on the pixel values. In this example, the kernel enhances certain features of the image based on the specified values.
import cv2
import numpy as np
import matplotlib.pyplot as plt

image = cv2.imread('McLaren-720S-Price-1200x675.jpg', cv2.IMREAD_GRAYSCALE)

# Define a custom filter kernel
kernel = np.array([[2, -1, 5],
                   [-5, 5, -1],
                   [0, -1, 0]])

filtered_image = cv2.filter2D(image, -1, kernel)

plt.subplot(1, 2, 1)
plt.imshow(image, cmap='gray')
plt.title('Original Image')
plt.axis('off')

plt.subplot(1, 2, 2)
plt.imshow(filtered_image, cmap='gray')
plt.title('Filtered Image')
plt.axis('off')

plt.show()
Thresholding
Note: In the code snippets, you will see _ , image when assigning the thresholded image. This is because the cv2.threshold function returns two values: the threshold value used and the thresholded image. Since we only need the thresholded image, we use _ to ignore the threshold value.
Thresholding converts an image into a binary image by setting pixel values based on a condition. There are several types of thresholding techniques:
Global Thresholding
Simple Thresholding
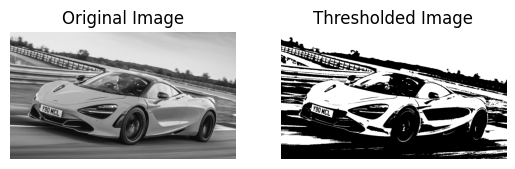
This method sets a fixed threshold value for the entire image. Pixels with values above the threshold are set to the maximum value (255), and those below are set to 0. The cv2.threshold() function is used for simple thresholding. Pixels with intensity greater than 127 are set to white (255), and those with intensity less than or equal to 127 are set to black (0), producing a binary image.
import cv2
import matplotlib.pyplot as plt

image = cv2.imread('McLaren-720S-Price-1200x675.jpg', cv2.IMREAD_GRAYSCALE)

_, thresholded_image = cv2.threshold(image, 127, 255, cv2.THRESH_BINARY)

plt.subplot(1, 2, 1)
plt.imshow(image, cmap='gray')
plt.title('Original Image')
plt.axis("off")

plt.subplot(1, 2, 2)
plt.imshow(thresholded_image, cmap='gray')
plt.title('Thresholded Image')
plt.axis("off")
plt.show()
Otsu Thresholding
Otsu's method determines the optimal threshold value automatically based on the histogram of the image. This method minimizes intra-class variance and maximizes inter-class variance. By setting the threshold value to 0 and using cv2.THRESH_OTSU, the function automatically calculates the best threshold value to separate the foreground from the background.
import cv2
import matplotlib.pyplot as plt

image = cv2.imread('McLaren-720S-Price-1200x675.jpg', cv2.IMREAD_GRAYSCALE)

_, otsu_thresholded_image = cv2.threshold(image, 0, 255, cv2.THRESH_BINARY + cv2.THRESH_OTSU)

plt.subplot(1, 2, 1)
plt.imshow(image, cmap='gray')
plt.title('Original Image')
plt.axis("off")

plt.subplot(1, 2, 2)
plt.imshow(otsu_thresholded_image, cmap='gray')
plt.title("Otsu's Thresholded Image")
plt.axis("off")
plt.show()

Adaptive Thresholding
Mean Adaptive Thresholding
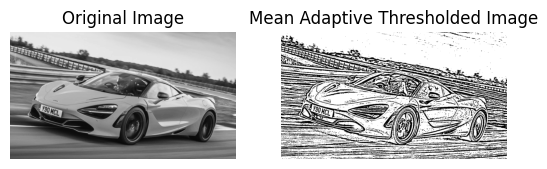
In Mean Adaptive Thresholding, the threshold value for each pixel is calculated based on the average of pixel values in a local neighborhood around that pixel. This method adjusts the threshold dynamically across different regions of the image. The cv2.adaptiveThreshold() function calculates the threshold for each pixel based on the mean value of the pixel values in a local 11x11 neighborhood. A constant value of 2 is subtracted from this mean to fine-tune the threshold. This method is effective for images with varying lighting conditions.
import cv2
import matplotlib.pyplot as plt

image = cv2.imread('McLaren-720S-Price-1200x675.jpg', cv2.IMREAD_GRAYSCALE)

mean_adaptive_thresholded_image = cv2.adaptiveThreshold(image, 255, cv2.ADAPTIVE_THRESH_MEAN_C, cv2.THRESH_BINARY, 11, 2)

plt.subplot(1, 2, 1)
plt.imshow(image, cmap='gray')
plt.title('Original Image')
plt.axis("off")

plt.subplot(1, 2, 2)
plt.imshow(mean_adaptive_thresholded_image, cmap='gray')
plt.title('Mean Adaptive Thresholded Image')
plt.axis("off")
plt.show()
Gaussian Adaptive Thresholding
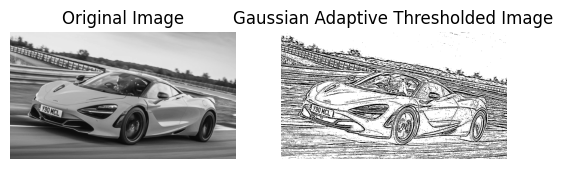
Gaussian Adaptive Thresholding computes the threshold value for each pixel based on a Gaussian-weighted sum of the pixel values in a local neighborhood. This method often provides better results in cases with non-uniform illumination. In Gaussian Adaptive Thresholding, the threshold is determined by a Gaussian-weighted sum of pixel values in an 11x11 neighborhood. The constant value 2 is subtracted from this weighted mean to adjust the threshold. This method is useful for handling images with varying lighting and shadows.
import cv2
import matplotlib.pyplot as plt

image = cv2.imread('McLaren-720S-Price-1200x675.jpg', cv2.IMREAD_GRAYSCALE)

gaussian_adaptive_thresholded_image = cv2.adaptiveThreshold(image, 255, cv2.ADAPTIVE_THRESH_GAUSSIAN_C, cv2.THRESH_BINARY, 11, 2)

plt.subplot(1, 2, 1)
plt.imshow(image, cmap='gray')
plt.title('Original Image')
plt.axis("off")

plt.subplot(1, 2, 2)
plt.imshow(gaussian_adaptive_thresholded_image, cmap='gray')
plt.title('Gaussian Adaptive Thresholded Image')
plt.axis("off")
plt.show()
References
- Encord.com
- Pyimagesearch.com
- OpenCV Thresholding
- OpenCV Filtering
Atas ialah kandungan terperinci Pengenalan Kepada Penglihatan Komputer dengan Python (Bahagian 1). Untuk maklumat lanjut, sila ikut artikel berkaitan lain di laman web China PHP!

Alat AI Hot

Undresser.AI Undress
Apl berkuasa AI untuk mencipta foto bogel yang realistik

AI Clothes Remover
Alat AI dalam talian untuk mengeluarkan pakaian daripada foto.

Undress AI Tool
Gambar buka pakaian secara percuma

Clothoff.io
Penyingkiran pakaian AI

Video Face Swap
Tukar muka dalam mana-mana video dengan mudah menggunakan alat tukar muka AI percuma kami!

Artikel Panas
Alat panas

Notepad++7.3.1
Editor kod yang mudah digunakan dan percuma

SublimeText3 versi Cina
Versi Cina, sangat mudah digunakan

Hantar Studio 13.0.1
Persekitaran pembangunan bersepadu PHP yang berkuasa

Dreamweaver CS6
Alat pembangunan web visual

SublimeText3 versi Mac
Perisian penyuntingan kod peringkat Tuhan (SublimeText3)
Topik panas
 1675
1675
 14
1429
52
1333
25
1278
29
1257
24
14
1429
52
1333
25
1278
29
1257
24

 Python vs C: Lengkung pembelajaran dan kemudahan penggunaan
Apr 19, 2025 am 12:20 AM
Python vs C: Lengkung pembelajaran dan kemudahan penggunaan
Apr 19, 2025 am 12:20 AM
Python lebih mudah dipelajari dan digunakan, manakala C lebih kuat tetapi kompleks. 1. Sintaks Python adalah ringkas dan sesuai untuk pemula. Penaipan dinamik dan pengurusan memori automatik menjadikannya mudah digunakan, tetapi boleh menyebabkan kesilapan runtime. 2.C menyediakan kawalan peringkat rendah dan ciri-ciri canggih, sesuai untuk aplikasi berprestasi tinggi, tetapi mempunyai ambang pembelajaran yang tinggi dan memerlukan memori manual dan pengurusan keselamatan jenis.
 Pembelajaran Python: Adakah 2 jam kajian harian mencukupi?
Apr 18, 2025 am 12:22 AM
Pembelajaran Python: Adakah 2 jam kajian harian mencukupi?
Apr 18, 2025 am 12:22 AM
Adakah cukup untuk belajar Python selama dua jam sehari? Ia bergantung pada matlamat dan kaedah pembelajaran anda. 1) Membangunkan pelan pembelajaran yang jelas, 2) Pilih sumber dan kaedah pembelajaran yang sesuai, 3) mengamalkan dan mengkaji semula dan menyatukan amalan tangan dan mengkaji semula dan menyatukan, dan anda secara beransur-ansur boleh menguasai pengetahuan asas dan fungsi lanjutan Python dalam tempoh ini.
 Python vs C: Meneroka Prestasi dan Kecekapan
Apr 18, 2025 am 12:20 AM
Python vs C: Meneroka Prestasi dan Kecekapan
Apr 18, 2025 am 12:20 AM
Python lebih baik daripada C dalam kecekapan pembangunan, tetapi C lebih tinggi dalam prestasi pelaksanaan. 1. Sintaks ringkas Python dan perpustakaan yang kaya meningkatkan kecekapan pembangunan. 2. Ciri-ciri jenis kompilasi dan kawalan perkakasan meningkatkan prestasi pelaksanaan. Apabila membuat pilihan, anda perlu menimbang kelajuan pembangunan dan kecekapan pelaksanaan berdasarkan keperluan projek.
 Python vs C: Memahami perbezaan utama
Apr 21, 2025 am 12:18 AM
Python vs C: Memahami perbezaan utama
Apr 21, 2025 am 12:18 AM
Python dan C masing -masing mempunyai kelebihan sendiri, dan pilihannya harus berdasarkan keperluan projek. 1) Python sesuai untuk pembangunan pesat dan pemprosesan data kerana sintaks ringkas dan menaip dinamik. 2) C sesuai untuk prestasi tinggi dan pengaturcaraan sistem kerana menaip statik dan pengurusan memori manual.
 Yang merupakan sebahagian daripada Perpustakaan Standard Python: Senarai atau Array?
Apr 27, 2025 am 12:03 AM
Yang merupakan sebahagian daripada Perpustakaan Standard Python: Senarai atau Array?
Apr 27, 2025 am 12:03 AM
Pythonlistsarepartofthestandardlibrary, sementara
 Python: Automasi, skrip, dan pengurusan tugas
Apr 16, 2025 am 12:14 AM
Python: Automasi, skrip, dan pengurusan tugas
Apr 16, 2025 am 12:14 AM
Python cemerlang dalam automasi, skrip, dan pengurusan tugas. 1) Automasi: Sandaran fail direalisasikan melalui perpustakaan standard seperti OS dan Shutil. 2) Penulisan Skrip: Gunakan Perpustakaan Psutil untuk memantau sumber sistem. 3) Pengurusan Tugas: Gunakan perpustakaan jadual untuk menjadualkan tugas. Kemudahan penggunaan Python dan sokongan perpustakaan yang kaya menjadikannya alat pilihan di kawasan ini.
 Python untuk pengkomputeran saintifik: rupa terperinci
Apr 19, 2025 am 12:15 AM
Python untuk pengkomputeran saintifik: rupa terperinci
Apr 19, 2025 am 12:15 AM
Aplikasi Python dalam pengkomputeran saintifik termasuk analisis data, pembelajaran mesin, simulasi berangka dan visualisasi. 1.Numpy menyediakan susunan pelbagai dimensi yang cekap dan fungsi matematik. 2. Scipy memanjangkan fungsi numpy dan menyediakan pengoptimuman dan alat algebra linear. 3. Pandas digunakan untuk pemprosesan dan analisis data. 4.Matplotlib digunakan untuk menghasilkan pelbagai graf dan hasil visual.
 Python untuk Pembangunan Web: Aplikasi Utama
Apr 18, 2025 am 12:20 AM
Python untuk Pembangunan Web: Aplikasi Utama
Apr 18, 2025 am 12:20 AM
Aplikasi utama Python dalam pembangunan web termasuk penggunaan kerangka Django dan Flask, pembangunan API, analisis data dan visualisasi, pembelajaran mesin dan AI, dan pengoptimuman prestasi. 1. Rangka Kerja Django dan Flask: Django sesuai untuk perkembangan pesat aplikasi kompleks, dan Flask sesuai untuk projek kecil atau sangat disesuaikan. 2. Pembangunan API: Gunakan Flask atau DjangorestFramework untuk membina Restfulapi. 3. Analisis Data dan Visualisasi: Gunakan Python untuk memproses data dan memaparkannya melalui antara muka web. 4. Pembelajaran Mesin dan AI: Python digunakan untuk membina aplikasi web pintar. 5. Pengoptimuman Prestasi: Dioptimumkan melalui pengaturcaraan, caching dan kod tak segerak
