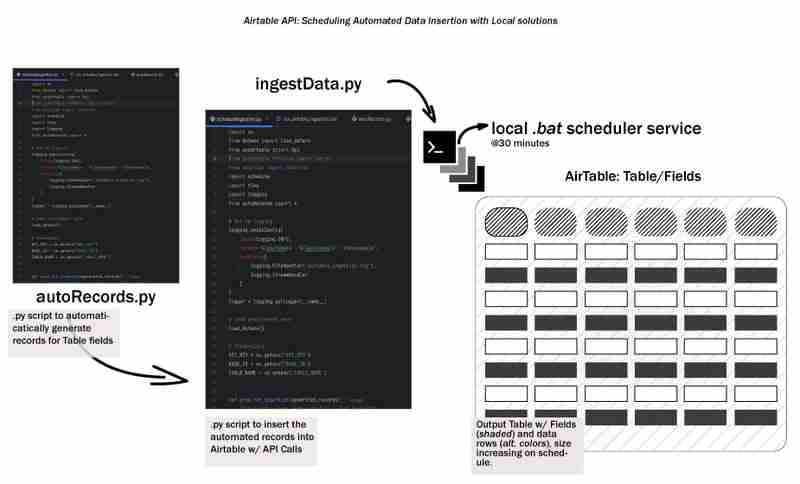

Kitaran hayat data keseluruhan bermula dengan menjana data dan menyimpannya dalam beberapa cara, di suatu tempat. Mari kita panggil ini sebagai kitaran hayat data peringkat awal dan kami akan meneroka cara untuk mengautomasikan pengingesan data ke dalam Airtable menggunakan aliran kerja setempat. Kami akan meliputi penyediaan persekitaran pembangunan, mereka bentuk proses pengingesan, mencipta skrip kelompok dan menjadualkan aliran kerja - memastikan perkara mudah, setempat/boleh dihasilkan semula dan boleh diakses.
Mula-mula, mari bercakap tentang Airtable. Airtable ialah alat yang berkuasa dan fleksibel yang menggabungkan kesederhanaan hamparan dengan struktur pangkalan data. Saya rasa ia sesuai untuk mengatur maklumat, mengurus projek, menjejaki tugas dan ia mempunyai peringkat percuma!
Kami akan membangunkan projek ini dengan python, jadi makan tengahari IDE kegemaran anda dan cipta persekitaran maya
# from your terminal
python -m venv <environment_name>
<environment_name>\Scripts\activate
Untuk bermula dengan Airtable, pergi ke tapak web Airtable. Sebaik sahaja anda telah mendaftar untuk akaun percuma, anda perlu membuat Ruang Kerja baharu. Fikirkan Ruang Kerja sebagai bekas untuk semua jadual dan data anda yang berkaitan.
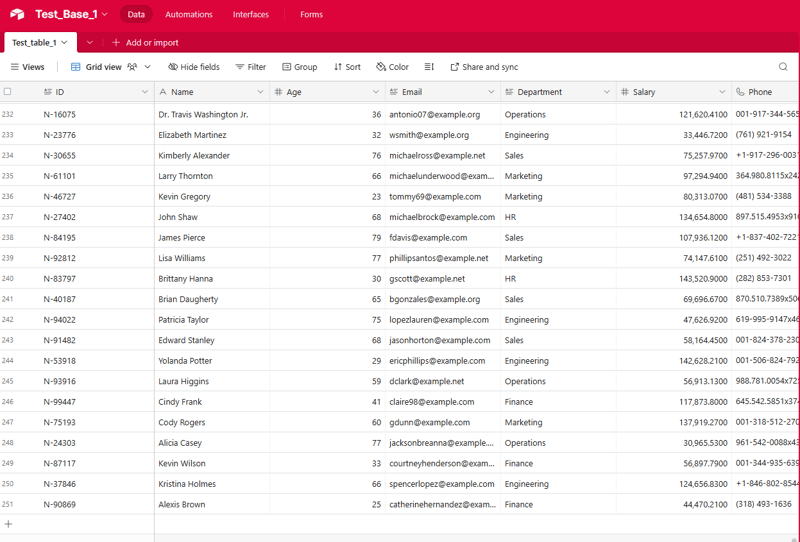
Seterusnya, buat Jadual baharu dalam Ruang Kerja anda. Jadual pada asasnya ialah hamparan tempat anda akan menyimpan data anda. Tentukan Medan (lajur) dalam Jadual anda untuk memadankan struktur data anda.
Berikut ialah coretan medan yang digunakan dalam tutorial, ia adalah gabungan Teks, Tarikh dan Nombor:

Untuk menyambungkan skrip anda ke Airtable, anda perlu menjana Kunci API atau Token Akses Peribadi. Kunci ini bertindak sebagai kata laluan, membenarkan skrip anda berinteraksi dengan data Airtable anda. Untuk menjana kunci, navigasi ke tetapan akaun Airtable anda, cari bahagian API dan ikut arahan untuk membuat kunci baharu.
*Ingat untuk memastikan kunci API anda selamat. Elakkan berkongsinya secara terbuka atau menyerahkannya ke repositori awam. *
Seterusnya, sentuh keperluan.txt. Di dalam fail .txt ini letakkan pakej berikut:
pyairtable
schedule
faker
python-dotenv
kini jalankan pip install -r requirements.txt untuk memasang pakej yang diperlukan.
Langkah ini ialah di mana kami mencipta skrip, .env ialah tempat kami akan menyimpan bukti kelayakan kami, autoRecords.py - untuk menjana data secara rawak untuk medan yang ditentukan dan ingestData.py untuk memasukkan rekod ke Airtable.

# from your terminal
python -m venv <environment_name>
<environment_name>\Scripts\activate
Bunyinya bagus, mari kita kumpulkan kandungan subtopik tertumpu untuk catatan blog anda pada penjana data pekerja ini.
Apabila mengerjakan projek yang melibatkan data pekerja, selalunya membantu untuk mempunyai cara yang boleh dipercayai untuk menjana data sampel yang realistik. Sama ada anda sedang membina sistem pengurusan HR, direktori pekerja atau apa-apa sahaja di antaranya, mempunyai akses kepada data ujian yang mantap boleh menyelaraskan pembangunan anda dan menjadikan aplikasi anda lebih berdaya tahan.
Dalam bahagian ini, kami akan meneroka skrip Python yang menjana rekod pekerja rawak dengan pelbagai medan yang berkaitan. Alat ini boleh menjadi aset yang berharga apabila anda perlu mengisi aplikasi anda dengan data yang realistik dengan cepat dan mudah.
Langkah pertama dalam proses penjanaan data kami ialah mencipta pengecam unik untuk setiap rekod pekerja. Ini adalah pertimbangan penting, kerana permohonan anda mungkin memerlukan cara untuk merujuk secara unik setiap pekerja individu. Skrip kami termasuk fungsi mudah untuk menjana ID ini:
pyairtable
schedule
faker
python-dotenv
Fungsi ini menjana ID unik dalam format "N-####", di mana nombornya ialah nilai rawak 5 digit. Anda boleh menyesuaikan format ini untuk memenuhi keperluan khusus anda.
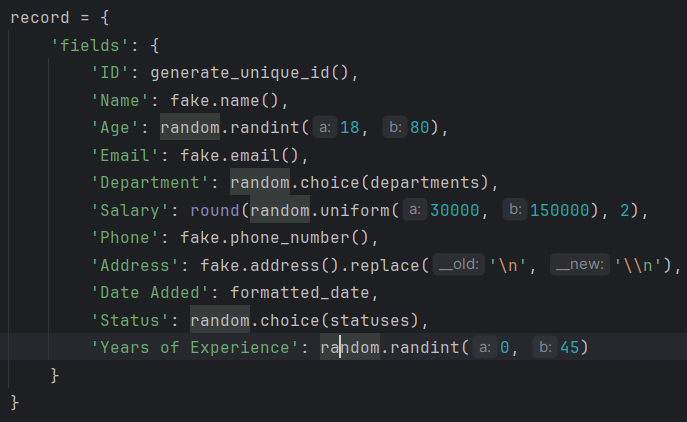
Seterusnya, mari kita lihat fungsi teras yang menjana rekod pekerja itu sendiri. Fungsi generate_random_records() mengambil bilangan rekod untuk dibuat sebagai input dan mengembalikan senarai kamus, di mana setiap kamus mewakili pekerja dengan pelbagai medan:
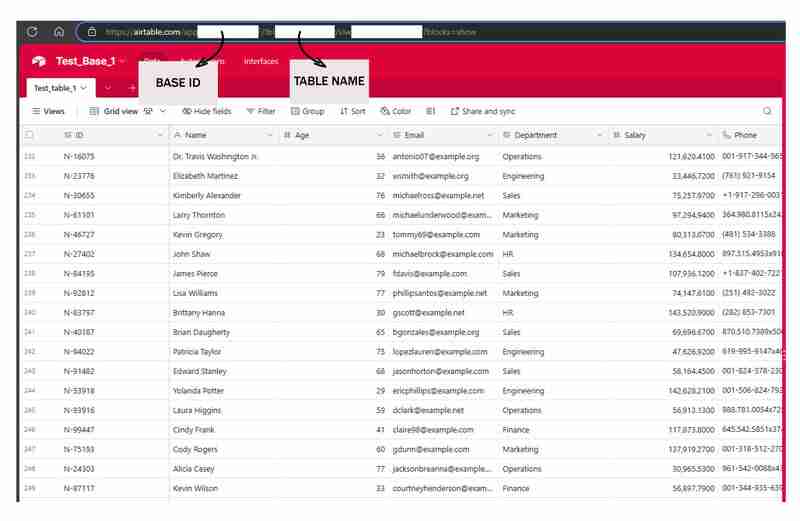
"https://airtable.com/app########/tbl######/viw####?blocks=show"
BASE_ID = 'app########'
TABLE_NAME = 'tbl######'
API_KEY = '#######'
Fungsi ini menggunakan perpustakaan Faker untuk menjana data yang kelihatan realistik untuk pelbagai medan pekerja, seperti nama, e-mel, nombor telefon dan alamat. Ia juga termasuk beberapa kekangan asas, seperti mengehadkan julat umur dan julat gaji kepada nilai yang munasabah.
Fungsi ini mengembalikan senarai kamus, di mana setiap kamus mewakili rekod pekerja dalam format yang serasi dengan Jadual Udara.
Akhir sekali, mari lihat fungsi prepare_records_for_airtable(), yang mengambil senarai rekod pekerja dan mengekstrak bahagian 'medan' setiap rekod. Ini ialah format yang dijangkakan oleh Airtable untuk mengimport data:
def generate_unique_id():
    """Generate a Unique ID in the format N-#####"""
    return f"N-{random.randint(10000, 99999)}"
Fungsi ini memudahkan struktur data, menjadikannya lebih mudah untuk digunakan apabila menyepadukan data yang dijana dengan Airtable atau sistem lain.
Menyatukan Semuanya
Untuk menggunakan alat penjanaan data ini, kita boleh memanggil fungsi generate_random_records() dengan bilangan rekod yang dikehendaki, dan kemudian hantar senarai yang terhasil kepada fungsi prepare_records_for_airtable():
# from your terminal
python -m venv <environment_name>
<environment_name>\Scripts\activate
Ini akan menjana 2 rekod pekerja rawak, mencetaknya dalam format asalnya, dan kemudian mencetak rekod dalam format rata yang sesuai untuk Airtable.
Lari:
pyairtable
schedule
faker
python-dotenv
Output:
"https://airtable.com/app########/tbl######/viw####?blocks=show"
BASE_ID = 'app########'
TABLE_NAME = 'tbl######'
API_KEY = '#######'
Selain menjana data pekerja yang realistik, skrip kami juga menyediakan fungsi untuk menyepadukan data tersebut dengan lancar dengan Airtable
Sebelum kami boleh mula memasukkan data yang kami hasilkan ke dalam Airtable, kami perlu mewujudkan sambungan ke platform. Skrip kami menggunakan perpustakaan pyairtable untuk berinteraksi dengan Airtable API. Kami mulakan dengan memuatkan pembolehubah persekitaran yang diperlukan, termasuk kunci Airtable API dan ID Pangkalan dan Nama Jadual tempat kami ingin menyimpan data:
def generate_unique_id():
    """Generate a Unique ID in the format N-#####"""
    return f"N-{random.randint(10000, 99999)}"
Dengan bukti kelayakan ini, kami kemudiannya boleh memulakan klien Airtable API dan mendapatkan rujukan kepada jadual khusus yang ingin kami kerjakan:
def generate_random_records(num_records=10):
    """
    Generate random records with reasonable constraints
    :param num_records: Number of records to generate
    :return: List of records formatted for Airtable
    """
    records = []

    # Constants
    departments = ['Sales', 'Engineering', 'Marketing', 'HR', 'Finance', 'Operations']
    statuses = ['Active', 'On Leave', 'Contract', 'Remote']

    for _ in range(num_records):
        # Generate date in the correct format
        random_date = datetime.now() - timedelta(days=random.randint(0, 365))
        formatted_date = random_date.strftime('%Y-%m-%dT%H:%M:%S.000Z')

        record = {
            'fields': {
                'ID': generate_unique_id(),
                'Name': fake.name(),
                'Age': random.randint(18, 80),
                'Email': fake.email(),
                'Department': random.choice(departments),
                'Salary': round(random.uniform(30000, 150000), 2),
                'Phone': fake.phone_number(),
                'Address': fake.address().replace('\n', '\n'),  # Escape newlines
                'Date Added': formatted_date,
                'Status': random.choice(statuses),
                'Years of Experience': random.randint(0, 45)
            }
        }
        records.append(record)

    return records
Sekarang kita telah menyediakan sambungan, kita boleh menggunakan fungsi generate_random_records() daripada bahagian sebelumnya untuk mencipta kumpulan rekod pekerja, dan kemudian memasukkannya ke dalam Airtable:
def prepare_records_for_airtable(records):
    """Convert records from nested format to flat format for Airtable"""
    return [record['fields'] for record in records]
Fungsi prep_for_insertion() bertanggungjawab untuk menukar format rekod bersarang yang dikembalikan oleh generate_random_records() ke dalam format rata yang dijangkakan oleh Airtable API. Setelah data disediakan, kami menggunakan kaedah table.batch_create() untuk memasukkan rekod dalam satu operasi pukal.
Untuk memastikan proses penyepaduan kami teguh dan mudah untuk nyahpepijat, kami juga telah menyertakan beberapa pengendalian ralat asas dan fungsi pengelogan. Jika sebarang ralat berlaku semasa proses memasukkan data, skrip akan log mesej ralat untuk membantu menyelesaikan masalah:
if __name__ == "__main__":
    records = generate_random_records(2)
    print(records)
    prepared_records = prepare_records_for_airtable(records)
    print(prepared_records)
Dengan menggabungkan keupayaan penjanaan data yang berkuasa bagi skrip kami yang terdahulu dengan ciri penyepaduan yang ditunjukkan di sini, anda boleh mengisi aplikasi berasaskan Airtable anda dengan cepat dan boleh dipercayai dengan data pekerja yang realistik.
Untuk menjadikan proses pengingesan data automatik sepenuhnya, kami boleh mencipta skrip kelompok (fail .bat) yang akan menjalankan skrip Python pada jadual biasa. Ini membolehkan anda menyediakan pengingesan data berlaku secara automatik tanpa campur tangan manual.
Berikut ialah contoh skrip kelompok yang boleh digunakan untuk menjalankan skrip ingestData.py:
python autoRecords.py
Mari kita pecahkan bahagian utama skrip ini:
Untuk menjadualkan skrip kelompok ini berjalan secara automatik, anda boleh menggunakan Penjadual Tugas Windows. Berikut ialah gambaran ringkas tentang langkah-langkah:


Kini, Penjadual Tugas Windows akan menjalankan skrip kelompok secara automatik pada selang waktu yang ditentukan, memastikan data Jadual Udara anda dikemas kini dengan kerap tanpa campur tangan manual.
Ini boleh menjadi alat yang tidak ternilai untuk ujian, pembangunan dan juga tujuan demonstrasi.
Sepanjang panduan ini, anda telah mempelajari cara menyediakan persekitaran pembangunan yang diperlukan, mereka bentuk proses pengingesan, mencipta skrip kelompok untuk mengautomasikan tugasan dan menjadualkan aliran kerja untuk pelaksanaan tanpa pengawasan. Kini, kami mempunyai pemahaman yang kukuh tentang cara memanfaatkan kuasa automasi tempatan untuk menyelaraskan operasi pengingesan data kami dan membuka kunci cerapan berharga daripada Airtable - ekosistem data yang dikuasakan.
Sekarang anda telah menyediakan proses pengingesan data automatik, terdapat banyak cara anda boleh membina asas ini dan membuka kunci lebih banyak nilai daripada data Airtable anda. Saya menggalakkan anda untuk mencuba kod, meneroka kes penggunaan baharu dan berkongsi pengalaman anda dengan komuniti.
Berikut ialah beberapa idea untuk anda bermula:
Kemungkinan tidak berkesudahan! Saya teruja untuk melihat cara anda membina proses pengingesan data automatik ini dan membuka kunci cerapan dan nilai baharu daripada data Airtable anda. Jangan teragak-agak untuk mencuba, bekerjasama dan berkongsi kemajuan anda. Saya di sini untuk menyokong anda sepanjang perjalanan.
Lihat kod penuh https://github.com/AkanimohOD19A/scheduling_airtable_insertion, tutorial video penuh sedang dalam perjalanan.
Atas ialah kandungan terperinci Aliran Kerja Setempat: Mengatur Pengingesan Data ke dalam Jadual Udara. Untuk maklumat lanjut, sila ikut artikel berkaitan lain di laman web China PHP!
 tutorial vba
 Bagaimana untuk mengimport fail mdf ke dalam pangkalan data
 Senarai kekunci pintasan Mac
 Kaedah pengoptimuman kedudukan kata kunci SEO Baidu
 nama penuh aplikasi
 Peranan kod bar
 Bagaimana untuk menukar huruf kecil kepada huruf besar dalam bahasa c
 Adakah FIL berbaloi untuk dipegang untuk jangka masa panjang?


