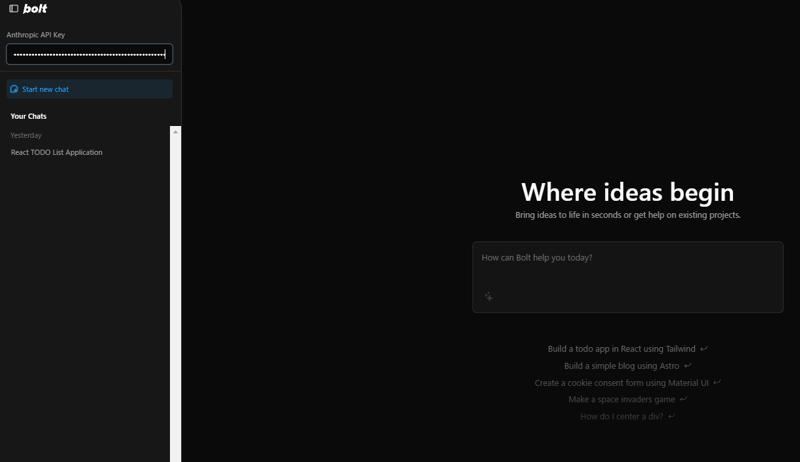
Dalam bolt.new, kunci API boleh dikonfigurasikan menggunakan pembolehubah persekitaran, tetapi kali ini, kami akan mengubah suainya untuk membenarkan input kunci API terus daripada antara muka.
Kami akan mendayakan input kunci API terus dari bar sisi.
Dalam bar sisi, yang pada masa ini memaparkan sejarah sembang, kami menambah borang baharu di bahagian atas untuk memasukkan kunci API.
Untuk mencapai ini, ubah suai fail bolt.new/app/components/sidebar/Menu.client.tsx.
Mula-mula, import fungsi untuk mengendalikan input kunci API:
import { ApiKeyInput } from '~/components/sidebar/ApiKeyInput';
Fail bolt.new/app/components/sidebar/ApiKeyInput.tsx akan dibuat kemudian.
Seterusnya, tambahkan borang untuk memasukkan kunci API dalam menu.
...
  return (
      <motion.div
        ref={menuRef}
        initial="closed"
        animate={open ? 'open' : 'closed'}
        variants={menuVariants}
        className="flex flex-col side-menu fixed top-0 w-[350px] h-full bg-bolt-elements-background-depth-2 border-r rounded-r-3xl border-bolt-elements-borderColor z-sidebar shadow-xl shadow-bolt-elements-sidebar-dropdownShadow text-sm"
      >
        <div className="flex items-center h-[var(--header-height)]">{/* Placeholder */}</div>
        <div className="flex-1 flex flex-col h-full w-full overflow-hidden">
          <ApiKeyInput /> {/* Add this line */}
          <div className="p-4">
...
Kod tambahan hendaklah diletakkan di sini.
Seterusnya, buat fail bolt.new/app/components/sidebar/ApiKeyInput.tsx dengan kandungan berikut:
import React, { useState } from 'react';

export function ApiKeyInput() {
  const [apiKey, setApiKey] = useState(localStorage.getItem('apiKey') || '');

  const handleChange = (event: React.ChangeEvent<HTMLInputElement>) => {
    const value = event.target.value;
    setApiKey(value);
    localStorage.setItem('apiKey', value);
    // Trigger API key change event
    window.dispatchEvent(new Event('apiKeyChanged'));
  };

  return (
    <div className="px-4 py-3 border-b border-bolt-elements-borderColor">
      <label
        htmlFor="api-key"
        className="block text-bolt-elements-textSecondary text-sm mb-2"
      >
        Anthropic API Key
      </label>
      <input
        type="password"
       >


<p>This component will allow the user to input and store the API key in localStorage and trigger a custom event when the key is changed.  </p>

<h3>


  Chat Screen Modification
</h3>

<p>Update the chat screen to disable message sending until an API key is entered.<br><br>
Below is the revised code for bolt.new/app/components/chat/BaseChat.client.tsx, with additions marked between // Append start and // Append end:<br>
</p>

<pre class="brush:php;toolbar:false">export const BaseChat = React.forwardRef<HTMLDivElement, BaseChatProps>(
  (
    {
      textareaRef,
      messageRef,
      scrollRef,
      showChat = true,
      chatStarted = false,
      isStreaming = false,
      enhancingPrompt = false,
      promptEnhanced = false,
      messages,
      input = '',
      sendMessage,
      handleInputChange,
      enhancePrompt,
      handleStop,
    },
    ref,
  ) => {
    // Append start
    const [isApiKeyMissing, setIsApiKeyMissing] = useState(true); // Track API key presence

    useEffect(() => {
      const checkApiKey = () => {
        const apiKey = localStorage.getItem('apiKey');
        console.log('apiKey:', apiKey);
        setIsApiKeyMissing(!apiKey);
      };

      // Initial check
      checkApiKey();

      // Add listener for API key changes
      window.addEventListener('apiKeyChanged', checkApiKey);

      return () => {
        window.removeEventListener('apiKeyChanged', checkApiKey);
      };
    }, []);
    // Append end

    const TEXTAREA_MAX_HEIGHT = chatStarted ? 400 : 200;

    return (
      <div
        ref={ref}
        className={classNames(
          styles.BaseChat,
          'relative flex h-full w-full overflow-hidden bg-bolt-elements-background-depth-1',
        )}
        data-chat-visible={showChat}
      >
        <ClientOnly>{() => <Menu />}</ClientOnly>
        <div ref={scrollRef} className="flex overflow-y-auto w-full h-full">
          <div className={classNames(styles.Chat, 'flex flex-col flex-grow min-w-[var(--chat-min-width)] h-full')}>
            {!chatStarted && (
              <div>


<p>This ensures that users cannot send messages until they enter an API key, with clear visual feedback provided.</p>

<h3>


  Passing the API Key to the LLM
</h3>

<p>To ensure the API key entered on the interface is accessible to the LLM, update the file bolt.new/app/lib/.server/llm/api-key.ts as follows:<br>
</p>

<pre class="brush:php;toolbar:false">import { env } from 'node:process';

export function getAPIKey(cloudflareEnv: Env) {
  // Append start
  const localApiKey = typeof window !== 'undefined' ? localStorage.getItem('apiKey') : null;
  return localApiKey || env.ANTHROPIC_API_KEY || cloudflareEnv.ANTHROPIC_API_KEY;
  // Append end
}
Ini memastikan sistem mengutamakan kunci API yang dimasukkan melalui UI (localApiKey). Jika tiada kunci ditemui dalam localStorage, ia akan kembali kepada pembolehubah persekitaran (env.ANTHROPIC_API_KEY atau cloudflareEnv.ANTHROPIC_API_KEY).
Selepas melengkapkan pengubahsuaian, gunakan arahan berikut untuk membina dan memulakan bolt.new:
pnpm run build
pnpm run start


Langkah-langkah ini memastikan bahawa fungsi berfungsi seperti yang dimaksudkan selepas pengubahsuaian.
Atas ialah kandungan terperinci Ubah suai antara muka bolt.new tempatan untuk membenarkan input kunci API. Untuk maklumat lanjut, sila ikut artikel berkaitan lain di laman web China PHP!
 Penggunaan fungsi urlencode
 Komputer dijangkiti dan tidak boleh dihidupkan
 Prestasi mikrokomputer terutamanya bergantung kepada
 Bagaimana untuk menyelesaikan masalah bahawa Apple tidak boleh memuat turun lebih daripada 200 fail
 Cara menaip simbol kurang daripada atau sama dalam Windows
 Bagaimana untuk membuka fail ESP
 Perisian untuk membuat penyelesai Sudoku
 Apakah perpustakaan yang biasa digunakan di golang?


