PS网页设计教程——小贴士:五步在PS中创建倒计时数字牌
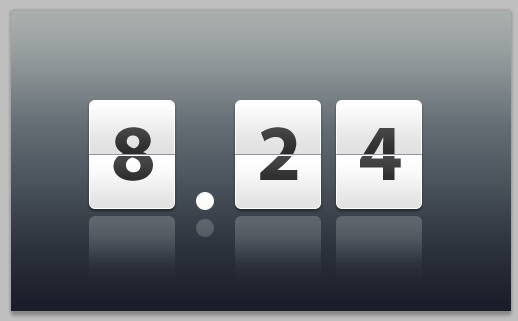
本教程展示如何在PS中设计倒计时数字牌,如下图所示

这种数字牌目前在很多场合都能看到,尤其是现在很流行的Android手机系统上也能看到一二
1. Setting up the Photoshop file
1、配置Photoshop文件
1.1. Create a new file (Ctrl + N). In the New file dialog box, set the Width and Height units to pixels (if it isn't already). Set the width to 500 and the height to 300 pixels. We're creating a graphic element for web, as mentioned above, so set the Resolution to 72 pixels/inch, color mode to RGB color, 8 bit and background contents to white.
1.1新建文件(Ctrl+N)。在新建文件的窗口上,设置宽度和高度的单位为pixels(如果不是pixels的话)。设置宽度为500,高度为300。要创建网页上用的图片元素,如上提及,分辨率设置为72像素/英寸,颜色模式设置为RGB颜色,8位。背景内容为白色
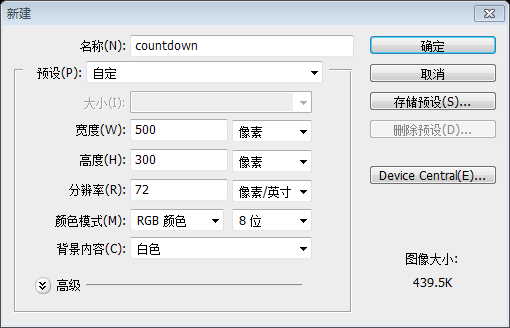
1.2. To unlock the layer, currently titled "background", double click on it and on appearance of a dialog window showing title as Layer 0, press ok.
1.2解锁该图层,当前的标题“背景”,双击该图层,在出现的对话窗口上显示的标题改为“图层”,按确定

2. Adding color to the background (Layer)
2、添加背景颜色(图层)
2.1. Select Layer 0 (if not already selected) and go to Layer > Layer Style > Gradient Overlay.
2.1选择“图层”(如果没有被选中),然后点击:图层 > 图层样式 > 渐变叠加
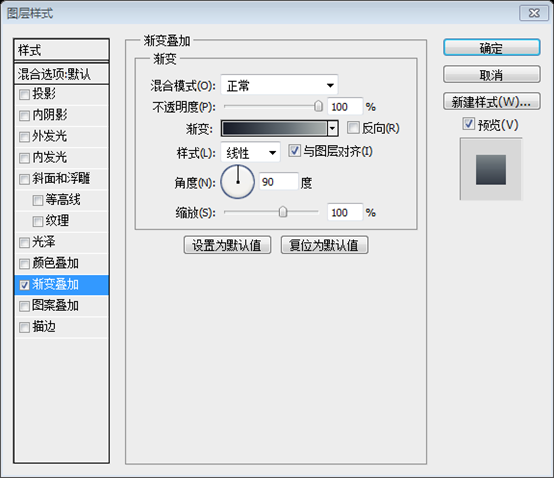
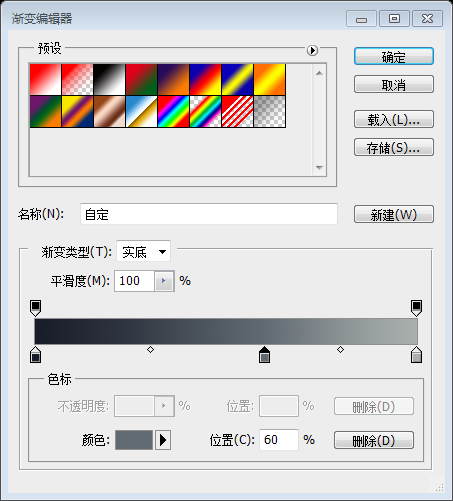
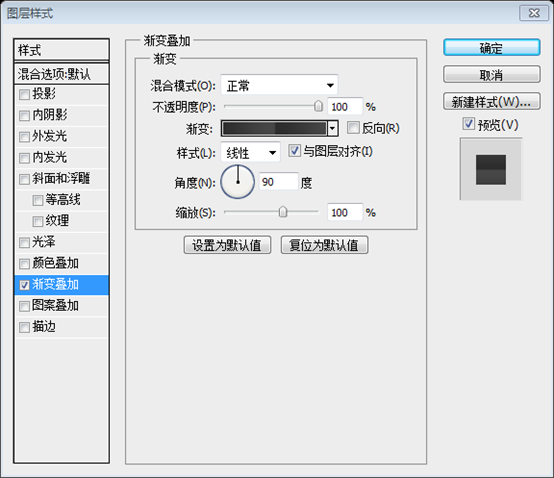
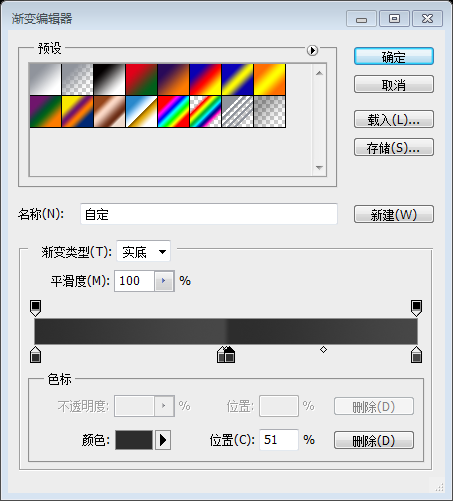
2.2. Make sure the opacity is 100%, style is linear and angle is 90 degrees. Click on the gradient and in the Gradient Editor, add color stops in this order: #191d29 at 0% location, #616a71 at 60% and #a9afab at 100% location.
2.2如下图设置图层样式,不透明度100%,样式选择线性,角度设置为90度。点击渐变,在渐变编辑器窗口里,按顺序设置颜色:在0%的位置上为#191d29,在60%的位置上为#616a71,在100%的位置上为#a9afab
3. Adding a white box
3、添加白色的方块
3.1. Click and hold (without releasing) the Rectangle Tool to select Rounded Rectangle Tool.
3.1点击并按住(不要松开)矩形工具,选择圆角矩形工具
3.2. Choosing radius as 6 px, as shown above, create a rectangular box like the one shown below and rename it as "white-box" after double clicking the "shape 1” layer.
3.2设置半径为6px,如上所示,创建一个圆角矩形(198,89,86,109),如下所示,改名为“白色方块”,在双击形状1图层之后

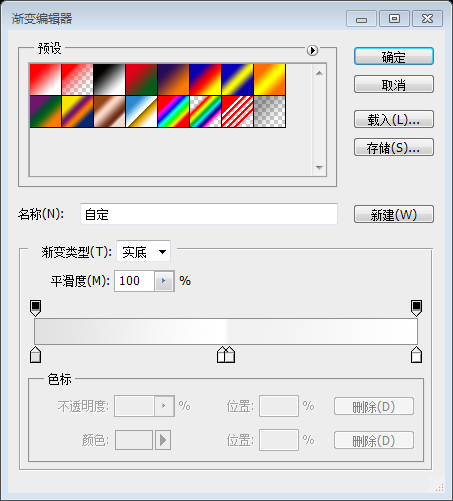
3.3. With white box as selection, go to gradient overlay (as explained in step 2.1). Again, make sure the opacity is 100%, style is linear and angle is 90 degrees. Click on the gradient and in the Gradient Editor, add color stops in this order: #e1e1e1 at 0% location, #ffffff at 49%, #e1e1e1 at 51% location and finally, #ffffff at 100% location.
3.3在白色的方块选中的时候,设置渐变叠加(像之前的步骤2.1)。再次,不透明度设置为100%,样式设置为线性,角度为90度。点击渐变,在渐变编辑器窗口里,按顺序设置颜色:在0%的位置上为#e1e1e1,在49%的位置上为#ffffff,在51%的位置上为#e1e1e1,在100%的位置上设置为#ffffff。
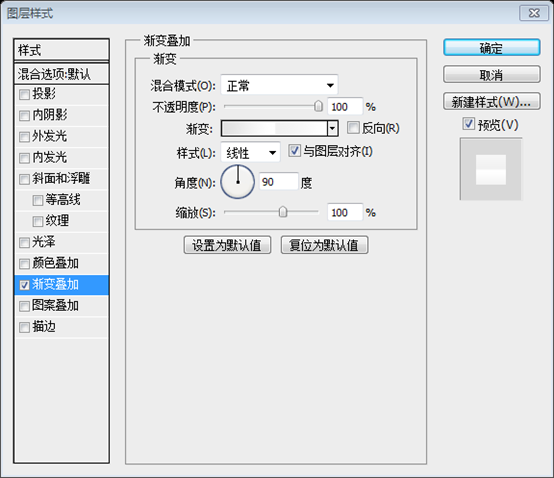
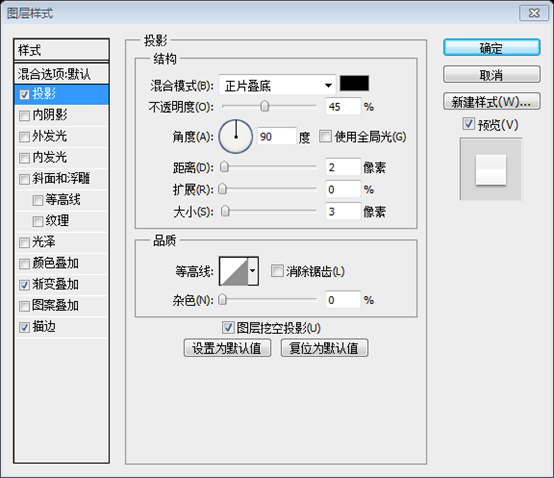
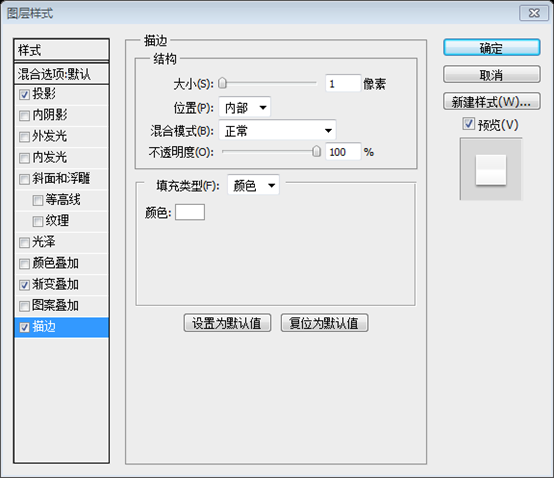
3.4. In the same box as gradient overlay, look for Drop Shadow and Stroke. We have to select them too. Drop shadow settings: Opacity - 45%, distance - 2 px, spread - 0 px and size - 3 px. Stroke settings: Size - 1 px, position - inside and color: #ffffff.
3.4在渐变叠加的窗口上,找到投影和描边。同样如下图设置。投影设置:不透明度为45%,距离为2px,扩展为0,大小为3px。描边设置:大小为1px,位置为内部,颜色为#ffffff。

4. Adding Separators to the box
4、在方块中添加分隔符
4.1. Click and hold the Rounded Rectangle Tool to select Line tool.
4.1点击并按住圆角矩形工具去选择直线工具
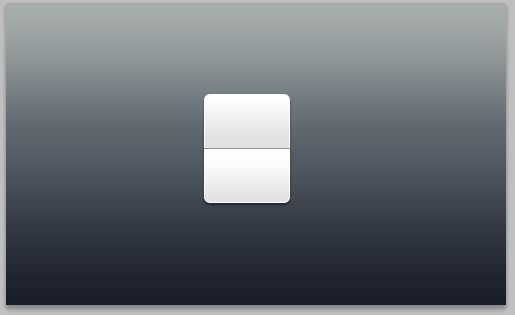
4.2. With weight as 1 px and color #90949c, draw a line horizontally middle across the white box, just enough to touch the edges widthwise, like shown in the pic below. Name it "dark-sep".
4.2宽度设置为1px,颜色为#90949c,在白色方块中画一条水平直线(198,143,86,1),正好触及白色矩形的两边,如下图所示,命名为“深线”
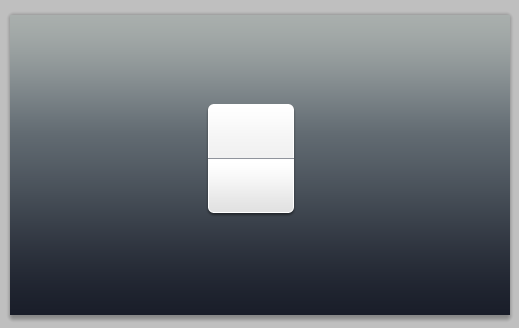
4.3. Right-click (ctrl-click in mac) "dark-sep" layer and select duplicate. Name it "white-sep". Press V on the keyboard to select Move tool, press bottom arrow to move "white-sep" downwards by 1 px and change it color to #ffffff.
4.3右击“深线”图层,选择复制图层。命名为“白线”,按键盘上的V选择移动工具,按下方向键移动“白线”图层下移1px,改变颜色为#ffffff
5. Adding text to complete the countdown
5、添加文本完成倒计时数字牌
5.1. Press T on the keyboard to select Text tool. We have chosen "Myriad Pro bold" in 80 pt size but feel free to select your favorite font here. Select the layer "white-box" and type in a digit or a letter in vertical and horizontal middle. We have typed in a 2.
5.1按键盘上的T选择文字工具。选择字体Myriad Pro bold,字体大小80pt,或者选择你觉得合适的字体。选择白色方块图层,居中输入一个数字或文字。这儿输入的是2.

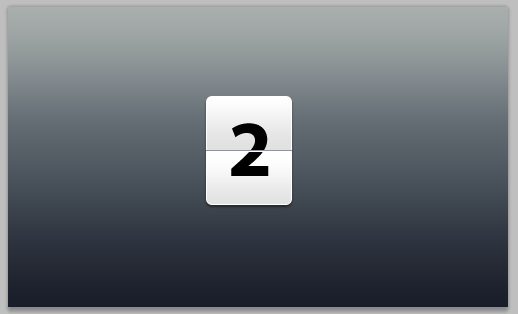
5.2. With text layer as selection, go to gradient overlay (as explained in step 2.1). Again, make sure the opacity is 100%, style is linear and angle is 90 degrees. Click on the gradient and in the Gradient Editor, add color stops in this order: #2d2d2d at 0% location, #474747 at 49%, #2d2d2d at 51% location and finally, #474747 at 100% location.
5.2选中文字图层,添加渐变叠加(像之前的步骤2.1)。再次,不透明度设置为100%,样式设置为线性,角度为90度。点击渐变,在渐变编辑器窗口里,按顺序设置颜色:在0%的位置上为#2d2d2d,在49%的位置上为#474747,在51%的位置上为#2d2d2d,在100%的位置上设置为#474747。

Here we have our countdown ready for usage as an element in broadcasting, collaterals or user interfaces.
至此已经完成计时牌,可以用在广告牌的元素,并列的元素,或是用户界面元素。
Bonus Step - add reflection to the counter
奖励步骤:添加数字牌的倒影
B.1. Select the layer "white-box" and duplicate this layer (step 4.3). Right click (ctrl-click in mac) and first select "rasterize layer" and then, "clear layer style" as shown below.
B.1选择“白色方块”图层,并复制该图层。右键选择“栅格化图层”,接着选“清除图层样式”
B.2. Press M on the keyboard to select Rectangular Marquee Tool and select the box 60% horizontally, from the bottom, like shown above. Go to Select > Modify > Feather and choose a feather radius of 20 px. We pressed "delete" 3 times to get the desired effect. You may choose as per your preference.
B.2按键盘上的M选择矩形选择工具,从下往上选择竖直60%部分,如上所示。点击:选择 > 修改 > 羽化,选择羽化半径为20px。 按Delete键3次获得理想的效果。你也可以按照你自己的想法设置
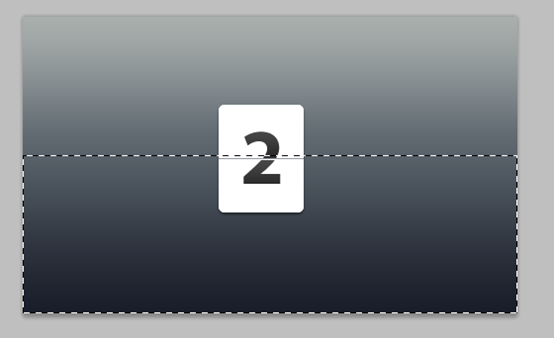
B.3. Press ctrl+d (cmd+d in mac) to deselect. Press V to go back to move tool and move the shape to the bottom of white box. Go to Edit > Transform > Flip vertical and change opacity of this layer to 20%.
B.3按Ctrl+D取消选择。按V选择移动工具,移动到白色方块的下方。点击:编辑 > 变形 > 垂直翻转(注:这步好像是多余的)。设置不透明度为20%

Show us what you made!
这是我另外做的一个效果
更多PS网页设计教程——小贴士:五步在PS中创建倒计时数字牌相关文章请关注PHP中文网!

Alat AI Hot

Undresser.AI Undress
Apl berkuasa AI untuk mencipta foto bogel yang realistik

AI Clothes Remover
Alat AI dalam talian untuk mengeluarkan pakaian daripada foto.

Undress AI Tool
Gambar buka pakaian secara percuma

Clothoff.io
Penyingkiran pakaian AI

AI Hentai Generator
Menjana ai hentai secara percuma.

Artikel Panas

Alat panas

Notepad++7.3.1
Editor kod yang mudah digunakan dan percuma

SublimeText3 versi Cina
Versi Cina, sangat mudah digunakan

Hantar Studio 13.0.1
Persekitaran pembangunan bersepadu PHP yang berkuasa

Dreamweaver CS6
Alat pembangunan web visual

SublimeText3 versi Mac
Perisian penyuntingan kod peringkat Tuhan (SublimeText3)

Topik panas
 1381
1381
 52
52
 Bagaimana saya menggunakan Photoshop untuk mencipta grafik media sosial?
Mar 18, 2025 pm 01:41 PM
Butiran artikel menggunakan Photoshop untuk grafik media sosial, meliputi persediaan, alat reka bentuk, dan teknik pengoptimuman. Ia menekankan kecekapan dan kualiti dalam penciptaan grafik.
 Bagaimanakah saya menyediakan imej untuk web menggunakan Photoshop (mengoptimumkan saiz fail, resolusi)?
Mar 18, 2025 pm 01:35 PM
Artikel membincangkan mengoptimumkan imej untuk web menggunakan Photoshop, memberi tumpuan kepada saiz fail dan resolusi. Isu utama adalah mengimbangi kualiti dan masa beban.
 Apakah sebab mengapa PS terus menunjukkan pemuatan?
Apr 06, 2025 pm 06:39 PM
PS "Memuatkan" Masalah disebabkan oleh akses sumber atau masalah pemprosesan: Kelajuan bacaan cakera keras adalah perlahan atau buruk: Gunakan CrystaldiskInfo untuk memeriksa kesihatan cakera keras dan menggantikan cakera keras yang bermasalah. Memori yang tidak mencukupi: Meningkatkan memori untuk memenuhi keperluan PS untuk imej resolusi tinggi dan pemprosesan lapisan kompleks. Pemandu kad grafik sudah lapuk atau rosak: Kemas kini pemandu untuk mengoptimumkan komunikasi antara PS dan kad grafik. Laluan fail terlalu panjang atau nama fail mempunyai aksara khas: Gunakan laluan pendek dan elakkan aksara khas. Masalah PS sendiri: Pasang semula atau membaiki pemasang PS.
 Apakah soalan umum mengenai mengeksport PDF di PS
Apr 06, 2025 pm 04:51 PM
Soalan dan penyelesaian yang sering ditanya Apabila mengeksport PS sebagai PDF: Font Embedding Masalah: Periksa pilihan "Font", pilih "Benamkan" atau tukar fon ke dalam lengkung (laluan). Masalah Penyimpangan Warna: Tukar fail ke dalam mod CMYK dan laraskan warna; Secara langsung mengeksportnya dengan RGB memerlukan persediaan psikologi untuk pratonton dan sisihan warna. Isu Resolusi dan Saiz Fail: Pilih resolusi mengikut keadaan sebenar, atau gunakan pilihan mampatan untuk mengoptimumkan saiz fail. Isu Kesan Khas: Gabungan (meratakan) lapisan sebelum mengeksport, atau menimbang kebaikan dan keburukan.
 Bagaimanakah saya menyediakan imej untuk cetak menggunakan Photoshop (resolusi, profil warna)?
Mar 18, 2025 pm 01:36 PM
Artikel ini membimbing untuk menyediakan imej untuk dicetak di Photoshop, memberi tumpuan kepada resolusi, profil warna, dan ketajaman. Ia berpendapat bahawa profil 300 ppi dan CMYK adalah penting untuk cetakan yang berkualiti.
 Bagaimana untuk menyelesaikan masalah pemuatan apabila PS sentiasa menunjukkan bahawa ia memuatkan?
Apr 06, 2025 pm 06:30 PM
Kad PS adalah "Memuatkan"? Penyelesaian termasuk: Memeriksa konfigurasi komputer (memori, cakera keras, pemproses), membersihkan pemecahan cakera keras, mengemas kini pemacu kad grafik, menyesuaikan tetapan PS, memasang semula PS, dan membangunkan tabiat pengaturcaraan yang baik.
 Bagaimana saya menggunakan keupayaan penyuntingan video Photoshop?
Mar 18, 2025 pm 01:37 PM
Artikel ini menerangkan cara menggunakan Photoshop untuk penyuntingan video, memperincikan langkah -langkah untuk mengimport, mengedit, dan mengeksport video, dan menonjolkan ciri -ciri utama seperti panel garis masa, lapisan video, dan kesan.
 Cara menetapkan perlindungan kata laluan untuk pdf eksport di ps
Apr 06, 2025 pm 04:45 PM
Eksport PDF yang dilindungi kata laluan di Photoshop: Buka fail imej. Klik "Fail" & gt; "Eksport" & gt; "Eksport sebagai PDF". Tetapkan pilihan "Keselamatan" dan masukkan kata laluan yang sama dua kali. Klik "Eksport" untuk menghasilkan fail PDF.


