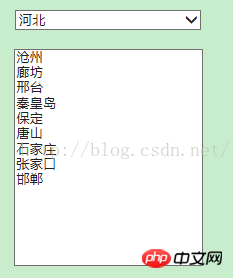
DropDownList和ListBox实现两级联动功能,他们也可以将从后台数据库中搜选的出来的信息加以绑定,这里要实现的功能是在DropDownList中选择“省”,然后让ListBox自动将其省份下的“市”显示出来,这就是所谓的两级联动功能,这个功能我们在很多注册网页上看见,今天咱们就用ASP.NET解开其神秘的面纱。
一、设置前台界面,在Web窗体中添加DropDownList和ListBox两个控件。界面图如下所示。

二、编写后台代码
在这,后台代码编写在其窗体的Page_Load事件中
<span style="font-family:KaiTi_GB2312;font-size:18px;">
protected void Page_Load(object sender, EventArgs e)
        {
            if (!Page.IsPostBack )  //判断页面是否第一次加载
            {
                SqlConnection con = DB.createConnection();  //此方法在上一篇文章中已经介绍,调用一个已经编写好的创建数据库连接的方法。
                SqlCommand cmd = new SqlCommand("select * from province",con);
                SqlDataReader sdr = cmd.ExecuteReader();
                this.DropDownList1.DataTextField = "proName";
                this.DropDownList1.DataValueField = "proID";      //主键字段
                this.DropDownList1.DataSource = sdr;
                this.DropDownList1.DataBind();
                sdr.Close();

            }

        }</span>
编写DropDownList1_SelectedIndexChanged事件代码,实现单击“省”,ListBox自动添加该“省”所具有的“市”
<span style="font-family:KaiTi_GB2312;font-size:18px;">
 protected void DropDownList1_SelectedIndexChanged(object sender, EventArgs e)
        {
            this.ListBox1.Items.Clear();
            SqlConnection con2 = DB.createConnection();
            SqlCommand cmd1 = new SqlCommand("select * from city where proID=" + this.DropDownList1.SelectedValue, con2);
            SqlDataReader sdr1 = cmd1.ExecuteReader();
            while (sdr1.Read())
            {
                this.ListBox1.Items.Add(new ListItem(sdr1.GetString(2),sdr1.GetInt32(0).ToString()));
            }
}</span>运行文件,效果图如下所示

这里河北省的城市我没有添加完整,只是为了实现两级联动的功能,相比前两篇博客中Web控件GridView和Repeater的使用,GridView和Repeater功能虽然是相当强大,但是不同的控件有不同的用途,在这里,杀鸡焉用牛刀?
Atas ialah kandungan terperinci 《ASP.NET》数据绑定—DropDownList、ListBox的图文代码详解. Untuk maklumat lanjut, sila ikut artikel berkaitan lain di laman web China PHP!


