

HTML5/CSS3实现漂亮的分步骤注册登录表单的示例代码分享

分步骤的登录注册表单现在也比较多,主要是能提高用户体验,用户可以有选择性的填写相应的表单信息,不至于让用户看到一堆表单望而却步。今天和大家分享的就是一款基于HTML5和CSS3的分步骤注册登录表单,外观不用说,非常漂亮。你看一下DEMO就知道了。
接下来我们要来一起看看实现的过程是怎样的。代码有点复杂,主要由HTML代码、CSS3代码以及Javascript代码组成。
HTML代码:
<form id="msform">
<!-- progressbar -->
<ul id="progressbar">
<li>Account Setup</li>
<li>Social Profiles</li>
<li>Personal Details</li>
</ul>
<!-- fieldsets -->
<fieldset>
<h2>Create your account</h2>
<h3>This is step 1</h3>
<input type="text" name="email" placeholder="Email" />
<input type="password" name="pass" placeholder="Password" />
<input type="password" name="cpass" placeholder="Confirm Password" />
<input type="button" name="next" value="Next" />
</fieldset>
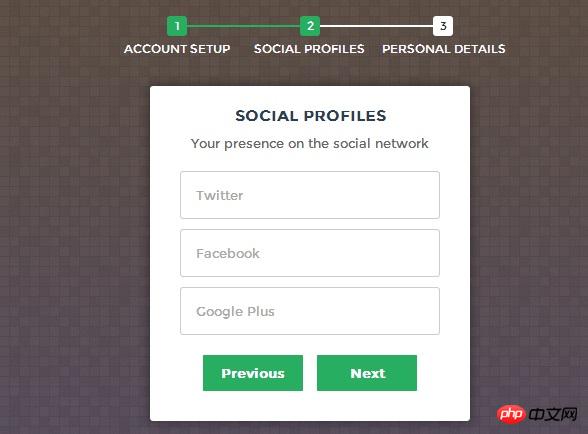
<fieldset>
<h2>Social Profiles</h2>
<h3>Your presence on the social network</h3>
<input type="text" name="twitter" placeholder="Twitter" />
<input type="text" name="facebook" placeholder="Facebook" />
<input type="text" name="gplus" placeholder="Google Plus" />
<input type="button" name="previous" value="Previous" />
<input type="button" name="next" value="Next" />
</fieldset>
<fieldset>
<h2>Personal Details</h2>
<h3>We will never sell it</h3>
<input type="text" name="fname" placeholder="First Name" />
<input type="text" name="lname" placeholder="Last Name" />
<input type="text" name="phone" placeholder="Phone" />
<textarea name="address" placeholder="Address"></textarea>
<input type="button" name="previous" value="Previous" />
<input type="submit" name="submit" value="Submit" />
</fieldset></form>HTML代码看起来很多,但是很简单,主要是描述了一form表单。
CSS代码:
/*form styles*/#msform {
    width: 400px;
    margin: 50px auto;
    text-align: center;
    position: relative;
}#msform fieldset {
    background: white;
    border: 0 none;
    border-radius: 3px;
    box-shadow: 0 0 15px 1px rgba(0, 0, 0, 0.4);
    padding: 20px 30px;

    box-sizing: border-box;
    width: 80%;
    margin: 0 10%;    /*stacking fieldsets above each other*/
    position: absolute;
}/*Hide all except first fieldset*/#msform fieldset:not(:first-of-type) {
    display: none;
}/*inputs*/#msform input, #msform textarea {
    padding: 15px;
    border: 1px solid #ccc;
    border-radius: 3px;
    margin-bottom: 10px;
    width: 100%;
    box-sizing: border-box;
    font-family: montserrat;
    color: #2C3E50;
    font-size: 13px;
}/*buttons*/#msform .action-button {
    width: 100px;
    background: #27AE60;
    font-weight: bold;
    color: white;
    border: 0 none;
    border-radius: 1px;
    cursor: pointer;
    padding: 10px 5px;
    margin: 10px 5px;
}#msform .action-button:hover, #msform .action-button:focus {
    box-shadow: 0 0 0 2px white, 0 0 0 3px #27AE60;
}/*headings*/.fs-title {
    font-size: 15px;
    text-transform: uppercase;
    color: #2C3E50;
    margin-bottom: 10px;
}.fs-subtitle {
    font-weight: normal;
    font-size: 13px;
    color: #666;
    margin-bottom: 20px;
}/*progressbar*/#progressbar {
    margin-bottom: 30px;
    overflow: hidden;    /*CSS counters to number the steps*/
    counter-reset: step;
}#progressbar li {
    list-style-type: none;
    color: white;
    text-transform: uppercase;
    font-size: 9px;
    width: 33.33%;
    float: left;
    position: relative;
}#progressbar li:before {
    content: counter(step);
    counter-increment: step;
    width: 20px;
    line-height: 20px;
    display: block;
    font-size: 10px;
    color: #333;
    background: white;
    border-radius: 3px;
    margin: 0 auto 5px auto;
}/*progressbar connectors*/#progressbar li:after {
    content: '';
    width: 100%;
    height: 2px;
    background: white;
    position: absolute;
    left: -50%;
    top: 9px;
    z-index: -1;
    /*put it behind the numbers*/}
    #progressbar li:first-child:after {
    /*connector not needed before the first step*/
    content: none;
}
/*marking active/completed steps green*/
/*The number of the step and the connector before it = green*/
#progressbar li.active:before,
#progressbar li.active:after{
    background: #27AE60;
    color: white;
}这里我们只是将渲染表单的CSS代码贴了出来,这让我们的表单看起来非常清新自然。另外要说明的一点是,这里我们利用了CSS3的:before属性。
最后是Javascript代码,可以实现注册表单的步骤跳转。
Javascript代码:
var current_fs, next_fs, previous_fs; //fieldsets
var left, opacity, scale; //fieldset properties which we will animate
var animating; //flag to prevent quick multi-click glitches

$(".next").click(function(){
    if(animating) return false;
    animating = true;

    current_fs = $(this).parent();
    next_fs = $(this).parent().next();

    //activate next step on progressbar using the index of next_fs
    $("#progressbar li").eq($("fieldset").index(next_fs)).addClass("active");

    //show the next fieldset
    next_fs.show();
    //hide the current fieldset with style
    current_fs.animate({opacity: 0}, {
        step: function(now, mx) {
            //as the opacity of current_fs reduces to 0 - stored in "now"
            //1. scale current_fs down to 80%
            scale = 1 - (1 - now) * 0.2;
            //2. bring next_fs from the right(50%)
            left = (now * 50)+"%";
            //3. increase opacity of next_fs to 1 as it moves in
            opacity = 1 - now;
            current_fs.css({'transform': 'scale('+scale+')'});
            next_fs.css({'left': left, 'opacity': opacity});
        },
        duration: 800,
        complete: function(){
            current_fs.hide();
            animating = false;
        },
        //this comes from the custom easing plugin
        easing: 'easeInOutBack'
    });
});

$(".previous").click(function(){
    if(animating) return false;
    animating = true;

    current_fs = $(this).parent();
    previous_fs = $(this).parent().prev();

    //de-activate current step on progressbar
    $("#progressbar li").eq($("fieldset").index(current_fs)).removeClass("active");

    //show the previous fieldset
    previous_fs.show();
    //hide the current fieldset with style
    current_fs.animate({opacity: 0}, {
        step: function(now, mx) {
            //as the opacity of current_fs reduces to 0 - stored in "now"
            //1. scale previous_fs from 80% to 100%
            scale = 0.8 + (1 - now) * 0.2;
            //2. take current_fs to the right(50%) - from 0%
            left = ((1-now) * 50)+"%";
            //3. increase opacity of previous_fs to 1 as it moves in
            opacity = 1 - now;
            current_fs.css({'left': left});
            previous_fs.css({'transform': 'scale('+scale+')', 'opacity': opacity});
        },
        duration: 800,
        complete: function(){
            current_fs.hide();
            animating = false;
        },
        //this comes from the custom easing plugin
        easing: 'easeInOutBack'
    });
});

$(".submit").click(function(){
    return false;
})这里我们可以看到,利用jQuery代码变得非常简洁。主要是3个事件:next、previous、submit,同时在next和previous时利用jQuery实现淡入淡出的动画效果,是不是很迷人?最后你也可以下载源代码。
Atas ialah kandungan terperinci HTML5/CSS3实现漂亮的分步骤注册登录表单的示例代码分享. Untuk maklumat lanjut, sila ikut artikel berkaitan lain di laman web China PHP!

Alat AI Hot

Undresser.AI Undress
Apl berkuasa AI untuk mencipta foto bogel yang realistik

AI Clothes Remover
Alat AI dalam talian untuk mengeluarkan pakaian daripada foto.

Undress AI Tool
Gambar buka pakaian secara percuma

Clothoff.io
Penyingkiran pakaian AI

Video Face Swap
Tukar muka dalam mana-mana video dengan mudah menggunakan alat tukar muka AI percuma kami!

Artikel Panas
Alat panas

Notepad++7.3.1
Editor kod yang mudah digunakan dan percuma

SublimeText3 versi Cina
Versi Cina, sangat mudah digunakan

Hantar Studio 13.0.1
Persekitaran pembangunan bersepadu PHP yang berkuasa

Dreamweaver CS6
Alat pembangunan web visual

SublimeText3 versi Mac
Perisian penyuntingan kod peringkat Tuhan (SublimeText3)
Topik panas
 1391
1391
 52
52

 Sempadan Jadual dalam HTML
Sep 04, 2024 pm 04:49 PM
Sempadan Jadual dalam HTML
Sep 04, 2024 pm 04:49 PM
Panduan untuk Sempadan Jadual dalam HTML. Di sini kita membincangkan pelbagai cara untuk menentukan sempadan jadual dengan contoh Sempadan Jadual dalam HTML.
 Jadual Bersarang dalam HTML
Sep 04, 2024 pm 04:49 PM
Jadual Bersarang dalam HTML
Sep 04, 2024 pm 04:49 PM
Ini ialah panduan untuk Nested Table dalam HTML. Di sini kita membincangkan cara membuat jadual dalam jadual bersama-sama dengan contoh masing-masing.
 HTML jidar-kiri
Sep 04, 2024 pm 04:48 PM
HTML jidar-kiri
Sep 04, 2024 pm 04:48 PM
Panduan untuk HTML margin-kiri. Di sini kita membincangkan gambaran keseluruhan ringkas tentang HTML margin-left dan Contoh-contohnya bersama-sama dengan Pelaksanaan Kodnya.
 Susun Atur Jadual HTML
Sep 04, 2024 pm 04:54 PM
Susun Atur Jadual HTML
Sep 04, 2024 pm 04:54 PM
Panduan untuk Susun Atur Jadual HTML. Di sini kita membincangkan Nilai Susun Atur Jadual HTML bersama-sama dengan contoh dan output n perincian.
 Pemegang Tempat Input HTML
Sep 04, 2024 pm 04:54 PM
Pemegang Tempat Input HTML
Sep 04, 2024 pm 04:54 PM
Panduan untuk Pemegang Tempat Input HTML. Di sini kita membincangkan Contoh Pemegang Tempat Input HTML bersama-sama dengan kod dan output.
 Memindahkan Teks dalam HTML
Sep 04, 2024 pm 04:45 PM
Memindahkan Teks dalam HTML
Sep 04, 2024 pm 04:45 PM
Panduan untuk Memindahkan Teks dalam HTML. Di sini kita membincangkan pengenalan, cara teg marquee berfungsi dengan sintaks dan contoh untuk dilaksanakan.
 Senarai Tertib HTML
Sep 04, 2024 pm 04:43 PM
Senarai Tertib HTML
Sep 04, 2024 pm 04:43 PM
Panduan kepada Senarai Tertib HTML. Di sini kami juga membincangkan pengenalan senarai dan jenis Tertib HTML bersama-sama dengan contoh mereka masing-masing
 Butang onclick HTML
Sep 04, 2024 pm 04:49 PM
Butang onclick HTML
Sep 04, 2024 pm 04:49 PM
Panduan untuk Butang onclick HTML. Di sini kita membincangkan pengenalan, kerja, contoh dan onclick Event masing-masing dalam pelbagai acara.
