

详解如何在CentOS7中使用Nginx和PHP7-FPM安装Nextcloud的图文教程

这篇文章主要介绍了详解如何在CentOS7中使用Nginx和PHP7-FPM安装Nextcloud,会通过 Nginx 和 PHP7-FPM 来运行 Nextcloud,同时使用 MariaDB 做为数据库系统。
Nextcloud 是一款自由 (开源) 的类 Dropbox 软件,由 ownCloud 分支演化形成。它使用 PHP 和 Javascript 编写,支持多种数据库系统,比如 MySQL/MariaDB、PostgreSQL、Oracle 数据库和 SQLite。它可以使你的桌面系统和云服务器中的文件保持同步,Nextcloud 为 Windows、Linux、Mac、安卓以及苹果手机都提供了客户端支持。Nextcloud 并非只是 Dropbox 的克隆,它还提供了很多附加特性,如日历、联系人、计划任务以及流媒体 Ampache。
在这篇文章中,我将向你展示如何在 CentOS 7 服务器中安装和配置最新版本的 Nextcloud 10。我会通过 Nginx 和 PHP7-FPM 来运行 Nextcloud,同时使用 MariaDB 做为数据库系统。
先决条件
64 位的 CentOS 7
服务器的 Root 权限
步骤 1 - 在 CentOS 7 中安装 Nginx 和 PHP7-FPM
在开始安装 Nginx 和 php7-fpm 之前,我们还学要先添加 EPEL 包的仓库源。使用如下命令:
yum -y install epel-release
现在开始从 EPEL 仓库来安装 Nginx:
yum -y install nginx
然后我们还需要为 php7-fpm 添加另外一个仓库。互联网中有很个远程仓库提供了 PHP 7 系列包,我在这里使用的是 webtatic。
添加 PHP7-FPM webtatic 仓库:
rpm -Uvh https://mirror.webtatic.com/yum/el7/webtatic-release.rpm
然后就是安装 PHP7-FPM 以及 Nextcloud 需要的一些包。
代码如下:
yum -y install php70w-fpm php70w-cli php70w-gd php70w-mcrypt php70w-mysql php70w-pear
php70w-xml php70w-mbstring php70w-pdo php70w-json php70w-pecl-apcu php70w-pecl-apcu-devel
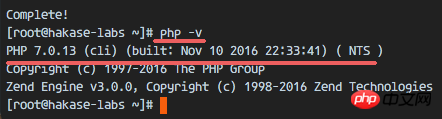
最后,从服务器终端里查看 PHP 的版本号,以便验证 PHP 是否正确安装。
php -v
步骤 2 - 配置 PHP7-FPM
在这一个步骤中,我们将配置 php-fpm 与 Nginx 协同运行。Php7-fpm 将使用 nginx 用户来运行,并监听 9000 端口。
使用 vim 编辑默认的 php7-fpm 配置文件。
vim /etc/php-fpm.d/www.conf
在第 8 行和第 10行,user 和 group 赋值为 nginx。
user = nginx
group = nginx
在第 22 行,确保 php-fpm 运行在指定端口。
listen = 127.0.0.1:9000
取消第 366-370 行的注释,启用 php-fpm 的系统环境变量。
env[HOSTNAME] = $HOSTNAME
env[PATH] = /usr/local/bin:/usr/bin:/bin
env[TMP] = /tmp
env[TMPDIR] = /tmp
env[TEMP] = /tmp
下一步,就是在 /var/lib/ 目录下创建一个新的文件夹 <a href="http://www.php.cn/php/php-tp-session.html" target="_blank">session</a>,并将其拥有者变更为 nginx 用户。
mkdir -p /var/lib/php/session
chown nginx:nginx -R /var/lib/php/session/
然后启动 php-fpm 和 Nginx,并且将它们设置为随开机启动的服务。
sudo systemctl start php-fpm
sudo systemctl start nginx
sudo systemctl enable php-fpm
sudo systemctl enable nginx
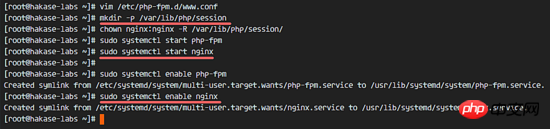
PHP7-FPM 配置完成
步骤 3 - 安装和配置 MariaDB
我这里使用 MariaDB 作为 Nextcloud 的数据库。可以直接使用 yum 命令从 CentOS 默认远程仓库中安装 mariadb-server 包。
yum -y install mariadb mariadb-server
启动 MariaDB,并将其添加到随系统启动的服务中去。
systemctl start mariadb
systemctl enable mariadb
现在开始配置 MariaDB 的 root 用户密码。
mysql_secure_installation
键入 Y ,然后设置 MariaDB 的 root 密码。
Set root password? [Y/n] Y
New password:
Re-enter new password:
Remove anonymous users? [Y/n] Y
Disallow root login remotely? [Y/n] Y
Remove test database and access to it? [Y/n] Y
Reload privilege tables now? [Y/n] Y
这样就设置好了密码,现在登录到 mysql shell 并为 Nextcloud 创建一个新的数据库和用户。这里我创建名为 nextcloud_db 的数据库以及名为 nextclouduser 的用户,用户密码为 nextclouduser@ 。当然了,要给你自己的系统选用一个更安全的密码。
mysql -u root -p
输入 MariaDB 的 root 密码,即可登录 mysql shell。
输入以下 mysql 查询语句来创建新的数据库和用户。
create database nextcloud_db;
create user nextclouduser@localhost identified by 'nextclouduser@';
grant all privileges on nextcloud_db.* to nextclouduser@localhost identified by 'nextclouduser@';
flush privileges;
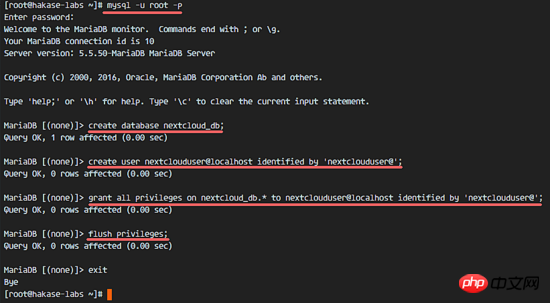
nextcloud_db 数据库和 nextclouduser 数据库用户创建完成
步骤 4 - 为 Nextcloud 生成一个自签名 SSL 证书
在教程中,我会让客户端以 https 连接来运行 Nextcloud。你可以使用诸如 let's encrypt 等免费 SSL 证书,或者是自己创建自签名 (self signed) SSL 证书。这里我使用 OpenSSL 来创建自己的自签名 SSL 证书。
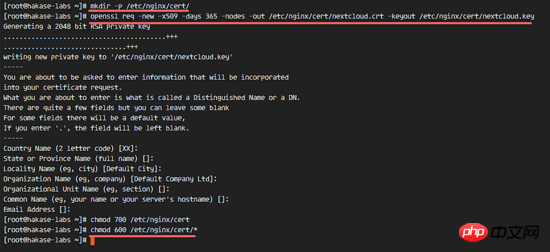
为 SSL 文件创建新目录:
mkdir -p /etc/nginx/cert/
如下,使用 openssl 生成一个新的 SSL 证书。
代码如下:
openssl req -new -x509 -days 365 -nodes -out /etc/nginx/cert/nextcloud.crt -keyout /etc/nginx/cert/nextcloud.key
最后使用 chmod 命令将所有证书文件的权限设置为 600。
chmod 700 /etc/nginx/cert
chmod 600 /etc/nginx/cert/*
步骤 5 - 下载和安装 Nextcloud
我直接使用 wget 命令下载 Nextcloud 到服务器上,因此需要先行安装 wget。此外,还需要安装 unzip 来进行解压。使用 yum 命令来安装这两个程序。
yum -y install wget unzip
先进入 /tmp 目录,然后使用 wget 从官网下载最新的 Nextcloud 10。
cd /tmp
wget https://download.nextcloud.com/server/releases/nextcloud-10.0.2.zip
解压 Nextcloud,并将其移动到 /usr/share/nginx/html/ 目录。
unzip nextcloud-10.0.2.zip
mv nextcloud/ /usr/share/nginx/html/
下一步,转到 Nginx 的 web 根目录为 Nextcloud 创建一个 data 文件夹。
cd /usr/share/nginx/html/
mkdir -p nextcloud/data/
变更 nextcloud 目录的拥有者为 nginx 用户和组。
chown nginx:nginx -R nextcloud/
步骤 6 - 在 Nginx 中为 Nextcloud 配置虚拟主机
在步骤 5 我们已经下载好了 Nextcloud 源码,并配置好了让它运行于 Nginx 服务器中,但我们还需要为它配置一个虚拟主机。在 Nginx 的 conf.d 目录下创建一个新的虚拟主机配置文件 nextcloud.conf。
cd /etc/nginx/conf.d/
vim nextcloud.conf
将以下内容粘贴到虚拟主机配置文件中:
upstream php-handler {
  server 127.0.0.1:9000;
  #server unix:/var/run/php5-fpm.sock;
}
server {
  listen 80;
  server_name cloud.nextcloud.co;
  # enforce https
  return 301 https://$server_name$request_uri;
}
server {
  listen 443 ssl;
  server_name cloud.nextcloud.co;
  ssl_certificate /etc/nginx/cert/nextcloud.crt;
  ssl_certificate_key /etc/nginx/cert/nextcloud.key;
  # Add headers to serve security related headers
  # Before enabling Strict-Transport-Security headers please read into this
  # topic first.
  add_header Strict-Transport-Security "max-age=15768000;
  includeSubDomains; preload;";
  add_header X-Content-Type-Options nosniff;
  add_header X-Frame-Options "SAMEORIGIN";
  add_header X-XSS-Protection "1; mode=block";
  add_header X-Robots-Tag none;
  add_header X-Download-Options noopen;
  add_header X-Permitted-Cross-Domain-Policies none;
  # Path to the root of your installation
  root /usr/share/nginx/html/nextcloud/;
  location = /robots.txt {
    allow all;
    log_not_found off;
    access_log off;
  }
  # The following 2 rules are only needed for the user_webfinger app.
  # Uncomment it if you're planning to use this app.
  #rewrite ^/.well-known/host-meta /public.php?service=host-meta last;
  #rewrite ^/.well-known/host-meta.json /public.php?service=host-meta-json
  # last;
  location = /.well-known/carddav {
   return 301 $scheme://$host/remote.php/dav;
  }
  location = /.well-known/caldav {
   return 301 $scheme://$host/remote.php/dav;
  }
  # set max upload size
  client_max_body_size 512M;
  fastcgi_buffers 64 4K;
  # Disable gzip to avoid the removal of the ETag header
  gzip off;
  # Uncomment if your server is build with the ngx_pagespeed module
  # This module is currently not supported.
  #pagespeed off;
  error_page 403 /core/templates/403.php;
  error_page 404 /core/templates/404.php;
  location / {
    rewrite ^ /index.php$uri;
  }
  location ~ ^/(?:build|tests|config|lib|3rdparty|templates|data)/ {
    deny all;
  }
  location ~ ^/(?:\.|autotest|occ|issue|indie|db_|console) {
    deny all;
  }
  location ~ ^/(?:index|remote|public|cron|core/ajax/update|status|ocs/v[12]|updater/.+|ocs-provider/.+|core/templates/40[34])\.php(?:$|/) {
    include fastcgi_params;
    fastcgi_split_path_info ^(.+\.php)(/.*)$;
    fastcgi_param script_FILENAME $document_root$fastcgi_script_name;
    fastcgi_param PATH_INFO $fastcgi_path_info;
    fastcgi_param HTTPS on;
    #Avoid sending the security headers twice
    fastcgi_param modHeadersAvailable true;
    fastcgi_param front_controller_active true;
    fastcgi_pass php-handler;
    fastcgi_intercept_errors on;
    fastcgi_request_buffering off;
  }
  location ~ ^/(?:updater|ocs-provider)(?:$|/) {
    try_files $uri/ =404;
    index index.php;
  }
  # Adding the cache control header for js and css files
  # Make sure it is BELOW the PHP block
  location ~* \.(?:css|js)$ {
    try_files $uri /index.php$uri$is_args$args;
    add_header Cache-Control "public, max-age=7200";
    # Add headers to serve security related headers (It is intended to
    # have those duplicated to the ones above)
    # Before enabling Strict-Transport-Security headers please read into
    # this topic first.
    add_header Strict-Transport-Security "max-age=15768000;
    includeSubDomains; preload;";
    add_header X-Content-Type-Options nosniff;
    add_header X-Frame-Options "SAMEORIGIN";
    add_header X-XSS-Protection "1; mode=block";
    add_header X-Robots-Tag none;
    add_header X-Download-Options noopen;
    add_header X-Permitted-Cross-Domain-Policies none;
    # Optional: Don't log access to assets
    access_log off;
  }
  location ~* \.(?:svg|gif|png|html|ttf|woff|ico|jpg|jpeg)$ {
    try_files $uri /index.php$uri$is_args$args;
    # Optional: Don't log access to other assets
    access_log off;
  }
}保存文件并退出 vim。
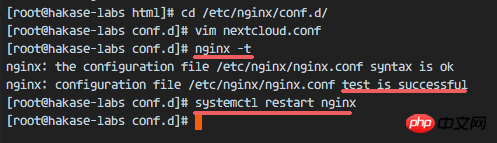
下载测试以下该 Nginx 配置文件是否有错误,没有的话就可以重启服务了。
nginx -t
systemctl restart nginx
步骤 7 - 为 Nextcloud 配置 SELinux 和 FirewallD 规则
本教程中,我们将以强制模式运行 SELinux,因此需要一个 SELinux 管理工具来为 Nextcloud 配置 SELinux。
使用以下命令安装 SELinux 管理工具。
yum -y install policycoreutils-python
然后以 root 用户来运行以下命令,以便让 Nextcloud 运行于 SELinux 环境之下。如果你是用的其他名称的目录,记得将 nextcloud 替换掉。
semanage fcontext -a -t httpd_sys_rw_content_t '/usr/share/nginx/html/nextcloud/data(/.*)?'
semanage fcontext -a -t httpd_sys_rw_content_t '/usr/share/nginx/html/nextcloud/config(/.*)?'
semanage fcontext -a -t httpd_sys_rw_content_t '/usr/share/nginx/html/nextcloud/apps(/.*)?'
semanage fcontext -a -t httpd_sys_rw_content_t '/usr/share/nginx/html/nextcloud/assets(/.*)?'
semanage fcontext -a -t httpd_sys_rw_content_t '/usr/share/nginx/html/nextcloud/.htaccess'
semanage fcontext -a -t httpd_sys_rw_content_t '/usr/share/nginx/html/nextcloud/.user.ini'
restorecon -Rv '/usr/share/nginx/html/nextcloud/'
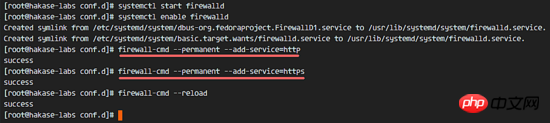
接下来,我们要启用 firewalld 服务,同时为 Nextcloud 开启 http 和 https 端口。
启动 firewalld 并设置随系统启动。
systemctl start firewalld
systemctl enable firewalld
现在使用 firewall-cmd 命令来开启 http 和 https 端口,然后重新加载防火墙。
firewall-cmd --permanent --add-service=http
firewall-cmd --permanent --add-service=https
firewall-cmd --reload
至此,服务器配置完成。
步骤 8 - Nextcloud 安装
打开你的 Web 浏览器,输入你为 Nextcloud 设置的域名,我这里设置为 cloud.nextcloud.co,然后会重定向到安全性更好的 https 连接。
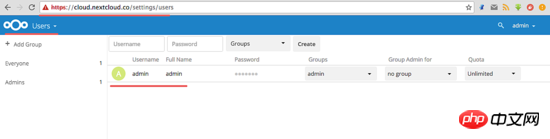
设置你的管理员用户名和密码,然后输入数据验证信息,点击 '完成安装 (Finish Setup)'。
Nextcloud 安装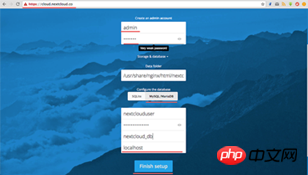
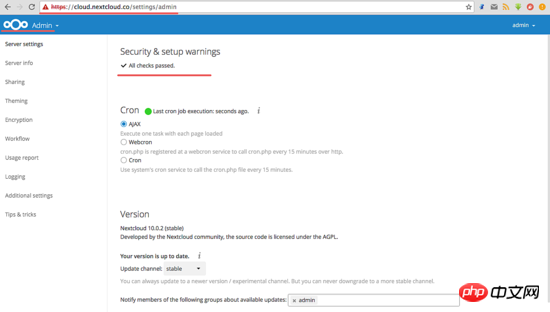
Nextcloud 管理面板大致如下:
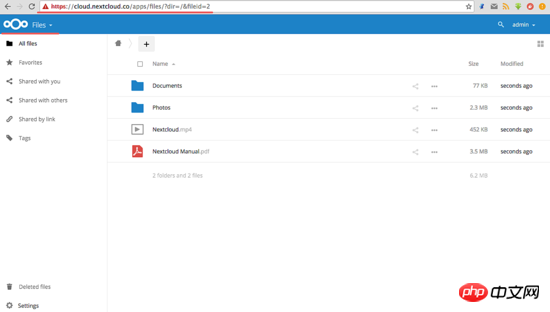
Nextcloud 用户设置:
管理设置:
至此,我们在 CentOS 7 服务器上通过使用 Nginx、PHP7-FPM、MariaDB 完成了 Nextcloud 的安装。希望对大家的学习有所帮助,也希望大家多多支持脚本之家。
Atas ialah kandungan terperinci 详解如何在CentOS7中使用Nginx和PHP7-FPM安装Nextcloud的图文教程. Untuk maklumat lanjut, sila ikut artikel berkaitan lain di laman web China PHP!

Alat AI Hot

Undresser.AI Undress
Apl berkuasa AI untuk mencipta foto bogel yang realistik

AI Clothes Remover
Alat AI dalam talian untuk mengeluarkan pakaian daripada foto.

Undress AI Tool
Gambar buka pakaian secara percuma

Clothoff.io
Penyingkiran pakaian AI

AI Hentai Generator
Menjana ai hentai secara percuma.

Artikel Panas
Alat panas

Notepad++7.3.1
Editor kod yang mudah digunakan dan percuma

SublimeText3 versi Cina
Versi Cina, sangat mudah digunakan

Hantar Studio 13.0.1
Persekitaran pembangunan bersepadu PHP yang berkuasa

Dreamweaver CS6
Alat pembangunan web visual

SublimeText3 versi Mac
Perisian penyuntingan kod peringkat Tuhan (SublimeText3)
Topik panas
 1378
1378
 52
52

 Cara Mengkonfigurasi Nginx di Windows
Apr 14, 2025 pm 12:57 PM
Cara Mengkonfigurasi Nginx di Windows
Apr 14, 2025 pm 12:57 PM
Bagaimana cara mengkonfigurasi nginx di Windows? Pasang Nginx dan buat konfigurasi hos maya. Ubah suai fail konfigurasi utama dan sertakan konfigurasi hos maya. Mulakan atau Muat semula Nginx. Uji konfigurasi dan lihat laman web. Selektif membolehkan SSL dan mengkonfigurasi sijil SSL. Selektif tetapkan firewall untuk membolehkan trafik port 80 dan 443.
 Bagaimana untuk memeriksa sama ada Nginx dimulakan?
Apr 14, 2025 pm 12:48 PM
Bagaimana untuk memeriksa sama ada Nginx dimulakan?
Apr 14, 2025 pm 12:48 PM
Di Linux, gunakan arahan berikut untuk memeriksa sama ada nginx dimulakan: Hakim status SistemCTL Nginx berdasarkan output arahan: Jika "Aktif: Aktif (Running)" dipaparkan, Nginx dimulakan. Jika "aktif: tidak aktif (mati)" dipaparkan, nginx dihentikan.
 Cara memeriksa sama ada nginx dimulakan
Apr 14, 2025 pm 01:03 PM
Cara memeriksa sama ada nginx dimulakan
Apr 14, 2025 pm 01:03 PM
Bagaimana untuk mengesahkan sama ada nginx dimulakan: 1. Gunakan baris arahan: status sistem sistem nginx (linux/unix), netstat -ano | Findstr 80 (Windows); 2. Periksa sama ada port 80 dibuka; 3. Semak mesej permulaan Nginx dalam log sistem; 4. Gunakan alat pihak ketiga, seperti Nagios, Zabbix, dan Icinga.
 Cara menyelesaikan nginx403
Apr 14, 2025 am 10:33 AM
Cara menyelesaikan nginx403
Apr 14, 2025 am 10:33 AM
Bagaimana untuk memperbaiki kesilapan dilarang nginx 403? Semak keizinan fail atau direktori; 2. Semak .htaccess File; 3. Semak fail konfigurasi nginx; 4. Mulakan semula nginx. Penyebab lain yang mungkin termasuk peraturan firewall, tetapan selinux, atau isu aplikasi.
 Cara memulakan nginx di linux
Apr 14, 2025 pm 12:51 PM
Cara memulakan nginx di linux
Apr 14, 2025 pm 12:51 PM
Langkah -langkah untuk memulakan Nginx di Linux: Periksa sama ada Nginx dipasang. Gunakan SistemCTL Mula Nginx untuk memulakan perkhidmatan Nginx. Gunakan SistemCTL Dayakan NGINX untuk membolehkan permulaan automatik Nginx pada permulaan sistem. Gunakan Status SistemCTL Nginx untuk mengesahkan bahawa permulaan berjaya. Lawati http: // localhost dalam pelayar web untuk melihat halaman selamat datang lalai.
 Cara menyelesaikan ralat nginx403
Apr 14, 2025 pm 12:54 PM
Cara menyelesaikan ralat nginx403
Apr 14, 2025 pm 12:54 PM
Pelayan tidak mempunyai kebenaran untuk mengakses sumber yang diminta, mengakibatkan ralat NGINX 403. Penyelesaian termasuk: Periksa keizinan fail. Semak konfigurasi .htaccess. Semak konfigurasi Nginx. Konfigurasikan keizinan Selinux. Semak peraturan firewall. Menyelesaikan masalah lain seperti masalah penyemak imbas, kegagalan pelayan, atau kesilapan lain yang mungkin.
 Cara menyelesaikan masalah domain nginx
Apr 14, 2025 am 10:15 AM
Cara menyelesaikan masalah domain nginx
Apr 14, 2025 am 10:15 AM
Terdapat dua cara untuk menyelesaikan masalah silang domain Nginx: Ubah suai tajuk tindak balas silang domain: Tambah arahan untuk membenarkan permintaan lintas domain, nyatakan kaedah dan tajuk yang dibenarkan, dan tetapkan masa cache. Gunakan modul CORS: Dayakan modul dan konfigurasikan peraturan CORS untuk membolehkan permintaan, kaedah, tajuk, dan masa cache domain.
 Cara menyelesaikan ralat nginx304
Apr 14, 2025 pm 12:45 PM
Cara menyelesaikan ralat nginx304
Apr 14, 2025 pm 12:45 PM
Jawab kepada Soalan: 304 Tidak diubahsuai ralat menunjukkan bahawa penyemak imbas telah cache versi sumber terkini permintaan klien. Penyelesaian: 1. Kosongkan cache penyemak imbas; 2. Lumpuhkan cache penyemak imbas; 3. Konfigurasi nginx untuk membolehkan cache pelanggan; 4. Periksa keizinan fail; 5. Semak fail hash; 6. Lumpuhkan CDN atau cache proksi terbalik; 7. Mulakan semula nginx.
