

分享利用 HTML5 的 Canvas 制作人脸的实例代码

这里主要使用了 HTML5 的 Canvas 进行绘制。利用html5制作人脸的实例代码。
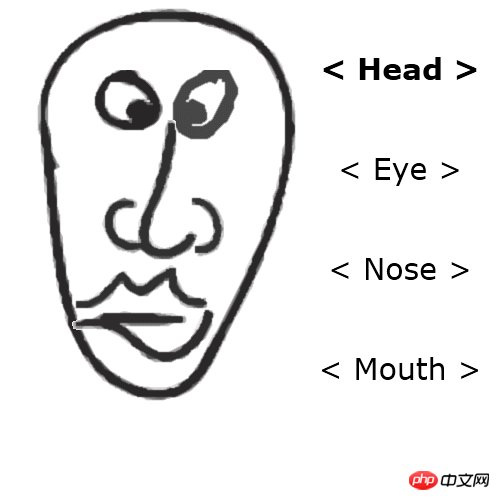
先看我们要绘制的人脸效果图:
这里主要使用了 HTML5 的 Canvas 进行绘制。
下面我们开始整个绘制过程:
1. HTML (index.html)
<!DOCTYPE html>
<html lang="en" >
    <head>
        <meta charset="utf-8" />

        <title>HTML5 Face Builder | Script Tutorials</title>

        <link href="css/main.css" rel="stylesheet" type="text/css" />

        <script src="http://code.jquery.com/jquery-latest.min.js"></script>
        <script type="text/javascript" src="js/script.js"></script>
    </head>
    <body>

        <header>
            <h2>HTML5 image crop tool</h2>
            <a href="http://www.script-tutorials.com/html5-face-builder/" class="stuts">Back to original tutorial on <span>Script Tutorials</span></a>

        </header>
        <p class="container">
            <canvas id="scene" width="500" height="500"></canvas>

            <p id="results">
                <h2>Use arrow keys to select your face details (up-down to select category, left-right to switch them), then click Spacebar to export as image.</h2>
                <img id="face_result" />
            </p>

        </p>
    </body>
</html>2. js/script.js
// inner variables
var canvas, ctx;
var oHead, oEye, oNose, oMouth;
var iSel = 0;
// -------------------------------------------------------------
// objects :
function Head(x, y, x2, y2, w, h, image) {
this.x = x;
this.y = y;
this.x2 = x2;
this.y2 = y2;
this.w = w;
this.h = h;
this.image = image;
this.iSpr = 0;
}
function Eye(x, y, x2, y2, w, h, image) {
this.x = x;
this.y = y;
this.x2 = x2;
this.y2 = y2;
this.w = w;
this.h = h;
this.image = image;
this.iSpr = 0;
}
function Nose(x, y, x2, y2, w, h, image) {
this.x = x;
this.y = y;
this.x2 = x2;
this.y2 = y2;
this.w = w;
this.h = h;
this.image = image;
this.iSpr = 0;
}
function Mouth(x, y, x2, y2, w, h, image) {
this.x = x;
this.y = y;
this.x2 = x2;
this.y2 = y2;
this.w = w;
this.h = h;
this.image = image;
this.iSpr = 0;
}
// -------------------------------------------------------------
// draw functions :
function clear() { // clear canvas function
ctx.clearRect(0, 0, ctx.canvas.width, ctx.canvas.height);
}
function drawScene() { // main drawScene function
clear(); // clear canvas
// draw head
ctx.drawImage(oHead.image, oHead.x2 + oHead.iSpr*oHead.w, oHead.y2, oHead.w, oHead.h, oHead.x, oHead.y, oHead.w, oHead.h);
// draw eyes
ctx.drawImage(oEye.image, oEye.x2 + oEye.iSpr*oEye.w, oEye.y2, oEye.w, oEye.h, oEye.x, oEye.y, oEye.w, oEye.h);
// draw nose
ctx.drawImage(oNose.image, oNose.x2 + oNose.iSpr*oNose.w, oNose.y2, oNose.w, oNose.h, oNose.x, oNose.y, oNose.w, oNose.h);
// draw mouth
ctx.drawImage(oMouth.image, oMouth.x2 + oMouth.iSpr*oMouth.w, oMouth.y2, oMouth.w, oMouth.h, oMouth.x, oMouth.y, oMouth.w, oMouth.h);
// draw controls
ctx.textAlign = 'center';
ctx.fillStyle = '#000';
ctx.font = '30px Verdana';
if (iSel == 0)
ctx.font = 'bold 30px Verdana';
ctx.fillText('< Head >', 400, 80);
ctx.font = '30px Verdana';
if (iSel == 1)
ctx.font = 'bold 30px Verdana';
ctx.fillText('< Eye >', 400, 180);
ctx.font = '30px Verdana';
if (iSel == 2)
ctx.font = 'bold 30px Verdana';
ctx.fillText('< Nose >', 400, 280);
ctx.font = '30px Verdana';
if (iSel == 3)
ctx.font = 'bold 30px Verdana';
ctx.fillText('< Mouth >', 400, 380);
}
// -------------------------------------------------------------
// initialization
$(function(){
canvas = document.getElementById('scene');
ctx = canvas.getContext('2d');
// initialization of dragon
var oHeadImage = new Image();
oHeadImage.src = 'images/image.png';
oHeadImage.onload = function() {};
oHead = new Head(0, 0, 0, 755, 300, 405, oHeadImage);
oEye = new Eye(40, 70, 0, 120, 235, 80, oHeadImage);
oNose = new Nose(70, 120, 0, 276, 180, 140, oHeadImage);
oMouth = new Mouth(60, 260, 0, 546, 170, 120, oHeadImage);
$(window).keydown(function(event){
switch (event.keyCode) {
case 38: // Up key
iSel--;
if (iSel < 0) {
iSel = 3;
}
break;
case 40: // Up key
iSel++;
if (iSel >= 4) {
iSel = 0;
}
break;
case 37: // Left key
// update sprite positions
if (iSel == 0) {
oHead.iSpr--;
if (oHead.iSpr < 0) {
oHead.iSpr = 3;
}
}
if (iSel == 1) {
oEye.iSpr--;
if (oEye.iSpr < 0) {
oEye.iSpr = 4;
}
}
if (iSel == 2) {
oNose.iSpr--;
if (oNose.iSpr < 0) {
oNose.iSpr = 4;
}
}
if (iSel == 3) {
oMouth.iSpr--;
if (oMouth.iSpr < 0) {
oMouth.iSpr = 4;
}
}
break;
case 39: // Right key
// update sprite positions
if (iSel == 0) {
oHead.iSpr++;
if (oHead.iSpr >= 4) {
oHead.iSpr = 0;
}
}
if (iSel == 1) {
oEye.iSpr++;
if (oEye.iSpr >= 5) {
oEye.iSpr = 0;
}
}
if (iSel == 2) {
oNose.iSpr++;
if (oNose.iSpr >= 5) {
oNose.iSpr = 0;
}
}
if (iSel == 3) {
oMouth.iSpr++;
if (oMouth.iSpr >= 5) {
oMouth.iSpr = 0;
}
}
break;
case 32: // Spacebar key - export results
var temp_ctx, temp_canvas;
temp_canvas = document.createElement('canvas');
temp_ctx = temp_canvas.getContext('2d');
temp_canvas.width = 360;
temp_canvas.height = 410;
// draw head
temp_ctx.drawImage(oHead.image, oHead.iSpr*oHead.w, oHead.y2, oHead.w, oHead.h, oHead.x, oHead.y, oHead.w, oHead.h);
// draw eyes
temp_ctx.drawImage(oEye.image, oEye.iSpr*oEye.w, oEye.y2, oEye.w, oEye.h, oEye.x, oEye.y, oEye.w, oEye.h);
// draw nose
temp_ctx.drawImage(oNose.image, oNose.iSpr*oNose.w, oNose.y2, oNose.w, oNose.h, oNose.x, oNose.y, oNose.w, oNose.h);
// draw mouth
temp_ctx.drawImage(oMouth.image, oMouth.iSpr*oMouth.w, oMouth.y2, oMouth.w, oMouth.h, oMouth.x, oMouth.y, oMouth.w, oMouth.h);
var vData = temp_canvas.toDataURL();
$('#face_result').attr('src', vData);
break;
}
});
setInterval(drawScene, 40); // loop drawScene
});【相关推荐】
1. 免费h5在线视频教程
2. HTML5 完整版手册
Atas ialah kandungan terperinci 分享利用 HTML5 的 Canvas 制作人脸的实例代码. Untuk maklumat lanjut, sila ikut artikel berkaitan lain di laman web China PHP!

Alat AI Hot

Undresser.AI Undress
Apl berkuasa AI untuk mencipta foto bogel yang realistik

AI Clothes Remover
Alat AI dalam talian untuk mengeluarkan pakaian daripada foto.

Undress AI Tool
Gambar buka pakaian secara percuma

Clothoff.io
Penyingkiran pakaian AI

Video Face Swap
Tukar muka dalam mana-mana video dengan mudah menggunakan alat tukar muka AI percuma kami!

Artikel Panas
Alat panas

Notepad++7.3.1
Editor kod yang mudah digunakan dan percuma

SublimeText3 versi Cina
Versi Cina, sangat mudah digunakan

Hantar Studio 13.0.1
Persekitaran pembangunan bersepadu PHP yang berkuasa

Dreamweaver CS6
Alat pembangunan web visual

SublimeText3 versi Mac
Perisian penyuntingan kod peringkat Tuhan (SublimeText3)
Topik panas
 1393
1393
 52
37
110
52
37
110

 Sempadan Jadual dalam HTML
Sep 04, 2024 pm 04:49 PM
Sempadan Jadual dalam HTML
Sep 04, 2024 pm 04:49 PM
Panduan untuk Sempadan Jadual dalam HTML. Di sini kita membincangkan pelbagai cara untuk menentukan sempadan jadual dengan contoh Sempadan Jadual dalam HTML.
 Jadual Bersarang dalam HTML
Sep 04, 2024 pm 04:49 PM
Jadual Bersarang dalam HTML
Sep 04, 2024 pm 04:49 PM
Ini ialah panduan untuk Nested Table dalam HTML. Di sini kita membincangkan cara membuat jadual dalam jadual bersama-sama dengan contoh masing-masing.
 HTML jidar-kiri
Sep 04, 2024 pm 04:48 PM
HTML jidar-kiri
Sep 04, 2024 pm 04:48 PM
Panduan untuk HTML margin-kiri. Di sini kita membincangkan gambaran keseluruhan ringkas tentang HTML margin-left dan Contoh-contohnya bersama-sama dengan Pelaksanaan Kodnya.
 Susun Atur Jadual HTML
Sep 04, 2024 pm 04:54 PM
Susun Atur Jadual HTML
Sep 04, 2024 pm 04:54 PM
Panduan untuk Susun Atur Jadual HTML. Di sini kita membincangkan Nilai Susun Atur Jadual HTML bersama-sama dengan contoh dan output n perincian.
 Pemegang Tempat Input HTML
Sep 04, 2024 pm 04:54 PM
Pemegang Tempat Input HTML
Sep 04, 2024 pm 04:54 PM
Panduan untuk Pemegang Tempat Input HTML. Di sini kita membincangkan Contoh Pemegang Tempat Input HTML bersama-sama dengan kod dan output.
 Memindahkan Teks dalam HTML
Sep 04, 2024 pm 04:45 PM
Memindahkan Teks dalam HTML
Sep 04, 2024 pm 04:45 PM
Panduan untuk Memindahkan Teks dalam HTML. Di sini kita membincangkan pengenalan, cara teg marquee berfungsi dengan sintaks dan contoh untuk dilaksanakan.
 Senarai Tertib HTML
Sep 04, 2024 pm 04:43 PM
Senarai Tertib HTML
Sep 04, 2024 pm 04:43 PM
Panduan kepada Senarai Tertib HTML. Di sini kami juga membincangkan pengenalan senarai dan jenis Tertib HTML bersama-sama dengan contoh mereka masing-masing
 Butang onclick HTML
Sep 04, 2024 pm 04:49 PM
Butang onclick HTML
Sep 04, 2024 pm 04:49 PM
Panduan untuk Butang onclick HTML. Di sini kita membincangkan pengenalan, kerja, contoh dan onclick Event masing-masing dalam pelbagai acara.
