微信开发百思不得姐实战教程
May 12, 2017 am 11:16 AM这篇文章主要介绍了微信小程序 实战小程序实例的相关资料,需要的朋友可以参考下
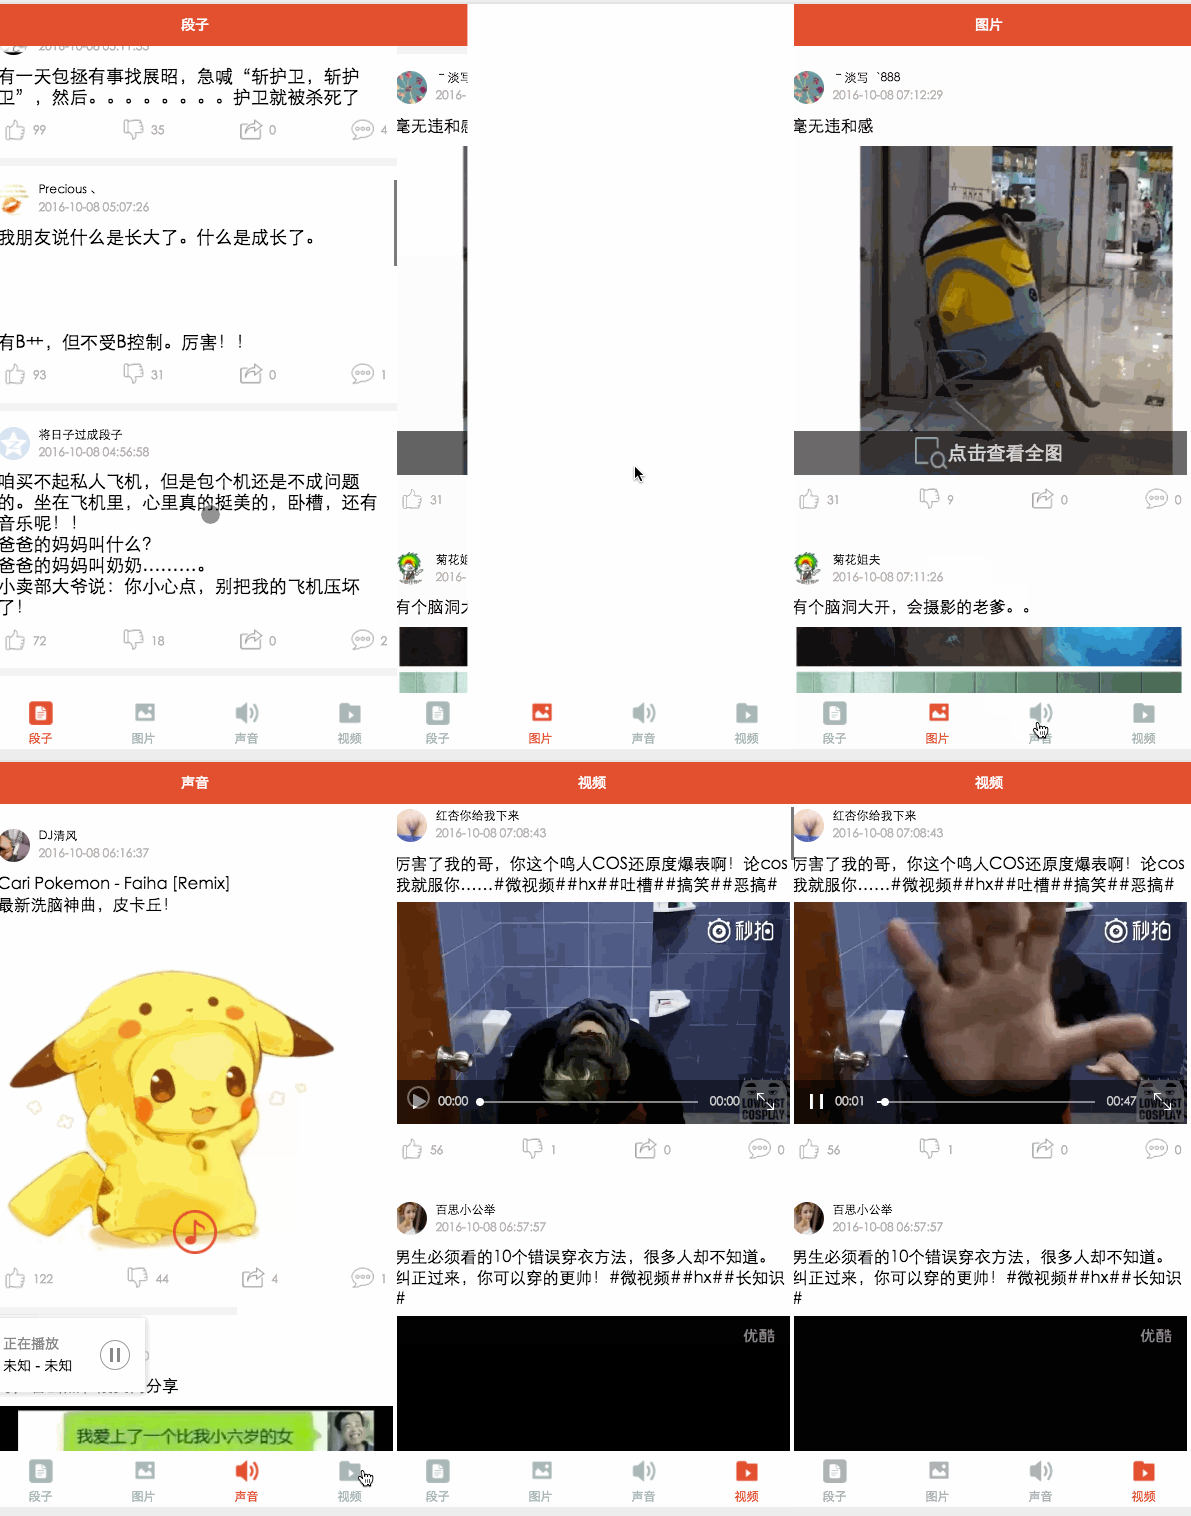
微信小程序基本组件和API已撸完,总归要回到正题的,花了大半天时间做了个精简版的百思不得姐,包括段子,图片,音频,视频,四个模块。这篇就带着大家简述下这个小的APP,源码会放到GitHub上欢迎start。
项目中我能学到什么?
{
 "pages":[
  "pages/word/word",
  "pages/image/image",
  "pages/voice/voice",
  "pages/video/video",
  "pages/detail/detail"
 ],
 "tabBar": {
  "color": "#a9b7b7",
  "selectedColor": "#eb4f38",
  "borderStyle": "white",
  "backgroundColor": "#ffffff",
  "list": [
   {
    "pagePath": "pages/word/word",
    "text": "段子",
    "iconPath": "image/wordN.png",
    "selectedIconPath": "image/wordS.png"
   },
   {
    "pagePath": "pages/image/image",
    "text": "图片",
    "iconPath": "image/imageN.png",
    "selectedIconPath": "image/imageS.png"
   },
   {
    "pagePath": "pages/voice/voice",
    "text": "声音",
    "iconPath": "image/voiceN.png",
    "selectedIconPath": "image/voiceS.png"
   },
   {
    "pagePath": "pages/video/video",
    "text": "视频",
    "iconPath": "image/videoN.png",
    "selectedIconPath": "image/videoS.png"
   }

  ]
 },
 "window":{
  "backgroundTextStyle":"light",
  "navigationBarBackgroundColor": "#eb4f38",
  "navigationBarTextStyle":"white"
 }
}
这里我们只要配置下程序全局属性,每个页面需要在pags属性中引入,有时候tabbar不显示有可能是因为这个,tabbar底部导航Item分为四个就是list里面的,这里主要配置选中未选中颜色背景色及每个底部选项页面页面引入和图片引入。window 属性主要配置窗体整体的颜色文字颜色和背景色,这里的window属性会被每个页面的window属性给覆盖。
app.wxss
/*整体view样式*/
.containsView{
 padding: 15rpx 15rpx 15rpx 15rpx;
 margin-top: 15rpx;
 margin-bottom: 15rpx;
 background-color: white;
}
/*头部整体样式*/
.topContainsView{
 display: flex;
 flex-direction: row;
 align-items: center;
 margin-bottom: 18rpx;
}

/**
 * 头像样式
*/
.profileImage{
 width: 60rpx;
 height: 60rpx;
 border-radius: 30rpx;
}

/*头部显示名字和时间整体样式*/
.topRightView{
 margin-left: 15rpx;
 display: flex;
 flex-direction: column;
}
/*用户名称样式*/
.topRightName{
 font-size: 18rpx;
}
/*时间样式*/
.topRightTime{
 font-size: 14rpx;
 color: #b8b2b2;
 margin-top: 10rpx;
}

/*因为中间部分不一样不放在整体样式中*/

/*底部view整体样式*/
.bottomView{
 display: flex;
 flex-direction: row;
 justify-content: space-between;
 align-items: center;
}
/*每个Item样式*/
.bottomItemView{
 display: flex;
 flex-direction: row;
 align-items: center;
 justify-content: center;
 margin-top: 18rpx;
 padding-left: 10rpx;
 padding-right: 10rpx;
}
/*Item样式中的图标样式 顶 踩 分享 评论*/
.bottomItemImage{
 width: 45rpx;
 height: 45rpx;
}
/*Item中的文字样式 顶 踩 分享 评论*/
.bottomItemText{
 font-size: 15rpx;
 color: #b8b2b2;
 margin-left: 10rpx;
 margin-top: 8rpx;
}

/*分割线样式*/
.pLine{
 background: #f3f3f3;
 width: 100%;
 height: 15rpx;
}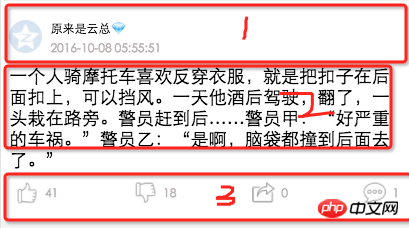
app.wxss我将四个模块分为三个部分 头部,内容区域, 底部因为每个页面头部,底部样式都一样而中间部分不一样所以我把1,3抽到全局中,注释比较清晰
段子模块
word.wxml
<loading hidden="{{loadingHidden}}">正在加载...</loading>
<scroll-view scroll-y="true" bindscrolltoupper="bindscrolltoupper" bindscrolltolower="bindscrolltolower" style="height: 100%">
 <block wx:for-items="{{list}}">
  <!-- 分割线 -->
  <view class="pLine"></view>
  <!-- 整体item样式 -->
  <view class="containsView">
   <view class="topContainsView">
    <image class="profileImage" src="{{item.profile_image}}" />
    <view class="topRightView">
     <text class="topRightName">{{item.name}}</text>
     <text class="topRightTime">{{item.passtime}}</text>
    </view>
   </view>
   <!-- 中间内容 -->
   <text class="centerContent">{{item.text}}</text>
   <!-- 底部view样式 -->
   <view class="bottomView">
    <view class="bottomItemView">
     <image class="bottomItemImage" src="../../image/ding.png" />
     <text class="bottomItemText">{{item.ding}}</text>
    </view>
    <view class="bottomItemView">
     <image class="bottomItemImage" src="../../image/cai.png" />
     <text class="bottomItemText">{{item.cai}}</text>
    </view>
    <view class="bottomItemView">
     <image class="bottomItemImage" src="../../image/share.png" />
     <text class="bottomItemText">{{item.repost}}</text>
    </view>
    <view class="bottomItemView">
     <image class="bottomItemImage" src="../../image/comment.png" />
     <text class="bottomItemText">{{item.comment}}</text>
    </view>
   </view>
  </view>
 </block>
</scroll-view>外层我们用scroll-view包裹以实现加载更多和上拉刷新 bindscrolltoupper=”bindscrolltoupper” 这个属性当滑动到顶部会调用这个方法bindscrolltolower=”bindscrolltolower”这个则滑到底部会调用,起始这里还可以将头部和底部布局抽出来通过引入方式使用,就不用四个页面都写了,自己可以弄下
word.js
Page({
 data: {
  list: [],
  maxtime: '',
  loadingHidden: false
 },
 onLoad: function (options) {
  // 页面初始化 options为页面跳转所带来的参数
  //加载最新
  this.requestData('newlist');
 },

 /**
  * 上拉刷新
  */
 bindscrolltoupper: function () {
  //加载最新
  // this.requestData('newlist');
 },

 /**
  * 加载更多
  */
 bindscrolltolower: function () {
  console.log('到底部')
  //加载更多
  this.requestData('list');
 },

 /**
  * 请求数据
  */
 requestData: function (a) {
  var that = this;
  console.log(that.data.maxtime)
  wx.request({
   url: 'http://api.budejie.com/api/api_open.php',
   data: {
    a: a,
    c: 'data',
    maxtime: that.data.maxtime,
    type: '29',
   },
   method: 'GET',
   success: function (res) {
    console.log(res)
    console.log('上一页', that.data.list)
    that.setData({
     // 拼接数组
     list: that.data.list.concat(res.data.list),
     loadingHidden: true,
     maxtime: res.data.info.maxtime
    })

   }
  })
 },
 onReady: function () {
  // 页面渲染完成
 },
 onShow: function () {
  // 页面显示
 },
 onHide: function () {
  // 页面隐藏
 },
 onUnload: function () {
  // 页面关闭
 }
})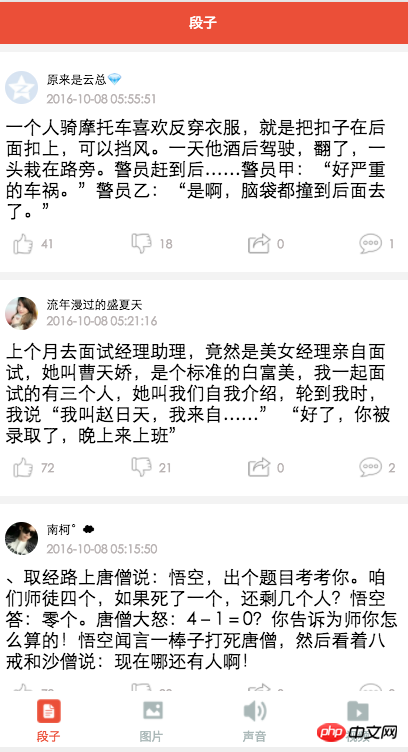
这里通过requestData方法加载数据,这个方法接受个参数,就是通过这个参数加载最新还是更多,通过maxtime这个参数去加载下一页,上一页的maxtime作为加载下一页的条件, 加载下一页数据我们通过concat方法将数组进行拼接,并改变加载状态loading。word.wxml和word.json中一个设置内容字体大小,一个设置导航条字,就不贴了。
图片模块
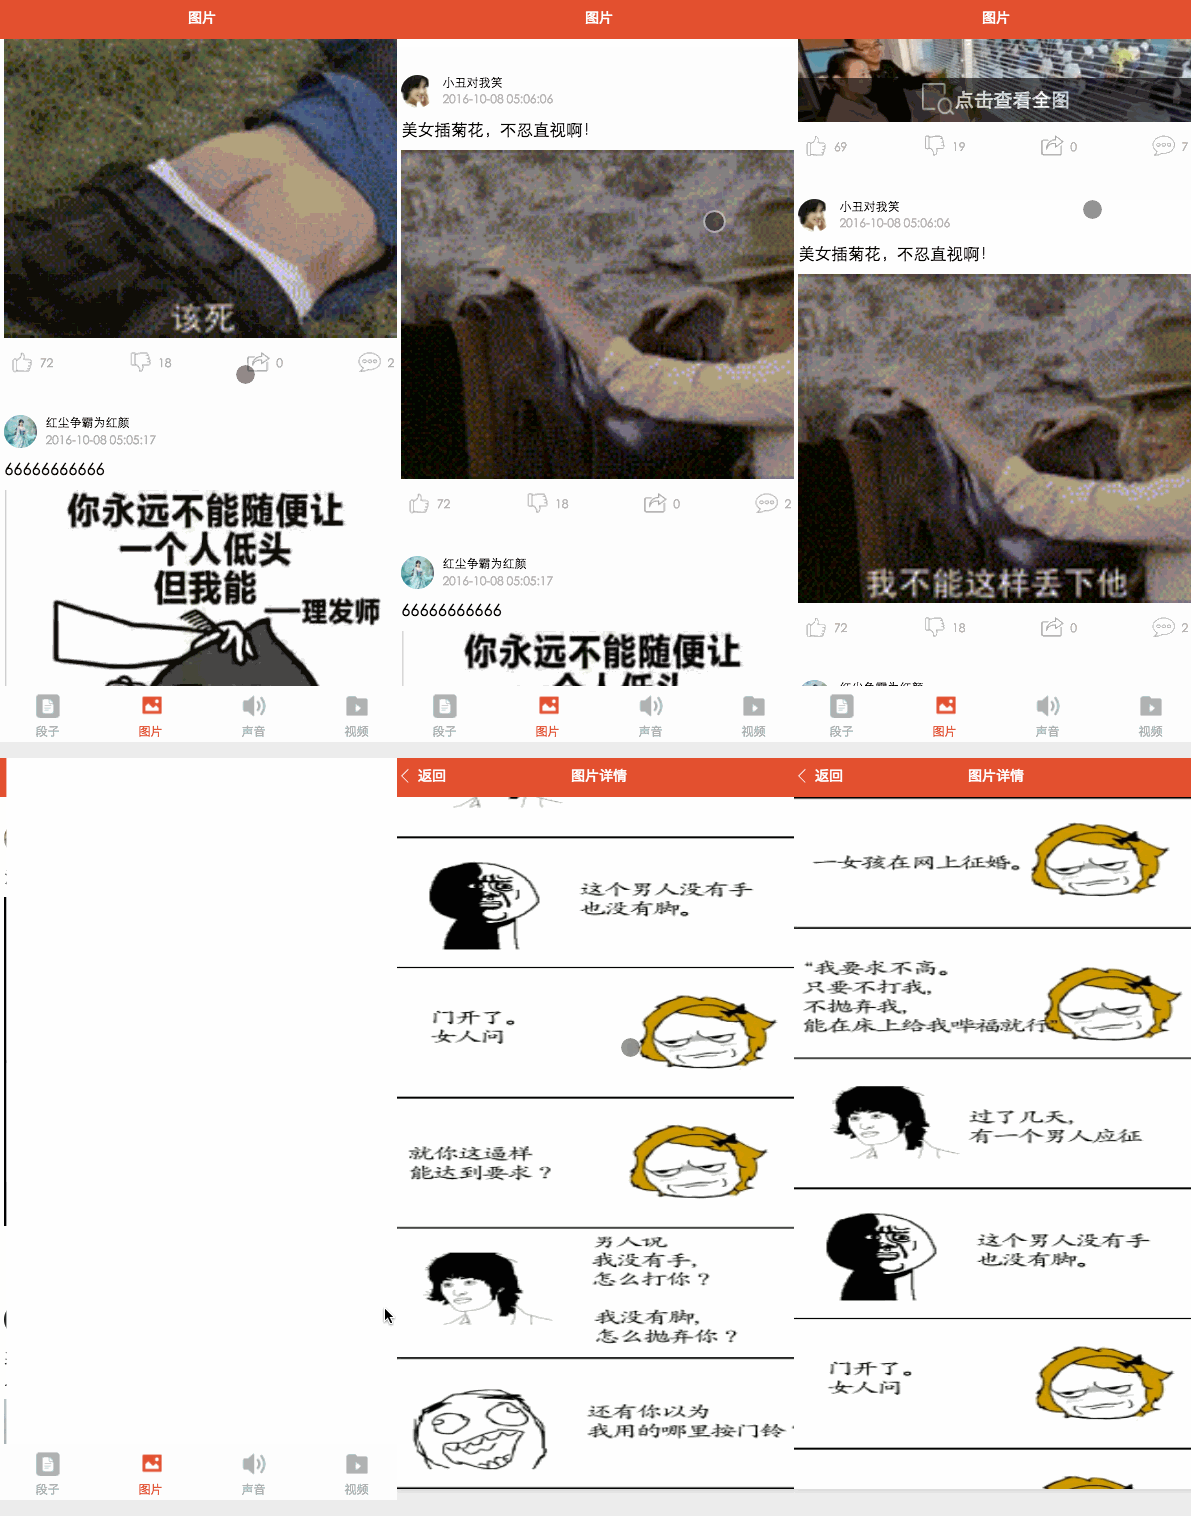
image.wxml
<loading hidden="{{loadingHidden}}">正在加载...</loading>
<scroll-view scroll-y="true" bindscrolltolower="bindscrolltolower" style="height: 100%">
 <block wx:for-items="{{list}}">
  <!-- 分割线 -->
  <view class="pLine"></view>
  <!-- 整体item样式 -->
  <view class="containsView">
   <view class="topContainsView">
    <image class="profileImage" src="{{item.profile_image}}" />
    <view class="topRightView">
     <text class="topRightName">{{item.name}}</text>
     <text class="topRightTime">{{item.passtime}}</text>
    </view>
   </view>
   <text style="font-size: 30rpx">{{item.text}}</text>
   <!-- 当时gif图 -->
   <view wx:if="{{item.is_gif != 0}}" style="position: relative;">
    <image class="centerContent" src="{{item.cdn_img}}" mode="aspectFill" />
   </view>
   <!-- 普通大图 可点击查看全部图片 -->
   <view data-url="{{item.cdn_img}}" data-height="{{item.height}}" data-width="{{item.width}}"
      bindtap="lookBigPicture" wx:elif="{{item.is_gif == 0}}" style="position: relative;">
    <!-- 图片资源 -->
    <image class="centerContent" src="{{item.cdn_img}}" mode="aspectFill" />
    <!-- 图片上浮动的点击查看详情图片view -->
    <view class="flexView">
     <image src="../../image/seeBigPicture.png" style="width: 60rpx; height: 60rpx;" />
     <text class="flexText">点击查看全图</text>
    </view>
   </view>
   <!-- 底部view样式 -->
   <view class="bottomView">
    <view class="bottomItemView">
     <image class="bottomItemImage" src="../../image/ding.png" />
     <text class="bottomItemText">{{item.ding}}</text>
    </view>
    <view class="bottomItemView">
     <image class="bottomItemImage" src="../../image/cai.png" />
     <text class="bottomItemText">{{item.cai}}</text>
    </view>
    <view class="bottomItemView">
     <image class="bottomItemImage" src="../../image/share.png" />
     <text class="bottomItemText">{{item.repost}}</text>
    </view>
    <view class="bottomItemView">
     <image class="bottomItemImage" src="../../image/comment.png" />
     <text class="bottomItemText">{{item.comment}}</text>
    </view>
   </view>
  </view>
 </block>
</scroll-view>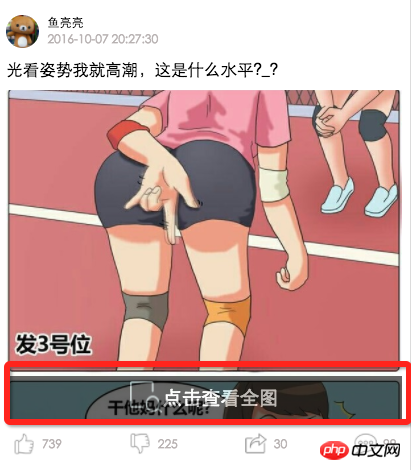

这里主要看中间部分我们通过是否是gif来区分处理图片,不是gif可以点击查看大图,这里有个view悬浮效果,结合界面和image.wxss看
image.wxss
/*中间文字样式*/
.centerContent{
 margin-top: 20rpx;
 width: 100%;
 height: 600rpx;

}
/*中间浮动文字样式*/
.flexView{
display: flex;
justify-content: center;
align-items: center;
width: 100%;
height: 80rpx;
position: absolute;
z-index: 2;
top: 540rpx;
background: #000000;
opacity: 0.6

}
/*浮动文字*/
.flexText{
 color: white;
 font-size: 35rpx;
}image.js
var detail = '../detail/detail'
Page({
 data: {
  list: [],
  maxtime: '',
  loadingHidden: false
 },
 onLoad: function (options) {
  // 页面初始化 options为页面跳转所带来的参数
  this.requestData('newlist');

 },
 /**
  * 滚动到底部时加载下一页
  */
 bindscrolltolower: function () {
  console.log('到底部')
  this.requestData('list');

 },

 /**
  * 加载数据
  */
 requestData: function (a) {
  var that = this;
  wx.request({
   url: 'http://api.budejie.com/api/api_open.php',
   data: {
    a: a,
    c: 'data',
    // 上一页的maxtime作为加载下一页的条件,
    maxtime: this.data.maxtime,
    type: '10',
   },
   method: 'GET',
   success: function (res) {
    console.log(res)
    console.log('上一页', that.datalist)
    that.setData({
     // 拼接数组
     list: that.data.list.concat(res.data.list),
     loadingHidden: true,
     maxtime: res.data.info.maxtime
    })

   }
  })
 },
 /**
  * 查看大图
  */
 lookBigPicture: function (e) {
  console.log(e);
  console.log(e.currentTarget.id)
  //图片url 对应wxml中data-url="{{item.url}}"
  var url = e.currentTarget.dataset.url;
  //获取图片高度 对应wxml中data-height="{{item.height}}"
  var height = e.currentTarget.dataset.height;
  //获取图片高度 对应wxml中data-width="{{item.width}}"
  var width = e.currentTarget.dataset.width;
  // 传参方式向GET请求
  wx.navigateTo({
   url: detail + '?' + 'url=' + url + "&height=" + height + "&width=" + width,
   success: function (res) {
    console.log(res)
   },
   fail: function (err) {
    console.log(err)
   },
  })
 },
 onReady: function () {
  // 页面渲染完成
 },
 onShow: function () {
  // 页面显示
 },
 onHide: function () {
  // 页面隐藏
 },
 onUnload: function () {
  // 页面关闭
 }
})这里主要看lookBigPicture方法 view data-url=”{{item.cdn_img}}” data-height=”{{item.height}}” data-width=”{{item.width}}”会在逻辑代码中装换成.语法使用 var url = e.currentTarget.dataset.url; 传值调转则向GET发送请求一样按照格式来就行了
【相关推荐】
1. 微信公众号平台源码下载
2. 投票源码下载
Atas ialah kandungan terperinci 微信开发百思不得姐实战教程. Untuk maklumat lanjut, sila ikut artikel berkaitan lain di laman web China PHP!

Artikel Panas

Alat panas Tag

Artikel Panas

Tag artikel panas

Notepad++7.3.1
Editor kod yang mudah digunakan dan percuma

SublimeText3 versi Cina
Versi Cina, sangat mudah digunakan

Hantar Studio 13.0.1
Persekitaran pembangunan bersepadu PHP yang berkuasa

Dreamweaver CS6
Alat pembangunan web visual

SublimeText3 versi Mac
Perisian penyuntingan kod peringkat Tuhan (SublimeText3)

Topik panas
 Program mini Xianyu WeChat dilancarkan secara rasmi
Feb 10, 2024 pm 10:39 PM
Program mini Xianyu WeChat dilancarkan secara rasmi
 Praktikal PHP: Contoh Kod untuk Melaksanakan Jujukan Fibonacci dengan Pantas
Mar 20, 2024 pm 02:24 PM
Praktikal PHP: Contoh Kod untuk Melaksanakan Jujukan Fibonacci dengan Pantas
 Applet WeChat melaksanakan fungsi muat naik imej
Nov 21, 2023 am 09:08 AM
Applet WeChat melaksanakan fungsi muat naik imej
 Gunakan applet WeChat untuk mencapai kesan penukaran karusel
Nov 21, 2023 pm 05:59 PM
Gunakan applet WeChat untuk mencapai kesan penukaran karusel
 Laksanakan kesan menu lungsur dalam applet WeChat
Nov 21, 2023 pm 03:03 PM
Laksanakan kesan menu lungsur dalam applet WeChat
 Laksanakan kesan penapis imej dalam program mini WeChat
Nov 21, 2023 pm 06:22 PM
Laksanakan kesan penapis imej dalam program mini WeChat
 Pertempuran Praktikal Golang: Perkongsian Petua Pelaksanaan untuk Fungsi Eksport Data
Feb 29, 2024 am 09:00 AM
Pertempuran Praktikal Golang: Perkongsian Petua Pelaksanaan untuk Fungsi Eksport Data


