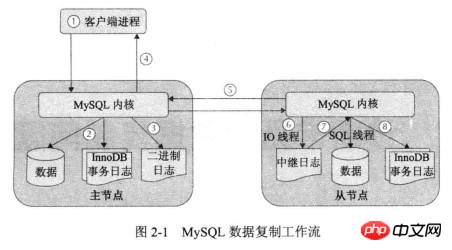
MySQL主从复制环境可以说是一切高可用的基础。它的原理也比较简单,下面我们先来了解下主从复制的原理:

虽然图上一共有7步,可以简化一下帮助记忆和理解:
Master上进行改、写操作;
MySQL把修改数据写进binlog;
Slave发起IO thread,把master上新的binlog拉取到本地中继日志中;
重放中继日志,让在master上面的修改、新增操作在Slave本机上重新运行一遍;
Slave按照正常的操作也会把操作写进本地的binlog。
本人有阿里云、腾讯云各一台屌丝机,因此用来试验,为保护隐私,把ip已经替换了,但不影响操作。
| 主机 | ip | 端口 | 版本 | 主从 |
|---|---|---|---|---|
| 阿里云 | 192.168.1.100 | 3306 | MySQL5.7.14 | Master |
| 腾讯云 | 192.168.1.200 | 3306 | MySQL5.7.18 | Slave |
在/etc/my.cnf中的mysqld选项下编辑,然后重启
[mysqld]
log-bin=mysql-bin
server-id=1003306
/etc/init.d/mysql restart
mysql> CREATE USER 'repl'@'%.mydomain.com' IDENTIFIED BY 'slave;
mysql> GRANT REPLICATION SLAVE ON *.* TO 'repl'@'192.168.1.200';
使用mysqldump导出所有数据库数据,另外备份文件中会记录当前的binlog文件和position。
#防止DDL、写操作
mysql>FLUSH TABLES WITH READ LOCK;
shell>mysqldump -uroot -p --single-transaction --master-data=2 -A>back.sql
也通过以下方式可以查看:
root@localhost [mysql]>show master status;
+------------------+----------+--------------+------------------+-------------------+
| File             | Position | Binlog_Do_DB | Binlog_Ignore_DB | Executed_Gtid_Set |
+------------------+----------+--------------+------------------+-------------------+
| mysql-bin.000045 |      939 |              |                  |                   |
+------------------+----------+--------------+------------------+-------------------+
1 row in set (0.00 sec)
解锁表
mysql> UNLOCK TABLES;
如果数据文件偏大或者数据多,可以使用percona的xtrabackup进行备份压缩,再传过去。
rsync back.sql root@192.168.1.200:/root
在/etc/my.cnf中的mysqld选项下编辑
[mysqld]
log-bin=mysql-bin
server-id=2003306
重启MySQL服务
shell>mysqldump -uroot -p --databases t1 <back.sql
这里的MASTER_LOG_FILE和MASTER_LOG_POS是刚才show master status的值,当然也可以使用more查看应该指定的位置。
CHANGE MASTER TO MASTER_HOST='192.168.1.200',MASTER_PORT=3306,MASTER_USER='repl',MASTER_PASSWORD='slave',MASTER_LOG_FILE='mysql-bin.000045',MASTER_LOG_POS=939;
这里的MASTER_LOG_FILE和MASTER_LOG_POS是刚才show master status的值,当然也可以使用more查看应该指定的位置。
shell>more back.sql
-- MySQL dump 10.13  Distrib 5.7.14, for linux-glibc2.5 (x86_64)
--
-- Host: localhost    Database:
-- ------------------------------------------------------
-- Server version   5.7.14-log

/*!40101 SET @OLD_CHARACTER_SET_CLIENT=@@CHARACTER_SET_CLIENT */;
/*!40101 SET @OLD_CHARACTER_SET_RESULTS=@@CHARACTER_SET_RESULTS */;
/*!40101 SET @OLD_COLLATION_CONNECTION=@@COLLATION_CONNECTION */;
/*!40101 SET NAMES utf8 */;
/*!40103 SET @OLD_TIME_ZONE=@@TIME_ZONE */;
/*!40103 SET TIME_ZONE='+00:00' */;
/*!40014 SET @OLD_UNIQUE_CHECKS=@@UNIQUE_CHECKS, UNIQUE_CHECKS=0 */;
/*!40014 SET @OLD_FOREIGN_KEY_CHECKS=@@FOREIGN_KEY_CHECKS, FOREIGN_KEY_CHECKS=0 */;
/*!40101 SET @OLD_SQL_MODE=@@SQL_MODE, SQL_MODE='NO_AUTO_VALUE_ON_ZERO' */;
/*!40111 SET @OLD_SQL_NOTES=@@SQL_NOTES, SQL_NOTES=0 */;

--
-- Position to start replication or point-in-time recovery from
--

CHANGE MASTER TO MASTER_LOG_FILE='mysql-bin.000045', MASTER_LOG_POS=939;
mysql>start slave;
mysql>show slave status\G
*************************** 1. row ***************************
               Slave_IO_State: Waiting for master to send event
                  Master_Host: 192.168.1.200
                  Master_User: repl
                  Master_Port: 3306
                Connect_Retry: 60
              Master_Log_File: mysql-bin.000045
          Read_Master_Log_Pos: 939
               Relay_Log_File: relay-bin.000001
                Relay_Log_Pos: 4
        Relay_Master_Log_File: mysql-bin.000045
             Slave_IO_Running: Yes
            Slave_SQL_Running: Yes
              Replicate_Do_DB:
          Replicate_Ignore_DB:
           Replicate_Do_Table:
       Replicate_Ignore_Table:
      Replicate_Wild_Do_Table:
  Replicate_Wild_Ignore_Table:
                   Last_Errno: 0
                   Last_Error:
                 Skip_Counter: 0
          Exec_Master_Log_Pos: 939
              Relay_Log_Space: 154
              Until_Condition: None
               Until_Log_File:
                Until_Log_Pos: 0
           Master_SSL_Allowed: No
           Master_SSL_CA_File:
           Master_SSL_CA_Path:
              Master_SSL_Cert:
            Master_SSL_Cipher:
               Master_SSL_Key:
        Seconds_Behind_Master: 0
Master_SSL_Verify_Server_Cert: No
                Last_IO_Errno: 0
                Last_IO_Error:
               Last_SQL_Errno: 0
               Last_SQL_Error:
  Replicate_Ignore_Server_Ids:
             Master_Server_Id: 23306
                  Master_UUID: 9a13d860-b55b-11e6-bf33-00163e054164
             Master_Info_File: /data/mysql/mysql3306/data/master.info
                    SQL_Delay: 0
          SQL_Remaining_Delay: NULL
      Slave_SQL_Running_State: Slave has read all relay log; waiting for more updates
           Master_Retry_Count: 86400
                  Master_Bind:
      Last_IO_Error_Timestamp:
     Last_SQL_Error_Timestamp:
               Master_SSL_Crl:
           Master_SSL_Crlpath:
           Retrieved_Gtid_Set:
            Executed_Gtid_Set: 3feb36dc-ef7e-11e6-a535-52540043f116:1-337886
                Auto_Position: 0
         Replicate_Rewrite_DB:
                 Channel_Name:
           Master_TLS_Version:
1 row in set (0.00 sec)
这里看到Slave_IO_Running和Slave_SQL_Running双YES一般就没有问题了。
现在可以在主上面进行一些新建数据库、新建数据表、插入输出等方式来验证是否主从生效。此步骤就大家自己随意发挥吧!
Atas ialah kandungan terperinci 教你如何在阿里云与腾讯云轻松搭建传统主从复制环境教程. Untuk maklumat lanjut, sila ikut artikel berkaitan lain di laman web China PHP!


