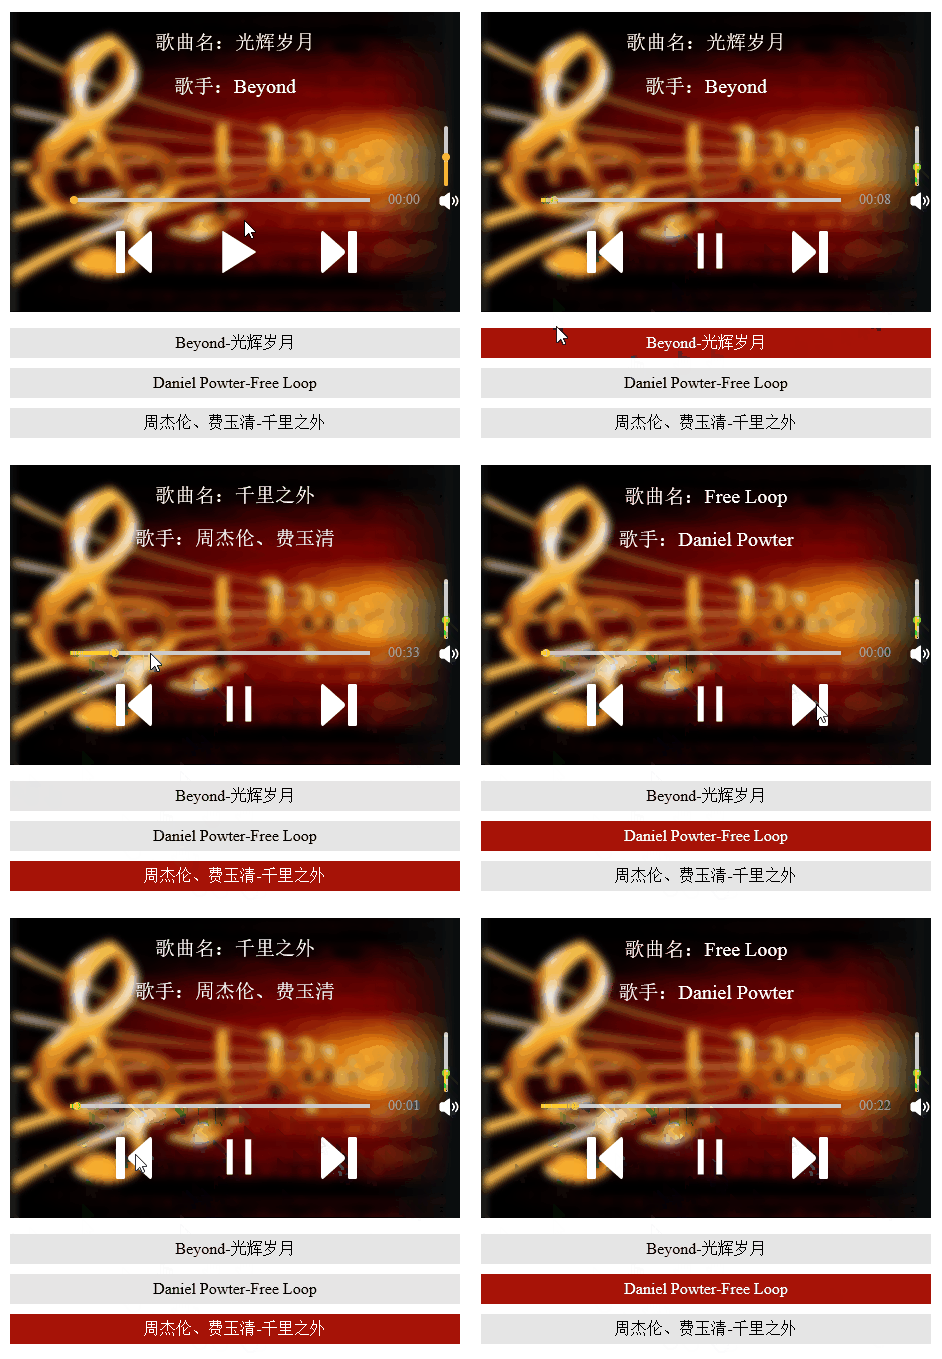
如何用html5 写出网页音乐播放器
功能简介
html5中推出了音视频标签,可以让我们不借助其他插件就可以直接播放音视频。下面我们就利用html5的audio标签及其相关属性和方法来制作一个简单的音乐播放器。关于html5制作网页音乐播放器主要包括以下几个功能:
1、播放暂停、上一首和下一首
2、调整音量和播放进度条
3、根据列表切换当前歌曲
先来看一下最终的完成效果:

这个音乐播放器的结构主要分为三部分:歌曲信息、播放器和播放列表,我们重点介绍一下播放器部分。首先在播放器中放三个audio标签用于播放:
 <audio id="music1">浏览器不支持audio标签
<source src="media/Beyond - 光辉岁月.mp3"></source>
</audio>
<audio id="music2">浏览器不支持audio标签
<source src="media/Daniel Powter - Free Loop.mp3"></source>
</audio>
<audio id="music3">浏览器不支持audio标签
<source src="media/周杰伦、费玉清 - 千里之外.mp3"></source>
</audio>
下面的播放列表也对应三个audio标签:
 <div id="playList">
<ul>
<li id="m0">Beyond-光辉岁月</li>
<li id="m1">Daniel Powter-Free Loop</li>
<li id="m2">周杰伦、费玉清-千里之外</li>
</ul>
</div>
接下来我们就开始逐步实现上面提到的功能吧,先来完成播放和暂停功能,在按下播放按钮时我们要做到进度条随歌曲进度前进,播放时间也逐渐增加,同时播放按钮变成暂停按钮,播放列表的样式也对应改变。
在做功能之前我们要先把三个audio标签获取id后存到一个数组中,供后续使用。
 var music1= document.getElementById("music1");
var music2= document.getElementById("music2");
var music3= document.getElementById("music3");
var mList = [music1,music2,music3];播放和暂停:
我们现在就可以完成播放按钮的功能啦,首先设置一个标志,用来标记音乐的播放状态,再为数组的索引index设置一个默认值:
然后对播放状态进行判断,调用对应的函数,并修改flag的值和列表对应项目样式:
var flag = true;
var index = 0;
function playMusic(){
if(flag&&mList[index].paused){
mList[index].play();
document.getElementById("m"+index).style.backgroundColor = "#A71307";
document.getElementById("m"+index).style.color = "white";
progressBar();
playTimes();
play.style.backgroundImage = "url(media/pause.png)";
flag = false;
}else{
mList[index].pause();
flag = true;
play.style.backgroundImage = "url(media/play.png)";
}
}上面的HTML页面的代码中调用了多个函数,其中播放和暂停是audio标签自带的方法,而其他的函数则是我们自己定义的。下面我们就来看一下这些函数是怎么实现的,又对应了哪些功能吧。
进度条和播放时间:
首先是进度条功能,获取歌曲的全部时长,然后再根据当前播放的进度与进度条总长度相乘计算出进度条的位置。
function progressBar(){
var lenth=mList[index].duration;
timer1=setInterval(function(){
cur=mList[index].currentTime;//获取当前的播放时间
progress.style.width=""+parseFloat(cur/lenth)*300+"px";
progressBtn.style.left= 60+parseFloat(cur/lenth)*300+"px";
},10)
}下面是改变播放时间功能,这里我们设置一个定时函数,每隔一段时间来执行一次以改变播放时间。因为我们获取到的歌曲时长是以秒来计算,所以我们要利用if语句对时长判断来进行换算,将播放时间改为以几分几秒的形式来显示。
function playTimes(){
timer2=setInterval(function(){
cur=parseInt(mList[index].currentTime);//秒数
var minute=parseInt(cur/60);
if (minute<10) {
if(cur%60<10){
playTime.innerHTML="0"+minute+":0"+cur%60+"";
}else{
playTime.innerHTML="0"+minute+":"+cur%60+"";
}
} else{
if(cur%60<10){
playTime.innerText= minute+":0"+cur%60+"";
}else{
playTime.innerText= minute+":"+cur%60+"";
}
}
},1000);
}调整播放进度和音量:
接下来我们再来完成一下通过进度条调整播放进度和调整音量功能。
调整播放进度功能利用了event对象来实现,因为offsetX属性只有IE事件具有,所以推荐使用IE浏览器查看效果。先对进度条添加事件监听,当在进度条上点击鼠标时,获取鼠标的位置,并根据位置除以进度条的总长度来计算当前的播放进度,然后对歌曲进行设置。
//调整播放进度
total.addEventListener("click",function(event){
var e = event || window.event;
document.onmousedown = function(event){
var e = event || window.event;
var mousePos1 = e.offsetX;
var maxValue1 = total.scrollWidth;
mList[index].currentTime = (mousePos1/300)*mList[index].duration;
progress.style.width = mousePos1+"px";
progressBtn.style.left = 60+ mousePos1 +"px";
}
})下面是调整音量功能,音量的调整我们采用拖动的形式实现,思路也是对音量条的按钮球添加事件监听,然后根据拖动的位置来计算按钮球相对于音量条整体的位置,最后根据计算结果与音量相乘得出当前音量:
volBtn.addEventListener("mousedown",function(event){
var e = event || window.event;
var that =this;
//阻止球的默认拖拽事件
e.preventDefault();
document.onmousemove = function(event){
var e = event || window.event;
var mousePos2 = e.offsetY;
var maxValue2 = vol.scrollHeight;
if(mousePos2<0){
mousePos2 = 0;
}
if(mousePos2>maxValue2){
mousePos2=maxValue2;
}
mList[index].volume = (1-mousePos2/maxValue2);
console.log(mList[index].volume);
volBtn.style.top = (mousePos2)+"px";
volBar.style.height = 60-(mousePos2)+"px";
document.onmouseup = function(event){
document.onmousemove = null;
document.onmouseup = null;
}
}
})歌曲切换
最后我们再来实现比较复杂的歌曲切换功能。
先来看用上一首和下一首按钮进行切换,在切换音乐时我们要注意的问题有下面几个:第一,我们要停止当前播放的音乐,转而播放下一首音乐;第二,要清空进度条和播放时间,重新计算;第三,歌曲信息要随之改变,播放器下面的播放列表样式也要变化。在弄清楚上面三点以后我们就可以开始实现功能了。
//上一曲
function prevM(){
clearInterval(timer1);
clearInterval(timer2);
stopM();
qingkong();
cleanProgress();
--index;
if(index==-1){
index=mList.length-1;
}
clearListBgc();
document.getElementById("m"+index).style.backgroundColor = "#A71307";
document.getElementById("m"+index).style.color = "white";
changeInfo(index);
mList[index].play();
progressBar();
playTimes();
if (mList[index].paused) {
play.style.backgroundImage = "url(media/play.png)";
}else{
play.style.backgroundImage = "url(media/pause.png)";
}
}
//下一曲
function nextM(){
clearInterval(timer1);
clearInterval(timer2);
stopM();
qingkong();
cleanProgress();
++index;
if(index==mList.length){
index=0;
}
clearListBgc();
document.getElementById("m"+index).style.backgroundColor = "#A71307";
document.getElementById("m"+index).style.color = "white";
changeInfo(index);
mList[index].play();
progressBar();
playTimes();
if (mList[index].paused) {
play.style.backgroundImage = "url(media/play.png)";
}else{
play.style.backgroundImage = "url(media/pause.png)";
}
}下面的代码是点击列表切换歌曲。
m0.onclick = function (){
clearInterval(timer1);
clearInterval(timer2);
qingkong();
flag = false;
stopM();
index = 0;
pauseall();
play.style.backgroundImage = "url(media/pause.png)";
clearListBgc();
document.getElementById("m0").style.backgroundColor = "#A71307";
document.getElementById("m"+index).style.color = "white";
mList[index].play();
cleanProgress();
progressBar();
changeInfo(index);
playTimes();
}
m1.onclick = function (){
clearInterval(timer1);
clearInterval(timer2);
flag = false;
qingkong();
stopM();
index = 1;
pauseall();
clearListBgc();
play.style.backgroundImage = "url(media/pause.png)";
document.getElementById("m1").style.backgroundColor = "#A71307";
document.getElementById("m"+index).style.color = "white";
mList[index].play();
cleanProgress();
changeInfo(index);
progressBar();
playTimes();
}
m2.onclick = function (){
clearInterval(timer1);
clearInterval(timer2);
flag = false;
qingkong();
stopM();
index = 2;
pauseall();
play.style.backgroundImage = "url(media/pause.png)";
clearListBgc();
document.getElementById("m2").style.backgroundColor = "#A71307";
document.getElementById("m"+index).style.color = "white";
mList[index].play();
cleanProgress();
changeInfo(index);
progressBar();
playTimes();
}通过播放列表来切换歌曲与通过按钮切换的思路差不多,只是根据对应的列表项来设置当前应该播放哪首歌曲。
首先是切换歌曲信息:上面切换歌曲的函数中都调用了几个方法,下面我们来看看这些方法的用途都是什么吧。
首先是切换歌曲信息:
function changeInfo(index){
if (index==0) {
musicName.innerHTML = "光辉岁月";
singer.innerHTML = "Beyond";
}
if (index==1) {
musicName.innerHTML = "Free Loop";
singer.innerHTML = "Daniel Powter";
}
if (index==2) {
musicName.innerHTML = "千里之外";
singer.innerHTML = "周杰伦、费玉清";
}
}然后清空两个定时器:
//将进度条置0
function cleanProgress(timer1){
if(timer1!=undefined){
clearInterval(timer1);
}
progress.style.width="0";
progressBtn.style.left="60px";
}
function qingkong(timer2){
if(timer2!=undefined){
clearInterval(timer2);
}
}再把播放的音乐停止,并且将播放时间恢复。
function stopM(){
if(mList[index].played){
mList[index].pause();
mList[index].currentTime=0;
flag=false;
}
}到此,html5写出的音乐播放器我们就基本完成了,完成之后效果还是很不错的。赶紧收藏吧希望大家能根据以上教程用html5写出自己的播放器。

Alat AI Hot

Undresser.AI Undress
Apl berkuasa AI untuk mencipta foto bogel yang realistik

AI Clothes Remover
Alat AI dalam talian untuk mengeluarkan pakaian daripada foto.

Undress AI Tool
Gambar buka pakaian secara percuma

Clothoff.io
Penyingkiran pakaian AI

AI Hentai Generator
Menjana ai hentai secara percuma.

Artikel Panas

Alat panas

Notepad++7.3.1
Editor kod yang mudah digunakan dan percuma

SublimeText3 versi Cina
Versi Cina, sangat mudah digunakan

Hantar Studio 13.0.1
Persekitaran pembangunan bersepadu PHP yang berkuasa

Dreamweaver CS6
Alat pembangunan web visual

SublimeText3 versi Mac
Perisian penyuntingan kod peringkat Tuhan (SublimeText3)

Topik panas
 1379
1379
 52
52
 Sempadan Jadual dalam HTML
Sep 04, 2024 pm 04:49 PM
Panduan untuk Sempadan Jadual dalam HTML. Di sini kita membincangkan pelbagai cara untuk menentukan sempadan jadual dengan contoh Sempadan Jadual dalam HTML.
 HTML jidar-kiri
Sep 04, 2024 pm 04:48 PM
Panduan untuk HTML margin-kiri. Di sini kita membincangkan gambaran keseluruhan ringkas tentang HTML margin-left dan Contoh-contohnya bersama-sama dengan Pelaksanaan Kodnya.
 Jadual Bersarang dalam HTML
Sep 04, 2024 pm 04:49 PM
Ini ialah panduan untuk Nested Table dalam HTML. Di sini kita membincangkan cara membuat jadual dalam jadual bersama-sama dengan contoh masing-masing.
 Susun Atur Jadual HTML
Sep 04, 2024 pm 04:54 PM
Panduan untuk Susun Atur Jadual HTML. Di sini kita membincangkan Nilai Susun Atur Jadual HTML bersama-sama dengan contoh dan output n perincian.
 Pemegang Tempat Input HTML
Sep 04, 2024 pm 04:54 PM
Panduan untuk Pemegang Tempat Input HTML. Di sini kita membincangkan Contoh Pemegang Tempat Input HTML bersama-sama dengan kod dan output.
 Senarai Tertib HTML
Sep 04, 2024 pm 04:43 PM
Panduan kepada Senarai Tertib HTML. Di sini kami juga membincangkan pengenalan senarai dan jenis Tertib HTML bersama-sama dengan contoh mereka masing-masing
 Memindahkan Teks dalam HTML
Sep 04, 2024 pm 04:45 PM
Panduan untuk Memindahkan Teks dalam HTML. Di sini kita membincangkan pengenalan, cara teg marquee berfungsi dengan sintaks dan contoh untuk dilaksanakan.
 Butang onclick HTML
Sep 04, 2024 pm 04:49 PM
Panduan untuk Butang onclick HTML. Di sini kita membincangkan pengenalan, kerja, contoh dan onclick Event masing-masing dalam pelbagai acara.


