众所周知作为webgl的插件,three.js肯定没有原生webgl那样,添加一个阴影这么费劲。所以,经过一小时的研究(笨人不聪明,已经是极限速度了)。终于将阴影效果做了出来,并且还发现一些容易犯错的地方。话不多说了,来一起看看详细的介绍吧。
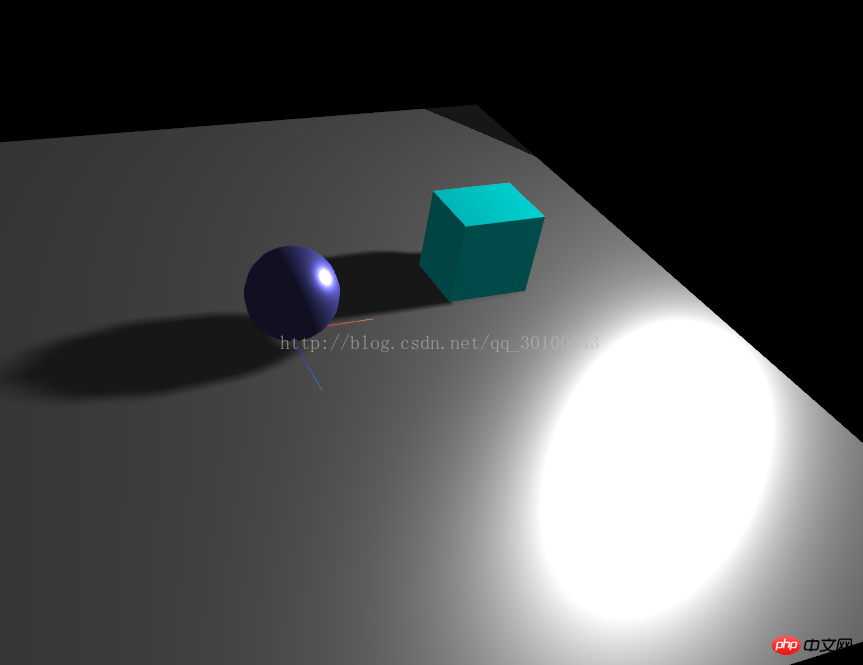
先上效果图:

实现这个效果其实很简单,只需要设置几个属性就可以实现当前的效果。而上面的材质问题我将放到下一节:
(1)首先需要告诉渲染器我需要阴影,你给我生成阴影:
renderer.shadowMap.enabled = true;
(2)然后告诉灯光,我需要阴影:
light.castShadow = true;
(3)告诉模型哪些需要投射阴影:
//告诉球需要投射阴影
 sphere.castShadow = true;
//告诉立方体需要投射阴影
 cube.castShadow = true;
(4)最后告诉最底下的平面长方形你要接受阴影:
plane.receiveShadow = true;
上面四步只要设置好了,就可以实现阴影的效果了。
注意事项:你的模型的材质一定要选择对灯光有反应的材质,要不然不会出现效果,就是因为这个问题导致好长时间没有整出来阴影。
案例全部代码:
<!DOCTYPE html>
<html lang="en">
<head>
 <meta charset="UTF-8">
 <title>Title</title>
 <style type="text/css">
 html, body {
  margin: 0;
  height: 100%;
 }

 canvas {
  display: block;
 }

 </style>
</head>
<body onload="draw();">

</body>
<script src="build/three.js"></script>
<script src="examples/js/controls/TrackballControls.js"></script>
<script src="examples/js/libs/stats.min.js"></script>
<script>
 var renderer;
 function initRender() {
 renderer = new THREE.WebGLRenderer({antialias:true});
 renderer.setSize(window.innerWidth, window.innerHeight);
 //告诉渲染器需要阴影效果
 renderer.shadowMap.enabled = true;
 renderer.shadowMap.type = THREE.PCFSoftShadowMap; // 默认的是,没有设置的这个清晰 THREE.PCFShadowMap
 document.body.appendChild(renderer.domElement);
 }

 var camera;
 function initCamera() {
 camera = new THREE.PerspectiveCamera(45, window.innerWidth/window.innerHeight, 0.1, 1000);
 camera.position.set(0, 40, 100);
 camera.lookAt(new THREE.Vector3(0,0,0));
 }

 var scene;
 function initScene() {
 scene = new THREE.Scene();
 }

 var light;
 function initLight() {
 scene.add(new THREE.AmbientLight(0x444444));

 light = new THREE.SpotLight(0xffffff);
 light.position.set(60,30,0);

 //告诉平行光需要开启阴影投射
 light.castShadow = true;

 scene.add(light);
 }

 function initModel() {
 //上面的球
 var sphereGeometry = new THREE.SphereGeometry(5,20,20);
 var sphereMaterial = new THREE.MeshStandardMaterial({color:0x7777ff});

 var sphere = new THREE.Mesh(sphereGeometry, sphereMaterial);
 sphere.position.y = 5;

 //告诉球需要投射阴影
 sphere.castShadow = true;

 scene.add(sphere);

 //辅助工具
 var helper = new THREE.AxisHelper(10);
 scene.add(helper);

 //立方体
 var cubeGeometry = new THREE.CubeGeometry(10,10,8);
 var cubeMaterial = new THREE.MeshLambertMaterial({color:0x00ffff});

 var cube = new THREE.Mesh(cubeGeometry, cubeMaterial);
 cube.position.x = 25;
 cube.position.y = 5;
 cube.position.z = -5;

 //告诉立方体需要投射阴影
 cube.castShadow = true;

 scene.add(cube);

 //底部平面
 var planeGeometry = new THREE.PlaneGeometry(100,100);
 var planeMaterial = new THREE.MeshStandardMaterial({color:0xaaaaaa});

 var plane = new THREE.Mesh(planeGeometry, planeMaterial);
 plane.rotation.x = - 0.5 * Math.PI;
 plane.position.y = -0;

 //告诉底部平面需要接收阴影
 plane.receiveShadow = true;

 scene.add(plane);

 }

 //初始化性能插件
 var stats;
 function initStats() {
 stats = new Stats();
 document.body.appendChild(stats.dom);
 }

 //用户交互插件 鼠标左键按住旋转,右键按住平移,滚轮缩放
 var controls;
 function initControls() {
 controls = new THREE.TrackballControls( camera );
 //旋转速度
 controls.rotateSpeed = 5;
 //变焦速度
 controls.zoomSpeed = 3;
 //平移速度
 controls.panSpeed = 0.8;
 //是否不变焦
 controls.noZoom = false;
 //是否不平移
 controls.noPan = false;
 //是否开启移动惯性
 controls.staticMoving = false;
 //动态阻尼系数 就是灵敏度
 controls.dynamicDampingFactor = 0.3;
 //未知,占时先保留
 //controls.keys = [ 65, 83, 68 ];
 controls.addEventListener( 'change', render );
 }

 function render() {
 renderer.render( scene, camera );
 }

 //窗口变动触发的函数
 function onWindowResize() {

 camera.aspect = window.innerWidth / window.innerHeight;
 camera.updateProjectionMatrix();
 controls.handleResize();
 render();
 renderer.setSize( window.innerWidth, window.innerHeight );

 }

 function animate() {
 //更新控制器
 render();

 //更新性能插件
 stats.update();

 controls.update();

 requestAnimationFrame(animate);
 }

 function draw() {
 initRender();
 initScene();
 initCamera();
 initLight();
 initModel();
 initControls();
 initStats();

 animate();
 window.onresize = onWindowResize;
 }
</script>
</html>相关推荐:
Atas ialah kandungan terperinci Three.js实现阴影效果代码. Untuk maklumat lanjut, sila ikut artikel berkaitan lain di laman web China PHP!


