
这篇文章主要介绍了VSCode下配置python调试运行环境的方法,需要的朋友可以参考下
VSCode配置python调试环境
很久之前的一个东东,翻出来看看
VSCode配置python调试环境
* 1.下载python解释器
* 2.在VSCode市场中安装Python插件
* 4.在用户设置里加两条
* 5.接下来是正式的调试了
Input
Output
Input示例
Output示例
1080 两个数的平方和
1.下载python解释器
python 3.6.3 for windows
安装到系统某个路径例如C:\Python36
最好添加到Path,也可以不加
2.在VSCode市场中安装Python插件
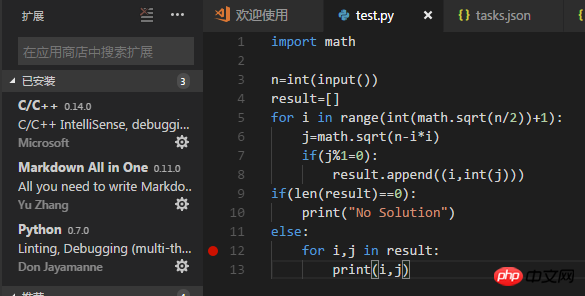
3.同样是打开一个文件夹,新建一个.py文件(这样容易识别项目,vscode就需要新建一个文件夹)
4.同样是launch.json文件和tasks.json文件
launch.josn
{
 // 使用 IntelliSense 了解相关属性。
 // 悬停以查看现有属性的描述。
 // 欲了解更多信息,请访问: https://go.microsoft.com/fwlink/?linkid=830387
 "version": "0.2.0",
 "configurations": [
  {
   "name": "Python",
   "type": "python",
   "request": "launch",
   "stopOnEntry": false,//是否在第一条语句时程序停止,下面的这个选项都一样
   "pythonPath": "C:/Python34/python",//可执行文件路径
   "program": "${file}",
   "cwd": "${workspaceRoot}",
   "env": {},
   "envFile": "${workspaceRoot}/.env",
   "debugOptions": [
    "WaitOnAbnormalExit",
    "WaitOnNormalExit",
    "RedirectOutput"
   ]
  },
  {
   "name": "PySpark",
   "type": "python",
   "request": "launch",
   "stopOnEntry": true,
   "osx": {
    "pythonPath": "${env:SPARK_HOME}/bin/spark-submit"
   },
   "windows": {
    "pythonPath": "${env:SPARK_HOME}/bin/spark-submit.cmd"
   },
   "linux": {
    "pythonPath": "${env:SPARK_HOME}/bin/spark-submit"
   },
   "program": "${file}",
   "cwd": "${workspaceRoot}",
   "env": {},
   "envFile": "${workspaceRoot}/.env",
   "debugOptions": [
    "WaitOnAbnormalExit",
    "WaitOnNormalExit",
    "RedirectOutput"
   ]
  },
  {
   "name": "Python Module",
   "type": "python",
   "request": "launch",
   "stopOnEntry": false,
   "pythonPath": "${config:python.pythonPath}",
   "module": "module.name",
   "cwd": "${workspaceRoot}",
   "env": {},
   "envFile": "${workspaceRoot}/.env",
   "debugOptions": [
    "WaitOnAbnormalExit",
    "WaitOnNormalExit",
    "RedirectOutput"
   ]
  },
  {
   "name": "Integrated Terminal/Console",
   "type": "python",
   "request": "launch",
   "stopOnEntry": false,
   "pythonPath": "${config:python.pythonPath}",
   "program": "${file}",
   "cwd": "",
   "console": "integratedTerminal",
   "env": {},
   "envFile": "${workspaceRoot}/.env",
   "debugOptions": [
    "WaitOnAbnormalExit",
    "WaitOnNormalExit"
   ]
  },
  {
   "name": "External Terminal/Console",
   "type": "python",
   "request": "launch",
   "stopOnEntry": false,
   "pythonPath": "${config:python.pythonPath}",
   "program": "${file}",
   "cwd": "",
   "console": "externalTerminal",
   "env": {},
   "envFile": "${workspaceRoot}/.env",
   "debugOptions": [
    "WaitOnAbnormalExit",
    "WaitOnNormalExit"
   ]
  },
  {
   "name": "Django",
   "type": "python",
   "request": "launch",
   "stopOnEntry": false,
   "pythonPath": "${config:python.pythonPath}",
   "program": "${workspaceRoot}/manage.py",
   "cwd": "${workspaceRoot}",
   "args": [
    "runserver",
    "--noreload",
    "--nothreading"
   ],
   "env": {},
   "envFile": "${workspaceRoot}/.env",
   "debugOptions": [
    "WaitOnAbnormalExit",
    "WaitOnNormalExit",
    "RedirectOutput",
    "DjangoDebugging"
   ]
  },
  {
   "name": "Flask",
   "type": "python",
   "request": "launch",
   "stopOnEntry": false,
   "pythonPath": "${config:python.pythonPath}",
   "program": "fully qualified path fo 'flask' executable. Generally located along with python interpreter",
   "cwd": "${workspaceRoot}",
   "env": {
    "FLASK_APP": "${workspaceRoot}/quickstart/app.py"
   },
   "args": [
    "run",
    "--no-debugger",
    "--no-reload"
   ],
   "envFile": "${workspaceRoot}/.env",
   "debugOptions": [
    "WaitOnAbnormalExit",
    "WaitOnNormalExit",
    "RedirectOutput"
   ]
  },
  {
   "name": "Flask (old)",
   "type": "python",
   "request": "launch",
   "stopOnEntry": false,
   "pythonPath": "${config:python.pythonPath}",
   "program": "${workspaceRoot}/run.py",
   "cwd": "${workspaceRoot}",
   "args": [],
   "env": {},
   "envFile": "${workspaceRoot}/.env",
   "debugOptions": [
    "WaitOnAbnormalExit",
    "WaitOnNormalExit",
    "RedirectOutput"
   ]
  },
  {
   "name": "Pyramid",
   "type": "python",
   "request": "launch",
   "stopOnEntry": true,
   "pythonPath": "${config:python.pythonPath}",
   "cwd": "${workspaceRoot}",
   "env": {},
   "envFile": "${workspaceRoot}/.env",
   "args": [
    "${workspaceRoot}/development.ini"
   ],
   "debugOptions": [
    "WaitOnAbnormalExit",
    "WaitOnNormalExit",
    "RedirectOutput",
    "Pyramid"
   ]
  },
  {
   "name": "Watson",
   "type": "python",
   "request": "launch",
   "stopOnEntry": true,
   "pythonPath": "${config:python.pythonPath}",
   "program": "${workspaceRoot}/console.py",
   "cwd": "${workspaceRoot}",
   "args": [
    "dev",
    "runserver",
    "--noreload=True"
   ],
   "env": {},
   "envFile": "${workspaceRoot}/.env",
   "debugOptions": [
    "WaitOnAbnormalExit",
    "WaitOnNormalExit",
    "RedirectOutput"
   ]
  },
  {
   "name": "Attach (Remote Debug)",
   "type": "python",
   "request": "attach",
   "localRoot": "${workspaceRoot}",
   "remoteRoot": "${workspaceRoot}",
   "port": 3000,
   "secret": "my_secret",
   "host": "localhost"
  }
 ]
}tasks.json
 {
  // See https://go.microsoft.com/fwlink/?LinkId=733558
  // for the documentation about the tasks.json format
  "version": "2.0.0",
  "tasks": [
   {
    "taskName": "echo",
    "type": "shell",
    "command": "C:\\Python34\\python",//Python可执行文件路径
    "args": ["${file}"]
   }
  ]
}4.在用户设置里加两条
settings.json
 "python.pythonPath": "C:\\Python34\\python" ,//路径
 "python.linting.enabled": false,//忘了是什么东西了,反正有用
Linting (Prospector, Pylint, pycodestyle, Flake8, pylama, pydocstyle, mypy with config files and plugin
静态代码扫描(可以理解为代码语法和格式错误提示,支持多种linter)
5.接下来是正式的调试了
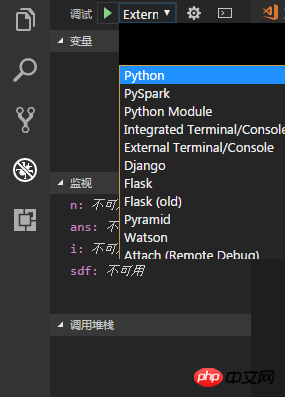
默认是Python选项
按\(
然后在
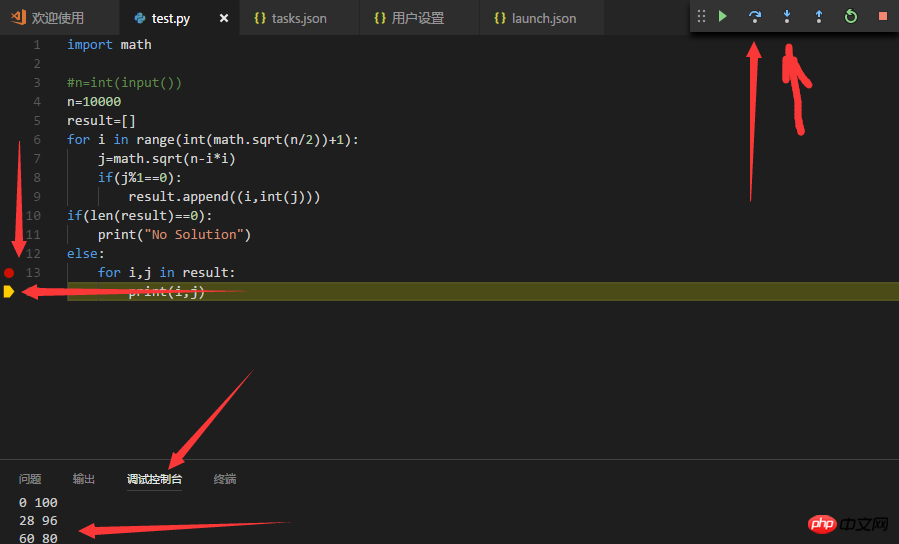
中有一些东西就是这样
但是这个默认的\(python\)选项并不能由用户输入
所以有
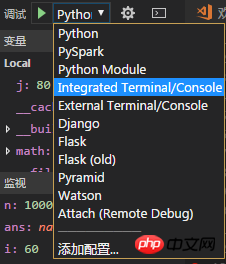
这个和下面的那个都可以
这个Intergrated……的选项是下图的东东

其实这个可以直接

直接当成cmd来用同样可以由用户输入
然后那个External……的选项只不过是开了一个控制台窗口
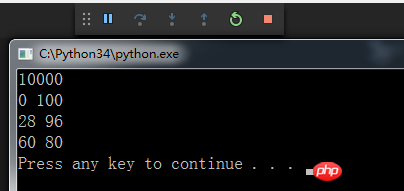
2333……
剩下的可以自己试试
说不定有惊喜
翻出很久之前做的一道题目
用py3写的
刚刚一直在用的test.py就是用的这道题的代码
1080 两个数的平方和
基准时间限制:1 秒 空间限制:131072 KB 分值: 5
给出一个整数N,将N表示为2个整数i j的平方和(i <= j),如果有多种表示,按照i的递增序输出。
例如:
(注:3 11同11 3算1种)
Input
一个数N()
Output
共K行:每行2个数,i j,表示。
如果无法分解为2个数的平方和,则输出
Input示例
130
Output示例
3 11
7 9
相关推荐:
Atas ialah kandungan terperinci VSCode下配置python调试运行环境的方法_python. Untuk maklumat lanjut, sila ikut artikel berkaitan lain di laman web China PHP!


