

Vue构建分页组件步骤详解
这次给大家带来Vue构建分页组件步骤详解,Vue构建分页组件的注意事项有哪些,下面就是实战案例,一起来看一下。
Web应用程序中资源分页不仅对性能很有帮助,而且从用户体验的角度来说也是非常有用的。在这篇文章中,将了解如何使用Vue创建动态和可用的分页组件。
基本结构
分页组件应该允许用户访问第一个和最后一个页面,向前和向后移动,并直接切换到近距离的页面。
大多数应用程序在用户每次更改页面时都会发出API请求。我们需要确保组件允许这样做,但是我们不希望在组件内发出这样的请求。这样,我们将确保组件在整个应用程序中是可重用的,并且请求都是在操作或服务层中进行的。我们可以通过使用用户单击的页面的数字触发事件来实现此目的。
有几种可能的方法来实现API端点上的分页。对于这个例子,我们假设API告诉我们每个页面的结果数、页面总数和当前页面。这些将是我们的动态 props 。
相反,如果API只告诉记录的总数,那么我们可以通过将结果的数量除以每一页的结果数来计算页数: totalResults / resultsPerPage 。
我们想要渲染一个按钮到 第一页 、 上一页 、 页面数量范围 、 下一页 和 最后一页 :
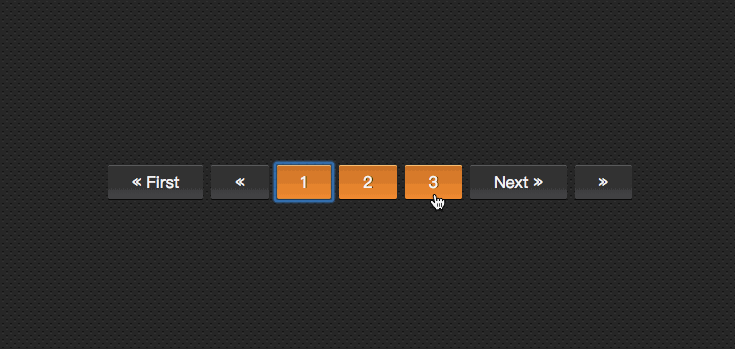
[first] [next] [1] [2] [3] [previous] [last]
比如像下图这样的一个效果:

尽管我们希望渲染一个系列的页面,但并不希望渲染所有可用页面。让我们允许在我们的组件中设置一个最多可见按钮的 props 。
既然我们知道了我们想要的组件要做成什么,需要哪些数据,我们就可以设置HTML结构和所需要的 props 。
<template id="pagination">
  <ul class="pagination">
    <li>
      <button type="button">« First</button>
    </li>
    <li>
      <button type="button">«</button>
    </li>
    <!-- 页数的范围 -->
    <li>
      <button type="button">Next »</button>
    </li>
    <li>
      <button type="button">»</button>
    </li>
  </ul>
</template>
Vue.component('pagination', {
  template: '#pagination',
  props: {
    maxVisibleButtons: {
      type: Number,
      required: false,
      default: 3
    },
    totalPages: {
      type: Number,
      required: true
    },
    total: {
      type: Number,
      required: true
    },
    currentPage: {
      type: Number,
      required: true
    }
  }
})上面的代码注册了一个 pagination 组件,如果调用这个组件:
<p id="app">
  <pagination></pagination>
</p>
这个时候看到的效果如下:

注意,为了能让组件看上去好看一点,给组件添加了一点样式。
事件监听
现在我们需要通知父组件,当用户单击按钮时,用户点击了哪个按钮。
我们需要为每个按钮添加一个事件监听器。 v-on 指令 允许侦听DOM事件。在本例中,我将使用 v-on 的快捷键 来侦听单击事件。
为了通知父节点,我们将使用 $emit 方法 来发出一个带有页面点击的事件。
我们还要确保分页按钮只有在页面可用时才唯一一个当前状态。为了这样做,将使用 v-bind 将 disabled 属性的值与当前页面绑定。我们还是使用 :v-bind 的快捷键 : 。
为了保持我们的 template 干净,将使用 computed 属性 来检查按钮是否被禁用。使用 computed 也会被缓存,这意味着只要 currentPage 不会更改,对相同计算属性的几个访问将返回先前计算的结果,而不必再次运行该函数。
<template id="pagination">
  <ul class="pagination">
    <li>
      <button type="button" @click="onClickFirstPage" :disabled="isInFirstPage">« First</button>
    </li>
    <li>
      <button type="button" @click="onClickPreviousPage" :disabled="isInFirstPage">«</button>
    </li>
    <li v-for="page in pages">
      <button type="button" @click="onClickPage(page.name)" :disabled="page.isDisabled"> {{ page.name }}</button>
    </li>
    <li>
      <button type="button" @click="onClickNextPage" :disabled="isInLastPage">Next »</button>
    </li>
    <li>
      <button type="button" @click="onClickLastPage" :disabled="isInLastPage">»</button>
    </li>
  </ul>
</template>
Vue.component('pagination', {
  template: '#pagination',
  props: {
    maxVisibleButtons: {
      type: Number,
      required: false,
      default: 3
    },
    totalPages: {
      type: Number,
      required: true
    },
    total: {
      type: Number,
      required: true
    },
    currentPage: {
      type: Number,
      required: true
    }
  },
  computed: {
    isInFirstPage: function () {
      return this.currentPage === 1
    },
    isInLastPage: function () {
      return this.currentPage === this.totalPages
    }
  },
  methods: {
    onClickFirstPage: function () {
      this.$emit('pagechanged', 1)
    },
    onClickPreviousPage: function () {
      this.$emit('pagechanged', this.currentPage - 1)
    },
    onClickPage: function (page) {
      this.$emit('pagechanged', page)
    },
    onClickNextPage: function () {
      this.$emit('pagechanged', this.currentPage + 1)
    },
    onClickLastPage: function () {
      this.$emit('pagechanged', this.totalPages)
    }
  }
})在调用 pagination 组件时,将 totalPages 和 total 以及 currentPage 传到组件中:
<p id="app">
  <pagination :total-pages="11" :total="120" :current-page="currentPage"></pagination>
</p>
let app = new Vue({
  el: '#app',
  data () {
    return {
      currentPage: 2
    }
  }
})运行上面的代码,将会报错:

不难发现,在 pagination 组件中,咱们还少了 pages 。从前面介绍的内容,我们不难发现,需要计算出 pages 的值。
Vue.component('pagination', {
  template: '#pagination',
  props: {
    maxVisibleButtons: {
      type: Number,
      required: false,
      default: 3
    },
    totalPages: {
      type: Number,
      required: true
    },
    total: {
      type: Number,
      required: true
    },
    currentPage: {
      type: Number,
      required: true
    }
  },
  computed: {
    isInFirstPage: function () {
      return this.currentPage === 1
    },
    isInLastPage: function () {
      return this.currentPage === this.totalPages
    },
    startPage: function () {
      if (this.currentPage === 1) {
        return 1
      }
      if (this.currentPage === this.totalPages) {
        return this.totalPages - this.maxVisibleButtons + 1
      }
      return this.currentPage - 1
    },
    endPage: function () {
      return Math.min(this.startPage + this.maxVisibleButtons - 1, this.totalPages)
    },
    pages: function () {
      const range = []
      for (let i = this.startPage; i <= this.endPage; i+=1) {
        range.push({
          name: i,
          isDisabled: i === this.currentPage
        })
      }
      return range
    }
  },
  methods: {
    onClickFirstPage: function () {
      this.$emit('pagechanged', 1)
    },
    onClickPreviousPage: function () {
      this.$emit('pagechanged', this.currentPage - 1)
    },
    onClickPage: function (page) {
      this.$emit('pagechanged', page)
    },
    onClickNextPage: function () {
      this.$emit('pagechanged', this.currentPage + 1)
    },
    onClickLastPage: function () {
      this.$emit('pagechanged', this.totalPages)
    }
  }
})这个时候得到的结果不再报错,你在浏览器中将看到下图这样的效果:

添加样式
现在我们的组件实现了最初想要的所有功能,而且添加了一些样式,让它看起来更像一个分页组件,而不仅像是一个列表。
我们还希望用户能够清楚地识别他们所在的页面。让我们改变表示当前页面的按钮的颜色。
为此,我们可以使用对象语法将HTML类绑定到当前页面按钮上。当使用对象语法绑定类名时,Vue将在值发生变化时自动切换类。
虽然 v-for 中的每个块都可以访问父作用域范围,但是我们将使用 method 来检查页面是否处于 active 状态,以便保持我们的 templage 干净。
Vue.component('pagination', {
  template: '#pagination',
  props: {
    maxVisibleButtons: {
      type: Number,
      required: false,
      default: 3
    },
    totalPages: {
      type: Number,
      required: true
    },
    total: {
      type: Number,
      required: true
    },
    currentPage: {
      type: Number,
      required: true
    }
  },
  computed: {
    isInFirstPage: function () {
      return this.currentPage === 1
    },
    isInLastPage: function () {
      return this.currentPage === this.totalPages
    },
    startPage: function () {
      if (this.currentPage === 1) {
        return 1
      }
      if (this.currentPage === this.totalPages) {
        return this.totalPages - this.maxVisibleButtons + 1
      }
      return this.currentPage - 1
    },
    endPage: function () {
      return Math.min(this.startPage + this.maxVisibleButtons - 1, this.totalPages)
    },
    pages: function () {
      const range = []
      for (let i = this.startPage; i <= this.endPage; i+=1) {
        range.push({
          name: i,
          isDisabled: i === this.currentPage
        })
      }
      return range
    }
  },
  methods: {
    onClickFirstPage: function () {
      this.$emit('pagechanged', 1)
    },
    onClickPreviousPage: function () {
      this.$emit('pagechanged', this.currentPage - 1)
    },
    onClickPage: function (page) {
      this.$emit('pagechanged', page)
    },
    onClickNextPage: function () {
      this.$emit('pagechanged', this.currentPage + 1)
    },
    onClickLastPage: function () {
      this.$emit('pagechanged', this.totalPages)
    },
    isPageActive: function (page) {
      return this.currentPage === page;
    }
  }
})接下来,在 pages 中添加当前状态:
<li v-for="page in pages">
  <button type="button" @click="onClickPage(page.name)" :disabled="page.isDisabled" :class="{active: isPageActive(page.name)}"> {{ page.name }}</button>
</li>这个时候你看到效果如下:

但依然还存在一点点小问题,当你在点击别的按钮时, active 状态并不会随着切换:
继续添加代码改变其中的效果:
let app = new Vue({
  el: '#app',
  data () {
    return {
      currentPage: 2
    }
  },
  methods: {
    onPageChange: function (page) {
      console.log(page)
      this.currentPage = page;
    }
  }
})在调用组件时:
<p id="app">
  <pagination :total-pages="11" :total="120" :current-page="currentPage" @pagechanged="onPageChange"></pagination>
</p>
这个时候的效果如下了:

到这里,基本上实现了咱想要的分页组件效果。
无障碍化处理
熟悉Bootstrap的同学都应该知道,Bootstrap中的组件都做了无障碍化的处理,就是在组件中添加了WAI-ARIA相关的设计。比如在分页按钮上添加 aria-label 相关属性:
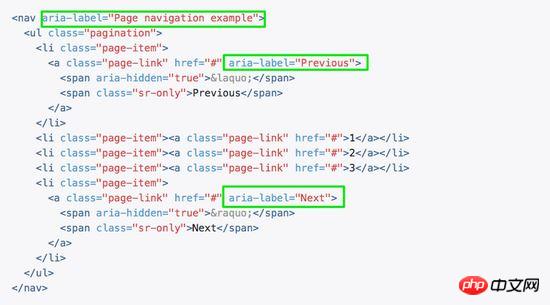
在我们这个组件中,也相应的添加有关于WAI-ARIA相关的处理:
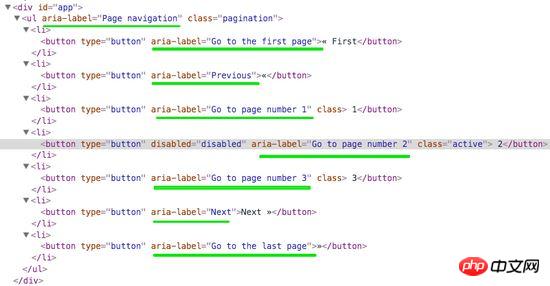
<template id="pagination">
  <ul class="pagination" aria-label="Page navigation">
    <li>
      <button type="button" @click="onClickFirstPage" :disabled="isInFirstPage" aria-label="Go to the first page">« First</button>
    </li>
    <li>
      <button type="button" @click="onClickPreviousPage" :disabled="isInFirstPage" aria-label="Previous">«</button>
    </li>
    <li v-for="page in pages">
      <button type="button" @click="onClickPage(page.name)" :disabled="page.isDisabled" :aria-label="`Go to page number ${page.name}`"> {{ page.name }}</button>
    </li>
    <li>
      <button type="button" @click="onClickNextPage" :disabled="isInLastPage" aria-label="Next">Next »</button>
    </li>
    <li>
      <button type="button" @click="onClickLastPage" :disabled="isInLastPage" aria-label="Go to the last page">»</button>
    </li>
  </ul>
</template>这样有关于 aria 相关的属性就加上了:
相信看了本文案例你已经掌握了方法,更多精彩请关注php中文网其它相关文章!
推荐阅读:
Atas ialah kandungan terperinci Vue构建分页组件步骤详解. Untuk maklumat lanjut, sila ikut artikel berkaitan lain di laman web China PHP!

Alat AI Hot

Undresser.AI Undress
Apl berkuasa AI untuk mencipta foto bogel yang realistik

AI Clothes Remover
Alat AI dalam talian untuk mengeluarkan pakaian daripada foto.

Undress AI Tool
Gambar buka pakaian secara percuma

Clothoff.io
Penyingkiran pakaian AI

AI Hentai Generator
Menjana ai hentai secara percuma.

Artikel Panas
Alat panas

Notepad++7.3.1
Editor kod yang mudah digunakan dan percuma

SublimeText3 versi Cina
Versi Cina, sangat mudah digunakan

Hantar Studio 13.0.1
Persekitaran pembangunan bersepadu PHP yang berkuasa

Dreamweaver CS6
Alat pembangunan web visual

SublimeText3 versi Mac
Perisian penyuntingan kod peringkat Tuhan (SublimeText3)
Topik panas
 1374
1374
 52
52

 Bagaimana untuk menjadikan Peta Google sebagai peta lalai dalam iPhone
Apr 17, 2024 pm 07:34 PM
Bagaimana untuk menjadikan Peta Google sebagai peta lalai dalam iPhone
Apr 17, 2024 pm 07:34 PM
Peta lalai pada iPhone ialah Peta, pembekal geolokasi proprietari Apple. Walaupun peta semakin baik, ia tidak berfungsi dengan baik di luar Amerika Syarikat. Ia tiada apa-apa untuk ditawarkan berbanding Peta Google. Dalam artikel ini, kami membincangkan langkah yang boleh dilaksanakan untuk menggunakan Peta Google untuk menjadi peta lalai pada iPhone anda. Cara Menjadikan Peta Google Peta Lalai dalam iPhone Menetapkan Peta Google sebagai aplikasi peta lalai pada telefon anda adalah lebih mudah daripada yang anda fikirkan. Ikut langkah di bawah – Langkah prasyarat – Anda mesti memasang Gmail pada telefon anda. Langkah 1 – Buka AppStore. Langkah 2 – Cari “Gmail”. Langkah 3 – Klik di sebelah apl Gmail
 ID Apple ini belum lagi digunakan dalam iTunes Store: Betulkan
Jun 10, 2024 pm 05:42 PM
ID Apple ini belum lagi digunakan dalam iTunes Store: Betulkan
Jun 10, 2024 pm 05:42 PM
Apabila log masuk ke iTunesStore menggunakan AppleID, ralat ini mengatakan "AppleID ini belum digunakan dalam iTunesStore" mungkin dilemparkan pada skrin. Tiada mesej ralat yang perlu dibimbangkan, anda boleh membetulkannya dengan mengikuti set penyelesaian ini. Betulkan 1 – Tukar Alamat Penghantaran Sebab utama gesaan ini muncul di iTunes Store ialah anda tidak mempunyai alamat yang betul dalam profil AppleID anda. Langkah 1 – Pertama, buka Tetapan iPhone pada iPhone anda. Langkah 2 – AppleID harus berada di atas semua tetapan lain. Jadi, bukalah. Langkah 3 – Setelah sampai, buka pilihan “Pembayaran & Penghantaran”. Langkah 4 – Sahkan akses anda menggunakan Face ID. langkah
 Langkah-langkah untuk menaik taraf kepada versi terkini WeChat (Kuasai kaedah naik taraf kepada versi terkini WeChat dengan mudah)
Jun 01, 2024 pm 10:24 PM
Langkah-langkah untuk menaik taraf kepada versi terkini WeChat (Kuasai kaedah naik taraf kepada versi terkini WeChat dengan mudah)
Jun 01, 2024 pm 10:24 PM
WeChat ialah salah satu platform media sosial di China yang melancarkan versi baharu secara berterusan untuk memberikan pengalaman pengguna yang lebih baik. Menaik taraf WeChat kepada versi terkini adalah sangat penting untuk terus berhubung dengan keluarga dan rakan sekerja, untuk terus berhubung dengan rakan dan untuk mengikuti perkembangan terkini. 1. Fahami ciri dan penambahbaikan versi terkini adalah sangat penting untuk memahami ciri dan penambahbaikan versi terkini sebelum menaik taraf WeChat. Untuk peningkatan prestasi dan pembetulan pepijat, anda boleh mengetahui tentang pelbagai ciri baharu yang dibawa oleh versi baharu dengan menyemak nota kemas kini di tapak web atau gedung aplikasi rasmi WeChat. 2. Semak versi WeChat semasa Kami perlu menyemak versi WeChat yang sedang dipasang pada telefon bimbit sebelum menaik taraf WeChat. Klik untuk membuka aplikasi WeChat "Saya" dan kemudian pilih menu "Perihal" di mana anda boleh melihat nombor versi WeChat semasa. 3. Buka apl
 Apl Shazam tidak berfungsi dalam iPhone: Betulkan
Jun 08, 2024 pm 12:36 PM
Apl Shazam tidak berfungsi dalam iPhone: Betulkan
Jun 08, 2024 pm 12:36 PM
Menghadapi masalah dengan apl Shazam pada iPhone? Shazam membantu anda mencari lagu dengan mendengarnya. Walau bagaimanapun, jika Shazam tidak berfungsi dengan betul atau tidak mengenali lagu itu, anda perlu menyelesaikannya secara manual. Membaiki apl Shazam tidak akan mengambil masa yang lama. Jadi, tanpa membuang masa lagi, ikut langkah di bawah untuk menyelesaikan isu dengan aplikasi Shazam. Betulkan 1 – Lumpuhkan Ciri Teks Tebal Teks tebal pada iPhone mungkin menjadi sebab mengapa Shazam tidak berfungsi dengan betul. Langkah 1 – Anda hanya boleh melakukan ini daripada tetapan iPhone anda. Jadi, bukalah. Langkah 2 - Seterusnya, buka tetapan "Paparan & Kecerahan" di sana. Langkah 3 - Jika anda mendapati bahawa "Teks Tebal" didayakan
 Tangkapan skrin iPhone tidak berfungsi: Cara membetulkannya
May 03, 2024 pm 09:16 PM
Tangkapan skrin iPhone tidak berfungsi: Cara membetulkannya
May 03, 2024 pm 09:16 PM
Ciri tangkapan skrin tidak berfungsi pada iPhone anda? Mengambil tangkapan skrin adalah sangat mudah kerana anda hanya perlu menahan butang Naik Kelantangan dan butang Kuasa pada masa yang sama untuk meraih skrin telefon anda. Walau bagaimanapun, terdapat cara lain untuk menangkap bingkai pada peranti. Betulkan 1 – Menggunakan Assistive Touch Ambil tangkapan skrin menggunakan ciri Assistive Touch. Langkah 1 – Pergi ke tetapan telefon anda. Langkah 2 – Seterusnya, ketik untuk membuka tetapan Kebolehcapaian. Langkah 3 – Buka tetapan Sentuh. Langkah 4 – Seterusnya, buka tetapan Assistive Touch. Langkah 5 – Hidupkan Sentuhan Bantu pada telefon anda. Langkah 6 – Buka “Sesuaikan Menu Teratas” untuk mengaksesnya. Langkah 7 – Sekarang anda hanya perlu memautkan mana-mana fungsi ini ke tangkapan skrin anda. Jadi klik pada yang pertama
 Isu zum Safari pada iPhone: Inilah penyelesaiannya
Apr 20, 2024 am 08:08 AM
Isu zum Safari pada iPhone: Inilah penyelesaiannya
Apr 20, 2024 am 08:08 AM
Jika anda tidak mempunyai kawalan ke atas tahap zum dalam Safari, menyelesaikan sesuatu boleh menjadi sukar. Jadi jika Safari kelihatan dizum keluar, itu mungkin menjadi masalah untuk anda. Berikut ialah beberapa cara anda boleh membetulkan isu zum kecil ini dalam Safari. 1. Pembesaran kursor: Pilih "Paparan" > "Pembesaran kursor" dalam bar menu Safari. Ini akan menjadikan kursor lebih kelihatan pada skrin, menjadikannya lebih mudah untuk dikawal. 2. Gerakkan tetikus: Ini mungkin kedengaran mudah, tetapi kadangkala hanya menggerakkan tetikus ke lokasi lain pada skrin boleh mengembalikannya ke saiz normal secara automatik. 3. Gunakan Pintasan Papan Kekunci Betulkan 1 – Tetapkan Semula Tahap Zum Anda boleh mengawal tahap zum terus daripada penyemak imbas Safari. Langkah 1 – Apabila anda berada di Safari
 Penjelasan terperinci tentang langkah-langkah untuk mendapatkan kebenaran pentadbir sistem Win11
Mar 08, 2024 pm 09:09 PM
Penjelasan terperinci tentang langkah-langkah untuk mendapatkan kebenaran pentadbir sistem Win11
Mar 08, 2024 pm 09:09 PM
Windows 11, sebagai sistem pengendalian terbaru yang dilancarkan oleh Microsoft, amat digemari oleh pengguna. Dalam proses menggunakan Windows 11, kadangkala kita perlu mendapatkan hak pentadbir sistem untuk melaksanakan beberapa operasi yang memerlukan kebenaran. Seterusnya, kami akan memperkenalkan secara terperinci langkah-langkah untuk mendapatkan hak pentadbir sistem dalam Windows 11. Langkah pertama ialah mengklik "Menu Mula". Anda boleh melihat ikon Windows di sudut kiri bawah Klik ikon untuk membuka "Menu Mula". Dalam langkah kedua, cari dan klik "
 Apl jam tiada dalam iPhone: Cara membetulkannya
May 03, 2024 pm 09:19 PM
Apl jam tiada dalam iPhone: Cara membetulkannya
May 03, 2024 pm 09:19 PM
Adakah apl jam hilang dari telefon anda? Tarikh dan masa masih akan dipaparkan pada bar status iPhone anda. Walau bagaimanapun, tanpa apl Jam, anda tidak akan dapat menggunakan jam dunia, jam randik, jam penggera dan banyak ciri lain. Oleh itu, membetulkan apl jam yang hilang hendaklah berada di bahagian atas senarai tugasan anda. Penyelesaian ini boleh membantu anda menyelesaikan isu ini. Betulkan 1 – Letakkan Apl Jam Jika anda tersilap mengalih keluar apl Jam daripada skrin utama anda, anda boleh meletakkan semula apl Jam pada tempatnya. Langkah 1 – Buka kunci iPhone anda dan mula meleret ke kiri sehingga anda mencapai halaman Pustaka Apl. Langkah 2 – Seterusnya, cari "jam" dalam kotak carian. Langkah 3 – Apabila anda melihat "Jam" di bawah dalam hasil carian, tekan dan tahan dan
