PHP实现用户注册登录功能的方法
本课程通过使用PHP及Web前端技术实现一个网站注册登录入口页面,学习并实践PHP编程等,有兴趣的同学可以参考一下。
本文介绍的是基于PHP实现用户注册登录功能,本项目分为四部分内容:1前端页面制作,2验证码制作,3实现注册登陆,4功能完善。具体情况可以往下看。
验证码制作
一、实验简介
本次实验将会带领大家使用面向对象的思想封装一个验证码类。并在注册和登陆界面展示使用。通过本次实验的学习,你将会领悟到 PHP 的 OOP 思想,以及 GD 库的使用,验证码生成。
1.1 涉及到的知识点
PHP
GD库
OOP编程
1.2 开发工具
sublime,一个方便快速的文本编辑器。点击桌面左下角: 应用程序菜单/开发/sublime
二、封装验证码类
2.1 建立目录以及准备字体
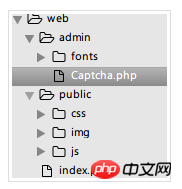
在 web 目录下建立一个 admin 目录作为我们的后台目录,存放后台代码文件。在 admin 下建立一个 fonts 目录,用于存放制作验证码所需字体。
在 admin 下新建一个 Captcha.php 文件,这就是我们需要编辑的验证码类文件。
当前目录层次结构:
编辑 Captcha.php 文件:
<?php
/**
* Captcha class
*/
class Captcha
{

  function __construct()
  {
    # code...
  }
}添加该类的私有属性和构造方法:
<?php
/**
* Captcha class
*/
class Captcha
{
private $codeNum; //验证码位数
private $width; //验证码图片宽度
private $height; //验证码图片高度
private $img; //图像资源句柄
private $lineFlag; //是否生成干扰线条
private $piexFlag; //是否生成干扰点
private $fontSize; //字体大小
private $code; //验证码字符
private $string; //生成验证码的字符集
private $font; //字体
function __construct($codeNum = 4,$height = 50,$width = 150,$fontSize = 20,$lineFlag = true,$piexFlag = true)
{
$this->string = 'qwertyupmkjnhbgvfcdsxa123456789'; //去除一些相近的字符
$this->codeNum = $codeNum;
$this->height = $height;
$this->width = $width;
$this->lineFlag = $lineFlag;
$this->piexFlag = $piexFlag;
$this->font = dirname(__FILE__).'/fonts/consola.ttf';
$this->fontSize = $fontSize;
}
}字体文件可通过以下命令下载到 fonts 目录:
$ wget http://labfile.oss.aliyuncs.com/courses/587/consola.ttf
接下来开始编写具体的方法:
创建图像资源句柄
//创建图像资源
public function createImage(){
    $this->img = imagecreate($this->width, $this->height);  //创建图像资源
    imagecolorallocate($this->img,mt_rand(0,100),mt_rand(0,100),mt_rand(0,100));  //填充图像背景(使用浅色)
}用到的相关函数
imagecreate:新建一个基于调色板的图像
imagecolorallocate:为一幅图像分配颜色
mt_rand:生成更好的随机数
创建验证码字符串并输出到图像
//创建验证码
public function createCode(){
$strlen = strlen($this->string)-1;
for ($i=0; $i < $this->codeNum; $i++) {
$this->code .= $this->string[mt_rand(0,$strlen)]; //从字符集中随机取出四个字符拼接
}
$_SESSION['code'] = $this->code; //加入 session 中
//计算每个字符间距
$diff = $this->width/$this->codeNum;
for ($i=0; $i < $this->codeNum; $i++) {
//为每个字符生成颜色(使用深色)
$txtColor = imagecolorallocate($this->img,mt_rand(100,255),mt_rand(100,255),mt_rand(100,255));
//写入图像
imagettftext($this->img, $this->fontSize, mt_rand(-30,30), $diff*$i+mt_rand(3,8), mt_rand(20,$this->height-10), $txtColor, $this->font, $this->code[$i]);
}
}用到的相关函数:
imagettftext:用 TrueType 字体向图像写入文本
创建干扰线条
//创建干扰线条(默认四条)
public function createLines(){
    for ($i=0; $i < 4; $i++) {
      $color = imagecolorallocate($this->img,mt_rand(0,155),mt_rand(0,155),mt_rand(0,155));  //使用浅色
      imageline($this->img,mt_rand(0,$this->width),mt_rand(0,$this->height),mt_rand(0,$this->width),mt_rand(0,$this->height),$color);
    }
}用到的相关函数:
imageline:画一条线段
创建干扰点
//创建干扰点 (默认一百个点)
public function createPiex(){
    for ($i=0; $i < 100; $i++) {
      $color = imagecolorallocate($this->img,mt_rand(0,255),mt_rand(0,255),mt_rand(0,255));
      imagesetpixel($this->img,mt_rand(0,$this->width),mt_rand(0,$this->height),$color);
    }
}使用的相关函数:
imagesetpixel:画一个单一像素
对外输出图像:
 public function show()
  {
    $this->createImage();
    $this->createCode();
    if ($this->lineFlag) {  //是否创建干扰线条
      $this->createLines();
    }
    if ($this->piexFlag) {  //是否创建干扰点
      $this->createPiex();
    }
    header('Content-type:image/png');  //请求页面的内容是png格式的图像
    imagepng($this->img);  //以png格式输出图像
    imagedestroy($this->img);  //清除图像资源,释放内存
}用到的相关函数:
imagepng:以 PNG 格式将图像输出到浏览器或文件
imagedestroy:销毁一图像
对外提供验证码:
public function getCode(){
return $this->code;
}
完整代码如下:
<?php
/**
* Captcha class
*/
class Captcha
{
private $codeNum;
private $width;
private $height;
private $img;
private $lineFlag;
private $piexFlag;
private $fontSize;
private $code;
private $string;
private $font;
function __construct($codeNum = 4,$height = 50,$width = 150,$fontSize = 20,$lineFlag = true,$piexFlag = true)
{
$this->string = 'qwertyupmkjnhbgvfcdsxa123456789';
$this->codeNum = $codeNum;
$this->height = $height;
$this->width = $width;
$this->lineFlag = $lineFlag;
$this->piexFlag = $piexFlag;
$this->font = dirname(__FILE__).'/fonts/consola.ttf';
$this->fontSize = $fontSize;
}
public function createImage(){
$this->img = imagecreate($this->width, $this->height);
imagecolorallocate($this->img,mt_rand(0,100),mt_rand(0,100),mt_rand(0,100));
}
public function createCode(){
$strlen = strlen($this->string)-1;
for ($i=0; $i < $this->codeNum; $i++) {
$this->code .= $this->string[mt_rand(0,$strlen)];
}
$_SESSION['code'] = $this->code;
$diff = $this->width/$this->codeNum;
for ($i=0; $i < $this->codeNum; $i++) {
$txtColor = imagecolorallocate($this->img,mt_rand(100,255),mt_rand(100,255),mt_rand(100,255));
imagettftext($this->img, $this->fontSize, mt_rand(-30,30), $diff*$i+mt_rand(3,8), mt_rand(20,$this->height-10), $txtColor, $this->font, $this->code[$i]);
}
}
public function createLines(){
for ($i=0; $i < 4; $i++) {
$color = imagecolorallocate($this->img,mt_rand(0,155),mt_rand(0,155),mt_rand(0,155));
imageline($this->img,mt_rand(0,$this->width),mt_rand(0,$this->height),mt_rand(0,$this->width),mt_rand(0,$this->height),$color);
}
}
public function createPiexs(){
for ($i=0; $i < 100; $i++) {
$color = imagecolorallocate($this->img,mt_rand(0,255),mt_rand(0,255),mt_rand(0,255));
imagesetpixel($this->img,mt_rand(0,$this->width),mt_rand(0,$this->height),$color);
}
}
public function show()
{
$this->createImage();
$this->createCode();
if ($this->lineFlag) {
$this->createLines();
}
if ($this->piexFlag) {
$this->createPiexs();
}
header('Content-type:image/png');
imagepng($this->img);
imagedestroy($this->img);
}
public function getCode(){
return $this->code;
}
}以上就是验证码类的全部代码。看起来确实挺简单的,不过用的图像处理函数比较多,上面相关的函数我也做了必要的链接和用途说明。这些函数也不用死记硬背,遇到不清楚的,随时查阅 PHP 官方文档,最重要的是还有中文文档。
2.2 使用验证码
既然已经封装完毕,那就可以开始使用了。这里为了方便,直接在 Captcha 类的下方调用该类:
session_start(); //开启session
$captcha = new Captcha();  //实例化验证码类(可自定义参数)
$captcha->show();  //调用输出
三、前端展示
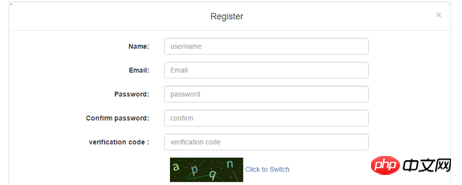
后端已经准备好了验证码,前端界面就可以展示了,修改 index.php 中的注册与登陆表单的验证码部分:
<p class="form-group"> <p class="col-sm-12"> <img src="admin/Captcha.php" alt="" id="codeimg" onclick="javascript:this.src = 'admin/Captcha.php?'+Math.random();"> <span>Click to Switch</span> </p> </p>
img 标签添加了点击事件的 js 代码,这样就可以实现点击更换验证码的功能!
效果图:

四、完善
到目前为止,我们的验证码模块基本就完成了。学习到这里,大家应该对面向对象编程有了进一步的理解。也领悟到了一丝 OOP 思想。OOP 的三大特征:封装,继承,多态。我们这里只用到了一点封装的思想。大家可以继续完善和改进这个验证码类,设计出更加完美的类。这个实验也告诉我们,PHP 的函数很多,不要死记硬背,多看官方文档。
总结:以上就是本篇文的全部内容,希望能对大家的学习有所帮助。
相关推荐:
Atas ialah kandungan terperinci PHP实现用户注册登录功能的方法. Untuk maklumat lanjut, sila ikut artikel berkaitan lain di laman web China PHP!

Alat AI Hot

Undresser.AI Undress
Apl berkuasa AI untuk mencipta foto bogel yang realistik

AI Clothes Remover
Alat AI dalam talian untuk mengeluarkan pakaian daripada foto.

Undress AI Tool
Gambar buka pakaian secara percuma

Clothoff.io
Penyingkiran pakaian AI

Video Face Swap
Tukar muka dalam mana-mana video dengan mudah menggunakan alat tukar muka AI percuma kami!

Artikel Panas

Alat panas

Notepad++7.3.1
Editor kod yang mudah digunakan dan percuma

SublimeText3 versi Cina
Versi Cina, sangat mudah digunakan

Hantar Studio 13.0.1
Persekitaran pembangunan bersepadu PHP yang berkuasa

Dreamweaver CS6
Alat pembangunan web visual

SublimeText3 versi Mac
Perisian penyuntingan kod peringkat Tuhan (SublimeText3)

Topik panas
 1393
1393
 52
52
 1205
1205
 24
24
 Jelaskan JSON Web Tokens (JWT) dan kes penggunaannya dalam PHP API.
Apr 05, 2025 am 12:04 AM
JWT adalah standard terbuka berdasarkan JSON, yang digunakan untuk menghantar maklumat secara selamat antara pihak, terutamanya untuk pengesahan identiti dan pertukaran maklumat. 1. JWT terdiri daripada tiga bahagian: header, muatan dan tandatangan. 2. Prinsip kerja JWT termasuk tiga langkah: menjana JWT, mengesahkan JWT dan muatan parsing. 3. Apabila menggunakan JWT untuk pengesahan di PHP, JWT boleh dijana dan disahkan, dan peranan pengguna dan maklumat kebenaran boleh dimasukkan dalam penggunaan lanjutan. 4. Kesilapan umum termasuk kegagalan pengesahan tandatangan, tamat tempoh, dan muatan besar. Kemahiran penyahpepijatan termasuk menggunakan alat debugging dan pembalakan. 5. Pengoptimuman prestasi dan amalan terbaik termasuk menggunakan algoritma tandatangan yang sesuai, menetapkan tempoh kesahihan dengan munasabah,
 Bagaimana anda menghuraikan dan memproses HTML/XML dalam PHP?
Feb 07, 2025 am 11:57 AM
Tutorial ini menunjukkan cara memproses dokumen XML dengan cekap menggunakan PHP. XML (bahasa markup extensible) adalah bahasa markup berasaskan teks yang serba boleh yang direka untuk pembacaan manusia dan parsing mesin. Ia biasanya digunakan untuk penyimpanan data
 Program PHP untuk mengira vokal dalam rentetan
Feb 07, 2025 pm 12:12 PM
Rentetan adalah urutan aksara, termasuk huruf, nombor, dan simbol. Tutorial ini akan mempelajari cara mengira bilangan vokal dalam rentetan yang diberikan dalam PHP menggunakan kaedah yang berbeza. Vokal dalam bahasa Inggeris adalah a, e, i, o, u, dan mereka boleh menjadi huruf besar atau huruf kecil. Apa itu vokal? Vokal adalah watak abjad yang mewakili sebutan tertentu. Terdapat lima vokal dalam bahasa Inggeris, termasuk huruf besar dan huruf kecil: a, e, i, o, u Contoh 1 Input: String = "TutorialSpoint" Output: 6 menjelaskan Vokal dalam rentetan "TutorialSpoint" adalah u, o, i, a, o, i. Terdapat 6 yuan sebanyak 6
 Terangkan pengikatan statik lewat dalam php (statik: :).
Apr 03, 2025 am 12:04 AM
Mengikat statik (statik: :) Melaksanakan pengikatan statik lewat (LSB) dalam PHP, yang membolehkan kelas panggilan dirujuk dalam konteks statik dan bukannya menentukan kelas. 1) Proses parsing dilakukan pada masa runtime, 2) Cari kelas panggilan dalam hubungan warisan, 3) ia boleh membawa overhead prestasi.
 Apakah kaedah Magic PHP (__construct, __destruct, __call, __get, __set, dll) dan menyediakan kes penggunaan?
Apr 03, 2025 am 12:03 AM
Apakah kaedah sihir PHP? Kaedah sihir PHP termasuk: 1. \ _ \ _ Membina, digunakan untuk memulakan objek; 2. \ _ \ _ Destruct, digunakan untuk membersihkan sumber; 3. \ _ \ _ Call, mengendalikan panggilan kaedah yang tidak wujud; 4. \ _ \ _ Mendapatkan, melaksanakan akses atribut dinamik; 5. \ _ \ _ Set, melaksanakan tetapan atribut dinamik. Kaedah ini secara automatik dipanggil dalam situasi tertentu, meningkatkan fleksibiliti dan kecekapan kod.
 Pintu masuk laman web rasmi DeepSeek dan aktiviti promosi terkini
Feb 19, 2025 pm 05:15 PM
Laman web rasmi DeepSeek kini melancarkan pelbagai aktiviti diskaun untuk menyediakan pengguna dengan pengalaman membeli -belah. Pengguna baru mendaftar untuk mendapatkan kupon $ 10, dan nikmati diskaun masa terhad 15% untuk keseluruhan penonton. Mengesyorkan rakan juga boleh mendapat ganjaran, dan anda boleh mengumpul mata untuk penebusan hadiah semasa membeli -belah. Tarikh akhir acara berbeza.
 Terangkan ungkapan perlawanan (Php 8) dan bagaimana ia berbeza dari suis.
Apr 06, 2025 am 12:03 AM
Dalam Php8, ungkapan perlawanan adalah struktur kawalan baru yang mengembalikan hasil yang berbeza berdasarkan nilai ungkapan. 1) Ia sama dengan pernyataan suis, tetapi mengembalikan nilai dan bukannya blok pernyataan pelaksanaan. 2) Ekspresi perlawanan secara ketat (===), yang meningkatkan keselamatan. 3) Ia mengelakkan kemungkinan ketinggalan dalam penyataan suis dan meningkatkan kesederhanaan dan kebolehbacaan kod.
 Apakah pemalsuan permintaan lintas tapak (CSRF) dan bagaimana anda melaksanakan perlindungan CSRF di PHP?
Apr 07, 2025 am 12:02 AM
Dalam PHP, anda boleh mencegah serangan CSRF dengan menggunakan token yang tidak dapat diramalkan. Kaedah khusus termasuk: 1. Menjana dan membenamkan token CSRF dalam bentuk; 2. Sahkan kesahihan token semasa memproses permintaan.


