

关于Vue绑定问题解析
这次给大家带来关于Vue绑定问题解析,Vue绑定的注意事项有哪些,下面就是实战案例,一起来看一下。
1、原理
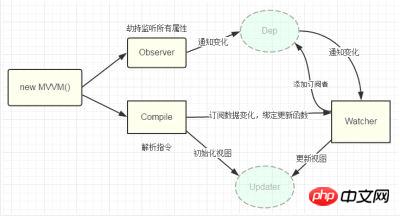
Vue的双向数据绑定的原理相信大家也都十分了解了,主要是通过 Object对象的defineProperty属性,重写data的set和get函数来实现的,这里对原理不做过多描述,主要还是来实现一个实例。为了使代码更加的清晰,这里只会实现最基本的内容,主要实现v-model,v-bind 和v-click三个命令,其他命令也可以自行补充。
添加网上的一张图
2、实现
页面结构很简单,如下
<p id="app">
 <form>
  <input type="text" v-model="number">
  <button type="button" v-click="increment">增加</button>
 </form>
 <h3 v-bind="number"></h3>
 </p>
包含:
1. 一个input,使用v-model指令
2. 一个button,使用v-click指令
3. 一个h3,使用v-bind指令。
我们最后会通过类似于vue的方式来使用我们的双向数据绑定,结合我们的数据结构添加注释
var app = new myVue({
  el:'#app',
  data: {
  number: 0
  },
  methods: {
  increment: function() {
   this.number ++;
  },
  }
})首先我们需要定义一个myVue构造函数:
function myVue(options) {
}为了初始化这个构造函数,给它添加一 个_init属性
function myVue(options) {
 this._init(options);
}
myVue.prototype._init = function (options) {
 this.$options = options; // options 为上面使用时传入的结构体,包括el,data,methods
 this.$el = document.querySelector(options.el); // el是 #app, this.$el是id为app的Element元素
 this.$data = options.data; // this.$data = {number: 0}
 this.$methods = options.methods; // this.$methods = {increment: function(){}}
}接下来实现_obverse函数,对data进行处理,重写data的set和get函数
并改造_init函数
myVue.prototype._obverse = function (obj) { // obj = {number: 0}
 var value;
 for (key in obj) { //遍历obj对象
  if (obj.hasOwnProperty(key)) {
  value = obj[key];
  if (typeof value === 'object') { //如果值还是对象,则遍历处理
   this._obverse(value);
  }
  Object.defineProperty(this.$data, key, { //关键
   enumerable: true,
   configurable: true,
   get: function () {
   console.log(`获取${value}`);
   return value;
   },
   set: function (newVal) {
   console.log(`更新${newVal}`);
   if (value !== newVal) {
    value = newVal;
   }
   }
  })
  }
 }
 }
 myVue.prototype._init = function (options) {
 this.$options = options;
 this.$el = document.querySelector(options.el);
 this.$data = options.data;
 this.$methods = options.methods;
 this._obverse(this.$data);
}接下来我们写一个指令类Watcher,用来绑定更新函数,实现对DOM元素的更新
function Watcher(name, el, vm, exp, attr) {
 this.name = name;   //指令名称,例如文本节点,该值设为"text"
 this.el = el;    //指令对应的DOM元素
 this.vm = vm;    //指令所属myVue实例
 this.exp = exp;   //指令对应的值,本例如"number"
 this.attr = attr;   //绑定的属性值,本例为"innerHTML"
 this.update();
 }
 Watcher.prototype.update = function () {
 this.el[this.attr] = this.vm.$data[this.exp]; //比如 H3.innerHTML = this.data.number; 当number改变时,会触发这个update函数,保证对应的DOM内容进行了更新。
}更新_init函数以及_obverse函数
myVue.prototype._init = function (options) {
 //...
 this._binding = {}; //_binding保存着model与view的映射关系,也就是我们前面定义的Watcher的实例。当model改变时,我们会触发其中的指令类更新,保证view也能实时更新
 //...
 }
 myVue.prototype._obverse = function (obj) {
 //...
  if (obj.hasOwnProperty(key)) {
  this._binding[key] = { // 按照前面的数据,_binding = {number: _directives: []}
   _directives: []
  };
  //...
  var binding = this._binding[key];
  Object.defineProperty(this.$data, key, {
   //...
   set: function (newVal) {
   console.log(`更新${newVal}`);
   if (value !== newVal) {
    value = newVal;
    binding._directives.forEach(function (item) { // 当number改变时,触发_binding[number]._directives 中的绑定的Watcher类的更新
    item.update();
    })
   }
   }
  })
  }
 }
}那么如何将view与model进行绑定呢?接下来我们定义一个_compile函数,用来解析我们的指令(v-bind,v-model,v-clickde)等,并在这个过程中对view与model进行绑定。
myVue.prototype._init = function (options) {
//...
this._complie(this.$el);
}
myVue.prototype._complie = function (root) { root 为 id为app的Element元素,也就是我们的根元素
var _this = this;
var nodes = root.children;
for (var i = 0; i < nodes.length; i++) {
var node = nodes[i];
if (node.children.length) { // 对所有元素进行遍历,并进行处理
this._complie(node);
}
if (node.hasAttribute('v-click')) { // 如果有v-click属性,我们监听它的onclick事件,触发increment事件,即number++
node.onclick = (function () {
var attrVal = nodes[i].getAttribute('v-click');
return _this.$methods[attrVal].bind(_this.$data); //bind是使data的作用域与method函数的作用域保持一致
})();
}
if (node.hasAttribute('v-model') && (node.tagName == 'INPUT' || node.tagName == 'TEXTAREA')) { // 如果有v-model属性,并且元素是INPUT或者TEXTAREA,我们监听它的input事件
node.addEventListener('input', (function(key) {
var attrVal = node.getAttribute('v-model');
//_this._binding['number']._directives = [一个Watcher实例]
// 其中Watcher.prototype.update = function () {
// node['vaule'] = _this.$data['number']; 这就将node的值保持与number一致
// }
_this._binding[attrVal]._directives.push(new Watcher(
'input',
node,
_this,
attrVal,
'value'
))
return function() {
_this.$data[attrVal] = nodes[key].value; // 使number 的值与 node的value保持一致,已经实现了双向绑定
}
})(i));
}
if (node.hasAttribute('v-bind')) { // 如果有v-bind属性,我们只要使node的值及时更新为data中number的值即可
var attrVal = node.getAttribute('v-bind');
_this._binding[attrVal]._directives.push(new Watcher(
'text',
node,
_this,
attrVal,
'innerHTML'
))
}
}
}至此,我们已经实现了一个简单vue的双向绑定功能,包括v-bind, v-model, v-click三个指令。效果如下图
附上全部代码,不到150行
myVue <p id="app"> <form> <input type="text" v-model="number"> <button type="button" v-click="increment">增加</button> </form> <h3 v-bind="number"></h3> </p> <script> function myVue(options) { this._init(options); } myVue.prototype._init = function (options) { this.$options = options; this.$el = document.querySelector(options.el); this.$data = options.data; this.$methods = options.methods; this._binding = {}; this._obverse(this.$data); this._complie(this.$el); } myVue.prototype._obverse = function (obj) { var value; for (key in obj) { if (obj.hasOwnProperty(key)) { this._binding[key] = { _directives: [] }; value = obj[key]; if (typeof value === 'object') { this._obverse(value); } var binding = this._binding[key]; Object.defineProperty(this.$data, key, { enumerable: true, configurable: true, get: function () { console.log(`获取${value}`); return value; }, set: function (newVal) { console.log(`更新${newVal}`); if (value !== newVal) { value = newVal; binding._directives.forEach(function (item) { item.update(); }) } } }) } } } myVue.prototype._complie = function (root) { var _this = this; var nodes = root.children; for (var i = 0; i < nodes.length; i++) { var node = nodes[i]; if (node.children.length) { this._complie(node); } if (node.hasAttribute('v-click')) { node.onclick = (function () { var attrVal = nodes[i].getAttribute('v-click'); return _this.$methods[attrVal].bind(_this.$data); })(); } if (node.hasAttribute('v-model') && (node.tagName == 'INPUT' || node.tagName == 'TEXTAREA')) { node.addEventListener('input', (function(key) { var attrVal = node.getAttribute('v-model'); _this._binding[attrVal]._directives.push(new Watcher( 'input', node, _this, attrVal, 'value' )) return function() { _this.$data[attrVal] = nodes[key].value; } })(i)); } if (node.hasAttribute('v-bind')) { var attrVal = node.getAttribute('v-bind'); _this._binding[attrVal]._directives.push(new Watcher( 'text', node, _this, attrVal, 'innerHTML' )) } } } function Watcher(name, el, vm, exp, attr) { this.name = name; //指令名称,例如文本节点,该值设为"text" this.el = el; //指令对应的DOM元素 this.vm = vm; //指令所属myVue实例 this.exp = exp; //指令对应的值,本例如"number" this.attr = attr; //绑定的属性值,本例为"innerHTML" this.update(); } Watcher.prototype.update = function () { this.el[this.attr] = this.vm.$data[this.exp]; } window.onload = function() { var app = new myVue({ el:'#app', data: { number: 0 }, methods: { increment: function() { this.number ++; }, } }) } </script>
相信看了本文案例你已经掌握了方法,更多精彩请关注php中文网其它相关文章!
推荐阅读:
Atas ialah kandungan terperinci 关于Vue绑定问题解析. Untuk maklumat lanjut, sila ikut artikel berkaitan lain di laman web China PHP!

Alat AI Hot

Undresser.AI Undress
Apl berkuasa AI untuk mencipta foto bogel yang realistik

AI Clothes Remover
Alat AI dalam talian untuk mengeluarkan pakaian daripada foto.

Undress AI Tool
Gambar buka pakaian secara percuma

Clothoff.io
Penyingkiran pakaian AI

Video Face Swap
Tukar muka dalam mana-mana video dengan mudah menggunakan alat tukar muka AI percuma kami!

Artikel Panas
Alat panas

Notepad++7.3.1
Editor kod yang mudah digunakan dan percuma

SublimeText3 versi Cina
Versi Cina, sangat mudah digunakan

Hantar Studio 13.0.1
Persekitaran pembangunan bersepadu PHP yang berkuasa

Dreamweaver CS6
Alat pembangunan web visual

SublimeText3 versi Mac
Perisian penyuntingan kod peringkat Tuhan (SublimeText3)
Topik panas
 1389
1389
 52
52

 Apa yang perlu saya lakukan jika saya menghadapi percetakan kod yang dihiasi untuk resit kertas terma depan?
Apr 04, 2025 pm 02:42 PM
Apa yang perlu saya lakukan jika saya menghadapi percetakan kod yang dihiasi untuk resit kertas terma depan?
Apr 04, 2025 pm 02:42 PM
Soalan dan penyelesaian yang sering ditanya untuk percetakan tiket kertas terma depan dalam pembangunan front-end, percetakan tiket adalah keperluan umum. Walau bagaimanapun, banyak pemaju sedang melaksanakan ...
 Siapa yang dibayar lebih banyak Python atau JavaScript?
Apr 04, 2025 am 12:09 AM
Siapa yang dibayar lebih banyak Python atau JavaScript?
Apr 04, 2025 am 12:09 AM
Tidak ada gaji mutlak untuk pemaju Python dan JavaScript, bergantung kepada kemahiran dan keperluan industri. 1. Python boleh dibayar lebih banyak dalam sains data dan pembelajaran mesin. 2. JavaScript mempunyai permintaan yang besar dalam perkembangan depan dan stack penuh, dan gajinya juga cukup besar. 3. Faktor mempengaruhi termasuk pengalaman, lokasi geografi, saiz syarikat dan kemahiran khusus.
 Demystifying JavaScript: Apa yang berlaku dan mengapa penting
Apr 09, 2025 am 12:07 AM
Demystifying JavaScript: Apa yang berlaku dan mengapa penting
Apr 09, 2025 am 12:07 AM
JavaScript adalah asas kepada pembangunan web moden, dan fungsi utamanya termasuk pengaturcaraan yang didorong oleh peristiwa, penjanaan kandungan dinamik dan pengaturcaraan tak segerak. 1) Pengaturcaraan yang didorong oleh peristiwa membolehkan laman web berubah secara dinamik mengikut operasi pengguna. 2) Penjanaan kandungan dinamik membolehkan kandungan halaman diselaraskan mengikut syarat. 3) Pengaturcaraan Asynchronous memastikan bahawa antara muka pengguna tidak disekat. JavaScript digunakan secara meluas dalam interaksi web, aplikasi satu halaman dan pembangunan sisi pelayan, sangat meningkatkan fleksibiliti pengalaman pengguna dan pembangunan silang platform.
 Bagaimana untuk menggabungkan elemen array dengan ID yang sama ke dalam satu objek menggunakan JavaScript?
Apr 04, 2025 pm 05:09 PM
Bagaimana untuk menggabungkan elemen array dengan ID yang sama ke dalam satu objek menggunakan JavaScript?
Apr 04, 2025 pm 05:09 PM
Bagaimana cara menggabungkan elemen array dengan ID yang sama ke dalam satu objek dalam JavaScript? Semasa memproses data, kita sering menghadapi keperluan untuk mempunyai id yang sama ...
 Bagaimana untuk mencapai kesan menatal paralaks dan kesan animasi elemen, seperti laman web rasmi Shiseido?
atau:
Bagaimanakah kita dapat mencapai kesan animasi yang disertai dengan menatal halaman seperti laman web rasmi Shiseido?
Apr 04, 2025 pm 05:36 PM
Bagaimana untuk mencapai kesan menatal paralaks dan kesan animasi elemen, seperti laman web rasmi Shiseido?
atau:
Bagaimanakah kita dapat mencapai kesan animasi yang disertai dengan menatal halaman seperti laman web rasmi Shiseido?
Apr 04, 2025 pm 05:36 PM
Perbincangan mengenai realisasi kesan animasi tatal dan elemen Parallax dalam artikel ini akan meneroka bagaimana untuk mencapai yang serupa dengan laman web rasmi Shiseido (https://www.shiseido.co.jp/sb/wonderland/) ... ...
 Perbezaan dalam Konsol.Log Output Result: Mengapa kedua -dua panggilan berbeza?
Apr 04, 2025 pm 05:12 PM
Perbezaan dalam Konsol.Log Output Result: Mengapa kedua -dua panggilan berbeza?
Apr 04, 2025 pm 05:12 PM
Perbincangan mendalam mengenai punca-punca utama perbezaan dalam output konsol.log. Artikel ini akan menganalisis perbezaan hasil output fungsi Console.log dalam sekeping kod dan menerangkan sebab -sebab di belakangnya. � ...
 Adakah JavaScript sukar belajar?
Apr 03, 2025 am 12:20 AM
Adakah JavaScript sukar belajar?
Apr 03, 2025 am 12:20 AM
Pembelajaran JavaScript tidak sukar, tetapi ia mencabar. 1) Memahami konsep asas seperti pembolehubah, jenis data, fungsi, dan sebagainya. 2) Pengaturcaraan asynchronous tuan dan melaksanakannya melalui gelung acara. 3) Gunakan operasi DOM dan berjanji untuk mengendalikan permintaan tak segerak. 4) Elakkan kesilapan biasa dan gunakan teknik debugging. 5) Mengoptimumkan prestasi dan mengikuti amalan terbaik.
 Bolehkah PowerPoint menjalankan JavaScript?
Apr 01, 2025 pm 05:17 PM
Bolehkah PowerPoint menjalankan JavaScript?
Apr 01, 2025 pm 05:17 PM
JavaScript boleh dijalankan di PowerPoint, dan boleh dilaksanakan dengan memanggil fail JavaScript luaran atau membenamkan fail HTML melalui VBA. 1. Untuk menggunakan VBA untuk memanggil fail JavaScript, anda perlu mendayakan makro dan mempunyai pengetahuan pengaturcaraan VBA. 2. Benamkan fail HTML yang mengandungi JavaScript, yang mudah dan mudah digunakan tetapi tertakluk kepada sekatan keselamatan. Kelebihan termasuk fungsi lanjutan dan fleksibiliti, sementara kelemahan melibatkan keselamatan, keserasian dan kerumitan. Dalam praktiknya, perhatian harus dibayar kepada keselamatan, keserasian, prestasi dan pengalaman pengguna.
