$选择器--是如何将DOM封装成jquery对象
前言:说到jquery不得不说的就是强大的jquery的选择器功能啦。该功能很强大,还单独分离出来sizzle模块供只需用到选择器功能的朋友使用。(该篇先不说jquery选择器的强大功能,先说说jquery是如何将DOM元素封装成jquery对象的)
一、Dom对象和jquery对象
<body> <script src="https://cdn.bootcss.com/jquery/2.0.0/jquery.min.js"></script> <p id="box">测试</p> <script> var oBox = document.getElementById('box'); var oBox2 = document.querySelector('#box'); var $Box = $('#box'); console.log(oBox); console.log(oBox2); console.log($Box); </script> </body> </html>
运行结果:

从中我们就可以看出区别了,$()把DOM对象封装成jquery对象,而DOM对象也就保存在jquery[0]中,这也就是为什么我们说的把jquery对象转化成DOM对象只需用jquery[0]或者jquery.get(0)了。
二、模拟jquery--根据id,封装jquery对象
这里先简化一下,看看封装jquery对象的一部分过程
<body>
<script src="https://cdn.bootcss.com/jquery/2.0.0/jquery.min.js"></script>
<p id="box">测试</p>
<script>
var $Box = $('#box');
console.log('这是jquery对象');
console.log($Box);
console.log('------分界线------');
(function(window,undefined){
var jQ = function(selector){
return new jQ.fn.init(selector);
};
jQ.fn = jQ.prototype = {
jquery:'2.0.0', //jquery版本号信息
constructor: jQ, //添加构造器属性
length:0, //初始length属性
selector:'', //初始selector属性
init: function(selector){
var match, elem, rquickExpr = /^(?:\s*(<[\w\W]+>)[^>]*|#([\w-]*))$/;
match = rquickExpr.exec( selector );
//console.log(match); //正则匹配找出id的值
if ( !selector ) { //如果selector为'',null,undefind直接退出操作
return this;
}
elem = document.getElementById(match[2]);
this[0] = elem;
this.context=document;
this.length = 1;
this.selector = selector;
return this;
}
}
jQ.fn.init.prototype = jQ.fn;
window.$$ = jQ;
})( window );
console.log('这是模拟的对象');
console.log($$('#box')); //输出封装的对象
</script>
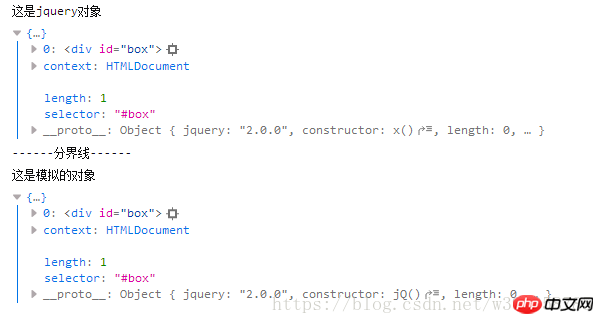
</body>②输出结果:(火狐浏览器上打开的)

这里需要注意的是,chrome浏览器在显示上有会些不同

jquery显示的是类数组对象形态。
③、解析
对于上面代码有很多看不明白的朋友建议看一下我前面写的文章【jquery源码】开始学习源码之前需要解决的一些问题。
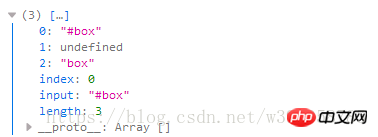
正则匹配我是直接复制了源码中的正则,可以输出该正则处理后的结果来看看。

三、模拟jquery--根据标签名,封装jquery对象
直接上代码
<body>
<ul class="list">
<li>测试1</li>
<li>测试2</li>
<li>测试3</li>
<li>测试4</li>
</ul>
<script>
console.log('这是jquery对象');
var aLi1 = $('li');
console.log(aLi1);
console.log('------分界线------');
(function(window,undefined){
var jQ = function(selector,context){
return new jQ.fn.init(selector, context);
};
jQ.fn = jQ.prototype = {
jquery:'2.0.0', //jquery版本号信息
constructor: jQ, //添加构造器属性
length:0, //初始length属性
selector:'', //初始selector属性
init: function(selector, context){
var match, elem;
if ( !selector ) { //如果selector为'',null,undefind直接退出操作
return this;
}
elem = document.getElementsByTagName(selector);
for(var i =0,len=elem.length; i<len; i++){
this[i] = elem[i];
}
this.context=document;
this.length = elem.length;
this.selector = selector;
return this;
}
}
jQ.fn.init.prototype = jQ.fn;
window.$$ = jQ;
})( window );
console.log('这是模拟的对象');
console.log($$('li')); //输出封装的对象
</script>
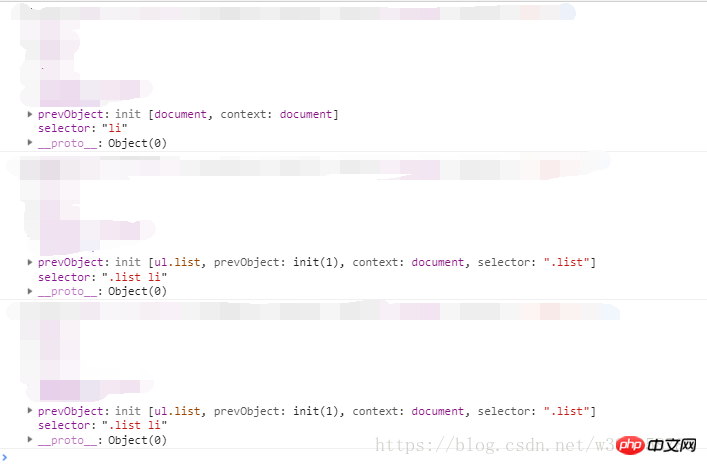
</body>输出结果:

这里只是单纯的模拟,jq处理起来远远没有那么简单,jquery还进行了大量的判断(下面的文章会继续说这个问题)。还可以在jquery对象中发现prevObject属性,该属性保存的是上一级的查找对象。看看下面的例子就能明白了。
<body>
<script src="https://cdn.bootcss.com/jquery/2.0.0/jquery.min.js"></script>
<ul class="list">
<li>测试1</li>
<li>测试2</li>
<li>测试3</li>
<li>测试4</li>
</ul>
<script>
var aLi1 = $('li');
console.log(aLi1);
var aLi2 = $('li','.list');
console.log(aLi2);
var aLi3 = $('.list').find('li');
console.log(aLi3);
</script>
</body>
本文讲解了$选择器--是如何将DOM封装成jquery对象,更多相关内容请关注php中文网。
相关推荐:
Atas ialah kandungan terperinci $选择器--是如何将DOM封装成jquery对象. Untuk maklumat lanjut, sila ikut artikel berkaitan lain di laman web China PHP!

Alat AI Hot

Undresser.AI Undress
Apl berkuasa AI untuk mencipta foto bogel yang realistik

AI Clothes Remover
Alat AI dalam talian untuk mengeluarkan pakaian daripada foto.

Undress AI Tool
Gambar buka pakaian secara percuma

Clothoff.io
Penyingkiran pakaian AI

AI Hentai Generator
Menjana ai hentai secara percuma.

Artikel Panas

Alat panas

Notepad++7.3.1
Editor kod yang mudah digunakan dan percuma

SublimeText3 versi Cina
Versi Cina, sangat mudah digunakan

Hantar Studio 13.0.1
Persekitaran pembangunan bersepadu PHP yang berkuasa

Dreamweaver CS6
Alat pembangunan web visual

SublimeText3 versi Mac
Perisian penyuntingan kod peringkat Tuhan (SublimeText3)

Topik panas
 1385
1385
 52
52
 Apakah sebab mengapa ref mengikat dom atau komponen gagal dalam vue3 dan cara menyelesaikannya
May 12, 2023 pm 01:28 PM
DOM pengikat Vue3ref atau penerangan senario analisis sebab kegagalan komponen Dalam Vue3, ia sering digunakan untuk menggunakan ref untuk mengikat komponen atau elemen DOM Banyak kali, ref digunakan dengan jelas untuk mengikat komponen berkaitan, tetapi pengikatan ref sering gagal. Contoh situasi kegagalan pengikatan ref Sebilangan besar kes di mana pengikatan ref gagal ialah apabila ref diikat pada komponen, komponen itu belum lagi diberikan, jadi pengikatan gagal. Atau komponen tidak diberikan pada permulaan dan ref tidak terikat Apabila komponen mula membuat, ref juga mula terikat, tetapi pengikatan antara ref dan komponen tidak selesai apabila menggunakan kaedah berkaitan komponen. Komponen terikat kepada ref menggunakan v-if, atau komponen induknya menggunakan v-if untuk menyebabkan halaman tersebut
 Apakah maksud vue dom?
Dec 20, 2022 pm 08:41 PM
DOM ialah model objek dokumen dan antara muka untuk pengaturcaraan HTML dalam halaman dimanipulasi melalui DOM. DOM ialah perwakilan objek dalam memori bagi dokumen HTML, dan ia menyediakan cara untuk berinteraksi dengan halaman web menggunakan JavaScript. DOM ialah hierarki (atau pokok) nod dengan nod dokumen sebagai akarnya.
 Apakah cara untuk mendapatkan nod DOM dalam Vue3
May 11, 2023 pm 04:55 PM
1. Native js mendapat nod DOM: document.querySelector (pemilih) document.getElementById (pemilih id) document.getElementsByClassName (pemilih kelas).... 2. Dapatkan objek contoh komponen semasa dalam vue2: kerana setiap vue Setiap contoh komponen mengandungi objek $refs, yang menyimpan rujukan kepada elemen atau komponen DOM yang sepadan. Jadi secara lalai, $refs komponen menghala ke objek kosong. Mula-mula anda boleh menambah ref="name" pada komponen, dan kemudian lulus ini.$refs.
 Panduan manipulasi DOM dalam PHP
May 21, 2023 pm 04:01 PM
Dalam pembangunan web, DOM (DocumentObjectModel) adalah konsep yang sangat penting. Ia membolehkan pembangun mengubah suai dan mengendalikan dokumen HTML atau XML halaman web dengan mudah, seperti menambah, memadam, mengubah suai elemen, dsb. Pustaka operasi DOM terbina dalam dalam PHP juga menyediakan pembangun dengan fungsi yang kaya Artikel ini akan memperkenalkan panduan operasi DOM dalam PHP, dengan harapan dapat membantu semua orang. Konsep asas DOM DOM ialah merentas platform, API bebas bahasa yang boleh
 Apakah objek dom dan bom?
Nov 13, 2023 am 10:52 AM
Terdapat 5 objek DOM termasuk "dokumen", "elemen", "Nod", "Acara" dan "Tetingkap" 2. "tetingkap", "navigator", "lokasi" dan "sejarah" dan "skrin" dan 5 lain; objek BOM.
 Apakah perbezaan antara bom dan dom
Nov 13, 2023 pm 03:23 PM
BOM dan DOM berbeza dari segi peranan dan fungsi, hubungan dengan JavaScript, saling bergantung, keserasian penyemak imbas yang berbeza dan pertimbangan keselamatan. Pengenalan terperinci: 1. Peranan dan fungsi Fungsi utama BOM adalah untuk mengendalikan tetingkap penyemak imbas Ia menyediakan akses terus dan kawalan tetingkap penyemak imbas, manakala fungsi utama DOM adalah untuk menukar dokumen web menjadi pokok objek. pembangun untuk Mendapatkan dan mengubah suai elemen dan kandungan halaman web melalui pepohon objek ini 2. Hubungan dengan JavaScript, dsb.
 Apakah objek terbina dalam DOM?
Dec 19, 2023 pm 03:45 PM
dom内置对象有:1、dokumen;2、tingkap;3、navigator;4、lokasi;5、sejarah;6,skrin;7,dokumen.dokumen .title;11、document.cookie。
 Apa yang dom dan bom capai?
Nov 20, 2023 pm 02:28 PM
DOM membolehkan akses dinamik dan kemas kini kepada kandungan halaman web, manakala BOM menyediakan API untuk berinteraksi dengan tetingkap penyemak imbas, termasuk mengawal tingkah laku penyemak imbas dan mendapatkan maklumat tentang pelayar dan persekitaran pengguna DOM digunakan terutamanya untuk mengendalikan kandungan halaman web mengendalikan tetingkap penyemak imbas dan berinteraksi dengan penyemak imbas bersama-sama membentuk asas penting dalam pembangunan bahagian hadapan Web, menyediakan pembangun kaedah yang kaya untuk mengawal dan mengendalikan halaman web dan pelayar untuk mencapai interaktiviti yang kukuh, aplikasi Web dengan pengalaman pengguna yang baik.


