这篇文章主要介绍了AngularJS使用ui-route实现多层嵌套路由的示例,现在分享给大家,也给大家做个参考。
本文介绍了AngularJS使用ui-route实现多层嵌套路由的示例,分享给大家,具体如下:
一、预期实现效果:
https://liyuan-meng.github.io/uiRouter-app/index.html
(项目地址:https://github.com/liyuan-meng/uiRouter-app)
二、分析题目要求,给出依赖关系,构建项目
1. service:
(1)根据条件查询people数据checkPeople.service,不给出条件则查询所有。
(2)得到路由信息getStateParams.service。
2. components:
(1)hello模块:点击button按钮更改内容。
(2)peolpleList模块:显示people列表,点击people显示people详情。依赖于checkPeople.service模块。
(3)peopleDetail模块:显示people详情,依赖于checkPeople.service模块和getStateParams.service模块。
3. 构建项目:

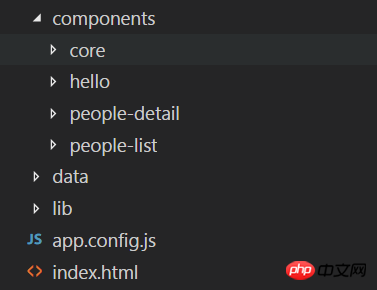
如图所示:component目录用来保存所有服务模块和业务模块,lib目录保存外部引用(我是用的是angular.js1.5.8和ui-route0.2.18),app.config.js文件用来配置路由,index.html则作为入口文件。
三、实现这个例子
1. 首页index.html
<!DOCTYPE html>
<html lang="en">
<head>
  <meta charset="UTF-8">
  <title>Title</title>
  <script src="./lib/angular.js"></script>
  <script src="./lib/angular-ui-route.js"></script>
  <script src="./app.config.js"></script>
  <script src="./components/core/people/checkPeople.service.js"></script>
  <script src="./components/core/people/getStateParams.service.js"></script>
  <script src="./components/hello/hello.component.js"></script>
  <script src="./components/people-list/people-list.component.js"></script>
  <script src="./components/people-detail/people-detail.component.js"></script>
</head>
<body ng-app="helloSolarSystem">
<p>
  <a ui-sref="helloState">Hello</a>
  <a ui-sref="aboutState">About</a>
  <a ui-sref="peopleState">People</a>
</p>

<ui-view></ui-view>

</body>
</html>
(1)导入lib中的文件以及所有用到的service和component服务的文件。
(2)ng-app="helloSolarSystem"指明了从helloSolarSystem模块开始解析。
(3)定义视图
2. 配置路由app.config.js
'use strict';
angular.module("helloSolarSystem", ['peopleList', 'peopleDetail', 'hello','ui.router']).
config(['$stateProvider', function ($stateProvider) {
$stateProvider.state('helloState', {
url: '/helloState',
template:'<hello></hello>'
}).state('aboutState', {
url: '/about',
template: '<h4>Its the UI-Router Hello Solar System app!</h4>'
}).state('peopleState', {
url: '/peopleList',
template:'<people-list></people-list>'
}).state('peopleState.details', {
url:'/detail/:id',
template: '<people-detail></people-detail>'
})
}
]);(1)模块名字:helloSolarSystem;
(2)注入'peopleList', 'peopleDetail', 'hello','ui.router'模块。
(3)配置stateProvider服务的视图控制,例如第一个名为helloState的视图控制器:当ui-sref == "helloState"的时候,路由更新为url的值#/helloState,并且
(4)嵌套路由的实现:名为peopleState的视图控制器是父路由。名为peopleState.details的视图控制器是子路由。这是一种相对路由方式,父路由将匹配.../index.html#/peopleState/,子路由将匹配.../index.html#/peopleState/detail/x(x是/detail/:id中的id的值)。如果改成绝对路由的形式,只需要写成url:'^/detail/:id',这时子路由将匹配.../index.html#/detail/x(x是/detail/:id中的id的值)。
4. 实现checkPeople.service(根据条件查找people)
checkPeople.sercice.js
'use strict';

//根据条件(参数)查找信息。
angular.module('people.checkPeople', ['ui.router']).
  factory('CheckPeople', ['$http', function ($http) {
    return {
      getData: getData
    };
    function getData(filed) {
      var people;
      var promise = $http({
        method: 'GET',
        url: './data/people.json'
      }).then(function (response) {
        if (filed) {
          people = response.data.filter(function (value) {
            if (Number(value.id) === Number(filed)) {
              return value;
            }
          })
        } else {
          people = response.data;
        }
        return people;
      });
      return promise;
    }
}]);(1)在getData这个函数中,我们想要返回一个保存people信息的数组,但是由于使用$http().then()服务的时候,这是一个异步请求,我们并不知道请求什么时候结束,所以世界返回people数组是有问题的。我们注意到,$http().then()是一个Promise对象,所以我们可以想到直接将这个对象返回,这样在就可以使用"函数的结果.then(function(data))"来得到异步请求拿来的数据data。
3. 实现getStateParams.service(获取路由信息)
getStatePatams.service.js
"use strict";

angular.module("getStateParams", ['ui.router']).
  factory("GetStateParams", ["$location", function ($location) {
    return {
      getParams: getParams
    };
    function getParams() {
      var partUrlArr = $location.url().split("/");
      return partUrlArr[partUrlArr.length-1];
    }
}]);(1)这里的getParams函数返回的是路由信息的最后一个数据,也就是people的id,这个service有些特殊,不够通用,可能还需要优化一下会更加合理。不过并不影响我们的需求。
4. 实现hello模块
hello.template.html
<p>
  <p ng-hide="hideFirstContent">hello solar sytem!</p>
  <p ng-hide="!hideFirstContent">whats up solar sytem!</p>
  <button ng-click="ctlButton()">click</button>
</p>
hello.component.js
'use strict';

angular.module("hello", [])
  .component('hello', {
    templateUrl: './components/hello/hello.template.html',
    controller: ["$scope",
      function HelloController($scope) {
        $scope.hideFirstContent = false;
        $scope.ctlButton = function () {
          this.hideFirstContent = !this.hideFirstContent;
        };
      }
    ]
});5. 实现peolpeList模块:
peopleList.template.html
<p>
  <ul>
    <a ng-repeat="item in people" ui-sref="peopleState.details({id:item.id})">
      <li>{{item.name}}</li>
    </a>
  </ul>
  <ui-view></ui-view>
</p>(1)这里的
peopleList.component.js
'use strict';

angular.module("peopleList", ['people.checkPeople'])
  .component('peopleList', {
    templateUrl: './components/people-list/people-list.template.html',
    controller: ['CheckPeople','$scope',
      function PeopleListController(CheckPeople, $scope) {
        $scope.people = [];
        CheckPeople.getData().then(function(data){
          $scope.people = data;
        });
      }
    ]
});6. 实现peopleDetail模块
peopleDetail.template.html
<ul ng-repeat="item in peopleDetails track by $index">
  <li>名字: {{item.name}}</li>
  <li>介绍: {{item.intro}}</li>
</ul>peopleDetail.component.js
'use strict';

angular.module("peopleDetail", ['people.checkPeople', 'getStateParams'])
  .component('peopleDetail', {
    templateUrl: './components/people-detail/people-detail.template.html',
    controller: ['CheckPeople', 'GetStateParams', '$scope',
      function peopleDetailController(CheckPeople, GetStateParams, $scope) {
        $scope.peopleDetails = [];
        CheckPeople.getData(GetStateParams.getParams()).then(function(data){
          $scope.peopleDetails = data;
        });
      }
    ]
});上面是我整理给大家的,希望今后会对大家有帮助。
相关文章:
利用vue+webpack如何解决打包文件 404 页面空白问题
通过webpack项目如何实现调试以及独立打包配置文件(详细教程)
Atas ialah kandungan terperinci 在AngularJS中使用ui-route实现多层嵌套路由(详细教程). Untuk maklumat lanjut, sila ikut artikel berkaitan lain di laman web China PHP!
 Cara membuat animasi gif dalam ps
 windows explorer telah berhenti berfungsi
 Apakah alat serangan DDoS?
 504 Gateway Masa tamat sebab dan penyelesaian
 unicode kepada bahasa Cina
 Apakah kekunci pintasan untuk menyalin dan menampal ctrl?
 Bagaimana untuk mengira bayaran pengendalian bayaran balik keretapi 12306
 apa itu javaweb
 Cara menggunakan fungsi penyahkod


