

如何利用Vue实现图片轮播
这次给大家带来如何利用Vue实现图片轮播,利用Vue实现图片轮播的注意事项有哪些,下面就是实战案例,一起来看一下。
之前一直都没有认真的写过一个组件。以前在写业务代码的过程中,都是用的别人封装好的组件,这次尝试着写了一个图片轮播组件,虽然比不上知名的轮播组件,但它的功能基本完整,而且在写这个组件的过程中,学的东西也很多,在这里也给大家分享出来,如有疏漏,欢迎指正!
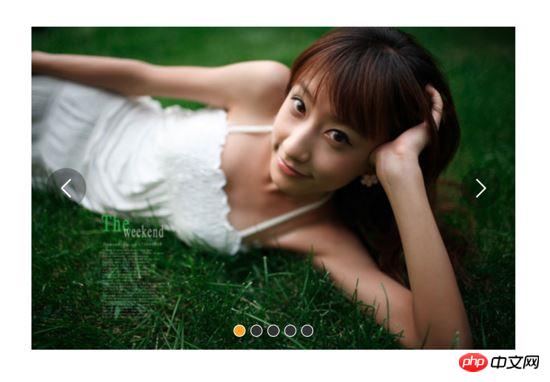
在制作这个组件之前,笔者google了不少关于轮播的文章,发现实现一个轮播的思路虽然各有不同,但是大的逻辑其实差不多,本文主要依据慕课网上焦点轮播图特效这节课,不过慕课网主要用原生JS写,而笔者则用Vue进行了重构,并且进行了一点修改。完成后的组件效果图如下:

一、理清思路,理解需求和原理
1. 要写一个什么样的轮播?
在点击右侧箭头时,图片向左滑动到下一张;点击左侧箭头时,图片向右滑到下一张
点击下面的小圆点,滑到对应的图片,相应小圆点的样式也发生改变
要有过渡效果,要缓缓滑动过去
当鼠标hover到图片上时,轮播暂停,当鼠标leave时,轮播继续
自动播放功能
无限滚动,即在滚动到最后一张时,再点击下一张时会继续向左滑动到第一张,而不是整个拉到第一张,这里有点难
2. 理解无限轮播的原理
我们先看下原理图:
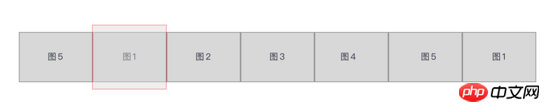
图中红线区域即是我们看到的图片,这个轮播 只展示5张图片 ,但是在它的首尾各还有两张图片,在图1前面放置了图5,在图5后面放置了图1,之所以这么做,是为了做无限滚动。 无限滚动的原理在于:当整个图向左侧滚动到右边的图5时,会继续向前走到图1,在完全显示出图1后,会以肉眼看不到的速度向右侧拉回到最左边的图1。 这样,即使再向左侧滑动看到的就是图2了。
如下图:在最后的图1完成过渡完全显示出来后,再将整个列表瞬间向右拉到左侧的图1。另一张边界图图5的滚动也是,不过方向相反。


二、先让图片切换起来
1. 布局和准备
<template>
 <p id="slider">
  <p class="window">  // window上图中红线框
   <ul class="container" :style="containerStyle"> //注意这里的:style //这是图片列表,排成一排
    <li> //列表最前面的辅助图,它和图5一样,用于无限滚动
     <img :src="sliders[sliders.length - 1].img" alt="">
    </li>
    <li v-for="(item, index) in sliders" :key="index"> //通过v-for渲染的需要展示的5张图
     <img :src="item.img" alt="">
    </li>
    <li> //列表最后面的辅助图,它和图1一样,用于无限滚动
     <img :src="sliders[0].img" alt="">
    </li>
   </ul>
   <ul class="direction"> //两侧的箭头
    <li class="left">
     <svg class="icon" width="30px" height="30.00px" viewBox="0 0 1024 1024" version="1.1" xmlns="http://www.w3.org/2000/svg"><path fill="#ffffff" d="M481.233 904c8.189 0 16.379-3.124 22.628-9.372 12.496-12.497 12.496-32.759 0-45.256L166.488 512l337.373-337.373c12.496-12.497 12.496-32.758 0-45.255-12.498-12.497-32.758-12.497-45.256 0l-360 360c-12.496 12.497-12.496 32.758 0 45.255l360 360c6.249 6.249 14.439 9.373 22.628 9.373z" /></svg>
    </li>
    <li class="right">
     <svg class="icon" width="30px" height="30.00px" viewBox="0 0 1024 1024" version="1.1" xmlns="http://www.w3.org/2000/svg"><path fill="#ffffff" d="M557.179 904c-8.189 0-16.379-3.124-22.628-9.372-12.496-12.497-12.496-32.759 0-45.256L871.924 512 534.551 174.627c-12.496-12.497-12.496-32.758 0-45.255 12.498-12.497 32.758-12.497 45.256 0l360 360c12.496 12.497 12.496 32.758 0 45.255l-360 360c-6.249 6.249-14.439 9.373-22.628 9.373z" /></svg>
    </li>
   </ul>
   <ul class="dots"> //下面的小圆点
    <li v-for="(dot, i) in sliders" :key="i"
    :class="{dotted: i === (currentIndex-1)}"
    >
    </li>
   </ul>
  </p>
 </p>
</template>
<script>
export default {
 name: 'slider',
 data () {
  return {
   sliders:[
    {
     img:'../../static/images/1.jpg'
    },
    {
     img:'../../static/images/2.jpg'
    },
    {
     img:'../../static/images/3.jpg'
    },
    {
     img:'../../static/images/4.jpg'
    },
    {
     img:'../../static/images/5.jpg'
    }
   ],
   currentIndex:1,
   distance:-600
  }
 },
 computed:{
  containerStyle() { //这里用了计算属性,用transform来移动整个图片列表
   return {
    transform:`translate3d(${this.distance}px, 0, 0)`
   }
  }
 }
}
</script>好了,布局大概就是这样,效果图如下:
上面的代码已经做了注释,有几个点在这里再提一下:
window是红线框, 宽度为600px ,它不会动,移动的是包裹着图片的container,它的移动方式用 :style="containerStyle" ,这是一个计算属性,用 transform:translate3d(${this.distance, 0, 0}) 来控制左右移动
data里的 distance 和 currentIndex 是关键, distance 控制着移动的距离,默认是-600,显示7张图片中的第二张,也就是图1。 currentIndex 是window显示的图片的索引,这里默认是1,也是7张图片中第2张。
需要展示的只有5张图片,但是在图1前了一张图5、在图5后面放了一张图1来做无限滚动,原理前面说过了
当点击右侧的箭头,container向左移动, distance 会越来越小;当点击左侧的箭头,container向右移动, distance 会越来越大,方向不要弄错
2. 图片切换
我们在左侧和右侧的箭头上添加点击事件:
<ul class="direction">
    <li class="left" @click="move(600, 1)">
     <svg class="icon" width="30px" height="30.00px" viewBox="0 0 1024 1024" version="1.1" xmlns="http://www.w3.org/2000/svg"><path fill="#ffffff" d="M481.233 904c8.189 0 16.379-3.124 22.628-9.372 12.496-12.497 12.496-32.759 0-45.256L166.488 512l337.373-337.373c12.496-12.497 12.496-32.758 0-45.255-12.498-12.497-32.758-12.497-45.256 0l-360 360c-12.496 12.497-12.496 32.758 0 45.255l360 360c6.249 6.249 14.439 9.373 22.628 9.373z" /></svg>
    </li>
    <li class="right" @click="move(600, -1)">
     <svg class="icon" width="30px" height="30.00px" viewBox="0 0 1024 1024" version="1.1" xmlns="http://www.w3.org/2000/svg"><path fill="#ffffff" d="M557.179 904c-8.189 0-16.379-3.124-22.628-9.372-12.496-12.497-12.496-32.759 0-45.256L871.924 512 534.551 174.627c-12.496-12.497-12.496-32.758 0-45.255 12.498-12.497 32.758-12.497 45.256 0l360 360c12.496 12.497 12.496 32.758 0 45.255l-360 360c-6.249 6.249-14.439 9.373-22.628 9.373z" /></svg>
    </li>
   </ul>
   ......
   methods:{
      move(offset, direction) {
        this.distance += this.distance * direction
        if (this.distance < -3000) this.distance = -600
        if (this.distance > -600) this.distance = -3000
      }
}解释下上面的代码:点击左侧或者右侧的箭头,调用move函数,move接收偏移量offset和方向direction两个参数。direction只传两个值,1表示container向右移动,-1表示container向左移动;偏移量是600,也就是一张图片的宽度。如果移动到7张图片的最后一张,就把container拉到7张图片里的第二张;如果移动到7张图片里第一张,就把container拉到7张图片里的第5张。
效果:
可以看到,图片切换效果已经出来了,但是下面的小圆点没有跟着变换。接下来我们把这个效果加上。从上面的html代码可以看到, :class="{dotted: i === (currentIndex - 1)}" ,小圆点的切换效果和data里的currentIndex值相关,我们只要随着图片切换变动currentIndex值就可以了。
修改move方法里的代码:
......
move(offset, direction) {
  direction === -1 ? this.currentIndex++ : this.currentIndex--
  if (this.currentIndex > 5) this.currentIndex = 1
  if (this.currentIndex < 1) this.currentIndex = 5
  this.distance = this.distance + offset * direction
  if (this.distance < -3000) this.distance = -600
  if (this.distance > -600) this.distance = -3000
}上面的添加的三行代码很好理解,如果是点击右侧箭头,container就是向左移动, this.currentIndex 就是减1,反之就是加1。
效果:
可以看到,小圆点的切换效果已经出来了。
三、过渡动画
上面的代码已经实现了切换,但是没有动画效果,显的非常生硬,接下来就是给每个图片的切换过程添加过渡效果。
这个轮播组件笔者并没有使用Vue自带的class钩子,也没有直接使用css的transition属性,而是用慕课网原作者讲的setTimeout方法加递归来实现。
其实我也试过使用Vue的钩子,但是总有一些小问题解决不掉;比如下面找到的这个例子:例子
这个例子在过渡的边界上有一些问题,我也遇到了,而且还是时有时无。而如果使用css的transition过渡方法,在处理边界的无限滚动上总会在chrome浏览器上有一下闪动,即使添加了 -webkit-transform-style:preserve-3d; 和 -webkit-backface-visibility:hidden 也还是没用,而且要配合transition的 transitionend 事件对于IE浏览器的支持也不怎么好。
如果大家有看到更好的办法,请在评论中留言哦~
下面我们来写这个过渡效果,主要是改写:
methods:{
  move(offset, direction) {
    direction === -1 ? this.currentIndex++ : this.currentIndex--
    if (this.currentIndex > 5) this.currentIndex = 1
    if (this.currentIndex < 1) this.currentIndex = 5
    const destination = this.distance + offset * direction
    this.animate(destination, direction)
  },
  animate(des, direc) {
    if ((direc === -1 && des < this.distance) || (direc === 1 && des > this.distance)) {
      this.distance += 30 * direc
      window.setTimeout(() => {
        this.animate(des, direc)
      }, 20)
    } else {
      this.distance = des
      if (des < -3000) this.distance = -600
      if (des > -600) this.distance = -3000
   }
  }
}上面的代码是这个轮播我觉得最麻烦、也是最难理解的地方。
来理解一下:首先,我们对于move方法进行了改写,因为要一点点的移动,所以要先算出要移动到的目标距离。然后,我们写一个animate函数来实现这个过渡。这个animate函数接收两个参数,一个是要移动到的距离,另一个是方向。 如果我们点击了右侧的箭头,container要向左侧移动,要是没有移动到目标距离,就在 this.distance 减去一定的距离,如果减去后还是没有到达,在20毫米以后再调用这个 this.animate ,如此不断移动,就形成了过渡效果。而如果移动到了目标距离,那就将目标距离赋值给 this.distance ,然后再进行边界和无限滚动的判断。
当然,使用 window.setInterval() 也可以实现这个效果,而且会稍微好理解一点,因为没有用到递归:
methods:{
  move(offset, direction) {
    direction === -1 ? this.currentIndex++ : this.currentIndex--
    if (this.currentIndex > 5) this.currentIndex = 1
    if (this.currentIndex < 1) this.currentIndex = 5
    const destination = this.distance + offset * direction
    this.animate(destination, direction)
  },
  animate(des, direc) {
    const temp = window.setInterval(() => {
      if ((direc === -1 && des < this.distance) || (direc === 1 && des > this.distance)) {
        this.distance += 30 * direc
      } else {
        window.clearInterval(temp)
        this.distance = des
        if (des < -3000) this.distance = -600
        if (des > -600) this.distance = -3000
      }
    }, 20)
  }
}实现出来的效果如下:

四、简单节流一下
写到这里,效果是出来了,但是会有一点问题,如果多次快速点击,就会有可能出现下面这种情况:
出现这种情况的原因很简单,因为是使用定时器过渡,所以连续快速点击就会出现错乱,简单节流一下就好了: 在过渡完成之前点击箭头无效,其实就是设了一个闸,第一次点击把闸打开,在闸再次打开之前,让一部分代码无法执行,然后再在恰当的时机把闸打开。
我们把这个闸设在move函数里:
move(offset, direction) {
  if (!this.transitionEnd) return //这里是闸
  this.transitionEnd = false    //开闸以后再把闸关上
  direction === -1 ? this.currentIndex++ : this.currentIndex--
  if (this.currentIndex > 5) this.currentIndex = 1
  if (this.currentIndex < 1) this.currentIndex = 5
  const destination = this.distance + offset * direction
  this.animate(destination, direction)
}this.transitionEnd 是这个闸的钥匙,我们把它放到data里:
this.transitionEnd: true
这个闸一开始默认的状态是开着的,第一次点击以后,这个闸就关上了, this.tranisitonEnd = false ,在再次打开之前,后面的代码都执行不了。接下来就是在恰当的时机把这个闸打开,而这个恰当的时机就是过渡完成时,也就是在 animate函数 里:
animate(des, direc) {
  if (this.temp) {
    window.clearInterval(this.temp)
    this.temp = null
  }
  this.temp = window.setInterval(() => {
    if ((direc === -1 && des < this.distance) || (direc === 1 && des > this.distance)) {
     this.distance += 30 * direc
    } else {
     this.transitionEnd = true   //闸再次打开
     window.clearInterval(this.temp)
     this.distance = des
     if (des < -3000) this.distance = -600
     if (des > -600) this.distance = -3000
    }
  }, 20)
}这下快速点击就没有之前的那个问题了:
五、点击小圆点实现图片过渡切换
到目前为止的代码:
<template>
 <p id="slider">
  <p class="window">
   <ul class="container" :style="containerStyle">
    <li>
     <img :src="sliders[sliders.length - 1].img" alt="">
    </li>
    <li v-for="(item, index) in sliders" :key="index">
     <img :src="item.img" alt="">
    </li>
    <li>
     <img :src="sliders[0].img" alt="">
    </li>
   </ul>
   <ul class="direction">
    <li class="left" @click="move(600, 1)">
     <svg class="icon" width="30px" height="30.00px" viewBox="0 0 1024 1024" version="1.1" xmlns="http://www.w3.org/2000/svg"><path fill="#ffffff" d="M481.233 904c8.189 0 16.379-3.124 22.628-9.372 12.496-12.497 12.496-32.759 0-45.256L166.488 512l337.373-337.373c12.496-12.497 12.496-32.758 0-45.255-12.498-12.497-32.758-12.497-45.256 0l-360 360c-12.496 12.497-12.496 32.758 0 45.255l360 360c6.249 6.249 14.439 9.373 22.628 9.373z" /></svg>
    </li>
    <li class="right" @click="move(600, -1)">
     <svg class="icon" width="30px" height="30.00px" viewBox="0 0 1024 1024" version="1.1" xmlns="http://www.w3.org/2000/svg"><path fill="#ffffff" d="M557.179 904c-8.189 0-16.379-3.124-22.628-9.372-12.496-12.497-12.496-32.759 0-45.256L871.924 512 534.551 174.627c-12.496-12.497-12.496-32.758 0-45.255 12.498-12.497 32.758-12.497 45.256 0l360 360c12.496 12.497 12.496 32.758 0 45.255l-360 360c-6.249 6.249-14.439 9.373-22.628 9.373z" /></svg>
    </li>
   </ul>
   <ul class="dots">
    <li v-for="(dot, i) in sliders" :key="i"
    :class="{dotted: i === (currentIndex-1)}"
    >
    </li>
   </ul>
  </p>
 </p>
</template>
<script>
export default {
 name: 'slider',
 data () {
  return {
   sliders:[
    {
     img:'../../static/images/1.jpg'
    },
    {
     img:'../../static/images/2.jpg'
    },
    {
     img:'../../static/images/3.jpg'
    },
    {
     img:'../../static/images/4.jpg'
    },
    {
     img:'../../static/images/5.jpg'
    }
   ],
   currentIndex:1,
   distance:-600,
   transitionEnd: true
  }
 },
 computed:{
  containerStyle() {
   return {
    transform:`translate3d(${this.distance}px, 0, 0)`
   }
  }
 },
 methods:{
  move(offset, direction) {
   if (!this.transitionEnd) return
   this.transitionEnd = false
   direction === -1 ? this.currentIndex++ : this.currentIndex--
   if (this.currentIndex > 5) this.currentIndex = 1
   if (this.currentIndex < 1) this.currentIndex = 5
   const destination = this.distance + offset * direction
   this.animate(destination, direction)
  },
  animate(des, direc) {
   if (this.temp) {
    window.clearInterval(this.temp)
    this.temp = null
   }
   this.temp = window.setInterval(() => {
    if ((direc === -1 && des < this.distance) || (direc === 1 && des > this.distance)) {
     this.distance += 30 * direc
    } else {
     this.transitionEnd = true
     window.clearInterval(this.temp)
     this.distance = des
     if (des < -3000) this.distance = -600
     if (des > -600) this.distance = -3000
    }
   }, 20)
  }
 }
}
</script>接下来我们要实现点击下面的小圆点来实现过渡和图片切换。
<ul class="dots">
  <li v-for="(dot, i) in sliders" :key="i"
  :class="{dotted: i === (currentIndex-1)}"
  @click = jump(i+1)>
  </li>
</ul>在点击小圆点的时候我们调用 jump 函数,并将索引 i+1 传给它。 这里需要特别注意,小圆点的索引和图片对应的索引不一致,图片共7张,而5个小圆点对应的是图片中中间的5张,所以我们才传 i+1 。
jump(index) {
  const direction = index - this.currentIndex >= 0 ? -1 : 1 //获取滑动方向
  const offset = Math.abs(index - this.currentIndex) * 600  //获取滑动距离
  this.move(offset, direction)
}上面的代码有一个问题,在jump函数里调用move方法,move里对于currentIndex的都是 +1 ,而点击小圆点可能是将 currentIndex 加或者减好多个,所以要对move里的代码修改下:
direction === -1 ? this.currentIndex += offset/600 : this.currentIndex -= offset/600
改一行,根据offset算出currentIndex就行了。
但是又有一个问题,长距离切换速度太慢,如下:
所以我们需要控制一下速度,让滑动一张图片耗费的时间和滑动多张图片耗费的时间一样,给move和animate函数添加一个speed参数,还要再算一下:
jump(index) {
  const direction = index - this.currentIndex >= 0 ? -1 : 1
  const offset = Math.abs(index - this.currentIndex) * 600
  const jumpSpeed = Math.abs(index - this.currentIndex) === 0 ? this.speed : Math.abs(index - this.currentIndex) * this.speed
  this.move(offset, direction, jumpSpeed)
}六、自动播放与暂停
前面的写的差不多了,到这里就非常简单了,写一个函数play:
play() {
  if (this.timer) {
    window.clearInterval(this.timer)
    this.timer = null
  }
  this.timer = window.setInterval(() => {
    this.move(600, -1, this.speed)
  }, 4000)
}除了初始化以后自动播放,还要通过mouseover和mouseleave来控制暂停与播放:
stop() {
  window.clearInterval(this.timer)
  this.timer = null
}七、 两处小坑
1. window.onblur 和 window.onfocus
写到这里,基本功能都差不多了。但是如果把页面切换到别的页面,导致轮播图所在页面失焦,过一段时间再切回来会发现轮播狂转。原因是页面失焦以后,setInterval停止运行,但是如果切回来就会一次性把该走的一次性走完。解决的方法也很简单,当页面失焦时停止轮播,页面聚焦时开始轮播。
window.onblur = function() { this.stop() }.bind(this)
window.onfocus = function() { this.play() }.bind(this)2. window.setInterval() 小坑
当定时器 window.setInterval() 在多个异步回调中使用时,就有可能在某种机率下开启多个执行队列, 所以为了保险起见,不仅应该在该清除时清除定时器,还要在每次使用之前也清除一遍 。
八、用props简单写两个对外接口
props: {
  initialSpeed: {
   type: Number,
   default: 30
  },
  initialInterval: {
   type: Number,
   default: 4
  }
},
data() {
  ......
  speed: this.initialSpeed
},
computed:{
  interval() {
    return this.initialInterval * 1000
  }
}然后再在相应的地方修改下就可以了。
完整的代码如下:
<template>
 <p id="slider">
  <p class="window" @mouseover="stop" @mouseleave="play">
   <ul class="container" :style="containerStyle">
    <li>
     <img :src="sliders[sliders.length - 1].img" alt="">
    </li>
    <li v-for="(item, index) in sliders" :key="index">
     <img :src="item.img" alt="">
    </li>
    <li>
     <img :src="sliders[0].img" alt="">
    </li>
   </ul>
   <ul class="direction">
    <li class="left" @click="move(600, 1, speed)">
     <svg class="icon" width="30px" height="30.00px" viewBox="0 0 1024 1024" version="1.1" xmlns="http://www.w3.org/2000/svg"><path fill="#ffffff" d="M481.233 904c8.189 0 16.379-3.124 22.628-9.372 12.496-12.497 12.496-32.759 0-45.256L166.488 512l337.373-337.373c12.496-12.497 12.496-32.758 0-45.255-12.498-12.497-32.758-12.497-45.256 0l-360 360c-12.496 12.497-12.496 32.758 0 45.255l360 360c6.249 6.249 14.439 9.373 22.628 9.373z" /></svg>
    </li>
    <li class="right" @click="move(600, -1, speed)">
     <svg class="icon" width="30px" height="30.00px" viewBox="0 0 1024 1024" version="1.1" xmlns="http://www.w3.org/2000/svg"><path fill="#ffffff" d="M557.179 904c-8.189 0-16.379-3.124-22.628-9.372-12.496-12.497-12.496-32.759 0-45.256L871.924 512 534.551 174.627c-12.496-12.497-12.496-32.758 0-45.255 12.498-12.497 32.758-12.497 45.256 0l360 360c12.496 12.497 12.496 32.758 0 45.255l-360 360c-6.249 6.249-14.439 9.373-22.628 9.373z" /></svg>
    </li>
   </ul>
   <ul class="dots">
    <li v-for="(dot, i) in sliders" :key="i"
    :class="{dotted: i === (currentIndex-1)}"
    @click = jump(i+1)
    >
    </li>
   </ul>
  </p>
 </p>
</template>
<script>
export default {
 name: 'slider',
 props: {
  initialSpeed: {
   type: Number,
   default: 30
  },
  initialInterval: {
   type: Number,
   default: 4
  }
 },
 data () {
  return {
   sliders:[
    {
     img:'../../static/images/1.jpg'
    },
    {
     img:'../../static/images/2.jpg'
    },
    {
     img:'../../static/images/3.jpg'
    },
    {
     img:'../../static/images/4.jpg'
    },
    {
     img:'../../static/images/5.jpg'
    }
   ],
   currentIndex:1,
   distance:-600,
   transitionEnd: true,
   speed: this.initialSpeed
  }
 },
 computed:{
  containerStyle() {
   return {
    transform:`translate3d(${this.distance}px, 0, 0)`
   }
  },
  interval() {
   return this.initialInterval * 1000
  }
 },
 mounted() {
  this.init()
 },
 methods:{
  init() {
   this.play()
   window.onblur = function() { this.stop() }.bind(this)
   window.onfocus = function() { this.play() }.bind(this)
  },
  move(offset, direction, speed) {
   if (!this.transitionEnd) return
   this.transitionEnd = false
   direction === -1 ? this.currentIndex += offset/600 : this.currentIndex -= offset/600
   if (this.currentIndex > 5) this.currentIndex = 1
   if (this.currentIndex < 1) this.currentIndex = 5
   const destination = this.distance + offset * direction
   this.animate(destination, direction, speed)
  },
  animate(des, direc, speed) {
   if (this.temp) {
    window.clearInterval(this.temp)
    this.temp = null
   }
   this.temp = window.setInterval(() => {
    if ((direc === -1 && des < this.distance) || (direc === 1 && des > this.distance)) {
     this.distance += speed * direc
    } else {
     this.transitionEnd = true
     window.clearInterval(this.temp)
     this.distance = des
     if (des < -3000) this.distance = -600
     if (des > -600) this.distance = -3000
    }
   }, 20)
  },
  jump(index) {
   const direction = index - this.currentIndex >= 0 ? -1 : 1
   const offset = Math.abs(index - this.currentIndex) * 600
   const jumpSpeed = Math.abs(index - this.currentIndex) === 0 ? this.speed : Math.abs(index - this.currentIndex) * this.speed
   this.move(offset, direction, jumpSpeed)
  },
  play() {
   if (this.timer) {
    window.clearInterval(this.timer)
    this.timer = null
   }
   this.timer = window.setInterval(() => {
    this.move(600, -1, this.speed)
   }, this.interval)
  },
  stop() {
   window.clearInterval(this.timer)
   this.timer = null
  }
 }
}
</script>相信看了本文案例你已经掌握了方法,更多精彩请关注php中文网其它相关文章!
推荐阅读:
Atas ialah kandungan terperinci 如何利用Vue实现图片轮播. Untuk maklumat lanjut, sila ikut artikel berkaitan lain di laman web China PHP!

Alat AI Hot

Undresser.AI Undress
Apl berkuasa AI untuk mencipta foto bogel yang realistik

AI Clothes Remover
Alat AI dalam talian untuk mengeluarkan pakaian daripada foto.

Undress AI Tool
Gambar buka pakaian secara percuma

Clothoff.io
Penyingkiran pakaian AI

AI Hentai Generator
Menjana ai hentai secara percuma.

Artikel Panas
Alat panas

Notepad++7.3.1
Editor kod yang mudah digunakan dan percuma

SublimeText3 versi Cina
Versi Cina, sangat mudah digunakan

Hantar Studio 13.0.1
Persekitaran pembangunan bersepadu PHP yang berkuasa

Dreamweaver CS6
Alat pembangunan web visual

SublimeText3 versi Mac
Perisian penyuntingan kod peringkat Tuhan (SublimeText3)
Topik panas
 1385
1385
 52
52

 Cara menambah fungsi ke butang untuk vue
Apr 08, 2025 am 08:51 AM
Cara menambah fungsi ke butang untuk vue
Apr 08, 2025 am 08:51 AM
Anda boleh menambah fungsi ke butang VUE dengan mengikat butang dalam templat HTML ke kaedah. Tentukan kaedah dan tulis logik fungsi dalam contoh Vue.
 Cara menggunakan bootstrap di vue
Apr 07, 2025 pm 11:33 PM
Cara menggunakan bootstrap di vue
Apr 07, 2025 pm 11:33 PM
Menggunakan bootstrap dalam vue.js dibahagikan kepada lima langkah: Pasang bootstrap. Import bootstrap di main.js. Gunakan komponen bootstrap secara langsung dalam templat. Pilihan: Gaya tersuai. Pilihan: Gunakan pemalam.
 Cara Menggunakan Watch di Vue
Apr 07, 2025 pm 11:36 PM
Cara Menggunakan Watch di Vue
Apr 07, 2025 pm 11:36 PM
Pilihan Watch di Vue.js membolehkan pemaju mendengar perubahan dalam data tertentu. Apabila data berubah, tontonkan mencetuskan fungsi panggil balik untuk melakukan paparan kemas kini atau tugas lain. Pilihan konfigurasinya termasuk segera, yang menentukan sama ada untuk melaksanakan panggilan balik dengan serta -merta, dan mendalam, yang menentukan sama ada untuk mendengarkan secara rekursif terhadap objek atau tatasusunan.
 Cara merujuk fail js dengan vue.js
Apr 07, 2025 pm 11:27 PM
Cara merujuk fail js dengan vue.js
Apr 07, 2025 pm 11:27 PM
Terdapat tiga cara untuk merujuk kepada fail JS dalam vue.js: Secara langsung tentukan jalan menggunakan & lt; skrip & gt; tag ;; import dinamik menggunakan cangkuk kitaran hayat yang dipasang (); dan mengimport melalui Perpustakaan Pengurusan Negeri VUEX.
 Apakah yang dimaksudkan dengan pembangunan Vue Multi-Page?
Apr 07, 2025 pm 11:57 PM
Apakah yang dimaksudkan dengan pembangunan Vue Multi-Page?
Apr 07, 2025 pm 11:57 PM
Pembangunan pelbagai halaman Vue adalah cara untuk membina aplikasi menggunakan rangka kerja VUE.JS, di mana permohonan dibahagikan kepada halaman berasingan: Penyelenggaraan kod: Memisahkan aplikasi ke dalam beberapa halaman boleh menjadikan kod lebih mudah untuk dikendalikan dan diselenggarakan. Modularity: Setiap halaman boleh digunakan sebagai modul yang berasingan untuk penggunaan semula dan penggantian mudah. Routing mudah: Navigasi antara halaman boleh diuruskan melalui konfigurasi penghalaan mudah. Pengoptimuman SEO: Setiap halaman mempunyai URL sendiri, yang membantu SEO.
 Cara kembali ke halaman sebelumnya oleh Vue
Apr 07, 2025 pm 11:30 PM
Cara kembali ke halaman sebelumnya oleh Vue
Apr 07, 2025 pm 11:30 PM
Vue.js mempunyai empat kaedah untuk kembali ke halaman sebelumnya: $ router.go (-1) $ router.back () menggunakan & lt; router-link to = & quot;/& quot; Komponen Window.History.Back (), dan pemilihan kaedah bergantung pada tempat kejadian.
 Cara Menanyakan Versi Vue
Apr 07, 2025 pm 11:24 PM
Cara Menanyakan Versi Vue
Apr 07, 2025 pm 11:24 PM
Anda boleh menanyakan versi VUE dengan menggunakan Vue Devtools untuk melihat tab VUE dalam konsol penyemak imbas. Gunakan NPM untuk menjalankan arahan "NPM LIST -G VUE". Cari item VUE dalam objek "Dependencies" fail Package.json. Untuk projek Vue CLI, jalankan perintah "Vue -version". Semak maklumat versi di & lt; skrip & gt; Tag dalam fail HTML yang merujuk kepada fail VUE.
 Cara Menggunakan Fungsi Memintas Vue
Apr 08, 2025 am 06:51 AM
Cara Menggunakan Fungsi Memintas Vue
Apr 08, 2025 am 06:51 AM
Pemintasan fungsi dalam VUE adalah teknik yang digunakan untuk mengehadkan bilangan kali fungsi dipanggil dalam tempoh masa yang ditentukan dan mencegah masalah prestasi. Kaedah pelaksanaan adalah: mengimport perpustakaan lodash: import {debounce} dari 'lodash'; Gunakan fungsi debounce untuk membuat fungsi memintas: const debouncedfunction = debounce (() = & gt; { / logical /}, 500); Panggil fungsi Intercept, dan fungsi kawalan dipanggil paling banyak sekali dalam 500 milisaat.
