ThinkPHP5中使用 Auth2进行验证的过程分析
本篇文章给大家分享的内容是关于ThinkPHP5中使用 Auth2进行验证的过程分析,有需要的朋友可以参考一下,希望能帮助到大家。
在tp上实现的auth2验证的,在网上发现笔记很少, 不像yii, 故在此发表一下笔记,用来帮助有相关需求的朋友
PS: 鉴于oauth2有四种方案, 本实例是基于 客户端凭证 实现,其他三种就不讲述了
一、通过composer安装
composer require --prefer-dist bshaffer/oauth2-server-php
安装完成后,如图: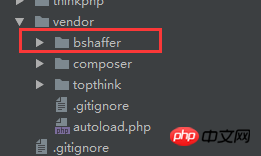
会出现相关的目录
二、实现授权文件
1) 创建对应的数据表
首先找到 Pdo.php文件,如图:
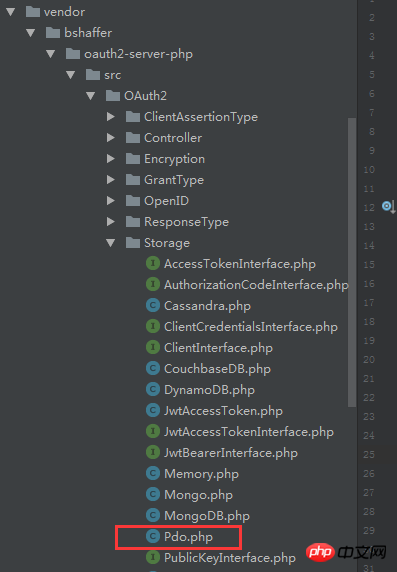
然后找到该位置
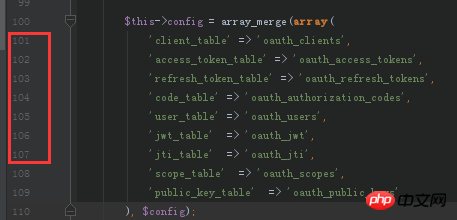
目的,是告诉你创建表时的名称,应该和这里使用的表名称一致
关于创建的表,我直接上代码,方便各位可以直接复制粘贴:
CREATE TABLE
oauth_access_tokens
 (
access_token
 varchar(40) NOT NULL,
client_id
 varchar(80) NOT NULL,
user_id
 int(11) DEFAULT NULL,
expires
 varchar(19) NOT NULL,
scope
 text,
  PRIMARY KEY (
access_token
),
  KEY
fk_access_token_oauth2_client_client_id
 (
client_id
),
  KEY
ix_access_token_expires
 (
expires
),
  CONSTRAINT
fk_access_token_oauth2_client_client_id
 FOREIGN KEY (
client_id
) REFERENCES
pos_oauth2_client
 (
client_id
) ON DELETE CASCADE ON UPDATE CASCADE
) ENGINE=InnoDB DEFAULT CHARSET=utf8;
CREATE TABLE
oauth_authorization_codes
 (
authorization_code
 varchar(40) NOT NULL,
client_id
 varchar(80) NOT NULL,
user_id
 int(11) DEFAULT NULL,
redirect_uri
 text NOT NULL,
expires
 int(11) NOT NULL,
scope
 text,
  PRIMARY KEY (
authorization_code
),
  KEY
fk_authorization_code_oauth2_client_client_id
 (
client_id
),
  KEY
ix_authorization_code_expires
 (
expires
),
  CONSTRAINT
fk_authorization_code_oauth2_client_client_id
 FOREIGN KEY (
client_id
) REFERENCES
pos_oauth2_client
 (
client_id
) ON DELETE CASCADE ON UPDATE CASCADE
) ENGINE=InnoDB DEFAULT CHARSET=utf8;
CREATE TABLE
oauth_clients
 (
client_id
 varchar(80) NOT NULL,
client_secret
 varchar(80) NOT NULL,
redirect_uri
 text NOT NULL,
grant_type
 text,
scope
 text,
created_at
 int(11) DEFAULT NULL,
updated_at
 int(11) DEFAULT NULL,
created_by
 int(11) DEFAULT NULL,
updated_by
 int(11) DEFAULT NULL,
  PRIMARY KEY (
client_id
)
) ENGINE=InnoDB DEFAULT CHARSET=utf8;
CREATE TABLE
oauth_refresh_tokens
 (
refresh_token
 varchar(40) NOT NULL,
client_id
 varchar(80) NOT NULL,
user_id
 int(11) DEFAULT NULL,
expires
 int(11) NOT NULL,
scope
 text,
  PRIMARY KEY (
refresh_token
),
  KEY
fk_refresh_token_oauth2_client_client_id
 (
client_id
),
  KEY
ix_refresh_token_expires
 (
expires
),
  CONSTRAINT
fk_refresh_token_oauth2_client_client_id
 FOREIGN KEY (
client_id
) REFERENCES
pos_oauth2_client
 (
client_id
) ON DELETE CASCADE ON UPDATE CASCADE
) ENGINE=InnoDB DEFAULT CHARSET=utf8;
CREATE TABLE
oauth_scopes
 (
scope
 text,
is_default
 tinyint(1) DEFAULT NULL
) ENGINE=MyISAM DEFAULT CHARSET=utf8;
添加一条数据
insert  into
oauth_clients
(
client_id,
client_secret,
redirect_uri,
grant_type,
scope,
created_at,
updated_at,
created_by,
updated_by
) values ('admin','123456','http://','client_credentials',NULL,NULL,NULL,NULL,NULL);
PS,说明一下,如图:
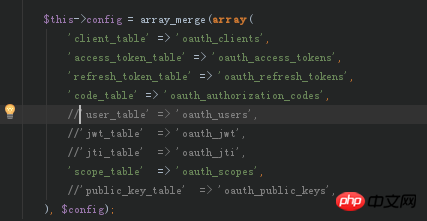
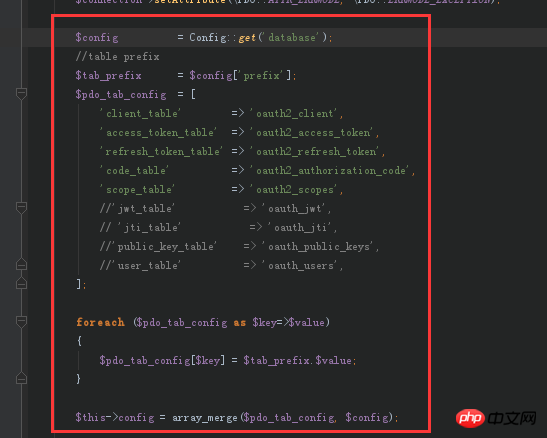
在我实际使用中,只使用到这五张表,也就是上面创建的五张表,在这个config里面,剩下的几个选项我是全部 注销掉了的
另外还有一个情况,说明一下: 有可能各位,对数据表设置了表前缀, 也是需要在此进行相关修改的, 比如我创建的,见图:

所以我进行了相关的修改:
2) 创建授权文件 Oauth2.php, 名字随便自己取
<?phpnamespace appcommon;/**
@author jinyan
@create 20180416
*/use OAuth2StoragePdo;use thinkConfig;
class Oauth2{/**
* @Register new Oauth2 apply
* @param string $action
* @return boolean|\OAuth2\Server
*/
function grantTypeOauth2($action=null)
{
Config::load(APP_PATH.'database.php');
$storage = new Pdo(
[
'dsn' => config('dsn'),
'username' => config('username'),
'password' => config('password')
]
);
$server = new \OAuth2\Server($storage, array('enforce_state'=>false));
// Add the "Client Credentials" grant type (it is the simplest of the grant types)
$server->addGrantType(new \OAuth2\GrantType\ClientCredentials($storage));
// Add the "Authorization Code" grant type (this is where the oauth magic happens)
$server->addGrantType(new \OAuth2\GrantType\AuthorizationCode($storage));
// Add the "User Credentials" grant type (this is where the oauth magic happens)
$server->addGrantType(new \OAuth2\GrantType\UserCredentials($storage));
return $server;
}
/**
* @校验token值
* @param unknown $server
*/
protected function checkApiAuthroize($server)
{
if (!$server->verifyResourceRequest(\OAuth2\Request::createFromGlobals())) {
$server->getResponse()->send();
exit;
}
}} ?>
3) 创建token文件, Access.php
<?phpnamespace apprestfulcontroller;use appcommonOauth2;
/**
@uathor:jinyan
*/
class Access extends Oauth2{protected $_server;
/**
* @授权配置
*/
public function __construct()
{
return $this->_server = $this->grantTypeOauth2();
}
/**
*
*/
private function _token()
{
// Handle a request for an OAuth2.0 Access Token and send the response to the client
$this->_server->handleTokenRequest(\OAuth2\Request::createFromGlobals())->send('json', 'oauth2_');
}
/**
* @get access_token
*/
public function access_token()
{
$this->_token();
}} ?>
那么如何请求一个access_token的值呢? 直接调用这个 acccess_token()的方法即可
request url: http://restful.thinkphp.com/r...
还请得之前创建数据表时,有添加了一条新数据吗? 其作用就是相当于用来获取access_token的账号密码之类的, 记得需要使用 Post方式获取token
请求的参数
{
client_id=admin
client_secret=123456
grant_type=client_credentials //这个参数是固定的
}如果请求成功的话,会返回如下图所示:

贴上,通过ff浏览器httprequest的请求界面:

4) 通过 access_token 获取接口数据 ,Sms.php
<?php
namespace apprestfulcontroller;
/**
Created by PhpStorm.
User: Administrator
Date: 2018/7/29
Time: 22:02
*/
use appcommonOauth2;
class Sms extends Oauth2
{
protected $_server;
/**
* @授权配置
*/
public function __construct()
{
$this->_server = $this->grantTypeOauth2();
}
public function test()
{
//access_token验证
$this->checkApiAuthroize($this->_server);
echo '成功请求到数据';
}
}三、 测试效果如图:
1)首先不带access_token请求, test()方法:
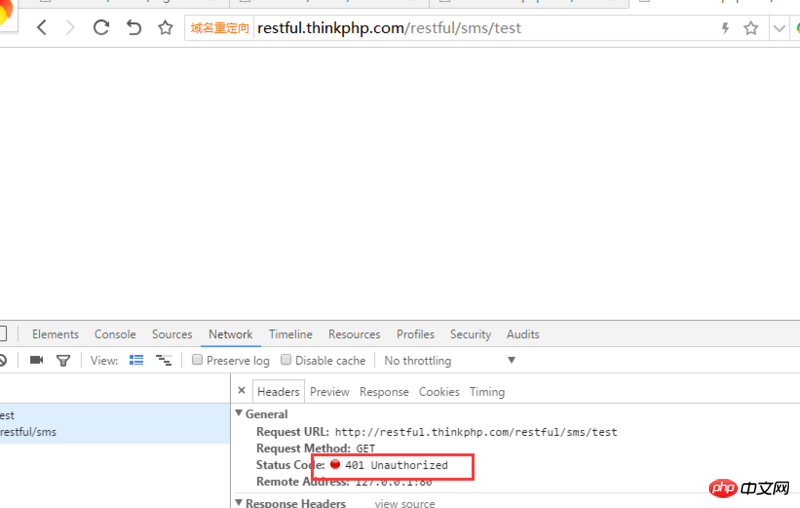
结果出现一个401未验证通过的状态
2)然后请求一个错误的access_token, test()方法
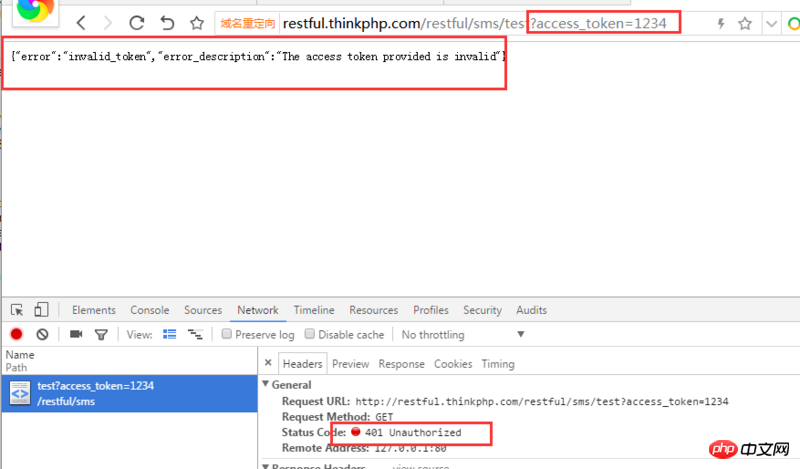
同样是一个401的状态,但此时,如图
有信息返回给我们
3) 最后,使用一个正确的access_token, test()方法
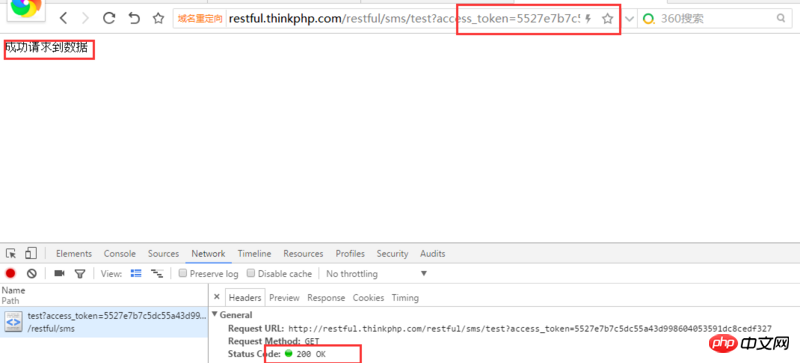
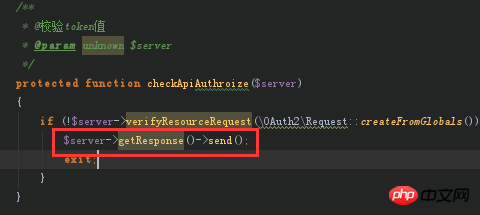
所以,基于第1种情况和第2种情况,你应该自定一个token未验证成功的方法,如图:
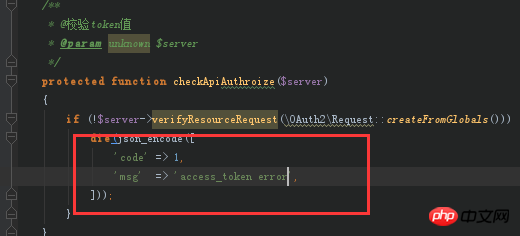
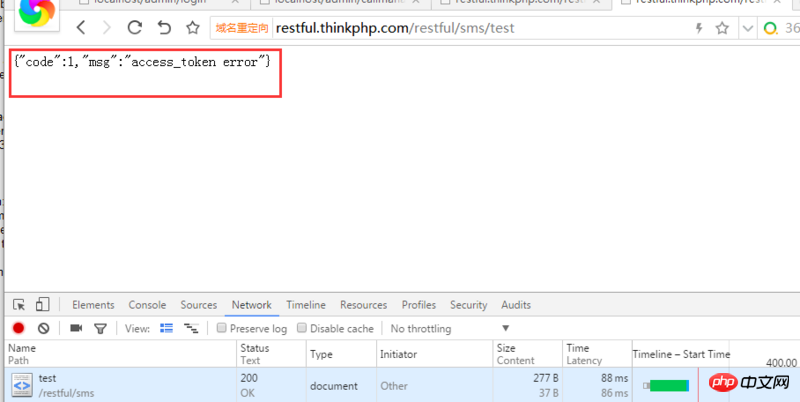


完结。
相关文章推荐:
thinkphp验证码的实现(form、ajax实现验证)_php实例
Atas ialah kandungan terperinci ThinkPHP5中使用 Auth2进行验证的过程分析. Untuk maklumat lanjut, sila ikut artikel berkaitan lain di laman web China PHP!

Alat AI Hot

Undresser.AI Undress
Apl berkuasa AI untuk mencipta foto bogel yang realistik

AI Clothes Remover
Alat AI dalam talian untuk mengeluarkan pakaian daripada foto.

Undress AI Tool
Gambar buka pakaian secara percuma

Clothoff.io
Penyingkiran pakaian AI

Video Face Swap
Tukar muka dalam mana-mana video dengan mudah menggunakan alat tukar muka AI percuma kami!

Artikel Panas

Alat panas

Notepad++7.3.1
Editor kod yang mudah digunakan dan percuma

SublimeText3 versi Cina
Versi Cina, sangat mudah digunakan

Hantar Studio 13.0.1
Persekitaran pembangunan bersepadu PHP yang berkuasa

Dreamweaver CS6
Alat pembangunan web visual

SublimeText3 versi Mac
Perisian penyuntingan kod peringkat Tuhan (SublimeText3)

Topik panas
 1657
1657
 14
14
 1415
1415
 52
52
 1309
1309
 25
25
 1257
1257
 29
29
 1230
1230
 24
24
 Bagaimana anda menghuraikan dan memproses HTML/XML dalam PHP?
Feb 07, 2025 am 11:57 AM
Tutorial ini menunjukkan cara memproses dokumen XML dengan cekap menggunakan PHP. XML (bahasa markup extensible) adalah bahasa markup berasaskan teks yang serba boleh yang direka untuk pembacaan manusia dan parsing mesin. Ia biasanya digunakan untuk penyimpanan data
 Jelaskan JSON Web Tokens (JWT) dan kes penggunaannya dalam PHP API.
Apr 05, 2025 am 12:04 AM
JWT adalah standard terbuka berdasarkan JSON, yang digunakan untuk menghantar maklumat secara selamat antara pihak, terutamanya untuk pengesahan identiti dan pertukaran maklumat. 1. JWT terdiri daripada tiga bahagian: header, muatan dan tandatangan. 2. Prinsip kerja JWT termasuk tiga langkah: menjana JWT, mengesahkan JWT dan muatan parsing. 3. Apabila menggunakan JWT untuk pengesahan di PHP, JWT boleh dijana dan disahkan, dan peranan pengguna dan maklumat kebenaran boleh dimasukkan dalam penggunaan lanjutan. 4. Kesilapan umum termasuk kegagalan pengesahan tandatangan, tamat tempoh, dan muatan besar. Kemahiran penyahpepijatan termasuk menggunakan alat debugging dan pembalakan. 5. Pengoptimuman prestasi dan amalan terbaik termasuk menggunakan algoritma tandatangan yang sesuai, menetapkan tempoh kesahihan dengan munasabah,
 Terangkan pengikatan statik lewat dalam php (statik: :).
Apr 03, 2025 am 12:04 AM
Mengikat statik (statik: :) Melaksanakan pengikatan statik lewat (LSB) dalam PHP, yang membolehkan kelas panggilan dirujuk dalam konteks statik dan bukannya menentukan kelas. 1) Proses parsing dilakukan pada masa runtime, 2) Cari kelas panggilan dalam hubungan warisan, 3) ia boleh membawa overhead prestasi.
 Program PHP untuk mengira vokal dalam rentetan
Feb 07, 2025 pm 12:12 PM
Rentetan adalah urutan aksara, termasuk huruf, nombor, dan simbol. Tutorial ini akan mempelajari cara mengira bilangan vokal dalam rentetan yang diberikan dalam PHP menggunakan kaedah yang berbeza. Vokal dalam bahasa Inggeris adalah a, e, i, o, u, dan mereka boleh menjadi huruf besar atau huruf kecil. Apa itu vokal? Vokal adalah watak abjad yang mewakili sebutan tertentu. Terdapat lima vokal dalam bahasa Inggeris, termasuk huruf besar dan huruf kecil: a, e, i, o, u Contoh 1 Input: String = "TutorialSpoint" Output: 6 menjelaskan Vokal dalam rentetan "TutorialSpoint" adalah u, o, i, a, o, i. Terdapat 6 yuan sebanyak 6
 Apakah kaedah Magic PHP (__construct, __destruct, __call, __get, __set, dll) dan menyediakan kes penggunaan?
Apr 03, 2025 am 12:03 AM
Apakah kaedah sihir PHP? Kaedah sihir PHP termasuk: 1. \ _ \ _ Membina, digunakan untuk memulakan objek; 2. \ _ \ _ Destruct, digunakan untuk membersihkan sumber; 3. \ _ \ _ Call, mengendalikan panggilan kaedah yang tidak wujud; 4. \ _ \ _ Mendapatkan, melaksanakan akses atribut dinamik; 5. \ _ \ _ Set, melaksanakan tetapan atribut dinamik. Kaedah ini secara automatik dipanggil dalam situasi tertentu, meningkatkan fleksibiliti dan kecekapan kod.
 PHP dan Python: Membandingkan dua bahasa pengaturcaraan yang popular
Apr 14, 2025 am 12:13 AM
PHP dan Python masing -masing mempunyai kelebihan mereka sendiri, dan memilih mengikut keperluan projek. 1.PHP sesuai untuk pembangunan web, terutamanya untuk pembangunan pesat dan penyelenggaraan laman web. 2. Python sesuai untuk sains data, pembelajaran mesin dan kecerdasan buatan, dengan sintaks ringkas dan sesuai untuk pemula.
 PHP: Bahasa utama untuk pembangunan web
Apr 13, 2025 am 12:08 AM
PHP adalah bahasa skrip yang digunakan secara meluas di sisi pelayan, terutamanya sesuai untuk pembangunan web. 1.PHP boleh membenamkan HTML, memproses permintaan dan respons HTTP, dan menyokong pelbagai pangkalan data. 2.PHP digunakan untuk menjana kandungan web dinamik, data borang proses, pangkalan data akses, dan lain -lain, dengan sokongan komuniti yang kuat dan sumber sumber terbuka. 3. PHP adalah bahasa yang ditafsirkan, dan proses pelaksanaan termasuk analisis leksikal, analisis tatabahasa, penyusunan dan pelaksanaan. 4.Php boleh digabungkan dengan MySQL untuk aplikasi lanjutan seperti sistem pendaftaran pengguna. 5. Apabila debugging php, anda boleh menggunakan fungsi seperti error_reporting () dan var_dump (). 6. Mengoptimumkan kod PHP untuk menggunakan mekanisme caching, mengoptimumkan pertanyaan pangkalan data dan menggunakan fungsi terbina dalam. 7
 PHP dalam Tindakan: Contoh dan aplikasi dunia nyata
Apr 14, 2025 am 12:19 AM
PHP digunakan secara meluas dalam e-dagang, sistem pengurusan kandungan dan pembangunan API. 1) e-dagang: Digunakan untuk fungsi keranjang belanja dan pemprosesan pembayaran. 2) Sistem Pengurusan Kandungan: Digunakan untuk penjanaan kandungan dinamik dan pengurusan pengguna. 3) Pembangunan API: Digunakan untuk Pembangunan API RESTful dan Keselamatan API. Melalui pengoptimuman prestasi dan amalan terbaik, kecekapan dan pemeliharaan aplikasi PHP bertambah baik.


