

linux系统下如何部署php项目环境

这篇文章给大家介绍的内容是关于linux系统下如何部署php项目环境,有一定的参考价值,有需要的朋友可以参考一下,希望对你有所帮助。
linux下部署php项目环境可以分为两种,一种使用Apache,php,mysql的压缩包安装,一种用yum命令进行安装。
使用三种软件的压缩包进行安装,需要手动配置三者之间的关系。apache和php之间的配置没有什么难度,但是和mysql进行配置的时候就需要对php的了解了。
以下是用yum在linux中配置php环境:
安装MySql
1.mysql和apache最好是首先进行安装的,因为在配置php的时候需要与mysql和apache进行关联配置和测试
首先下载mysql-sever文件,因为博主linux环境是CentOS版本,yum源中貌似没有正常安装mysql时的mysql-sever文件,需要去官网上下载
1.下载mysql-service文件
[root@tele-1 ~]# wget
mysql-service
[root@tele-1 ~]# rpm -ivh mysql-community-release-el7-5.noarch.rpm
2.安装mysql
[root@tele-1 ~]# yum install mysql-community-server
3.安装完毕之后启动mysql服务
[root@tele-1 ~]# service mysqld restart
4. 初步安装的mysql是没有密码的,用户名默认是root。所以我们需要修改密码,用mysql命令行进行修改
1.进入mysql命令行
[root@tele-1 ~]# mysql -urootWelcome to the MySQL monitor.  Commands end with ; or \g.Your MySQL connection id is 474801Server version: 5.6.36 MySQL Community Server (GPL)

Copyright (c) 2000, 2017, Oracle and/or its affiliates. All rights reserved.Oracle is a registered trademark of Oracle Corporation and/or its
affiliates. Other names may be trademarks of their respective
owners.Type 'help;' or '\h' for help. Type '\c' to clear the current input statement.mysql>
2.使用命令进行密码修改
mysql> set password for 'root'@'localhost' = password('你要修改的密码');
Query OK, 0 rows affected (0.06 sec)
5.因为博主是用本地navicat软件来连接linux下的mysql的,所以如果要在本地访问的话,就需要改一下mysql数据库中的user表了
1.操作mysql数据库表
mysql> use mysql;
Reading table information for completion of table and column names
You can turn off this feature to get a quicker startup with -A

Database changedmysql>
<br><span style="font-family: 楷体; font-size: 14px">
2.查看user表中的数据(在mysql命令行中可以直接进行sql语句编写)</span>
mysql> select * from user;+-----------+------+-----------------------------------+-------------+-------------+-------------+-------------+-------------+-----------+-------------+---------------+--------------+-----------+------------+-----------------+------------+------------+--------------+------------+-----------------------+------------------+--------------+-----------------+------------------+------------------+----------------+---------------------+--------------------+------------------+------------+--------------+------------------------+----------+------------+-------------+--------------+---------------+-------------+-----------------+----------------------+-----------------------+-----------------------+------------------+
| Host      | User | Password                                  | Select_priv | Insert_priv | Update_priv | Delete_priv | Create_priv | Drop_priv | Reload_priv | Shutdown_priv | Process_priv | File_priv | Grant_priv | References_priv | Index_priv | Alter_priv | Show_db_priv | Super_priv | Create_tmp_table_priv | Lock_tables_priv | Execute_priv | Repl_slave_priv | Repl_client_priv | Create_view_priv | Show_view_priv | Create_routine_priv | Alter_routine_priv | Create_user_priv | Event_priv | Trigger_priv | Create_tablespace_priv | ssl_type | ssl_cipher | x509_issuer | x509_subject | max_questions | max_updates | max_connections | max_user_connections | plugin                | authentication_string | password_expired |
+-----------+------+-----------------------------------+-------------+-------------+-------------+-------------+-------------+-----------+-------------+---------------+--------------+-----------+------------+-----------------+------------+------------+--------------+------------+-----------------------+------------------+--------------+-----------------+------------------+------------------+----------------+---------------------+--------------------+------------------+------------+--------------+------------------------+----------+------------+-------------+--------------+---------------+-------------+-----------------+----------------------+-----------------------+-----------------------+------------------+| %         | root | *3ce8dad2446975d8b0c771bd7e48d15b | Y           | Y           | Y           | Y           | Y           | Y         | Y           | Y             | Y            | Y         | Y          | Y               | Y          | Y          | Y            | Y          | Y                     | Y                | Y            | Y               | Y                | Y                | Y              | Y                   | Y                  | Y                | Y          | Y            | Y                      |          |            |             |              |             0 |           0 |               0 |                    0 | mysql_native_password |                       | N                || localhost | root | *3ce8dad2446975d8b0c771bd7e48d15b | Y           | Y           | Y           | Y           | Y           | Y         | Y           | Y             | Y            | Y         | Y          | Y               | Y          | Y          | Y            | Y          | Y                     | Y                | Y            | Y               | Y                | Y                | Y              | Y                   | Y                  | Y                | Y          | Y            | Y                      |          |            |             |              |             0 |           0 |               0 |                    0 | mysql_native_password |                       | N                |
| 127.0.0.1 | root | *3ce8dad2446975d8b0c771bd7e48d15b | Y           | Y           | Y           | Y           | Y           | Y         | Y           | Y             | Y            | Y         | Y          | Y               | Y          | Y          | Y            | Y          | Y                     | Y                | Y            | Y               | Y                | Y                | Y              | Y                   | Y                  | Y                | Y          | Y            | Y                      |          |            |             |              |             0 |           0 |               0 |                    0 | mysql_native_password |                       | N                |
| ::1       | root | *3ce8dad2446975d8b0c771bd7e48d15b | Y           | Y           | Y           | Y           | Y           | Y         | Y           | Y             | Y            | Y         | Y          | Y               | Y          | Y          | Y            | Y          | Y                     | Y                | Y            | Y               | Y                | Y                | Y              | Y                   | Y                  | Y                | Y          | Y            | Y                      |          |            |             |              |             0 |           0 |               0 |                    0 | mysql_native_password |                       | N                || tele-1    |      |                                           | N           | N           | N           | N           | N           | N         | N           | N             | N            | N         | N          | N               | N          | N          | N            | N          | N                     | N                | N            | N               | N                | N                | N              | N                   | N                  | N                | N          | N            | N                      |          |            |             |              |             0 |           0 |               0 |                    0 | mysql_native_password | NULL                  | N                |
+-----------+------+-----------------------------------+-------------+-------------+-------------+-------------+-------------+-----------+-------------+---------------+--------------+-----------+------------+-----------------+------------+------------+--------------+------------+-----------------------+------------------+--------------+-----------------+------------------+------------------+----------------+---------------------+--------------------+------------------+------------+--------------+------------------------+----------+------------+-------------+--------------+---------------+-------------+-----------------+----------------------+-----------------------+-----------------------+------------------+
5 rows in set (0.00 sec)mysql>

3.博主的表中是修改之后的表了,想要远程访问,就需要上边红色标注的数据了,Host指的是可以访问此数据库的ip地址,%代表的是所有的请求都可以连接进来。
大家可以修改一条数据,也可以添加一条数据。但是最好不要修改上边蓝色标注的数据,修改语句就是下边的格式
mysql> update user set Host = '%' where ???4.最后推出exit或者\q都是退出mysql命令行的方法
mysql> \q
Bye
安装Apache
1.apache安装方法相对简单
[root@tele-2 ~]# yum install httpd
2.外网访问虚拟机中的地址,我们就需要修改一下apache的配置文件/etc/httpd/conf/httpd.conf
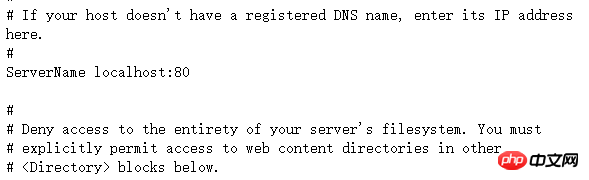
找到 #ServerName www.example.com:80 改为 ServerName localhost:80
如右图所示:
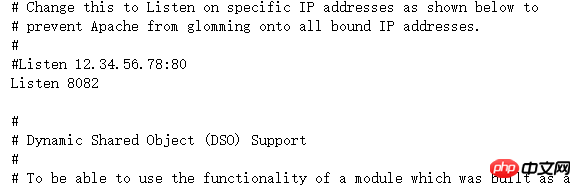
找到 #Listen 改为 Listen:8080(linux中开放的端口号80XX)
如右图所示:
3.修改完成之后我们需要再次启动httpd服务,并查看启动状态
[root@tele-2 ~]# service httpd startRedirecting to /bin/systemctl start  httpd.service
[root@tele-2 ~]# service httpd statusRedirecting to /bin/systemctl status  httpd.service
● httpd.service - The Apache HTTP Server
   Loaded: loaded (/usr/lib/systemd/system/httpd.service; enabled; vendor preset: disabled)
   Active: active (running) since Mon 2017-06-05 15:57:34 CST; 5s ago
     Docs: man:httpd(8)
           man:apachectl(8)
  Process: 54532 ExecStop=/bin/kill -WINCH ${MAINPID} (code=exited, status=0/SUCCESS)
  Process: 39046 ExecReload=/usr/sbin/httpd $OPTIONS -k graceful (code=exited, status=0/SUCCESS)
 Main PID: 54573 (httpd)
   Status: "Processing requests..."
   Memory: 15.8M
   CGroup: /system.slice/httpd.service
           ├─54573 /usr/sbin/httpd -DFOREGROUND
           ├─54576 /usr/sbin/httpd -DFOREGROUND
           ├─54577 /usr/sbin/httpd -DFOREGROUND
           ├─54578 /usr/sbin/httpd -DFOREGROUND
           ├─54579 /usr/sbin/httpd -DFOREGROUND
           └─54580 /usr/sbin/httpd -DFOREGROUND

Jun 05 15:57:34 tele-2 systemd[1]: Starting The Apache HTTP Server...Jun 05 15:57:34 tele-2 systemd[1]: Started The Apache HTTP Server.4.此时你就可以访问你的服务器了,输入localhost或者ip地址,出现一 个Apache test page powered by centos的测试页面
安装PHP
1.php安装命令
[root@tele-2 ~]# yum install php
2.直接一路安装,安装完成之后再次重启httpd服务
[root@tele-2 ~]# service httpd startRedirecting to /bin/systemctl start httpd.service
3.重启之后我们进行测试PHP相关信息,我们新建一个PHP界面进行测试
在apache默认页面路径/var/www/html下新建一个test.php页面,添加代码
<?php phpinfo();?>
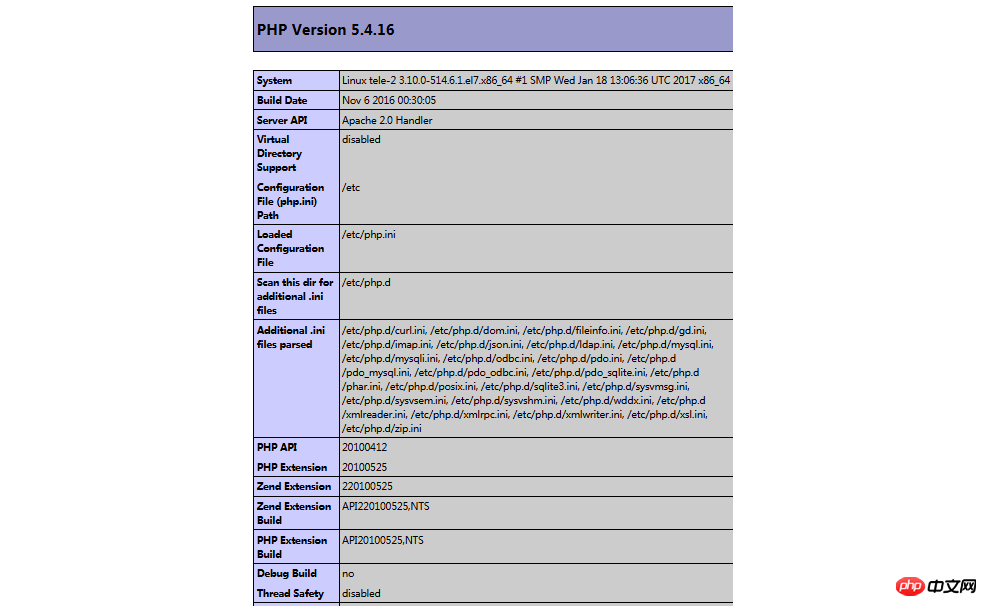
4.访问这个页面,输入localhost/test.php,或者
ip:端口号/test.php就可以看见php环境的配置信息了。如右图:
关联php和mysql
1.搜索模块
[root@tele-2 ~]# yum search php
2.安装相关模块
[root@tele-2 ~]# yum install php-mysql php-gd php-imap php-ldap php-odbc php-pear php-xml php-xmlrpc

3.安装完成,重启mysqld,重启httpd
重新访问刚才的info.php,我们发现已经多了MySQL的相关信息。如右图:
至此,php在linux中的运行环境就已经成功配置完成了。
1.mysql yum安装默认文件夹及相关命令
/var/lib/mysql/

:/usr/share/mysql(mysql.server)

/usr/bin(mysqladmin mysqldump)

my.cnf: /etc/my.cnf

:/etc/rc.d/init.d/mysql
:service mysql start
停止命令:service mysql stop
运行状态:service mysql status
2.apache
配置文件路径:/etc/httpd/conf/httpd.conf
service httpd start
service httpd stop
运行状态:service httpd status
3.php
php默认页面路径:/var/www/html
相关文章推荐:
Atas ialah kandungan terperinci linux系统下如何部署php项目环境. Untuk maklumat lanjut, sila ikut artikel berkaitan lain di laman web China PHP!

Alat AI Hot

Undresser.AI Undress
Apl berkuasa AI untuk mencipta foto bogel yang realistik

AI Clothes Remover
Alat AI dalam talian untuk mengeluarkan pakaian daripada foto.

Undress AI Tool
Gambar buka pakaian secara percuma

Clothoff.io
Penyingkiran pakaian AI

AI Hentai Generator
Menjana ai hentai secara percuma.

Artikel Panas
Alat panas

Notepad++7.3.1
Editor kod yang mudah digunakan dan percuma

SublimeText3 versi Cina
Versi Cina, sangat mudah digunakan

Hantar Studio 13.0.1
Persekitaran pembangunan bersepadu PHP yang berkuasa

Dreamweaver CS6
Alat pembangunan web visual

SublimeText3 versi Mac
Perisian penyuntingan kod peringkat Tuhan (SublimeText3)
Topik panas
 1377
1377
 52
52

 Panduan Pemasangan dan Naik Taraf PHP 8.4 untuk Ubuntu dan Debian
Dec 24, 2024 pm 04:42 PM
Panduan Pemasangan dan Naik Taraf PHP 8.4 untuk Ubuntu dan Debian
Dec 24, 2024 pm 04:42 PM
PHP 8.4 membawa beberapa ciri baharu, peningkatan keselamatan dan peningkatan prestasi dengan jumlah penamatan dan penyingkiran ciri yang sihat. Panduan ini menerangkan cara memasang PHP 8.4 atau naik taraf kepada PHP 8.4 pada Ubuntu, Debian, atau terbitan mereka
 Tarikh dan Masa CakePHP
Sep 10, 2024 pm 05:27 PM
Tarikh dan Masa CakePHP
Sep 10, 2024 pm 05:27 PM
Untuk bekerja dengan tarikh dan masa dalam cakephp4, kami akan menggunakan kelas FrozenTime yang tersedia.
 Bincangkan CakePHP
Sep 10, 2024 pm 05:28 PM
Bincangkan CakePHP
Sep 10, 2024 pm 05:28 PM
CakePHP ialah rangka kerja sumber terbuka untuk PHP. Ia bertujuan untuk menjadikan pembangunan, penggunaan dan penyelenggaraan aplikasi lebih mudah. CakePHP adalah berdasarkan seni bina seperti MVC yang berkuasa dan mudah difahami. Model, Pandangan dan Pengawal gu
 Muat naik Fail CakePHP
Sep 10, 2024 pm 05:27 PM
Muat naik Fail CakePHP
Sep 10, 2024 pm 05:27 PM
Untuk mengusahakan muat naik fail, kami akan menggunakan pembantu borang. Di sini, adalah contoh untuk muat naik fail.
 Pengesah Mencipta CakePHP
Sep 10, 2024 pm 05:26 PM
Pengesah Mencipta CakePHP
Sep 10, 2024 pm 05:26 PM
Pengesah boleh dibuat dengan menambah dua baris berikut dalam pengawal.
 Cara Menyediakan Kod Visual Studio (Kod VS) untuk Pembangunan PHP
Dec 20, 2024 am 11:31 AM
Cara Menyediakan Kod Visual Studio (Kod VS) untuk Pembangunan PHP
Dec 20, 2024 am 11:31 AM
Kod Visual Studio, juga dikenali sebagai Kod VS, ialah editor kod sumber percuma — atau persekitaran pembangunan bersepadu (IDE) — tersedia untuk semua sistem pengendalian utama. Dengan koleksi sambungan yang besar untuk banyak bahasa pengaturcaraan, Kod VS boleh menjadi c
 Panduan Ringkas CakePHP
Sep 10, 2024 pm 05:27 PM
Panduan Ringkas CakePHP
Sep 10, 2024 pm 05:27 PM
CakePHP ialah rangka kerja MVC sumber terbuka. Ia menjadikan pembangunan, penggunaan dan penyelenggaraan aplikasi lebih mudah. CakePHP mempunyai beberapa perpustakaan untuk mengurangkan beban tugas yang paling biasa.
 Bagaimana anda menghuraikan dan memproses HTML/XML dalam PHP?
Feb 07, 2025 am 11:57 AM
Bagaimana anda menghuraikan dan memproses HTML/XML dalam PHP?
Feb 07, 2025 am 11:57 AM
Tutorial ini menunjukkan cara memproses dokumen XML dengan cekap menggunakan PHP. XML (bahasa markup extensible) adalah bahasa markup berasaskan teks yang serba boleh yang direka untuk pembacaan manusia dan parsing mesin. Ia biasanya digunakan untuk penyimpanan data
