Rumah hujung hadapan web tutorial css 如何使用css定位html元素?(附示例)

如何使用css定位html元素?(附示例)

Nov 05, 2018 am 10:02 AM
kedudukan css

在页面上定位内容时,可以使用少量属性来帮助操作元素的位置。本文将给你介绍一些使用CSS position 属性包含不同定位元素类型的示例。

要在元素上使用定位,必须首先声明其位置property,该位置指定用于元素的定位方法的类型。使用position属性值,使用top,bottom,left和right属性定位元素。它们的位置也取决于它们的位置值。(推荐课程:css视频教程

定位值有五种类型:static(静态的)、relative(相对的)、fixed(固定的)、absolute(绝对的)、sticky(黏性的)

static(静态的)

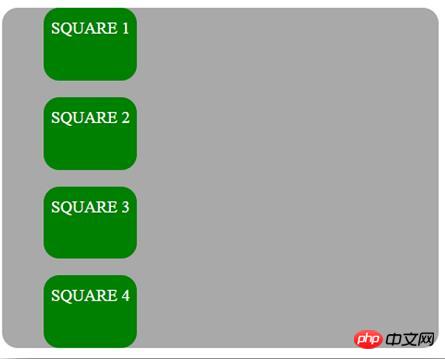
默认情况下,HTML元素定位为静态,元素根据文档的正常流程定位; 静态定位元素不受顶部,底部,左侧和右侧属性的影响。一个元素用position: static定位不会有其他特殊的定位方式。

用于将位置设置为静态的CSS是:

1

position: static;

Salin selepas log masuk

接下来是使用静态位置值的示例:

1

2

3

4

5

6

7

8

9

10

11

12

13

14

15

16

17

18

19

20

21

22

23

24

25

26

27

28

29

30

31

32

33

34

35

<!DOCTYPE html>

<html>

<head>

<style>

body {

  color: WHITE;

  font:  Helvetica;

  width: 420px;

}

.square-set,

.square {

  border-radius: 15px;

}

.square-set {

  background: darkgrey;

}

.square {

  position: static;

  background: Green;

  height: 70px;

  line-height: 40px;

  text-align: center;

  width: 90px;

}

</style>

</head>

<body>

<div class="square-set">

  <figure class="square square-1">SQUARE 1</figure>

  <figure class="square square-2">SQUARE 2</figure>

  <figure class="square square-3">SQUARE 3</figure>

  <figure class="square square-4">SQUARE 4</figure>

</div>

</body>

</html>

Salin selepas log masuk

效果如下:

360截图20181105094735142.jpg

relative(相对的)

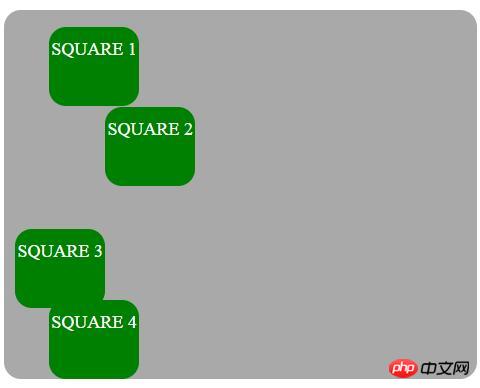
该元素根据文档的正常流动位于相对于它的正常位置被定位,然后偏移相对于本身的基于上,右,下和左的值。偏移量不会影响任何其他元素的位置; 因此,页面布局中为元素给出的空间与位置是静态的相同。设置相对定位元素的顶部,右侧,底部和左侧属性将使其远离其正常位置进行调整。其他内容不会被调整以适应元素留下的任何空白。

用于将位置设置为相对的CSS是:

1

position: relative;

Salin selepas log masuk

以下示例使用相对位置值:

1

2

3

4

5

6

7

8

9

10

11

12

13

14

15

16

17

18

19

20

21

22

23

24

25

26

27

28

29

30

31

32

33

34

35

36

37

38

39

40

41

42

43

44

45

<!DOCTYPE html>

<html>

<head>

<style>

body {

  color: white;

  font:   Helvetica ;

  width: 420px;

}

.square-set,

.square {

  border-radius: 15px;

}

.square-set {

  background: darkgrey;

}

.square {

  background: green;

  height: 70px;

  line-height: 40px;

  position: relative;

  text-align: center;

  width: 80px;

}

.square-1 {

    top: 15px;

  }

.square-2 {

  left: 50px;

}

.square-3 {

  bottom: -23px;

  right: 30px;

}

</style>

</head>

<body>

<div class="square-set">

  <figure class="square square-1">SQUARE 1</figure>

  <figure class="square square-2">SQUARE 2</figure>

  <figure class="square square-3">SQUARE 3</figure>

  <figure class="square square-4">SQUARE 4</figure>

</div>

</body>

</html>

Salin selepas log masuk

效果如下:

360截图20181105095023965.jpg

absolute(绝对的)

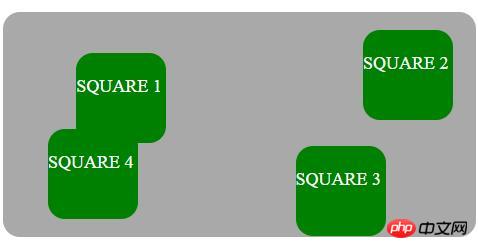
该元素将从普通文档流中删除,并且在页面布局中,不会为该元素创建空间。元素相对于最近定位的祖先定位,如果有的话; 否则,它相对于初始包含块放置,其最终位置由顶部,右侧,底部和左侧的值确定。

用于将位置设置为绝对的CSS是:

1

position: absolute;

Salin selepas log masuk

具有position: absolute; 相对于最接近的祖先定位的元素。如果绝对定位元素没有定位祖先,它将使用文档正文,并与页面滚动一起移动。“定位”元素是其static位置的元素

以下例子强调元素的绝对位置:

1

2

3

4

5

6

7

8

9

10

11

12

13

14

15

16

17

18

19

20

21

22

23

24

25

26

27

28

29

30

31

32

33

34

35

36

37

38

39

40

41

42

43

44

45

46

47

<!DOCTYPE html>

<html>

<head>

<style>

.square-set {

 color: WHITE;

 background: darkgrey;

 height: 200px;

 position: relative;

 border-radius: 15px;

 font:  Helvetica ;

 width: 420px;

}

.square {

 background: green;

 height: 80px;

 position: absolute;

 width: 80px;

 border-radius: 15px;

 line-height: 60px;

}

.square-1 {

 top: 10%;

 left: 6%;

}

.square-2 {

 top: 5;

 right: -20px;

}

.square-3 {

 bottom: -15px;

 right: 40px;

}

.square-4 {

 bottom: 0;

}

</style>

</head>

<body>

<div class="square-set">

 <figure class="square square-1">SQUARE 1</figure>

 <figure class="square square-2">SQUARE 2</figure>

 <figure class="square square-3">SQUARE 3</figure>

 <figure class="square square-4">SQUARE 4</figure>

</div>

</body>

</html>

Salin selepas log masuk

效果如下:

360截图20181105095425516.jpg

fixed(固定的)

它从正常文档流中删除的元素,并且在页面布局中,没有为元素创建空间。元素相对于由视口建立的初始包含块定位,其最终位置由值top,right,bottom和left确定。此值始终创建新的堆叠上下文。

用于将位置设置为固定的CSS如下所示:

1

position: fixed;

Salin selepas log masuk

元素position: fixed; 相对于视口定位,这意味着即使页面滚动,它也始终保持在同一位置。top,right,bottom和left属性用于定位元素。

sticky(黏性的)

该元素对应于文档的正常流程定位,然后根据顶部,右侧,底部和左侧的值相对于其最接近的上升块级别(包括与表格相关的元素)偏移。偏移量不会影响任何其他元素的位置。

此值始终创建新的堆叠上下文。请注意,粘性元素“粘附”到其最近的祖先,即使该祖先不是最近的实际滚动祖先,也具有“滚动机制”。

用于将位置设置为粘性的CSS是:

1

position: sticky;

Salin selepas log masuk

position: sticky; 根据用户的滚动位置定位元素,并根据滚动位置在 位置relative 和fixed位置之间切换。

重叠元素

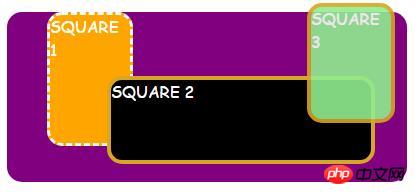
网页上的重叠元素非常有用,可以突出显示,推广和关注我们网页上的重要内容。在您的网站上制作元素叠加是非常有用且非常有价值的功能设计实践。当元素被定位时,它们可以与其他元素重叠,因此为了指定顺序(应该在其他元素的前面或后面放置哪个元素),我们应该使用z-index属性。堆栈顺序较大的元素始终位于堆栈顺序较低的元素前面。作为通知,z-index属性仅适用于定位元素(position:absolute,position:relative或position:fixed)。

以下示例显示了z-index属性如何在不同的方块上工作:

1

2

3

4

5

6

7

8

9

10

11

12

13

14

15

16

17

18

19

20

21

22

23

24

25

26

27

28

29

30

31

32

33

34

35

36

37

38

39

40

41

42

43

44

45

46

47

48

49

50

51

52

53

54

55

56

57

<!DOCTYPE html>

<html>

<head>

<style>

.square-set {

  color: white;

  background: purple;

  height: 170px;

  position: relative;

  border-radius: 15px;

  font:  Helvetica;

  width: 400px;

}

.square {

  background: orange;

  border: 4px solid goldenrod;

  position: absolute;

  border-radius: 15px;

  height: 80px;

  width: 80px;

}

.square-1 {

  position: relative;

  z-index: 1;

  border: dashed;

  height: 8em;

  margin-bottom: 1em;

  margin-top: 2em;

}

.square-2 {

  position: absolute;

  z-index: 2;

  background: black;

  width: 65%;

  left: 60px;

  top: 3em;

}

.square-3 {

  position: absolute;

  z-index: 3;

  background: lightgreen;

  width: 20%;

  left: 65%;

  top: -25px;

  height: 7em;

  opacity: 0.9;

}

</style>

</head>

<body>

<div class="square-set">

  <figure class="square square-1">SQUARE 1</figure>

  <figure class="square square-2">SQUARE 2</figure>

  <figure class="square square-3">SQUARE 3</figure>

</div>

</body>

</html>

Salin selepas log masuk

效果如下:

360截图20181105095727530.jpg

在图像上定位文本

下面的示例使用上述CSS定位值在图像上覆盖一些文本:

1

2

3

4

5

6

7

8

9

10

11

12

13

14

15

16

17

18

19

20

21

22

23

24

25

26

27

28

29

30

31

32

33

34

35

36

37

38

<!DOCTYPE html>

<html>

<head>

<style>

.module{

  background:

    linear-gradient{

      rgba(0, 4, 5, 0.6),

      rgba(2, 0, 3, 0.6)

    ),

    url(http://www.holtz.org/Library/Images/Slideshows/Gallery/Landscapes/43098-DSC_64xx_landscape-keltern-1_wall.jpg);

  background-size: cover;

  width: 600px;

  height: 400px;

  margin: 10px 0 0 10px;

  position: relative;

  float: left;

}

.mid h3 {

  font-family: Helvetica;

  font-weight: 900;

  color: white;

  text-transform: uppercase;

  margin: 0;

  position: absolute;

  top: 30%;

  left: 50%;

  font-size: 3rem;

  transform: translate(-50%, -50%);

}

</style>

</head>

<body>

<div class="module mid">

  <h3>Wild nature</h3>

</div>

</body>

</html>

Salin selepas log masuk

效果如下:

360截图20181105095855441.jpg

最后

在本文中,我们已经描述并给出了CSS定位类型的示例,并描述了如何重叠元素并在图像上添加一些文本。

Atas ialah kandungan terperinci 如何使用css定位html元素?(附示例). Untuk maklumat lanjut, sila ikut artikel berkaitan lain di laman web China PHP!

Kenyataan Laman Web ini
Kandungan artikel ini disumbangkan secara sukarela oleh netizen, dan hak cipta adalah milik pengarang asal. Laman web ini tidak memikul tanggungjawab undang-undang yang sepadan. Jika anda menemui sebarang kandungan yang disyaki plagiarisme atau pelanggaran, sila hubungi admin@php.cn

Tag artikel panas

Notepad++7.3.1

Notepad++7.3.1

Editor kod yang mudah digunakan dan percuma

SublimeText3 versi Cina

SublimeText3 versi Cina

Versi Cina, sangat mudah digunakan

Hantar Studio 13.0.1

Hantar Studio 13.0.1

Persekitaran pembangunan bersepadu PHP yang berkuasa

Dreamweaver CS6

Dreamweaver CS6

Alat pembangunan web visual

SublimeText3 versi Mac

SublimeText3 versi Mac

Perisian penyuntingan kod peringkat Tuhan (SublimeText3)

Menambah bayang -bayang kotak ke blok dan elemen WordPress Menambah bayang -bayang kotak ke blok dan elemen WordPress Mar 09, 2025 pm 12:53 PM

Menambah bayang -bayang kotak ke blok dan elemen WordPress

Buat borang hubungan JavaScript dengan rangka kerja pintar Buat borang hubungan JavaScript dengan rangka kerja pintar Mar 07, 2025 am 11:33 AM

Buat borang hubungan JavaScript dengan rangka kerja pintar

Buat editor teks sebaris dengan atribut yang boleh dipertikaikan Buat editor teks sebaris dengan atribut yang boleh dipertikaikan Mar 02, 2025 am 09:03 AM

Buat editor teks sebaris dengan atribut yang boleh dipertikaikan

Bekerja dengan Caching Graphql Bekerja dengan Caching Graphql Mar 19, 2025 am 09:36 AM

Bekerja dengan Caching Graphql

Menjadikan Peralihan Svelte Khas pertama anda Menjadikan Peralihan Svelte Khas pertama anda Mar 15, 2025 am 11:08 AM

Menjadikan Peralihan Svelte Khas pertama anda

Membandingkan 5 Pembina Borang PHP Terbaik (dan 3 skrip percuma) Membandingkan 5 Pembina Borang PHP Terbaik (dan 3 skrip percuma) Mar 04, 2025 am 10:22 AM

Membandingkan 5 Pembina Borang PHP Terbaik (dan 3 skrip percuma)

Muat naik fail dengan multer di node.js dan ekspres Muat naik fail dengan multer di node.js dan ekspres Mar 02, 2025 am 09:15 AM

Muat naik fail dengan multer di node.js dan ekspres

Tunjukkan, jangan beritahu Tunjukkan, jangan beritahu Mar 16, 2025 am 11:49 AM

Tunjukkan, jangan beritahu

See all articles