本文介绍了veth-pair和它的连通性,以及两个 namespace 之间的连通性.
顾名思义,veth-pair 就是一对的虚拟设备接口,和 tap/tun 设备不同的是,它都是成对出现的。一端连着协议栈,一端彼此相连着。如下图所示:

正因为有这个特性,它常常充当着一个桥梁,连接着各种虚拟网络设备,典型的例子像“两个 namespace 之间的连接”,“Bridge、OVS 之间的连接”,“Docker 容器之间的连接” 等等,以此构建出非常复杂的虚拟网络结构,比如 OpenStack Neutron。
我们给上图中的 veth0 和 veth1 分别配上 IP:10.1.1.2 和 10.1.1.3,然后从 veth0 ping 一下 veth1。理论上它们处于同网段,是能 ping 通的,但结果却是 ping 不通。
抓个包看看,tcpdump -nnt -i veth0
root@ubuntu:~# tcpdump -nnt -i veth0
tcpdump: verbose output suppressed, use -v or -vv for full protocol decode
listening on veth0, link-type EN10MB (Ethernet), capture size 262144 bytes
ARP, Request who-has 10.1.1.3 tell 10.1.1.2, length 28
ARP, Request who-has 10.1.1.3 tell 10.1.1.2, length 28
可以看到,由于 veth0 和 veth1 处于同一个网段,且是第一次连接,所以会事先发 ARP 包,但 veth1 并没有响应 ARP 包。
经查阅,这是由于我使用的 Ubuntu 系统内核中一些 ARP 相关的默认配置限制所导致的,需要修改一下配置项:
echo 1 > /proc/sys/net/ipv4/conf/veth1/accept_local
echo 1 > /proc/sys/net/ipv4/conf/veth0/accept_local
echo 0 > /proc/sys/net/ipv4/conf/all/rp_filter
echo 0 > /proc/sys/net/ipv4/conf/veth0/rp_filter
echo 0 > /proc/sys/net/ipv4/conf/veth1/rp_filter
完了再 ping 就行了。
root@ubuntu:~# ping -I veth0 10.1.1.3 -c 2
PING 10.1.1.3 (10.1.1.3) from 10.1.1.2 veth0: 56(84) bytes of data.
64 bytes from 10.1.1.3: icmp_seq=1 ttl=64 time=0.047 ms
64 bytes from 10.1.1.3: icmp_seq=2 ttl=64 time=0.064 ms

--- 10.1.1.3 ping statistics ---
2 packets transmitted, 2 received, 0% packet loss, time 3008ms
rtt min/avg/max/mdev = 0.047/0.072/0.113/0.025 ms
我们对这个通信过程比较感兴趣,可以抓包看看。
对于 veth0 口:
root@ubuntu:~# tcpdump -nnt -i veth0
tcpdump: verbose output suppressed, use -v or -vv for full protocol decode
listening on veth0, link-type EN10MB (Ethernet), capture size 262144 bytes
ARP, Request who-has 10.1.1.3 tell 10.1.1.2, length 28
ARP, Reply 10.1.1.3 is-at 5a:07:76:8e:fb:cd, length 28
IP 10.1.1.2 > 10.1.1.3: ICMP echo request, id 2189, seq 1, length 64
IP 10.1.1.2 > 10.1.1.3: ICMP echo request, id 2189, seq 2, length 64
IP 10.1.1.2 > 10.1.1.3: ICMP echo request, id 2189, seq 3, length 64
IP 10.1.1.2 > 10.1.1.3: ICMP echo request, id 2244, seq 1, length 64
对于 veth1 口:
root@ubuntu:~# tcpdump -nnt -i veth1
tcpdump: verbose output suppressed, use -v or -vv for full protocol decode
listening on veth1, link-type EN10MB (Ethernet), capture size 262144 bytes
ARP, Request who-has 10.1.1.3 tell 10.1.1.2, length 28
ARP, Reply 10.1.1.3 is-at 5a:07:76:8e:fb:cd, length 28
IP 10.1.1.2 > 10.1.1.3: ICMP echo request, id 2189, seq 1, length 64
IP 10.1.1.2 > 10.1.1.3: ICMP echo request, id 2189, seq 2, length 64
IP 10.1.1.2 > 10.1.1.3: ICMP echo request, id 2189, seq 3, length 64
IP 10.1.1.2 > 10.1.1.3: ICMP echo request, id 2244, seq 1, length 64
奇怪,我们并没有看到 ICMP 的 echo reply 包,那它是怎么 ping 通的?
其实这里 echo reply 走的是 localback 口,不信抓个包看看:
root@ubuntu:~# tcpdump -nnt -i lo
tcpdump: verbose output suppressed, use -v or -vv for full protocol decode
listening on lo, link-type EN10MB (Ethernet), capture size 262144 bytes
IP 10.1.1.3 > 10.1.1.2: ICMP echo reply, id 2244, seq 1, length 64
IP 10.1.1.3 > 10.1.1.2: ICMP echo reply, id 2244, seq 2, length 64
IP 10.1.1.3 > 10.1.1.2: ICMP echo reply, id 2244, seq 3, length 64
IP 10.1.1.3 > 10.1.1.2: ICMP echo reply, id 2244, seq 4, length 64
为什么?
我们看下整个通信流程就明白了。
echo request,通过 socket 发给协议栈。ip route show table 0 查看)。整个过程如下图所示:

namespace 是 Linux 2.6.x 内核版本之后支持的特性,主要用于资源的隔离。有了 namespace,一个 Linux 系统就可以抽象出多个网络子系统,各子系统间都有自己的网络设备,协议栈等,彼此之间互不影响。
如果各个 namespace 之间需要通信,怎么办呢,答案就是用 veth-pair 来做桥梁。
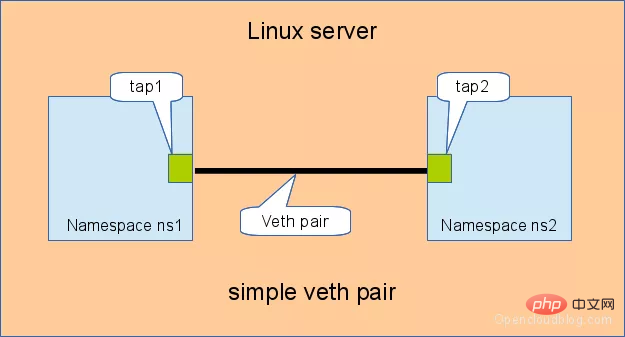
根据连接的方式和规模,可以分为“直接相连”,“通过 Bridge 相连” 和 “通过 OVS 相连”。
直接相连是最简单的方式,如下图,一对 veth-pair 直接将两个 namespace 连接在一起。

给 veth-pair 配置 IP,测试连通性:
# 创建 namespace
ip netns a ns1
ip netns a ns2

# 创建一对 veth-pair veth0 veth1
ip l a veth0 type veth peer name veth1

# 将 veth0 veth1 分别加入两个 ns
ip l s veth0 netns ns1
ip l s veth1 netns ns2

# 给两个 veth0 veth1 配上 IP 并启用
ip netns exec ns1 ip a a 10.1.1.2/24 dev veth0
ip netns exec ns1 ip l s veth0 up
ip netns exec ns2 ip a a 10.1.1.3/24 dev veth1
ip netns exec ns2 ip l s veth1 up

# 从 veth0 ping veth1
[root@localhost ~]# ip netns exec ns1 ping 10.1.1.3
PING 10.1.1.3 (10.1.1.3) 56(84) bytes of data.
64 bytes from 10.1.1.3: icmp_seq=1 ttl=64 time=0.073 ms
64 bytes from 10.1.1.3: icmp_seq=2 ttl=64 time=0.068 ms

--- 10.1.1.3 ping statistics ---
15 packets transmitted, 15 received, 0% packet loss, time 14000ms
rtt min/avg/max/mdev = 0.068/0.084/0.201/0.032 ms
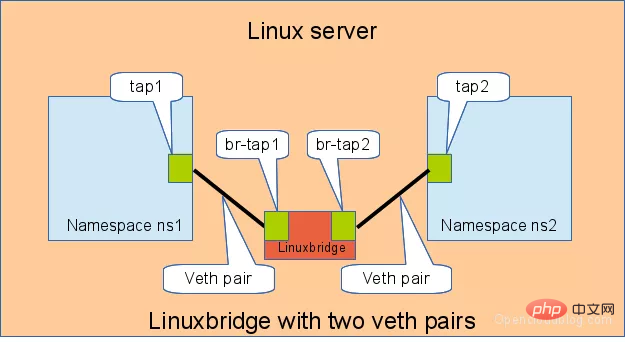
Linux Bridge 相当于一台交换机,可以中转两个 namespace 的流量,我们看看 veth-pair 在其中扮演什么角色。
如下图,两对 veth-pair 分别将两个 namespace 连到 Bridge 上。

同样给 veth-pair 配置 IP,测试其连通性:
# 首先创建 bridge br0
ip l a br0 type bridge
ip l s br0 up

# 然后创建两对 veth-pair
ip l a veth0 type veth peer name br-veth0
ip l a veth1 type veth peer name br-veth1

# 分别将两对 veth-pair 加入两个 ns 和 br0
ip l s veth0 netns ns1
ip l s br-veth0 master br0
ip l s br-veth0 up

ip l s veth1 netns ns2
ip l s br-veth1 master br0
ip l s br-veth1 up

# 给两个 ns 中的 veth 配置 IP 并启用
ip netns exec ns1 ip a a 10.1.1.2/24 dev veth0
ip netns exec ns1 ip l s veth0 up

ip netns exec ns2 ip a a 10.1.1.3/24 dev veth1
ip netns exec ns2 ip l s veth1 up

# veth0 ping veth1
[root@localhost ~]# ip netns exec ns1 ping 10.1.1.3
PING 10.1.1.3 (10.1.1.3) 56(84) bytes of data.
64 bytes from 10.1.1.3: icmp_seq=1 ttl=64 time=0.060 ms
64 bytes from 10.1.1.3: icmp_seq=2 ttl=64 time=0.105 ms

--- 10.1.1.3 ping statistics ---
2 packets transmitted, 2 received, 0% packet loss, time 999ms
rtt min/avg/max/mdev = 0.060/0.082/0.105/0.024 ms
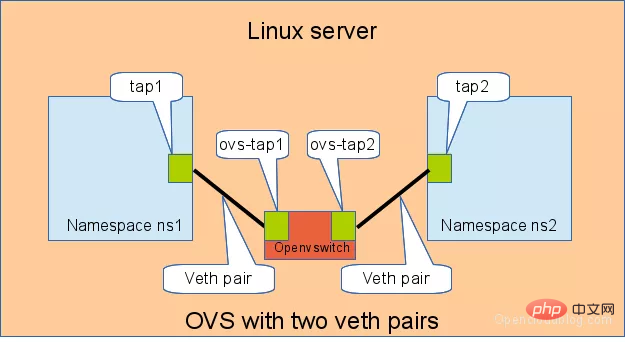
OVS 是第三方开源的 Bridge,功能比 Linux Bridge 要更强大,对于同样的实验,我们用 OVS 来看看是什么效果。
如下图所示:

同样测试两个 namespace 之间的连通性:
# 用 ovs 提供的命令创建一个 ovs bridge
ovs-vsctl add-br ovs-br

# 创建两对 veth-pair
ip l a veth0 type veth peer name ovs-veth0
ip l a veth1 type veth peer name ovs-veth1

# 将 veth-pair 两端分别加入到 ns 和 ovs bridge 中
ip l s veth0 netns ns1
ovs-vsctl add-port ovs-br ovs-veth0
ip l s ovs-veth0 up

ip l s veth1 netns ns2
ovs-vsctl add-port ovs-br ovs-veth1
ip l s ovs-veth1 up

# 给 ns 中的 veth 配置 IP 并启用
ip netns exec ns1 ip a a 10.1.1.2/24 dev veth0
ip netns exec ns1 ip l s veth0 up

ip netns exec ns2 ip a a 10.1.1.3/24 dev veth1
ip netns exec ns2 ip l s veth1 up

# veth0 ping veth1
[root@localhost ~]# ip netns exec ns1 ping 10.1.1.3
PING 10.1.1.3 (10.1.1.3) 56(84) bytes of data.
64 bytes from 10.1.1.3: icmp_seq=1 ttl=64 time=0.311 ms
64 bytes from 10.1.1.3: icmp_seq=2 ttl=64 time=0.087 ms
^C
--- 10.1.1.3 ping statistics ---
2 packets transmitted, 2 received, 0% packet loss, time 999ms
rtt min/avg/max/mdev = 0.087/0.199/0.311/0.112 ms
veth-pair 在虚拟网络中充当着桥梁的角色,连接多种网络设备构成复杂的网络。
veth-pair 的三个经典实验,直接相连、通过 Bridge 相连和通过 OVS 相连。
http://www.opencloudblog.com/?p=66
https://segmentfault.com/a/1190000009251098
Atas ialah kandungan terperinci Linux 虚拟网络设备 veth-pair 详解,这篇料很足. Untuk maklumat lanjut, sila ikut artikel berkaitan lain di laman web China PHP!