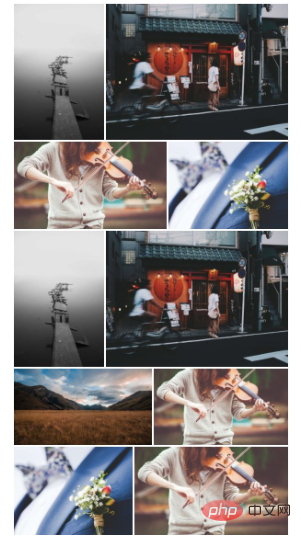

最近在做一个小程序项目,在 UI 上借鉴了一下其他 App 设计,其中有一个图片横向布局铺满的 UI 感觉挺好看的,类似于传统的瀑布流布局横过来一样。于是就自己实现了一下,并且将原本的横向两张图的方法扩展了下,改成了可以自定义显示张数的方法。下面是基本的显示效果:

单行显示两张图

单行显示五张图
下面先说说写这个方法时的思路:
效果分析
可以看到在上图中,单行不管显示几张图片,都几乎能够保证图片被完整显示出来,并且每一行的高度都不同——这是为了保证每张图都能几乎完整显示,所以必须要根据实际要显示的图片来动态地调整行高。
由于像素渲染必须取整,所以计算图片的宽高方面会存在 1~2px 的误差。这个误差可以直接忽略,并不会导致图片在视觉上产生拉伸。
分析完效果后,就有了下面几个问题:
1、如何保证每一行都能完整显示里面的图片?要知道每张图片的宽高都是不同的
2、如何动态计算每一行的高度?
3、在最后图片剩余数量不满足单行显示的图片数的情况下,如何对最后一行的图片进行布局?
4、……
问题分析
先来看第一个问题:如何保证单行的每一张图片都能完整显示。
首先我们可以确定单行的图片显示数量,这个是预先设置好的,比如上面的单行 5 张图 numberInLine = 5。而同一行中的每张图片高度都相同,这样就可以根据图片宽度与所有图片的总宽度的比值,计算出这张图片实际渲染时占单行的宽度,公式如下:
imageRenderWidth = (imageWidth / imagesTotalWidth) * lineWidth
虽然图片的实际宽高各不相同,但是由于单行图片的高度都相同,我们就可以通过先假设一个标准高度 stdHeight ,通过这个标准高度把每张图片的宽度都进行比例缩放,这样就可以顺利计算出单张图片宽度在所有图片总宽度中的比值
如何计算每一行的高度
在能够确定图片宽度的前提下,要确定每一行的高度相对就非常简单了。以每行第一张图片为基准,先计算出第一张图片的渲染宽度,然后计算出这张图片的渲染高度,并以此作为行高,之后的每张图片都通过行高计算出各自的渲染宽度。但是需要注意的是,为了填满单行,最后一张图片需要通过总宽度-之前所有图片宽度之和的方式计算出,否则就会有空白,表达公式如下:
// 第一张图片渲染宽度
firstImageRenderWidth = (firstImageWidth / imagesTotalWidth) * lineWidth
// 第一张图片渲染高度,即行高,即该行所有图片高度
lineHeight = imagesRenderHeight = firstImageRenderWidth / (firstImageWidth / firstImageHeight)
// 中间图片渲染宽度
middleImageRenderWidth = lineHeight * (middleImageWidth / middleImageHeight)
// 最后一张图片渲染宽度
lastImageRenderWidth = lineWidth - otherImagesTotalRenderWidth
当剩余图片数量不足单行数量时如何布局?
这个问题需要分两种情况来考虑:
1、当单行需要 5 张,而剩余数量不足 5 张但大于 1 张时(如 4 张图片):该行可按照剩余图片的数量布局,算法依然如上。所以对于这点,需要让代码具有可复用性;
2、只剩下 1 张图片时,有下面几种处理方法:
可以将这张图片占满全部行宽并且完整显示,但是如果这张图片是高度很高的图片,就会严重影响布局的美观性
依然将图片占满行宽,但是给定一个最大高度,当高度不及最大高度时完整显示,当超过时只显示部分,这样能保证布局美观性,但是最后一张图片的显示存在瑕疵
取前一行的行高作为最后一行的行高,这样可以在保证整体布局一致性的情况下,依然可以完整显示图片,但是这样做最后一行会留有大量空白位置
对于上面三种处理方式,作者采用的是第二种。感兴趣的小伙伴可以自己尝试其他两种方式。或者如果你有更好的布局方式,也可以在评论里告诉作者哦!
不知道上面三个问题的解释小伙伴们有没有理解了呢?不理解也没事,可以直接通过代码来了解是如何解决这些问题的。
代码实现
/* imagesLayout.js */
/*
 * 图片横向瀑布流布局 最大限度保证每张图片完整显示 可以获取最后计算出来的图片布局宽高信息 最后的瀑布流效果需要配合 css 实现(作者通过浮动布局实现)当然你也可以对代码进行修改 让其能够直接返回一段已经布局完成的 html 结构
 * 需要先提供每张图片的宽高 如果没有图片的宽高数据 则可以在代码中添加处理方法从而获取到图片宽高数据后再布局 但是并不推荐这样做
 * 尽量保证图片总数能被单行显示的数量整除 避免最后一行单张显示 否则会影响美观
 * 每张图由于宽高取整返回的宽高存在0-2px的误差 可以通过 css 保证视觉效果
 */
/*
 * @param images {Object} 图片对象列表,每一个对象有 src width height 三个属性
 * @param containerWidth {Integer} 容器宽度
 * @param numberInLine {Integer} 单行显示图片数量
 * @param limit {Integer} 限制需要进行布局的图片的数量 如果传入的图片列表有100张 但只需要对前20张进行布局 后面的图片忽略 则可以使用此参数限制 如果不传则默认0(不限制)
 * @param stdRatio {Float} 图片标准宽高比
 */
class ImagesLayout {
  constructor(images, containerWidth, numberInLine = 10, limit = 0, stdRatio = 1.5) {
    // 图片列表
    this.images = images
    // 布局完毕的图片列表 通过该属性可以获得图片布局的宽高信息
    this.completedImages = []
    // 容器宽度
    this.containerWidth = containerWidth
    // 单行显示的图片数量
    this.numberInLine = numberInLine
    // 限制布局的数量 如果传入的图片列表有100张 但只需要对前20张进行布局 后面的图片忽略 则可以使用此参数限制 如果不传则默认0(不限制)
    this.limit = limit
    // 图片标准宽高比(当最后一行只剩一张图片时 为了不让布局看上去很奇怪 所以要有一个标准宽高比 当图片实际宽高比大于标准宽高比时会发生截取 小于时按照实际高度占满整行显示)
    this.stdRatio = stdRatio
    // 图片撑满整行时的标准高度
    this.stdHeight = this.containerWidth / this.stdRatio
    this.chunkAndLayout()
  }
  // 将图片列表根据单行数量分块并开始计算布局
  chunkAndLayout () {
    // 当图片只有一张时,完整显示这张图片
    if (this.images.length === 1) {
      this.layoutFullImage(this.images[0])
      return
    }
    let temp = []
    for (let i = 0; i < this.images.length; i++) {
      if (this.limit && i >= this.limit) return
      temp.push(this.images[i])
      // 当单行图片数量达到限制数量时
      // 当已经是最后一张图片时
      // 当已经达到需要布局的最大数量时
      if (i % this.numberInLine === this.numberInLine - 1 || i === this.images.length - 1 || i === this.limit - 1) {
        this.computedImagesLayout(temp)
        temp = []
      }
    }
  }
  // 完整显示图片
  layoutFullImage (image) {
    let ratio = image.width / image.height
    image.width = this.containerWidth
    image.height = parseInt(this.containerWidth / ratio)
    this.completedImages.push(image)
  }
  // 根据分块计算图片布局信息
  computedImagesLayout(images) {
    if (images.length === 1) {
      // 当前分组只有一张图片时
      this.layoutWithSingleImage(images[0])
    } else {
      // 当前分组有多张图片时
      this.layoutWithMultipleImages(images)
    }
  }
  // 分组中只有一张图片 该张图片会单独占满整行的布局 如果图片高度过大则以标准宽高比为标准 其余部分剪裁 否则完整显示
  layoutWithSingleImage (image) {
    let ratio = image.width / image.height
    image.width = this.containerWidth
    // 如果是长图,则布局时按照标准宽高比显示中间部分
    if (ratio < this.stdRatio) {
      image.height = parseInt(this.stdHeight)
    } else {
      image.height = parseInt(this.containerWidth / ratio)
    }
    this.completedImages.push(image)
  }
  // 分组中有多张图片时的布局
    // 以相对图宽为标准,根据每张图的相对宽度计算占据容器的宽度
  layoutWithMultipleImages(images) {
    let widths = [] // 保存每张图的相对宽度
    let ratios = [] // 保存每张图的宽高比
    images.forEach(item => {
      // 计算每张图的宽高比
      let ratio = item.width / item.height
      // 根据标准高度计算相对图宽
      let relateWidth = this.stdHeight * ratio
      widths.push(relateWidth)
      ratios.push(ratio)
    })
    // 计算每张图片相对宽度的总和
    let totalWidth = widths.reduce((sum, item) => sum + item, 0)
    let lineHeight = 0 // 行高
    let leftWidth = this.containerWidth // 容器剩余宽度 还未开始布局时的剩余宽度等于容器宽度
    images.forEach((item, i) => {
      if (i === 0) {
        // 第一张图片
        // 通过图片相对宽度与相对总宽度的比值计算出在容器中占据的宽度与高度
        item.width = parseInt(this.containerWidth * (widths[i] / totalWidth))
        item.height = lineHeight = parseInt(item.width / ratios[i])
        // 第一张图片布局后的剩余容器宽度
        leftWidth = leftWidth - item.width
      } else if (i === images.length - 1) {
        // 最后一张图片
        // 宽度为剩余容器宽度
        item.width = leftWidth
        item.height = lineHeight
      } else {
        // 中间图片
        // 以行高为标准 计算出图片在容器中的宽度
        item.height = lineHeight
        item.width = parseInt(item.height * ratios[i])
        // 图片布局后剩余的容器宽度
        leftWidth = leftWidth - item.width
      }
      this.completedImages.push(item)
    })
  }
}<!-- imagesLayout.html -->
<!-- css 布局通过浮动实现 -->
<style>
* {
box-sizing: border-box;
}
#horizontal-waterfull {
width: 300px;
}
#horizontal-waterfull:before, #horizontal-waterfull:after {
content: '';
display: table;
clear: both;
}
img {
display: block;
width: 100%;
height: 100%;
}
.image-box {
float: left;
padding: 1px;
overflow: hidden;
}
</style>
// 水平布局瀑布流容器
<div id="horizontal-waterfull"></div>
<script src="./imagesLayout.js"></script>
<script>
// 待布局图片列表
const images = [{
src: 'https://static.cxstore.top/images/lake.jpg',
width: 4000,
height: 6000
}, {
src: 'https://static.cxstore.top/images/japan.jpg',
width: 1500,
height: 1125
}, {
src: 'https://static.cxstore.top/images/girl.jpg',
width: 5616,
height: 3266
}, {
src: 'https://static.cxstore.top/images/flower.jpg',
width: 4864,
height: 3648
}, {
src: 'https://static.cxstore.top/images/lake.jpg',
width: 4000,
height: 6000
}, {
src: 'https://static.cxstore.top/images/japan.jpg',
width: 1500,
height: 1125
}, {
src: 'https://static.cxstore.top/images/grass.jpg',
width: 5184,
height: 2916
}]
// 获取布局容器
const $box = document.getElementById('horizontal-waterfull')
// 创建一个布局实例
const layout = new ImagesLayout(images, $box.clientWidth, 4)
// 通过 layout 的 completedImages 获取所有图片的布局信息
layout.completedImages.forEach(item => {
let $imageBox = document.createElement('div')
$imageBox.setAttribute('class', 'image-box')
$imageBox.style.width = item.width + 'px'
$imageBox.style.height = item.height + 'px'
let $image = document.createElement('img')
$image.setAttribute('src', item.src)
$imageBox.appendChild($image)
$box.appendChild($imageBox)
})推荐教程:《JS教程》
Atas ialah kandungan terperinci JavaScript 如何实现横向瀑布流. Untuk maklumat lanjut, sila ikut artikel berkaitan lain di laman web China PHP!


