

学习如何用pixi.js开发微信小游戏

微信小程序开发栏目介绍如何用pixi.js开发微信小游戏。

1.使用PixiJS渲染引擎
微信小游戏是一个不同于浏览器的 JavaScript 运行环境,没有 BOM 和 DOM API。然而pixi.js是用 JavaScript 结合其他 HTML5 技术来显示媒体,创建动画或管理交互式图像。是依赖浏览器提供的 BOM 和 DOM API 的。所以如果要在微信小游戏中使用pixi.js,需要对引擎进行改造。
不过小游戏提供了对大部分 Canvas 2d 和 WebGL 1.0 特性的支持,支持情况参见 RenderingContext,pixi.js它能自动侦测使用WebGL还是Canvas来创建图形。
无论是怎样的引擎,最终在游戏运行时所做的大部分事情都是 随着用户的交互更新画面和播放声音。小游戏的开发语言是 JavaScript,那么在引擎的底层就需要通过 JavaScript 调用绘制 API 和音频 API。
一段 JavaScript 代码在运行时可以调用的 API 是依赖于 宿主环境 的。我们最常用的 console.log 甚至都不是 JavaScript 语言核心的一部分,而是浏览器这个宿主环境提供的。常见的宿主环境有浏览器、Node.js 等。浏览器有 BOM 和 DOM API,而 Node.js 则没有;Node.js 有 fs、net 等 Node.js 核心模块提供的文件、网络 API,而浏览器则不具备这些模块。例如,下面这段在浏览器中可以正常运行的代码,在 Node.js 中运行就会报错。
let canvas = document.createElement('canvas')复制代码因为 Node.js 这个宿主环境根本没有提供 document 这个内置的全局变量。
ReferenceError: document is not defined复制代码
小游戏的运行环境是一个不同于浏览器的宿主环境,没有提供 BOM 和 DOM API,提供的是 wx API。通过 wx API,开发者可以调用 Native 提供的绘制、音视频、网络、文件等能力。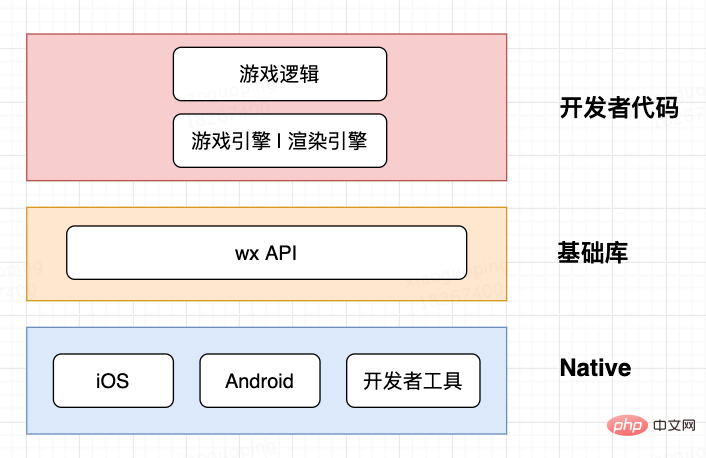
如果你想创建画布,你需要调用 wx.createCanvas()
let canvas = wx.createCanvas()let context = canvas.getContext('2d')复制代码如果你想创建一个音频对象,你需要调用 wx.createInnerAudioContext()
let audio = wx.createInnerAudioContext()// src 地址仅作演示,并不真实存在audio.src = 'bgm.mp3'audio.play()复制代码
如果你想获取屏幕的宽高,你需要调用 wx.getSystemInfoSync()
let { screenWidth, screenHeight } = wx.getSystemInfoSync()复制代码但是基于 pixi.js 渲染引擎会通过以下方式去创建stage 并挂载到页面
document.body.appendChild(app.view);复制代码
此时会产生错误,理由如前文所述,小游戏这个宿主环境根本没有提供 document 和 window 这两个在浏览器中内置的全局变量。因为小游戏环境是一个不同于浏览器的宿主环境。
ReferenceError: document is not definedReferenceError: window is not defined复制代码
所以,基本上基于pixi.js开发的小游戏,都不能直接迁移到小游戏中使用,因为pixi.js的实现可能或多或少都用到了 BOM 和 DOM 这些浏览器环境特有的 API。只有对pixi.js进行改造,将对 BOM 和 DOM API 的调用改成 wx API 的调用,才能运行在小游戏环境中。
但是pixi.js的代码我们不能改变,也没办法直接去修改API的实现,还有一种适配方式,即在渲染引擎和游戏逻辑代码之间加一层模拟 BOM 和 DOM API 的适配层,我们称之为 Adapter。这层适配层在全局通过 wx API 模拟了引擎会访问到的那部分 window 和 document 对象的属性和方法,使引擎感受不到环境的差异。
Adapter 是用户代码,不是基础库的一部分。关于 Adapter 的介绍,参见教程 Adapter。
2. Adapter 适配器
1. weapp-adapter
小游戏的运行环境在 iOS 上是 JavaScriptCore,在 Android 上是 V8,都是没有 BOM 和 DOM 的运行环境,没有全局的 document 和 window 对象。因此当你希望使用 DOM API 来创建 Canvas 和 Image 等元素的时候,会引发错误。
const canvas = document.createElement('canvas')复制代码但是我们可以使用 wx.createCanvas 和 wx.createImage 来封装一个 document。
const document = {    createElement: function (tagName) {
        tagName = tagName.toLowerCase()        if (tagName === 'canvas') {            return wx.createCanvas()
        }        else if (tagName === 'image') {            return wx.createImage()
        }
    }
}复制代码这时代码就可以像在浏览器中创建元素一样创建 Canvas 和 Image 了。
const canvas = document.createElement('canvas')const image = document.createImage('image')复制代码同样,如果想实现 new Image() 的方式创建 Image 对象,只须添加如下代码。
function Image () {    return wx.createImage()
}复制代码这些使用 wx API 模拟 BOM 和 DOM 的代码组成的库称之为 Adapter。顾名思义,这是对基于浏览器环境的游戏引擎在小游戏运行环境下的一层适配层,使游戏引擎在调用 DOM API 和访问 DOM 属性时不会产生错误。
Adapter 是一个抽象的代码层,并不特指某一个适配小游戏的第三方库,每位开发者都可以根据自己的项目需要实现相应的 Adapter。官方实现了一个 Adapter 名为 weapp-adapter, 并提供了完整的源码,供开发者使用和参考。
**
Adapter 下载地址 weapp-adapter.zip
weapp-adapter 会预先调用 wx.createCanvas() 创建一个上屏 Canvas,并暴露为一个全局变量 canvas。
require('./weapp-adapter')var context = canvas.getContext('2d')
context.fillStyle = 'red'context.fillRect(0, 0, 100, 100)复制代码除此之外 weapp-adapter 还模拟了以下对象和方法:
- document.createElement
- canvas.addEventListener
- localStorage
- Audio
- Image
- WebSocket
- XMLHttpRequest
- 等等...
需要强调的是,weapp-adapter 对浏览器环境的模拟是远不完整的,仅仅只针对游戏引擎可能访问的属性和调用的方法进行了模拟,也不保证所有游戏引擎都能通过 weapp-adapter 顺利无缝接入小游戏。直接将 weapp-adapter 提供给开发者,更多地是作为参考,开发者可以根据需要在 weapp-adapter 的基础上进行扩展,以适配自己项目使用的游戏引擎。
2. pixi-adapter
小游戏基础库只提供 wx.createCanvas 和 wx.createImage 等 wx API 以及 setTimeout/setInterval/requestAnimationFrame 等常用的 JS 方法。
1.全局对象
window对象是浏览器环境下的全局对象。小游戏运行环境中没有BOM API,因此没有window对象。但是小游戏提供了全局对象GameGlobal,所有全局定义的变量都是GameGlobal的属性。
console.log(GameGlobal.setTimeout === setTimeout);console.log(GameGlobal.requestAnimationFrame === requestAnimationFrame);复制代码
以上代码执行结果均为true。 开发者可以根据需要把自己封装的类和函数挂载到GameGlobal上。
GameGlobal.render = function(){    // 具体的方法实现}
render();复制代码2. Element 元素构造
import { canvas } from './canvas'/**
 * Base Element
 */export class Element {
  style = { cursor: null }  appendChild() {}  removeChild() {}  addEventListener() {}  removeEventListener() {}
}export const HTMLCanvasElement = canvas.constructorexport const HTMLImageElement = wx.createImage().constructorexport class HTMLVideoElement extends Element {

}复制代码3. document 构造
import { Canvas } from './canvas'import Image from './Image'import { Element } from './element'const stack = {}/**
 * document 适配
 */export default {  body: new Element('body'),  addEventListener(type, handle) {
    stack[type] = stack[type] || []
    stack[type].push(handle)
  },  removeEventListener(type, handle) {    if (stack[type] && stack[type].length) {      const i = stack[type].indexOf(handle)
      i !== -1 && stack[type].splice(i)
    }
  },  dispatch(ev) {    const queue = stack[ev.type]
    queue && queue.forEach(handle => handle(ev))
  },  createElement(tag) {    switch (tag) {      case 'canvas': {        return new Canvas()
      }      case 'img': {        return new Image()
      }      default: {        return new Element()
      }
    }
  }
}复制代码4.统一入口
import { noop } from './util'import Image from './Image'import { canvas } from './canvas'import location from './location'import document from './document'import WebSocket from './WebSocket'import navigator from './navigator'import TouchEvent from './TouchEvent'import XMLDocument from './XMLDocument'import localStorage from './localStorage'import XMLHttpRequest from './XMLHttpRequest'import { Element, HTMLCanvasElement, HTMLImageElement, HTMLVideoElement } from './element'const { platform } = wx.getSystemInfoSync()

GameGlobal.canvas = canvas // 全局canvascanvas.addEventListener = document.addEventListener
canvas.removeEventListener = document.removeEventListener// 模拟器 挂载window上不能修改if (platform === 'devtools') {  Object.defineProperties(window, {    Image: {value: Image},    Element: {value: Element},    ontouchstart: {value: noop},    WebSocket: {value: WebSocket},    addEventListener: {value: noop},    TouchEvent: {value: TouchEvent},    XMLDocument: {value: XMLDocument},    localStorage: {value: localStorage},    XMLHttpRequest: {value: XMLHttpRequest},    HTMLVideoElement: {value: HTMLVideoElement},    HTMLImageElement: {value: HTMLImageElement},    HTMLCanvasElement: {value: HTMLCanvasElement},
  })  // 挂载 document
  for (const key in document) {    const desc = Object.getOwnPropertyDescriptor(window.document, key)    if (!desc || desc.configurable) {      Object.defineProperty(window.document, key, {value: document[key]})
    }
  }
} else {
  GameGlobal.Image = Image
  GameGlobal.window = GameGlobal
  GameGlobal.ontouchstart = noop
  GameGlobal.document = document
  GameGlobal.location = location
  GameGlobal.WebSocket = WebSocket
  GameGlobal.navigator = navigator
  GameGlobal.TouchEvent = TouchEvent
  GameGlobal.addEventListener = noop
  GameGlobal.XMLDocument = XMLDocument
  GameGlobal.removeEventListener = noop
  GameGlobal.localStorage = localStorage
  GameGlobal.XMLHttpRequest = XMLHttpRequest
  GameGlobal.HTMLImageElement = HTMLImageElement
  GameGlobal.HTMLVideoElement = HTMLVideoElement
  GameGlobal.HTMLCanvasElement = HTMLCanvasElement
  GameGlobal.WebGLRenderingContext = GameGlobal.WebGLRenderingContext || {}
}复制代码思路建议为先引入通用的 Adapter 尝试运行,然后遇到的问题再逐个解决掉。
相关免费学习推荐:微信小程序开发
Atas ialah kandungan terperinci 学习如何用pixi.js开发微信小游戏. Untuk maklumat lanjut, sila ikut artikel berkaitan lain di laman web China PHP!

Alat AI Hot

Undresser.AI Undress
Apl berkuasa AI untuk mencipta foto bogel yang realistik

AI Clothes Remover
Alat AI dalam talian untuk mengeluarkan pakaian daripada foto.

Undress AI Tool
Gambar buka pakaian secara percuma

Clothoff.io
Penyingkiran pakaian AI

Video Face Swap
Tukar muka dalam mana-mana video dengan mudah menggunakan alat tukar muka AI percuma kami!

Artikel Panas
Alat panas

Notepad++7.3.1
Editor kod yang mudah digunakan dan percuma

SublimeText3 versi Cina
Versi Cina, sangat mudah digunakan

Hantar Studio 13.0.1
Persekitaran pembangunan bersepadu PHP yang berkuasa

Dreamweaver CS6
Alat pembangunan web visual

SublimeText3 versi Mac
Perisian penyuntingan kod peringkat Tuhan (SublimeText3)
Topik panas
 1393
1393
 52
1205
24
52
1205
24