css img不透明度如何设置
css img不透明度的设置方法:首先创建一个HTML和css示例文件;然后通过给指定img设置样式为“img{opacity:0.4;filter:alpha(opacity=40);}”即可。

本教程操作环境:Windows7系统、HTML5&&CSS3版本,该方法适用于所有品牌电脑。
推荐:《css视频教程》
通过 CSS 创建透明图像是很容易的。
注释:CSS opacity 属性是 W3C CSS 推荐标准的一部分。
创建透明图像 - Hover 效果
在本例中,当用户将鼠标指针移动到图片上时,会改变图片的透明度。
创建文本在背景图像上的透明框
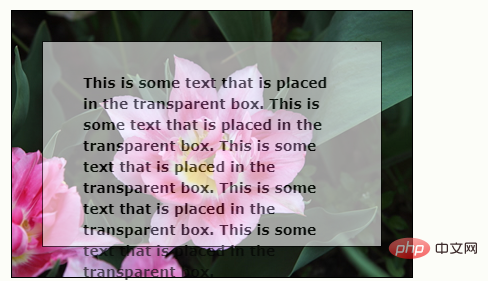
本例创建了一个包围文本的半透明框。
实例 1 - 创建透明图像
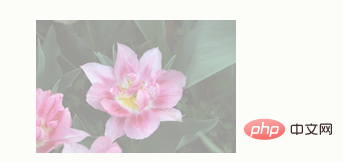
定义透明效果的 CSS3 属性是 opacity。
首先,我们将展示如何通过 CSS 来创建透明图像。
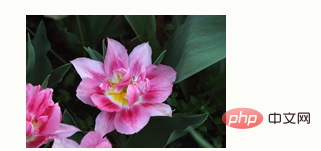
常规图像:
带有透明度的相同图像:
请看下面的 CSS:
img
{
opacity:0.4;
filter:alpha(opacity=40); /* 针对 IE8 以及更早的版本 */
}IE9, Firefox, Chrome, Opera 和 Safari 使用属性 opacity 来设定透明度。opacity 属性能够设置的值从 0.0 到 1.0。值越小,越透明。
IE8 以及更早的版本使用滤镜 filter:alpha(opacity=x)。x 能够取的值从 0 到 100。值越小,越透明。
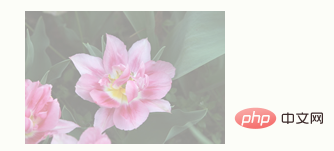
实例 2 - 图像透明度 - Hover 效果
请把鼠标指针移动到图像上:
CSS 是这样的:
img
{
opacity:0.4;
filter:alpha(opacity=40); /* 针对 IE8 以及更早的版本 */
}
img:hover
{
opacity:1.0;
filter:alpha(opacity=100); /* 针对 IE8 以及更早的版本 */
}第一个 CSS 代码块类似实例 1 中的代码。此外,我们已经设置了当鼠标指针位于图像上时的样式。在这个例子中,当指针移动到图像上时,我们希望图像是不透明的。
对应的 CSS 是:opacity=1。
IE8 以及更早的浏览器:filter:alpha(opacity=100)。
当鼠标指针移出图像后,图像会再次透明。
实例 3 - 透明框中的文本
This is some text that is placed in the transparent box. This is some text that is placed in the transparent box. This is some text that is placed in the transparent box. This is some text that is placed in the transparent box. This is some text that is placed in the transparent box.
源代码是这样的:
<!DOCTYPE html>
<html>
<head>
<style>
div.background
{
width: 400px;
height: 266px;
background: url('/i/tulip_peach_blossom_w.jpg') no-repeat;
border: 1px solid black;
}
div.transbox
{
width: 338px;
height: 204px;
margin:30px;
background-color: #ffffff;
border: 1px solid black;
/* for IE */
filter:alpha(opacity=60);
/* CSS3 standard */
opacity:0.6;
}
div.transbox p
{
margin: 30px 40px;
}
</style>
</head>
<body>
<div class="background">
<div class="transbox">
<p>
This is some text that is placed in the transparent box.
This is some text that is placed in the transparent box.
This is some text that is placed in the transparent box.
This is some text that is placed in the transparent box.
This is some text that is placed in the transparent box.
</p>
</div>
</div>
</body>
</html>首先,我们创建一个 div 元素 (class="background"),它有固定的高度和宽度、背景图像,以及边框。然后我们在第一个 div 内创建稍小的 div (class="transbox")。"transbox" div 有固定的宽度、背景色和边框 - 并且它是透明的。在透明 div 内部,我们在 p 元素中加入了一些文本。
Atas ialah kandungan terperinci css img不透明度如何设置. Untuk maklumat lanjut, sila ikut artikel berkaitan lain di laman web China PHP!

Alat AI Hot

Undresser.AI Undress
Apl berkuasa AI untuk mencipta foto bogel yang realistik

AI Clothes Remover
Alat AI dalam talian untuk mengeluarkan pakaian daripada foto.

Undress AI Tool
Gambar buka pakaian secara percuma

Clothoff.io
Penyingkiran pakaian AI

AI Hentai Generator
Menjana ai hentai secara percuma.

Artikel Panas

Alat panas

Notepad++7.3.1
Editor kod yang mudah digunakan dan percuma

SublimeText3 versi Cina
Versi Cina, sangat mudah digunakan

Hantar Studio 13.0.1
Persekitaran pembangunan bersepadu PHP yang berkuasa

Dreamweaver CS6
Alat pembangunan web visual

SublimeText3 versi Mac
Perisian penyuntingan kod peringkat Tuhan (SublimeText3)

Topik panas
 1378
1378
 52
52
 Cara Menulis Garis Pecah Di Bootstrap
Apr 07, 2025 pm 03:12 PM
Terdapat dua cara untuk membuat garis perpecahan bootstrap: menggunakan tag, yang mewujudkan garis perpecahan mendatar. Gunakan harta sempadan CSS untuk membuat garis perpecahan gaya tersuai.
 Peranan HTML, CSS, dan JavaScript: Tanggungjawab Teras
Apr 08, 2025 pm 07:05 PM
HTML mentakrifkan struktur web, CSS bertanggungjawab untuk gaya dan susun atur, dan JavaScript memberikan interaksi dinamik. Ketiga melaksanakan tugas mereka dalam pembangunan web dan bersama -sama membina laman web yang berwarna -warni.
 Cara menggunakan bootstrap di vue
Apr 07, 2025 pm 11:33 PM
Menggunakan bootstrap dalam vue.js dibahagikan kepada lima langkah: Pasang bootstrap. Import bootstrap di main.js. Gunakan komponen bootstrap secara langsung dalam templat. Pilihan: Gaya tersuai. Pilihan: Gunakan pemalam.
 Cara memasukkan gambar di bootstrap
Apr 07, 2025 pm 03:30 PM
Terdapat beberapa cara untuk memasukkan imej dalam bootstrap: masukkan imej secara langsung, menggunakan tag HTML IMG. Dengan komponen imej bootstrap, anda boleh memberikan imej yang responsif dan lebih banyak gaya. Tetapkan saiz imej, gunakan kelas IMG-cecair untuk membuat imej boleh disesuaikan. Tetapkan sempadan, menggunakan kelas IMG-Sempadan. Tetapkan sudut bulat dan gunakan kelas IMG-bulat. Tetapkan bayangan, gunakan kelas bayangan. Saiz semula dan letakkan imej, menggunakan gaya CSS. Menggunakan imej latar belakang, gunakan harta CSS imej latar belakang.
 Cara mengubah saiz bootstrap
Apr 07, 2025 pm 03:18 PM
Untuk menyesuaikan saiz unsur-unsur dalam bootstrap, anda boleh menggunakan kelas dimensi, yang termasuk: menyesuaikan lebar: .col-, .w-, .mw-adjust ketinggian: .h-, .min-h-, .max-h-
 Cara Menyiapkan Kerangka untuk Bootstrap
Apr 07, 2025 pm 03:27 PM
Untuk menubuhkan rangka kerja bootstrap, anda perlu mengikuti langkah -langkah ini: 1. Rujuk fail bootstrap melalui CDN; 2. Muat turun dan tuan rumah fail pada pelayan anda sendiri; 3. Sertakan fail bootstrap di HTML; 4. Menyusun sass/kurang seperti yang diperlukan; 5. Import fail tersuai (pilihan). Setelah persediaan selesai, anda boleh menggunakan sistem grid Bootstrap, komponen, dan gaya untuk membuat laman web dan aplikasi yang responsif.
 Cara menggunakan butang bootstrap
Apr 07, 2025 pm 03:09 PM
Bagaimana cara menggunakan butang bootstrap? Perkenalkan CSS bootstrap untuk membuat elemen butang dan tambahkan kelas butang bootstrap untuk menambah teks butang
 Cara melihat tarikh bootstrap
Apr 07, 2025 pm 03:03 PM
Jawapan: Anda boleh menggunakan komponen pemetik tarikh bootstrap untuk melihat tarikh di halaman. Langkah -langkah: Memperkenalkan rangka kerja bootstrap. Buat kotak input pemilih Tarikh dalam HTML. Bootstrap secara automatik akan menambah gaya kepada pemilih. Gunakan JavaScript untuk mendapatkan tarikh yang dipilih.


